Introduction
A lemon has pointed ends, but this pouch replaces them with a stable rounded-square profile. This lemon crochet pouch pattern uses worsted cotton, a 3.5 mm hook, five leaves, lining, and a 20 cm zipper to produce a 15 cm accessory for notions or cosmetics. The project suits an intermediate crocheter because zipper placement and symmetrical shell shaping require controlled tension.
The Design: What Makes This Lemon Pouch Different
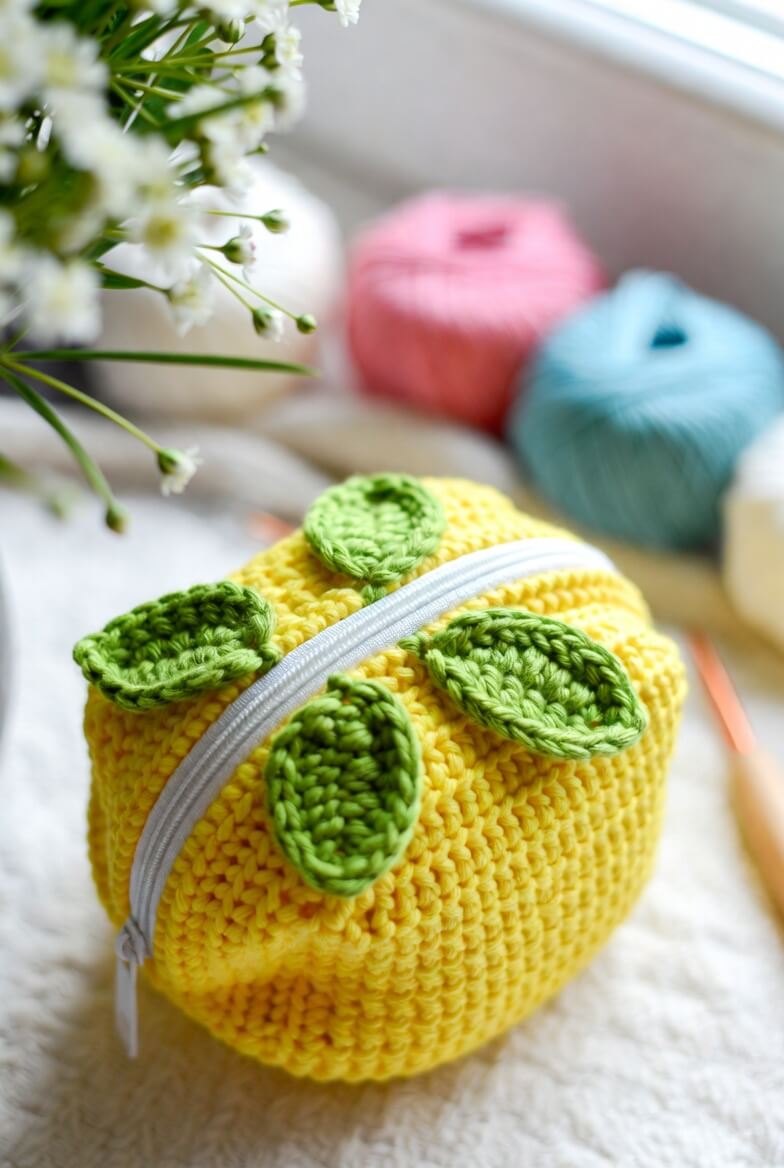
The photographed pouch is neither a flat citrus appliqué nor a conventional stuffed lemon. Its body has two broad faces and enough depth to hold objects, so the pattern uses matching cupped shells rather than one closed oval. Three unchanged rounds after the 42-stitch expansion create the side depth without increasing the opening circumference.
Five leaves break up the yellow surface and identify the fruit without embroidered facial details. Their pointed chain-based construction also contrasts with the dense circular shells. A white zipper follows the upper curve, producing a strong visual line and an opening wider than a coin-purse slit.
The most common mistake in a crochet lemon zipper pouch is attaching the zipper before blocking both shells to equal dimensions. One shell then stretches farther along the tape, and the closed pouch twists. This fruit pouch crochet pattern avoids that fault by marking matching quarter points before sewing.
Project Info at a Glance
| Skill Level | Time | Finished Size | Hook | Best For |
|---|---|---|---|---|
| Intermediate | 5–7 hours | 15 × 14 × 6 cm | 3.5 mm | Crochet tools, cosmetics, charging cables |
Finished dimensions are the target measurements for this photo-inspired pattern. Comparable published lemon bags measure 16.2 cm square and 24 × 18 cm, while published fruit pouches may be substantially smaller.
Materials and Tools
Yarn
- Lemon yellow — worsted cotton — 80 g — Rico Creative Cotton Aran, Paintbox Cotton Aran, or comparable firm cotton
- Light leaf green — worsted cotton — 8 g — same yarn family
- Dark olive green — worsted cotton — 7 g — same yarn family
- Matching sewing thread — polyester — approximately 5 m — yellow or neutral
Worsted cotton and a 3.5 mm hook form a dense fabric suitable for structured fruit crochet. A published 10.5 cm stuffed lemon uses 22 g yellow and 3 g green, while a 16.2 cm bag specification permits a full 100 g skein of each color. The quantities above account for the pouch’s two broad shells and five leaves.
Tools
- Hook 3.5 mm
- 20 cm nylon coil zipper, white
- Cotton lining fabric, two pieces measuring 18 × 17 cm
- Light fusible stabilizer, two pieces measuring 16 × 15 cm
- Tapestry needle
- Sharp sewing needle
- Stitch markers
- Pins or sewing clips
- Scissors
- Measuring tape
- Optional 20–30 g polyester stuffing for lightly padded walls
No safety eyes are required because the reference object has no face.
Abbreviations
- MR — magic ring
- sc — single crochet
- inc — two sc in one stitch
- dec — single-crochet decrease
- sl st — slip stitch
- ch — chain
- BLO — back loop only
- hdc — half double crochet
- dc — double crochet
- tr — treble crochet
- st/sts — stitch/stitches
- R — round
- FO — fasten off
An invisible decrease is made through the front loops of the next two stitches before completing one single crochet.
Pattern — Step by Step
Work the shells in continuous spirals. Mark the first stitch of every round. The stitch totals follow six-stitch expansion: each increase round adds six stitches, and the selected large plateau is 42 stitches.
Front Shell
Yarn: lemon yellow — Source: standard six-stitch amigurumi expansion
R1: 6 sc in MR (6)
R2: inc ×6 (12)
R3: (sc, inc) ×6 (18)
R4: (2 sc, inc) ×6 (24)
R5: (3 sc, inc) ×6 (30)
R6: (4 sc, inc) ×6 (36)
R7: (5 sc, inc) ×6 (42)
R8: sc around (42)
R9: sc around (42)
R10: sc around (42)
The final three rounds turn the flat disc into a shallow cup. Do not stuff.
Sl st in the next stitch. Fasten off, leaving a 70 cm tail for joining.
The shell should measure close to 15 cm across after light blocking. Cotton behavior varies, so compare the shell with the zipper before making the second piece.
Back Shell
Yarn: lemon yellow — Source: standard six-stitch amigurumi expansion
R1: 6 sc in MR (6)
R2: inc ×6 (12)
R3: (sc, inc) ×6 (18)
R4: (2 sc, inc) ×6 (24)
R5: (3 sc, inc) ×6 (30)
R6: (4 sc, inc) ×6 (36)
R7: (5 sc, inc) ×6 (42)
R8: sc around (42)
R9: sc around (42)
R10: sc around (42)
Match the diameter and cup depth to the front shell before cutting the yarn.
Sl st in the next stitch. Fasten off, leaving a 70 cm tail.
Large Pointed Leaves — Make 4
Yarn: make two in light green and two in dark olive
Ch 11.
R1: Beginning in the second ch from the hook, sc, hdc, dc in next 2 ch, tr in next 2 ch, dc in next 2 ch, hdc, 3 sc in final ch. Rotate the work to continue along the unused loops on the opposite side of the chain. Hdc, dc in next 2 ch, tr in next 2 ch, dc in next 2 ch, hdc, sc. Join with sl st to the first sc.
R2: Ch 1, sc in each stitch around, placing 3 sc in the center stitch at the tip. Join with sl st.
Flatten the leaf before measuring. Each finished leaf should be approximately 8 cm long and 4 cm wide.
Fasten off. Leave a 25 cm tail for sewing.
Small Top Leaf — Make 1
Yarn: light green
Ch 8.
R1: Beginning in the second ch from the hook, sc, hdc, dc in next 3 ch, hdc, 3 sc in final ch. Rotate to work along the other side. Hdc, dc in next 3 ch, hdc, sc. Join with sl st.
R2: Ch 1, sc around, placing 3 sc in the center stitch at the pointed end. Join with sl st.
Finished measurement: approximately 5.5 cm long and 3 cm wide.
Fasten off. Leave a 20 cm tail.
Optional Leaf Veins
Yarn: contrasting green
Insert the hook at the base of one leaf and bring up a loop on the surface. Work 6–8 loose slip stitches along the center line toward the point. Pull each loop to the height of the surrounding crochet so the leaf remains flat.
Fasten off. Weave both ends into the back of the leaf.
Repeat on the remaining leaves when stronger definition is required. The photographed leaves rely mainly on raised stitch texture, so this step may be omitted.
Stabilizer Inserts — Make 2
Material: light fusible stabilizer
Place one crocheted shell on paper and trace around it. Draw a second line 8 mm inside the traced edge. Cut the paper template, then cut two stabilizer pieces from it.
Fuse or baste one insert to the wrong side of each lining piece according to the stabilizer manufacturer’s temperature instructions. Keep adhesive away from the crochet itself.
Fabric Lining Shells — Make 2
Material: cotton fabric
Use the full crocheted shell as the cutting template, adding a 1 cm seam allowance around the outer edge. Cut two fabric pieces.
Fold the zipper-edge allowance to the wrong side by 1 cm and press. Do not stitch the remaining perimeter yet.
Pin the lining pieces right sides together. Sew around the lower perimeter with a 1 cm seam allowance, leaving the zipper curve open. Clip the seam allowance at 2 cm intervals without cutting through the stitches. Turn right side out and press.
Crochet Shell Joining Edge
Yarn: lemon yellow
Place the two shells with wrong sides facing. Align the magic-ring centers and mark four matching quarter points.
Beginning 2 cm below one upper quarter marker, join the shells through both layers:
R1: sc through both shell edges for 21 stitches, following the lower half of the pouch (21)
Leave the upper 21 stitches of each shell unjoined. This 42-stitch opening receives the zipper.
Fasten off. Leave a 20 cm tail, then weave it through at least 5 cm of dense stitches.
Zipper Installation
Material: 20 cm nylon zipper
Close the zipper and mark its midpoint. Mark the midpoint of the unjoined edge on each crochet shell.
Place the zipper beneath the crochet opening with the teeth sitting 3–4 mm from the yellow edge. Match all midpoint and quarter-point markers. The zipper ends should extend evenly toward the side seam.
Using doubled sewing thread, backstitch the zipper to the front shell. Keep each stitch approximately 3 mm long and place it through the zipper tape rather than near the coil. Repeat for the back shell.
Open and close the zipper five times. Correct puckered sections before adding the lining.
Slip the fabric lining inside the pouch. Blind-stitch its pressed upper edges to the zipper tape, keeping the fabric clear of the teeth.
Optional Padded Wall
Material: polyester stuffing
For a softly rounded shape like the photograph, place a thin layer of stuffing between each crochet shell and its stabilizer-backed lining. Use approximately 10–15 g per side.
Distribute the fibers to a depth no greater than 8 mm. Excess filling reduces storage space and pushes the zipper seam outward.
Tack the lining to each shell at the center with one concealed thread stitch. This prevents the padding from dropping toward the bottom during use.
Leaf Placement
Parts: four large leaves and one small leaf
Arrange the leaves while the zipper is closed.
Place one dark leaf near the upper-left edge of the front shell, angled about 25 degrees downward. Set one light leaf on the right side, with its point directed toward the zipper.
Position the second dark leaf on the lower central area. Attach the remaining large leaf to the opposite shell so the motif continues around the pouch rather than crowding one face.
Center the small leaf near the top, approximately 2 cm from the zipper midpoint.
Sew each leaf around its lower half only. Leaving the tips free preserves the raised layered appearance shown in the reference image.
Assembly
- Block both yellow shells to the same 15 cm diameter and allow them to dry flat.
- Mark the upper opening and lower joining sections on both shells.
- Join 21 matching edge stitches around the lower half.
- Prepare the stabilizer-backed fabric lining and sew its lower perimeter.
- Mark the midpoint and quarter points of the crochet opening and zipper tape.
- Backstitch the zipper to the first shell, then repeat on the second shell.
- Test the zipper five times and remove any stitch that catches the slider.
- Add no more than 15 g of optional padding behind each shell.
- Blind-stitch the lining to the zipper tape without crossing the teeth.
- Pin and sew the five leaves in the photographed asymmetrical arrangement.
The completed pouch measures approximately 15 × 14 × 6 cm when worked at the stated tension.
7 Technical Tips
- A drifting round marker produces a skewed shell seam. Move the marker after every 42-stitch round and recount at R7, R8, and R10.
- Overstuffing creates a zipper gap at the center. Keep optional padding below 8 mm deep and stop adding fiber when the empty pouch closes without resistance.
- A visible decrease can form a horizontal bar on dense cotton. When resizing the shell downward, work all decreases through the front loops and space six decreases evenly.
- Premature zipper sewing causes unequal shell lengths. Block both shells first, then mark the opening at four matching points before making the first backstitch.
- Loose cotton tension exposes the lining between stitches. A 3.5 mm hook should produce about 11 single crochets per 5 cm.
- Unpinned leaves rotate during sewing. Use one pin at the base and one 5 mm behind the tip, then stitch only around the lower half of each leaf.
- A short woven tail can escape beside the zipper. Carry every structural yarn tail through at least 5 cm of stitches, reverse direction, and pass through another 3 cm before trimming.
Conclusion
Finish the lemon crochet pouch pattern by checking the zipper ends, lining edge, and every leaf attachment under firm hand pressure. The next practical step is to load the pouch with the objects it will hold and confirm that none can reach the zipper teeth through a loose lining seam. Photograph the closed pouch from the leaf side and the open pouch from above so readers can assess both shaping and capacity. Save the finished project to Pinterest, then share the same two views on Instagram with #LemonLeafZipperPouch. Which leaf arrangement matches the lemon most clearly: three leaves on the front and two on the back, or an even split around the zipper?









