Introduction
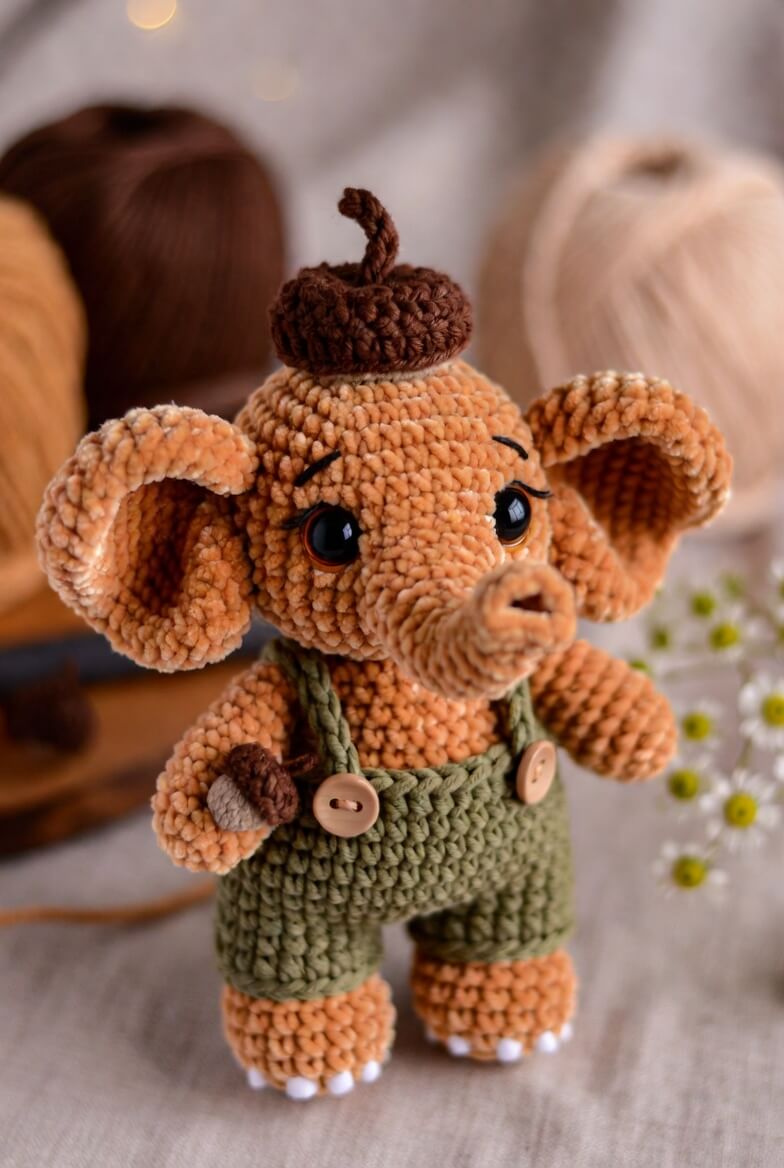
An elephant wearing an acorn cap needs the stem centered above the trunk, not above the closing seam. This elephant amigurumi crochet pattern creates a 30–34 cm standing figure with wide ears, sage overalls and a handheld acorn. Use worsted chenille, a 4 mm hook and 16 mm safety eyes. Intermediate skills are required. Broad feet and a firmly packed lower body provide a stable display base.
The Design: What Makes Alder the Elephant Different
Alder uses a 42-stitch head plateau because the trunk, large eyes and cup-shaped ears require separate attachment zones. Seven increase rounds produce a broad crown without forcing the eye posts toward the ear seams. The body reaches the same maximum count, but its plateau is shorter. That proportion gives the elephant in overalls crochet design a compact waist above two substantial legs. A constant 12-stitch trunk forms a controlled tube, while mixed-height stitches bend its lower section forward without wire. The acorn cap has a wide lower band and a shallow crown, keeping its weight close to the head. One common mistake in a chenille elephant amigurumi is attaching the ears before checking cap clearance. Ears placed too high push the brim upward and expose the closing point. Pin the hat and ears together before completing either seam.
Project Info at a Glance
| Skill Level | Time | Finished Size | Hook | Best For |
|---|---|---|---|---|
| Intermediate | 10–13 hours | Approximately 30–34 cm including cap | 4 mm | Autumn displays, nursery shelves and woodland collections |
Materials and Tools
Yarn
- Burnt orange or caramel — worsted chenille or velvet — approximately 160–190 g — use for the elephant.
- Sage green — worsted or light-chunky yarn — approximately 70–90 g — use for the overalls and straps.
- Dark brown — worsted yarn — approximately 30–40 g — use for the acorn cap and handheld acorn.
- Taupe — worsted yarn — approximately 8 g — use for the lower section of the handheld acorn.
- Cream — smooth DK yarn — under 5 g — use for the cheek patches.
- White — smooth DK yarn — under 5 g — use for six toenails.
- Black — embroidery thread — use for the eyebrows and eyelashes.
Tools
- 4 mm crochet hook
- 16 mm safety eyes
- Two 22–25 mm wooden buttons
- Polyester stuffing
- Blunt tapestry needle
- Locking stitch markers
- Long sewing pins
- Scissors
Use one yarn line for the elephant pieces so the ears, trunk and legs share the same gauge. Wooden buttons and safety eyes are small detachable components, so replace them with embroidery when making the project for a child who may mouth the toy.
Abbreviations
- MR — magic ring
- sc — single crochet
- inc — two single crochet stitches in one stitch
- dec — single crochet two stitches together
- sl st — slip stitch
- ch — chain
- hdc — half double crochet
- dc — double crochet
- BLO — back loop only
- FLO — front loop only
For an invisible decrease, insert the hook through the front loops of the next two stitches and complete both loops as one single crochet.
Pattern — Step by Step
Work stuffed pieces in a continuous spiral unless joined rounds or turned rows are specified. Mark the first stitch of every round. This large standing elephant uses a 42-stitch plateau.
Head
Yarn: burnt orange or caramel — Source basis: standard amigurumi mathematics.
R1: 6 sc in MR (6)
R2: inc ×6 (12)
R3: (sc, inc) ×6 (18)
R4: (2 sc, inc) ×6 (24)
R5: (3 sc, inc) ×6 (30)
R6: (4 sc, inc) ×6 (36)
R7: (5 sc, inc) ×6 (42)
R8–R15: sc around (42)
R16: (5 sc, dec) ×6 (36)
Insert the 16 mm eyes between R11 and R12 with eight visible stitches between the posts. Position the face center halfway between them before attaching the washers.
R17: (4 sc, dec) ×6 (30)
R18: (3 sc, dec) ×6 (24)
R19: (2 sc, dec) ×6 (18)
Stuff the crown firmly. Add small pieces behind the eyes to keep both sockets level.
R20: (sc, dec) ×6 (12)
R21: dec ×6 (6)
Fasten off. Leave a 30 cm tail and close through the front loops.
Body
Yarn: burnt orange or caramel — Source basis: standard amigurumi mathematics.
R1: 6 sc in MR (6)
R2: inc ×6 (12)
R3: (sc, inc) ×6 (18)
R4: (2 sc, inc) ×6 (24)
R5: (3 sc, inc) ×6 (30)
R6: (4 sc, inc) ×6 (36)
R7: (5 sc, inc) ×6 (42)
R8–R12: sc around (42)
R13: (5 sc, dec) ×6 (36)
R14–R16: sc around (36)
R17: (4 sc, dec) ×6 (30)
R18–R19: sc around (30)
R20: (3 sc, dec) ×6 (24)
R21: sc around (24)
R22: (2 sc, dec) ×6 (18)
Pack the bottom half firmly. Keep the upper 2 cm moderately filled so the neck seam can be drawn tight.
R23: (sc, dec) ×6 (12)
R24: dec ×6 (6)
Fasten off. Leave a 35 cm tail for attaching the body to the head.
Arms (Make 2)
Yarn: burnt orange or caramel — Source basis: standard amigurumi mathematics.
R1: 6 sc in MR (6)
R2: inc ×6 (12)
R3: (sc, inc) ×6 (18)
R4–R6: sc around (18)
R7: (sc, dec) ×6 (12)
R8–R14: sc around (12)
R15: dec ×6 (6)
Stuff the hand and lower arm. Leave R11–R15 lightly filled so the left arm can hold the acorn.
Fasten off. Leave a 30 cm sewing tail.
Legs (Make 2)
Yarn: burnt orange or caramel — Source basis: standard amigurumi mathematics.
R1: 6 sc in MR (6)
R2: inc ×6 (12)
R3: (sc, inc) ×6 (18)
R4: (2 sc, inc) ×6 (24)
R5–R8: sc around (24)
R9: (2 sc, dec) ×6 (18)
R10–R16: sc around (18)
R17: (sc, dec) ×6 (12)
R18: dec ×6 (6)
Stuff R1–R11 firmly. Use smaller pieces above R11 to keep the upper legs cylindrical.
Fasten off. Leave a 35 cm sewing tail.
Outer Ears (Make 2)
Yarn: burnt orange or caramel — work in joined rounds.
R1: 6 sc in MR, join (6)
R2: inc ×6, join (12)
R3: (sc, inc) ×6, join (18)
R4: (2 sc, inc) ×6, join (24)
R5: (3 sc, inc) ×6, join (30)
R6: (4 sc, inc) ×6, join (36)
R7: (5 sc, inc) ×6, join (42)
R8: sc around, join (42)
Do not stuff. Fold each circle slightly to form a shallow cup.
Fasten off. Leave a 40 cm sewing tail.
Inner-Ear Panels (Make 2)
Yarn: a darker caramel or matching smooth yarn — work in joined rounds.
R1: 6 sc in MR, join (6)
R2: inc ×6, join (12)
R3: (sc, inc) ×6, join (18)
R4: (2 sc, inc) ×6, join (24)
R5: (3 sc, inc) ×6, join (30)
Fasten off. Leave a 30 cm tail and sew one panel inside each outer ear.
Trunk
Yarn: burnt orange or caramel — Source basis: narrow spiral-tube construction.
R1: 6 sc in MR (6)
R2: inc ×6 (12)
R3–R8: sc around (12)
R9: 3 sc, 3 hdc, 3 sc, 3 sl st (12)
R10–R13: sc around (12)
R14: 2 sc, 4 hdc, 2 sc, 4 sl st (12)
R15–R18: sc around (12)
R19: 3 sl st, 3 sc, 3 hdc, 3 sc (12)
R20–R22: sc around (12)
Stuff R1–R12 firmly and the remaining rounds lightly. Keep the hdc groups within one marked sector to form a single forward bend.
Fasten off. Leave a 35 cm tail.
Trunk-Nostril Rim
Yarn: dark brown.
Join yarn to one front-loop stitch of trunk R1. Work 6 sl st around the opening (6).
Fasten off. Weave the ends into the trunk.
Cheek Patches (Make 2)
Yarn: cream — Source basis: standard flat-circle mathematics.
R1: 6 sc in MR (6)
R2: inc ×6 (12)
Join with a sl st. Fasten off and leave a 15 cm sewing tail. These patches should remain mostly hidden beneath the trunk sides.
Tail
Yarn: burnt orange or caramel.
R1: 6 sc in MR (6)
R2–R8: sc around (6)
Do not stuff. Add three 6 cm strands to the tip and trim the tassel to 2 cm.
Fasten off. Leave a 20 cm sewing tail.
Toenails (Make 6)
Yarn: white.
Ch 3. Sl st in the second chain from the hook and sc in the final chain (2).
Fasten off. Leave a 10 cm tail on each nail.
Overall Leg Openings (Make 2)
Yarn: sage green — work in joined rounds.
Ch 25 and join without twisting.
R1–R5: sc around, join (24)
Fasten off the first opening. Do not cut the yarn after completing the second.
Overall Shorts
Yarn: sage green — continue from the second leg opening.
R6: sc 24 around the second opening, ch 3, sc 24 around the first opening, ch 3 (54)
R7: sc around, working one sc in each chain (54)
R8: (7 sc, dec) ×6 (48)
R9–R11: sc around (48)
R12: (6 sc, dec) ×6 (42)
R13–R15: sc around (42)
R16: (5 sc, dec) ×6 (36)
Test the garment over both legs and the lower body before cutting the yarn. The waistband should sit below the widest body round.
Fasten off. Weave the tail inside the garment.
Overall Bib
Yarn: sage green — work in turned rows.
Ch 17.
Row 1: sc in second ch from hook and across (16)
Rows 2–10: ch 1, turn, sc across (16)
Row 11: ch 1, turn, dec, 12 sc, dec (14)
Fasten off. Leave a 30 cm tail and sew the lower edge to the center front of the waistband.
Overall Straps (Make 2)
Yarn: sage green — work in turned rows.
Ch 5.
Row 1: sc in second ch from hook and across (4)
Rows 2–26: ch 1, turn, sc across (4)
Measure each strap from the upper bib corner, over the shoulder and down to the back waistband. Add or remove rows before attachment.
Fasten off. Leave a 25 cm sewing tail.
Acorn Cap Brim
Yarn: dark brown — work in joined rounds.
R1: ch 43 and join without twisting, sc around (42)
R2–R3: BLO sc around, join (42)
Place the brim around the crown above the ears. It should sit flat without compressing the head.
Acorn Cap Crown
Continue in dark brown.
R4–R5: sc around (42)
R6: (5 sc, dec) ×6 (36)
R7: sc around (36)
R8: (4 sc, dec) ×6 (30)
R9: (3 sc, dec) ×6 (24)
R10: (2 sc, dec) ×6 (18)
R11: (sc, dec) ×6 (12)
R12: dec ×6 (6)
Do not stuff. Close the final six stitches and flatten the crown against the head.
Fasten off. Leave a 25 cm tail.
Cap Stem
Yarn: dark brown.
R1: 6 sc in MR (6)
R2–R7: sc around (6)
Do not stuff. Bend the stem slightly toward the elephant’s right side.
Fasten off. Leave a 15 cm sewing tail.
Handheld Acorn Nut
Yarn: taupe.
R1: 6 sc in MR (6)
R2: inc ×6 (12)
R3–R5: sc around (12)
R6: (sc, dec) ×4 (8)
Stuff firmly and leave the upper opening exposed for the cap.
Fasten off. Leave a 15 cm tail.
Handheld Acorn Top
Yarn: dark brown.
R1: 6 sc in MR (6)
R2: inc ×6 (12)
R3: sc around (12)
R4: FLO (sc, inc) ×6 (18)
Place the flared final round over the taupe nut and sew through R3 of the brown top.
Fasten off. Leave a 20 cm tail.
Small Acorn Stem
Yarn: dark brown.
Ch 6. Sl st in the second chain from the hook and in each remaining chain (5).
Fasten off. Leave a 10 cm tail and sew the stem to the center of the acorn top.
Assembly
- Pull the overall shorts over both legs and the lower body, placing the waistband below body R10.
- Center the head over the body and sew twice around the neck seam through corresponding stitches.
- Pin the trunk between the eyes with its base spanning head R12–R17, then sew around the full base.
- Attach the cheek patches partly beneath the trunk and embroider one eyebrow plus two upper lashes around each eye.
- Pin the lined ears behind the eye line between head R7 and R15, then test the cap before completing the ear seams.
- Sew the legs beneath the body between R4 and R9 and attach three white toenails across each foot.
- Attach the bib to the waistband, run both straps over the shoulders and secure each front end with one button.
- Sew the arms beside body R17, angling the left hand inward around the small acorn.
- Attach the tail below the back waistband, sew the cap stem to the crown and tack the brim to the head at four points.
- Bury every structural tail through at least 5 cm of stuffing, reverse direction once and trim after the yarn retracts.
The completed elephant should stand without support while the acorn remains fixed against the left hand.
7 Technical Tips
- Round-start drift: Chenille can hide the first stitch and rotate the trunk away from the eye midpoint. Place a locking marker through both loops and recount every 42-stitch plateau round.
- Collapsed forehead: Sparse filling above 16 mm eyes creates two visible hollows. Add stuffing in pieces smaller than 3 cm until the crown retains a rounded profile.
- Decrease holes: Standard decreases can expose pale stuffing between caramel stitches. Work each decrease through the front loops and keep the finished loop close to the 4 mm hook shaft.
- Blocked eye access: Installing the washers after head R17 leaves a restricted 30-stitch opening. Fit both eyes after R16 and compare their height before locking either backing.
- Rotated trunk: Mixed-height stitches placed in different sectors create an unwanted S curve. Mark one four-stitch sector and keep every hdc group inside that section.
- Slipping overalls: A waistband more than 1 cm wider than the body can slide below the hips. Pin the garment at four quarter points before attaching the bib or straps.
- Uneven standing base: A 5 mm difference between leg seams makes the body lean. Pin both legs, place the elephant on a level surface and sew neither one permanently until both feet carry weight.
Conclusion
Check the trunk center, overall waistband and ear clearance before trimming the final assembly tails. The next practical step is to crochet one 42-stitch outer ear and compare its diameter with the completed head; chenille thickness can change the width by several centimeters. Save this elephant amigurumi crochet pattern to Pinterest and share front, side and back photographs on Instagram with #AlderAcornElephant. Those views show the strap length, cap angle and standing balance more accurately than one frontal photograph. For this elephant specifically, should the cap stem curve toward the raised trunk or point toward the acorn held in its left hand?









