Introduction
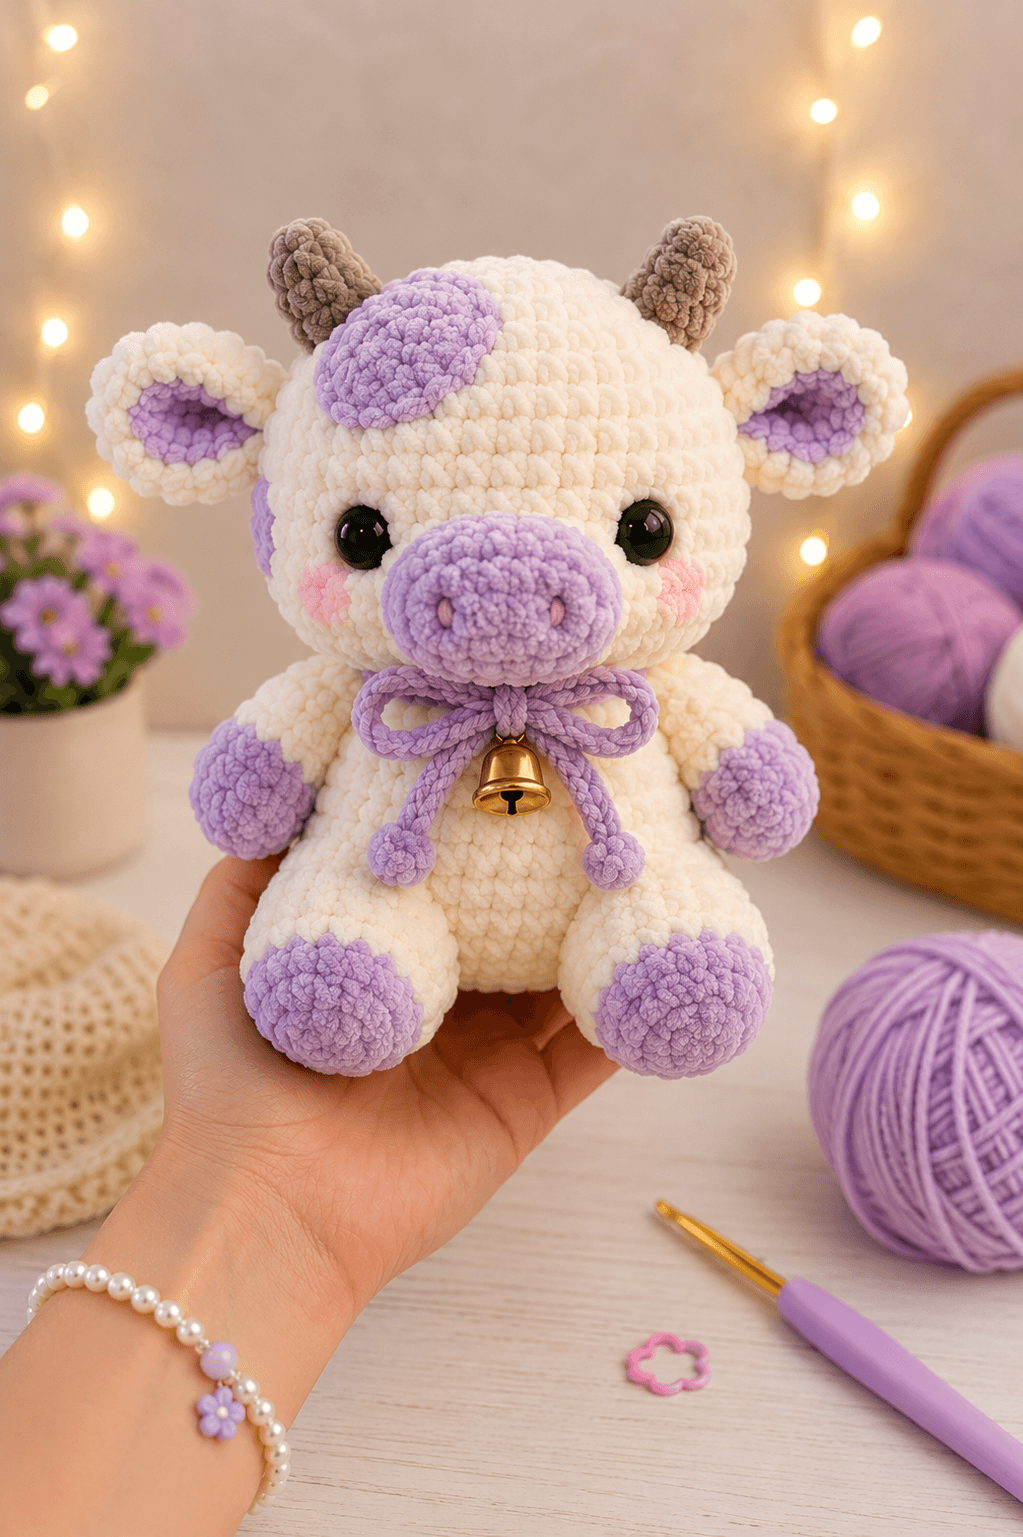
A cow’s muzzle projects below the eyes while its horns sit behind the forehead line, so both features must be positioned on different planes. This cow amigurumi crochet pattern uses super-bulky chenille, a 5 mm hook and 18 mm eyes to produce a sitting cow about 21.6 cm tall. The project suits intermediate makers and creates a stable display plush with a removable bell collar.
The Design: What Makes Lavender Bell Different
The head reaches a 36-stitch plateau, giving the plush enough width for a large oval muzzle without forcing the eyes toward the sides. Its body also reaches 36 stitches, but fewer plateau rounds keep the torso shorter than the head. That ratio produces the compact calf shape shown in the reference image. Separate back legs form a broad seated base, while smaller front legs sit higher on the body and angle slightly inward. The plush cow crochet pattern also uses folded circular ears rather than narrow leaves, matching the thick outer rims visible in chenille fabric. One common error is sewing both horns directly above the eyes. Cow horns sit closer to the crown and inside the ear line, so low placement compresses the forehead and interferes with the coat spot. This chenille cow amigurumi avoids that conflict by placing the horns first and fitting the lavender patch between them.
Project Info at a Glance
| Skill Level | Time | Finished Size | Hook | Best For |
|---|---|---|---|---|
| Intermediate | 7–10 hours | About 21.6 cm sitting | 5 mm | Display, nursery décor and supervised play |
Materials and Tools
Yarn
- Cream — super-bulky chenille — approximately 120–150 g — Himalaya Dolphin Baby, Premier Parfait Chunky or a comparable plush yarn.
- Lavender — super-bulky chenille — approximately 35–45 g — used for the muzzle, hooves, inner ears, spots and bow ends.
- Taupe brown — super-bulky chenille — approximately 8–12 g — used for both horns.
- Pale pink — plush or smooth yarn — approximately 3 g — used for the cheeks and nostrils.
Tools
- 5 mm crochet hook
- Two 18 mm black safety eyes
- Polyester stuffing, approximately 120–160 g
- Yarn needle with an eye large enough for chenille
- Locking stitch markers
- Rust-resistant pins
- Scissors
- One 20–25 mm craft bell for a decorative, removable collar
Plastic eyes and a detachable bell are not suitable for children under three. Substitute embroidered eyes and omit the bell when the finished cow will be handled by an infant or toddler.
Abbreviations
- MR — magic ring
- sc — single crochet
- inc — two single crochets in one stitch
- dec — single-crochet decrease
- sl st — slip stitch
- ch — chain
- BLO — back loop only
An invisible decrease is worked through the front loops of the next two stitches, reducing the gap that can expose stuffing in tightly packed rounds.
Pattern — Step by Step
Work in a continuous spiral unless a section states otherwise. Place a marker in the first stitch of every round.
Head
Yarn: cream — original shaping based on standard six-stitch amigurumi math.
R1: 6 sc in MR (6)
R2: inc ×6 (12)
R3: (1 sc, inc) ×6 (18)
R4: (2 sc, inc) ×6 (24)
R5: (3 sc, inc) ×6 (30)
R6: (4 sc, inc) ×6 (36)
R7–R12: sc around (36)
Insert the eyes between R9 and R10, approximately eight visible stitches apart. Check the spacing with the muzzle held against the face before attaching the washers.
R13: (4 sc, dec) ×6 (30)
R14: (3 sc, dec) ×6 (24)
R15: (2 sc, dec) ×6 (18)
Stuff firmly around the eye posts and across both sides of the head. Keep the lower face slightly softer so the muzzle can sit flush.
R16: (1 sc, dec) ×6 (12)
R17: dec ×6 (6)
Fasten off. Leave a 15 cm tail, thread it through the front loops and close the opening.
Body
Yarn: cream — original shaping based on standard six-stitch amigurumi math.
R1: 6 sc in MR (6)
R2: inc ×6 (12)
R3: (1 sc, inc) ×6 (18)
R4: (2 sc, inc) ×6 (24)
R5: (3 sc, inc) ×6 (30)
R6: (4 sc, inc) ×6 (36)
R7–R10: sc around (36)
R11: (4 sc, dec) ×6 (30)
R12–R13: sc around (30)
R14: (3 sc, dec) ×6 (24)
R15: sc around (24)
R16: (2 sc, dec) ×6 (18)
Stuff the lower half firmly. Add smaller pieces near the neck opening so the body remains rounded rather than pear-shaped.
R17: (1 sc, dec) ×6 (12)
Fasten off. Leave a 30 cm tail for sewing the body to the head.
Front Legs — Make Two
Yarn: begin in lavender and change to cream.
R1: 6 sc in MR (6)
R2: inc ×6 (12)
R3: (1 sc, inc) ×6 (18)
R4: sc around in BLO (18)
R5: sc around (18)
R6: change to cream, (1 sc, dec) ×6 (12)
R7–R10: sc around (12)
Stuff the hoof and the lower half of the leg. Leave the top half flexible.
R11: (2 sc, dec) ×3 (9)
Flatten the opening and crochet 4 sc through both layers.
Fasten off. Leave a 25 cm sewing tail.
Back Legs — Make Two
Yarn: begin in lavender and change to cream.
R1: 6 sc in MR (6)
R2: inc ×6 (12)
R3: (1 sc, inc) ×6 (18)
R4: (2 sc, inc) ×6 (24)
R5: sc around in BLO (24)
R6: sc around (24)
R7: change to cream, (2 sc, dec) ×6 (18)
R8–R10: sc around (18)
R11: (1 sc, dec) ×6 (12)
R12–R14: sc around (12)
Pack the lavender foot firmly. Add moderate stuffing to the cream section so the leg bends where it meets the body.
Flatten and crochet 6 sc through both layers.
Fasten off. Leave a 30 cm sewing tail.
Outer Ears — Make Two
Yarn: cream — the 6, 12 and 18 progression follows common published cow-ear construction.
R1: 6 sc in MR (6)
R2: inc ×6 (12)
R3: (1 sc, inc) ×6 (18)
R4: (2 sc, inc) ×6 (24)
Fasten off. Leave a 25 cm tail. Fold each circle slightly below the center to form a thick oval ear.
Inner Ears — Make Two
Yarn: lavender.
R1: 6 sc in MR (6)
R2: inc ×6 (12)
R3: (1 sc, inc) ×6 (18)
Fasten off. Leave a 20 cm tail. Sew one lavender circle to each cream ear, keeping a visible cream border.
Horns — Make Two
Yarn: taupe brown.
R1: 6 sc in MR (6)
R2: sc around (6)
R3: (1 sc, inc) ×3 (9)
R4–R6: sc around (9)
R7: (1 sc, dec) ×3 (6)
Add a narrow roll of stuffing. Do not widen the base.
Fasten off. Leave a 25 cm sewing tail.
Muzzle
Yarn: lavender.
R1: 6 sc in MR (6)
R2: inc ×6 (12)
R3: (1 sc, inc) ×6 (18)
R4: (2 sc, inc) ×6 (24)
R5–R6: sc around (24)
R7: (2 sc, dec) ×6 (18)
Add a thin layer of stuffing. The muzzle should remain oval and low-profile rather than spherical.
Fasten off. Leave a 30 cm sewing tail. Embroider two vertical pink nostrils three to four stitches apart.
Forehead Spot
Yarn: lavender.
R1: 6 sc in MR (6)
R2: inc ×6 (12)
R3: (1 sc, inc) ×6 (18)
R4: 6 sc, 2 inc, 6 sc, 2 inc, 2 sc (22)
Fasten off. Leave a 25 cm tail. The uneven final round creates the irregular patch visible between the horns.
Side Coat Spot
Yarn: lavender.
R1: 6 sc in MR (6)
R2: inc ×6 (12)
R3: (1 sc, inc) ×6 (18)
Fasten off. Leave a 20 cm tail.
Cheek Patches — Make Two
Yarn: pale pink.
R1: 6 sc in MR (6)
R2: inc ×6 (12)
Fasten off. Leave a 15 cm tail. Flatten the circles before sewing.
Bow Cord and Bell
Yarn: lavender. The bell remains removable.
Ch 76, beginning with a 20 cm tail.
Row 1: sl st in the second ch from the hook and in every ch across (75)
Fasten off with a second 20 cm tail. Knot a small yarn ball or pompom at each end. Thread the cord through the bell loop, wrap it around the neck and tie a bow at the front.
Assembly
- Center the head over the body opening and pin it at four evenly spaced points.
- Sew the head to the body with two complete passes around the neck seam.
- Position the muzzle below the eyes, with its upper edge about one round beneath the eye line, then sew around it.
- Attach the cheek patches beside the lower edges of the eyes without allowing them to touch the muzzle.
- Sew the horns to the crown approximately six stitches apart and angle their tips slightly outward.
- Place the ears outside the horn line, keeping their folded edges horizontal, then sew through both folded layers.
- Pin the back legs to the lower third of the body and test the sitting balance before sewing them in place.
- Attach the front legs to the upper sides of the torso, angling the lavender hooves toward the center.
- Sew the forehead spot between the horns and attach the smaller coat spot to one side of the head.
- Tie the bow cord around the neck, center the removable bell and weave all structural yarn tails into stuffed sections.
The completed cow should sit without hand support and keep both eyes level when viewed from the front.
7 Technical Tips
- Stitch-marker drift: A misplaced marker shifts the muzzle and coat spot away from the face center. Count all 36 stitches at the end of each head plateau round.
- Understuffed neck: A soft upper body allows the large head to tilt forward. Pack stuffing into the final three body rounds until the neck resists finger pressure without becoming rigid.
- Visible decrease gaps: Standard decreases can expose white stuffing through lavender chenille. Work every decrease through the front loops and keep the hook parallel to the fabric.
- Locked eye misalignment: Safety-eye washers cannot be repositioned after installation. Test both eyes eight visible stitches apart and photograph the face from the front before locking them.
- Chenille tension breaks: Pulling a magic ring by the fuzzy strand can strip the yarn core. Close each ring gradually while holding the smooth inner thread rather than the pile.
- Uneven leg placement: A difference of one round between the back legs makes the cow lean. Pin both legs at the same body round and place the inner edges an equal distance from the centerline.
- Loose tail weaving: Short chenille ends can work back through the fabric. Leave at least 15 cm, pass each tail through three different stitch directions and trim it only after the end retracts into the stuffing.
Conclusion
Check the cow from the front, side and seated positions before cutting the final assembly tails. The muzzle should remain centered beneath the eyes, both horns should clear the forehead patch, and the back legs should contact the surface at equal points. Make the next version with a brown patch, a smaller embroidered bell or reversed cream-and-lavender colors while retaining the same stitch counts. Save the finished cow amigurumi crochet pattern to a Pinterest project board and post the completed plush on Instagram with #LavenderBellCow. Which coat spot would you move first: the large forehead patch or the smaller patch beside the ear?
Technical Sources
- Jess Huff, Caroline the Cow: https://jesshuff.com/caroline-the-cow-free-amigurumi-pattern/
- Ravelry, Cow Amigurumi by Megan A: https://www.ravelry.com/patterns/library/cow-amigurumi-4
- Amigurumi Corner, Little Cow: https://amigurumicorner.com/little-cow-amigurumi-a-free-pattern/
- Grace and Yarn, Amigurumi Cow: https://www.graceandyarn.com/2018/04/amigurumi-cow-pattern-free-tutorial.html
- Virkadia, Cow Pocket Pet: https://virkadia.com/cow-pocket-pet-free-crochet-pattern/









