Introduction
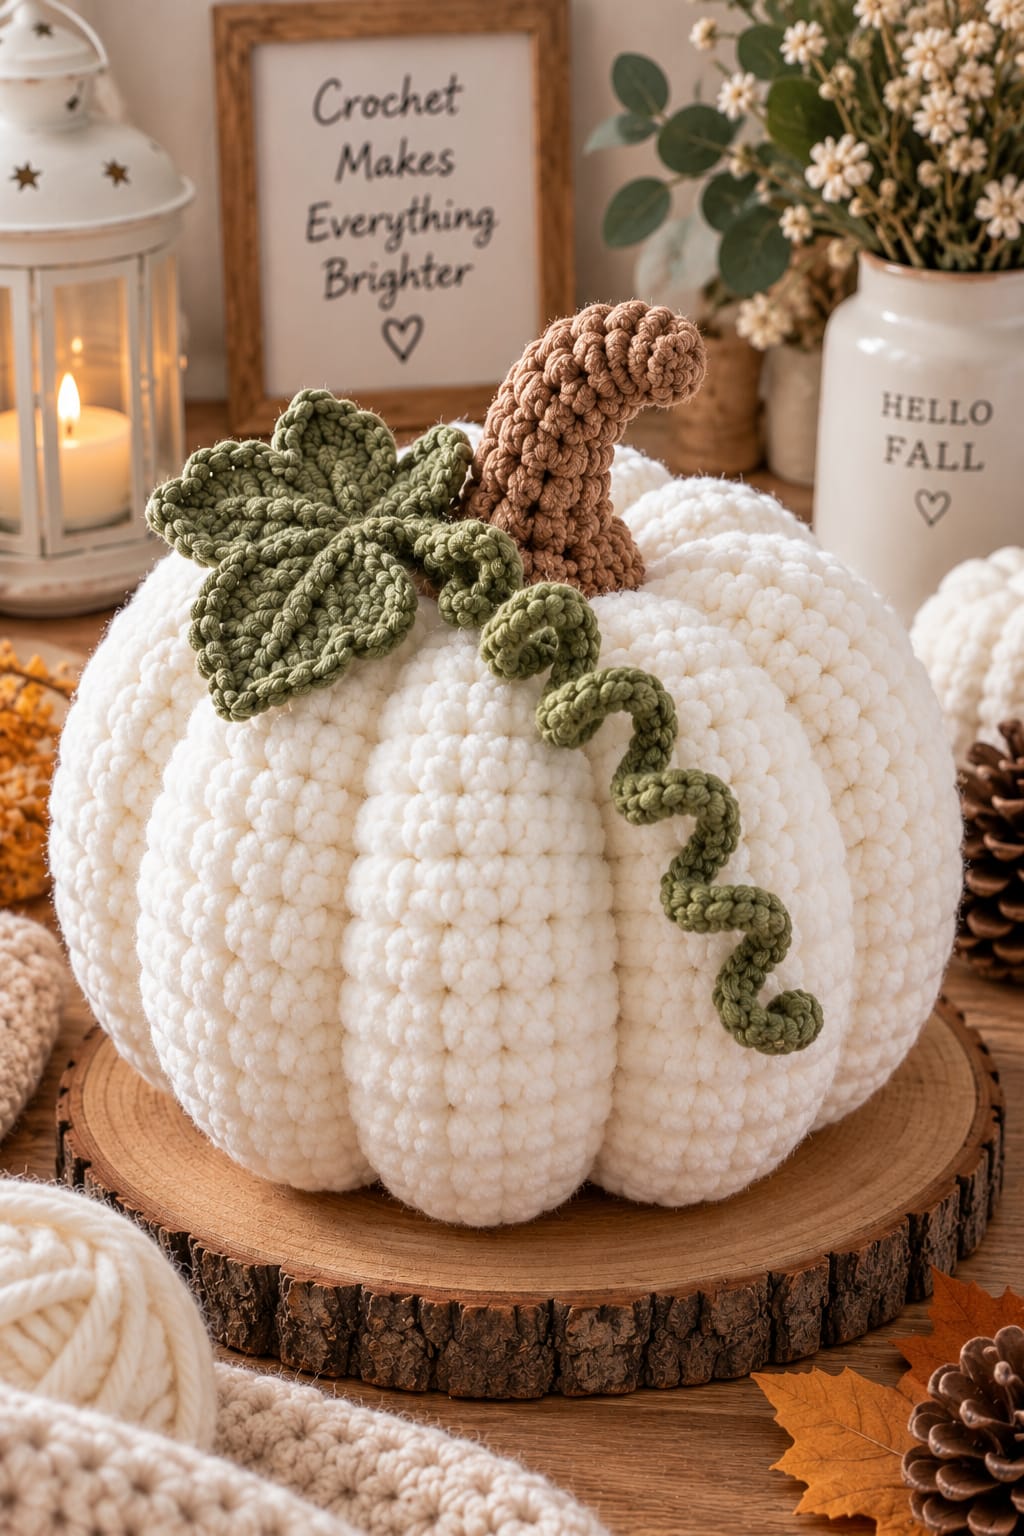
Eight deep ivory lobes and a bent, heavily textured brown stem give this pumpkin its oversized silhouette before the green leaf is even attached. This large white crochet pumpkin pattern uses super-bulky yarn, an 8 mm hook, a ribbed panel construction, stuffing, and external sculpting strands. The intermediate reconstruction targets 28–32 cm wide and makes a substantial tabletop or shelf decoration.
The instructions below are an original photo-inspired reconstruction based on visible structure; published patterns cited later are used only for sizing, gauge, and material benchmarks.
The Design: What Makes This White Pumpkin Different
The photograph depends on pronounced vertical structure rather than color variation. A flat ribbed rectangle becomes the pumpkin body, then eight sculpting strands compress that stuffed tube into broad lobes. This construction gives a chunky crochet pumpkin stronger channels than a conventional round amigurumi sphere. The crown also needs a deep central recess because the tall curved stem would look unstable if attached to a flat top. Finally, the botanical topper combines one broad lobed leaf with a long spiral tendril instead of several small leaves. The most common scale error is making a large-looking pumpkin from too few rows. Super-bulky yarn helps, but a 28–32 cm reconstruction still needs a panel with enough circumference to remain broad after the eight sculpting strands are tightened.
Project Info at a Glance
| Skill Level | Time | Finished Size | Hook | Best For |
|---|---|---|---|---|
| Intermediate | Reconstruction estimate: 5–7 hours | 28–32 cm wide × 23–26 cm body height | 8 mm body; 5 mm topper | Large fall displays, shelves, tables, entry consoles |
Published chunky-pumpkin patterns support the yarn and hook range. Louise Bollanos’ Chunky Pumpkin uses super-bulky yarn, a 9 mm hook, approximately 50–60 yards, and a published gauge of 6.6 stitches × 8 rows per 4 inches. Suzanne Carlson’s Wide Ribbed Pumpkin also uses super-bulky yarn and a 9 mm hook, with a gauge of 8 stitches × 8 rows per 4 inches. Crochet 365 Knit Too lists an 8 mm hook, super-bulky yarn, 55–60 yards, and 9 stitches per 4 inches for its Chunky Pumpkin.
Materials and Tools
Yarn
- Warm ivory — super bulky #6 — reconstruction estimate: 220–280 g / 135–175 m
- Medium warm brown — worsted #4 — reconstruction estimate: 35–45 g
- Muted olive green — worsted #4 — reconstruction estimate: 40–50 g
A smooth super-bulky yarn gives the body strong stitch definition. Plush blanket yarn can also be used, but the sculpting channels will look softer. Published chunky pumpkin references commonly use #6 yarn with 8–10 mm hooks; the smaller 8 mm hook here deliberately creates a dense stuffed fabric.
Tools
- 8 mm crochet hook for pumpkin body
- 5 mm crochet hook for stem, leaf, and vine
- 650–800 g polyester stuffing — reconstruction estimate
- Large tapestry needle
- Locking stitch markers
- Scissors
- Measuring tape
- Optional floral wire for a poseable stem
Abbreviations
- MR — magic ring
- ch — chain
- sl st — slip stitch
- sc — single crochet
- hdc — half double crochet
- dc — double crochet
- tr — treble crochet
- BLO — back loop only
- inc — two stitches in one stitch
- dec — decrease
- st/sts — stitch/stitches
An invisible decrease is worked through the front loops of two adjacent stitches before completing one single crochet, reducing bulk when shaping small stuffed components such as the stem.
Gauge and Scale
Make a ribbed swatch before committing to the body panel. A useful reconstruction target is approximately 7–8 hdc stitches and 7–8 rows per 10 cm after the fabric is relaxed.
Published examples show how strongly yarn and gauge affect pumpkin dimensions. Crafting Each Day’s Wide Ribbed Pumpkin uses #6 yarn, a 9 mm hook, 30 yards, and an 8-stitch × 8-row gauge per 4 inches; its finished measurement is approximately 13 inches in circumference and 3 inches high. Brittany Dickson’s published Crochet Pumpkin provides three sizes with finished circumferences of approximately 14, 15, and 21 inches and uses hooks from 5.5 to 9 mm according to yarn weight.
The photographed pumpkin is substantially larger and taller than those small tabletop examples, so the instructions below intentionally increase both panel dimensions and yarn allowance.
Pattern — Step by Step
Large Ribbed Pumpkin Body
Yarn: warm ivory. Hook: 8 mm. Construction: flat rectangle joined into a tube.
Foundation: Ch 22.
Row 1: Hdc in second ch from hook and in every chain across. (21)
Row 2: Ch 1, turn. Hdc BLO in every stitch across. (21)
Rows 3–56: Repeat Row 2. (21)
Do not fasten off.
The relaxed rectangle should measure approximately 27–30 cm high × 70–76 cm long. Exact dimensions matter more than row gauge at this stage. If 56 rows do not reach at least 70 cm, continue adding rows in pairs until they do.
The BLO construction produces 56 vertical-looking ribs after the panel is joined into a tube. Eight external shaping channels will later group those small ridges into the broad lobes visible in the photograph.
Joining the Body
Fold the rectangle so Row 56 meets the foundation edge.
Working through the corresponding loops of both edges, slip stitch from top to bottom. Keep every join loose enough that the seam remains approximately as elastic as the surrounding fabric.
Fasten off with a 100 cm tail.
Turn the tube so the seam faces inward.
Closing the Bottom
Thread the long tail onto a large tapestry needle.
Run the needle through the end of every second rib around the lower opening.
Pull gradually until the opening closes.
Pass through the gathered center twice, knot securely, and weave the tail through approximately 8–10 cm of the interior fabric.
Turn the body right side out.
Stuffing the Pumpkin
Begin with stuffing around the outside wall rather than packing the center immediately.
Fill the lower perimeter first, then the side walls.
Add stuffing to the middle in smaller sections.
The body should be firm enough to resist a light hand press but still compress when the sculpting strands are installed.
Keep the uppermost 4–5 cm slightly less dense. This softer crown makes it possible to form the deep stem recess.
Closing the Crown
Cut approximately 120 cm of matching ivory yarn.
Thread the needle through every second rib around the upper opening.
Pull until the opening is approximately 2–3 cm wide.
Add the final stuffing through this opening.
Pull closed completely.
Pass the yarn through the gathered center several times but do not cut it yet.
Creating the Crown Recess
Push the long needle from the crown center through the stuffed pumpkin and out through the exact bottom center.
Bring the needle back through the body to the crown.
Pull until the top sinks approximately 3–4 cm.
Repeat once.
Tie securely beneath the future stem position.
This compression creates the squat pumpkin profile and gives the stem a physical socket instead of leaving it perched on top of the stuffing.
Eight Sculpting Channels
Cut eight lengths of ivory yarn approximately 130 cm each.
For the first channel, anchor the yarn at the bottom center.
Run it externally through one existing BLO groove to the crown.
Insert the needle through the crown center and bring it back through the pumpkin to the bottom.
Pull until that groove deepens by approximately 1.5–2 cm.
Tie securely.
Repeat at equal intervals around the pumpkin to make eight sculpted lobes.
Do not tighten one strand completely before checking the opposite channel. Work in opposing pairs: 12 and 6 o’clock, 3 and 9 o’clock, then the four diagonal positions.
Checking the Pumpkin Shape
Set the body on a flat surface.
The reconstruction target is approximately 28–32 cm wide × 23–26 cm high before the stem.
Massage stuffing from any overfilled lobe toward a smaller neighboring lobe.
The channels should be deep but not so tight that the yarn disappears into the crochet fabric.
Textured Brown Stem
Yarn: medium brown worsted. Hook: 5 mm. Finished reconstruction target: approximately 14–16 cm following the curve.
R1: 6 sc in MR. (6)
R2: Inc ×6. (12)
R3: BLO sc around. (12)
R4: Sc around. (12)
R5: *Sc, bobble in next st* ×6. (12 working positions)
R6: Sc around. (12)
R7: *Bobble, sc in next st* ×6. (12)
R8: Sc around. (12)
R9: *Sc, bobble in next st* ×6. (12)
R10: Sc around. (12)
R11: *Bobble, sc in next st* ×6. (12)
R12: Sc around. (12)
R13: *Sc, bobble in next st* ×6. (12)
R14: Sc around. (12)
R15: *Bobble, sc in next st* ×6. (12)
R16: Sc around. (12)
R17: (Sc, dec) ×4. (8)
R18: Sc around. (8)
Fasten off with a 50 cm tail.
Bobble Stitch for the Stem
For each bobble, yarn over and insert the hook into the designated stitch. Yarn over and draw up a loop, yarn over and pull through two loops. Repeat that partial dc action four more times in the same stitch, then yarn over and pull through all remaining loops.
Push the bobble toward the outside of the stem before working the following stitch.
Shaping the Curved Stem
Stuff the lower 7–8 cm firmly.
Use progressively less stuffing toward the tip.
For a fixed textile-only stem, bend the upper section while sewing several small hidden stitches between neighboring bobble rounds on the inside of the curve.
For a poseable stem, insert a doubled length of floral wire with both wire ends folded back and fully enclosed. The wire must never protrude through the crochet fabric.
The finished curve should lean noticeably to one side, matching the hooked profile in the photograph.
Large Five-Lobed Olive Leaf
Yarn: muted olive. Hook: 5 mm. Reconstruction target: approximately 14–16 cm across.
Center R1: 10 sc in MR. Join. (10)
The leaf consists of five lobes. Each lobe uses two center stitches.
Lobe 1
Sl st in next center stitch.
Ch 13.
Starting in second chain, work:
Sl st in 1, sc in 2, hdc in 2, dc in 3, tr in 2, dc in 1, hdc in 1. (12)
Work 5 sc into the final chain at the lobe tip.
Mirror the 12-stitch sequence down the opposite side.
Sl st in the next center stitch.
Lobes 2–5
Repeat the complete Lobe 1 instructions four more times, using the next two center stitches for each lobe.
Five lobes consume all ten stitches of the center ring.
Fasten off with a 40 cm tail.
Leaf Definition Round
Join olive yarn at the base of one lobe.
Surface slip stitch along the foundation-chain ridge toward the lobe point.
Stop approximately 1 cm before the tip.
Repeat independently on all five lobes.
These raised center ridges reproduce the strongly veined, slightly curled botanical texture visible in the reference.
Curly Green Vine
ChristaCoDesign’s published pumpkin-vine tutorial explains the basic mechanism: multiple stitches worked into successive chain stitches force the chain to curl. The following reconstruction scales that idea for the long tendril in the photograph.
With olive yarn and the 5 mm hook, ch 46.
Starting in the second chain from hook, work 3 sc in each chain across. (135 sc)
The vine will spiral automatically.
Fasten off with a 35 cm tail.
Do not block the spiral flat.
Secondary Short Vine
For the smaller curl near the leaf, ch 24.
Work 3 sc in every chain from the second chain onward. (69 sc)
Fasten off with a sewing tail.
Allow the two vines to curl in different directions rather than forcing matching spirals.
Positioning the Leaf
Place the five-lobed leaf immediately beside the stem socket.
Angle the largest-looking lobe toward the left or front-left side.
Allow two lobes to overlap the crown.
Sew the center ring firmly to the pumpkin.
Add one concealed attachment stitch approximately 3 cm along each of the two lowest lobes.
Leave the remaining lobe sections free so the leaf retains its dimensional profile.
Positioning the Vines
Sew the long vine beneath the leaf center.
Allow approximately 22–28 cm of spiral to hang freely over one pumpkin lobe.
Place the short vine closer to the stem.
Attach only the first 2–3 cm of each vine. Sewing the entire spiral to the body removes the suspended corkscrew shape visible in the photograph.
Attaching the Stem
Insert approximately 2–3 cm of the stem base into the crown recess.
Thread the brown tail through the ivory body.
Sew around the stem base at eight evenly spaced points.
Pass the needle diagonally through the lower stem twice to resist sideways movement.
The stem should remain stable when the pumpkin is lifted gently from underneath, but the decoration should never be carried by the stem.
Refining the Eight Lobes
After the topper is installed, check the pumpkin from above.
The eight channels should radiate from the stem socket at approximately equal angles.
If one channel is shallow, tighten only that sculpting strand.
If a lobe is narrow, loosen its two neighboring channels slightly instead of forcing more stuffing into the closed body.
Assembly
- Crochet the 21-stitch ivory body panel for at least 56 rows, checking that the relaxed rectangle reaches approximately 27–30 × 70–76 cm before seaming.
- Join the short edges into a tube, gather the bottom securely, turn the body right side out, and distribute stuffing around the outer wall before filling the center.
- Gather the crown after stuffing and pass a long strand from crown to base and back to create a 3–4 cm central recess.
- Add eight external sculpting strands in opposing pairs, positioning them at approximately equal intervals and tightening each channel by roughly 1.5–2 cm.
- Crochet the brown stem through Round 18, stuff the lower section firmly, and create its hooked profile with concealed shaping stitches or safely enclosed floral wire.
- Make the five-lobed olive leaf, add surface-slip-stitch center veins, and position its center immediately beside the stem socket.
- Crochet the 46-chain long vine and 24-chain short vine, allow both to spiral naturally, and attach only their first 2–3 cm beneath the leaf.
- Insert the lower 2–3 cm of the brown stem into the crown recess and sew its base to the body at eight points, adding two diagonal stabilizing stitches.
- Secure the leaf center and lower portions of two lobes, then arrange the remaining lobes and vines over the crown without sewing their outer sections flat.
- Weave every tail through at least 8 cm of matching fabric, reshape all eight pumpkin lobes by hand, and confirm a final reconstruction width of approximately 28–32 cm.
The completed pumpkin has eight broad sculpted lobes, one tall curved textured stem, a five-lobed olive leaf, and two corkscrew vines.
7 Technical Tips
- The stuffing shows between stitches: use an 8 mm hook with #6 yarn and check the fabric while stretching the swatch. A gap wider than approximately 3 mm under light tension indicates that a smaller hook is needed.
- The pumpkin becomes tall instead of broad: verify that the body rectangle reaches at least 70 cm in length while remaining about 27–30 cm high. A nearly square panel produces a ball rather than the wide profile shown in the photograph.
- One lobe becomes much narrower than the others: tighten sculpting strands in opposing pairs instead of working clockwise around the pumpkin. A channel pulled more than about 2 cm deeper than its opposite can shift the stuffing permanently.
- The crown remains domed: pass the center-compression strand completely from crown to base and back before attaching the stem. Target a 3–4 cm recess so the tall brown stem sits inside the silhouette rather than above a rounded mound.
- The stem falls sideways: attach its base at eight points and bury approximately 2–3 cm inside the crown socket. Sewing only around the outer edge creates a hinge beneath a 14–16 cm stem.
- The leaf curls into a cup: keep each surface-slip-stitch vein loose and stop approximately 1 cm before the lobe tip. A center vein shortened by 5 mm can visibly buckle a worsted-weight leaf.
- The vine refuses to spiral: work exactly three single crochets into each foundation chain. One stitch per chain produces a straight cord, while inconsistent increases create irregular waves instead of the compact corkscrew shown in the reference.
Why a Ribbed Panel Works Better at This Scale
A conventional amigurumi pumpkin can be increased round by round, but a large #6-yarn sphere requires careful gauge calculations to prevent the body from becoming too tall. A ribbed rectangle separates height from circumference. The starting chain controls height; the number of rows controls width.
That distinction is useful for this photograph because the pumpkin is conspicuously broad. Back-loop half double crochet also creates many small vertical ridges before sculpting begins. The eight shaping strands then group those ridges into major lobes.
The result has two levels of texture: fine crochet ribbing and deep anatomical channels.
Published Super-Bulky Pumpkin Benchmarks
Suzanne Carlson’s Wide Ribbed Pumpkin uses Lion Brand Hometown, super-bulky #6 yarn, a 9 mm hook, and 30 yards. Its published gauge is 8 stitches × 8 rows per 4 inches. Crafting Each Day lists the corresponding finished measurement at approximately 13 inches circumference × 3 inches high.
Louise Bollanos’ Chunky Pumpkin uses super-bulky yarn, a 9 mm hook, and approximately 50–60 yards. Ravelry lists a single-crochet gauge of 6.6 stitches × 8 rows per 4 inches, while the project information gives a 5 × 8 inch starting rectangle and a finished pumpkin around 13 inches in circumference.
Published Larger Pumpkin Benchmark
Brittany Dickson’s Crochet Pumpkin is written for three yarn weights and hook sizes. The published yarn options include medium, bulky, and super-bulky yarn, paired with 5.5, 6.5, and 9 mm hooks. Finished circumferences include approximately 14, 15, and 21 inches.
That range demonstrates why yarn weight alone cannot establish finished scale. Panel dimensions and gauge must increase with the intended pumpkin circumference.
Published Stem, Leaf, and Vine Benchmark
ChristaCoDesign’s Pumpkin Stem, Leaf and Vine pattern uses approximately 23–25 yards of cotton and a 5 mm hook. The published stem begins with six single crochets and works vertically in rounds, while its vine is created by placing multiple stitches into a foundation chain to force curling.
Those techniques provide useful benchmarks for the botanical topper. The larger stem, five-lobed leaf, and longer vines above are original reconstruction components sized for the supplied image.
Changing the Pumpkin Size
For a pumpkin around 20–22 cm wide, reduce the body to approximately 18 stitches high and 42–46 ribbed rows.
For a pumpkin wider than 35 cm, increase the panel length to approximately 82–88 cm while keeping its relaxed height around 30–32 cm.
Always evaluate the rectangle before seaming. Increasing both dimensions equally tends to create a larger sphere rather than a broader pumpkin.
Using Blanket Yarn
Plush polyester blanket yarn can reproduce the soft white body visible in the image. Make a 10 cm swatch first because blanket yarn varies considerably in thickness.
Use the smallest hook that produces a flexible fabric without visible stuffing gaps. If an 8 mm hook makes the fabric stiff, move to 9 mm and increase the panel dimensions only after measuring the new gauge.
Velvet and chenille also require gentler gathering because aggressive pulling can strip fibers from the yarn core.
Making the Ribs Deeper
For stronger channels, pass each sculpting strand around the pumpkin twice before tying it.
Do not simply pull a single strand harder. Excessive localized tension can cut into plush yarn and create a narrow crease rather than a rounded lobe.
A useful target is a groove approximately 1.5–2 cm deep at the pumpkin’s widest point.
Making a Short Natural-Looking Stem
For a less dramatic topper, stop the brown stem after Round 10.
Stuff firmly and attach it vertically without the curved upper section.
The resulting stem will measure roughly half the reconstruction height and will shift visual emphasis toward the green leaf and pumpkin body.
Alternative Leaf Placement
The photograph concentrates the leaf on one side of the stem. For a more symmetrical arrangement, make a second five-lobed leaf and place it on the opposite side.
Rotate the second leaf approximately 45 degrees so its lobes do not align directly with the first.
Two leaves require additional crown attachment space, so position both before permanently sewing the stem.
Yarn Planning
Crochet ten body rows and weigh them before committing to the full panel.
Multiply that weight by approximately 5.6 for the 56-row body, then add 15–20% for the seam, gathering, sculpting strands, gauge variation, and swatching.
This measurement-based method is preferable for an oversized pumpkin because published examples range from roughly 30 yards for small super-bulky pumpkins to substantially more yarn when circumference and height are increased.
Care and Storage
Follow the yarn manufacturer’s washing directions. If the stem contains floral wire, spot cleaning is preferable unless the wire is specifically rated for laundering.
Support the pumpkin from underneath when moving it. Never carry the decoration by the brown stem or green vine.
For storage, place the pumpkin upright in a container large enough that the eight lobes are not compressed. Bend a wired stem only gradually, and keep heavy objects away from the leaf and corkscrew vine.
Sources
Ravelry — Wide Ribbed Pumpkin by Suzanne Carlson — super-bulky yarn, 9 mm hook, 30 yards, and 8 × 8 stitch/row gauge per 4 inches.
Crafting Each Day — Free Chunky Crochet Pumpkin Pattern — #6 yarn, 9 mm hook, 30 yards, 8 × 8 gauge, and approximately 13-inch circumference benchmark.
Ravelry — Chunky Pumpkin by Louise Bollanos — super-bulky yarn, 9 mm hook, 50–60 yards, and 6.6-stitch gauge per 4 inches.
Handy Little Me — Crochet Pumpkin Pattern — ribbed rectangle construction, super-bulky yarn, 9 mm hook, and approximately 50 g yarn benchmark.
Ravelry — Chunky Pumpkin by Crochet 365 Knit Too — super-bulky yarn, 8 mm hook, 55–60 yards, and 9-stitch hdc-BLO gauge per 4 inches.
Ravelry — Crochet Pumpkin by Brittany Dickson — three yarn weights, 5.5–9 mm hooks, and published 14-, 15-, and 21-inch circumference options.
ChristaCoDesign — Crochet Pumpkin Stem, Leaf and Vine Pattern — 5 mm hook, cotton yarn, round stem construction, leaf technique, and increasing-chain vine reference.
Sierra’s Crafty Creations — Easy Ribbed Crochet Pumpkin — ribbed construction examples across worsted, super-bulky, blanket, and jumbo yarn weights.
Conclusion
The broad body is the measurement to establish first: finish the ivory panel at roughly 27–30 × 70–76 cm before committing to the seam. After stuffing, install the eight sculpting strands in opposing pairs, then form the crown recess before adding any botanical pieces. Crochet the textured stem separately and test its angle beside the five-lobed leaf before permanent attachment. Your next step is to make a 10 cm BLO swatch and confirm that stuffing cannot show through the stretched fabric. Save this large white crochet pumpkin pattern to Pinterest or share the finished version on Instagram with #LargeWhiteCrochetPumpkin. Would you keep the long hooked brown stem or shorten it for a squatter pumpkin profile?









