Introduction
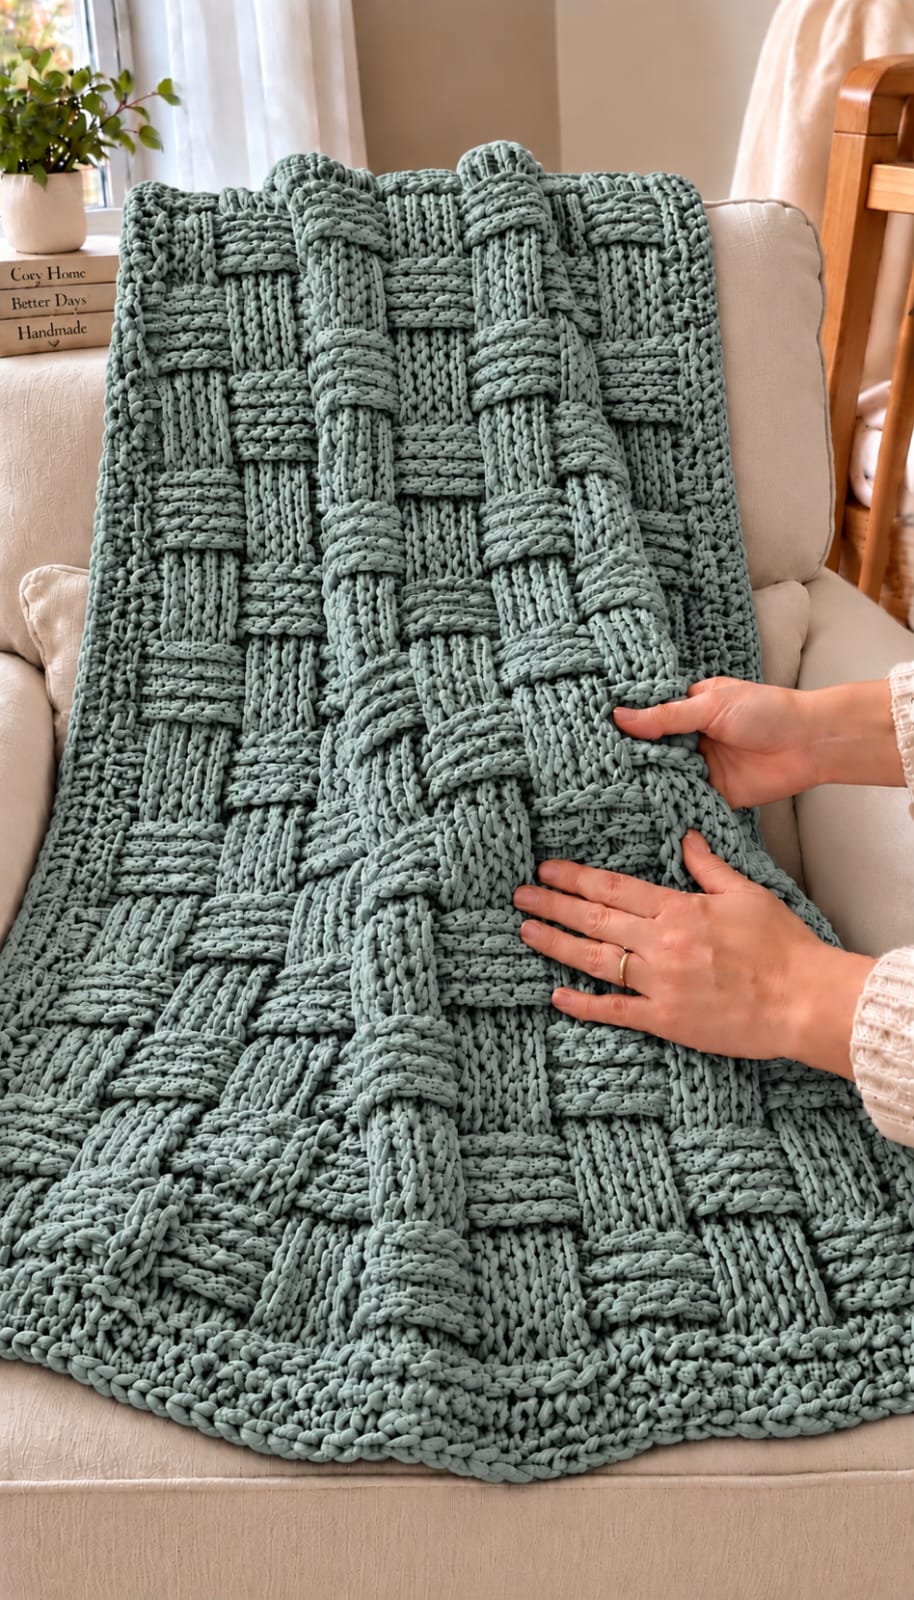
Oversized four-stitch blocks cross at right angles across this sage throw, creating the illusion that thick crocheted bands have been woven over and under one another. This chunky crochet basketweave blanket pattern uses super-bulky chenille yarn, an 8 mm hook, and front- and back-post double crochet. The intermediate reconstruction targets approximately 115 × 140 cm and produces a dense sofa throw with no separate motifs to assemble.
The instructions below are an original photo-inspired reconstruction based on visible structure; published patterns cited later are used only for sizing, gauge, and material benchmarks.
The Design: What Makes This Basketweave Blanket Different
The photograph depends on unusually large woven-looking blocks rather than the smaller three-stitch basketweave commonly used for scarves and dishcloths. Groups of four post stitches create broad vertical ribs, then the stitch orientation reverses to make the next block appear horizontal. Four-row sections keep each rectangle close to square when worked in thick chenille. A narrow perimeter stabilizes the dense center without competing with its relief. For this super bulky basketweave crochet blanket, the foundation count also includes one plain edge stitch at each side, preventing the first and final post groups from becoming distorted. The main failure mode is inconsistent post orientation after turning. A group that faces forward on the blanket’s display side must remain visually forward throughout its four-row block even though the crocheter alternates between the right and wrong sides.
Project Info at a Glance
| Skill Level | Time | Finished Size | Hook | Best For |
|---|---|---|---|---|
| Intermediate | Reconstruction estimate: 18–24 hours | Reconstruction target: 115 × 140 cm | 8 mm | Sofa throw, reading chair, textured bed layer |
Published chunky basketweave blankets support the material category used here. Michele Webb’s Chunky Basketweave Blanket specifies super-bulky Bernat Blanket, an 8 mm hook, 1,460–1,540 yards, and a finished size of 45 × 55 inches. Yarnspirations’ Basket Weave Crochet Blanket uses super-bulky Bernat Blanket Tweeds, a 9 mm hook, a published gauge of 8 stitches × 5 rows per 4 inches, and 1,720–1,760 yards. Another Yarnspirations basketweave design uses Bernat Forever Fleece Tweeds, an 11.5 mm hook, and a published pattern gauge of 6.5 stitches × 4 rows per 4 inches.
Materials and Tools
Yarn
- Muted sage green — super bulky #6 chenille or fleece-style polyester — reconstruction estimate: 1,450–1,650 m / 2,000–2,300 g
Bernat Blanket is a useful yarn-category benchmark because a published 45 × 55 inch basketweave blanket requires approximately 75 ounces and 1,460–1,540 yards. Basketweave consumes considerably more yarn than an open stitch because post stitches wrap around existing stitch columns and create a thick double-sided fabric.
Tools
- 8 mm crochet hook
- Large tapestry needle
- Locking stitch markers
- Scissors
- Measuring tape
- Optional blocking mats
Abbreviations
- ch — chain
- sl st — slip stitch
- sc — single crochet
- hdc — half double crochet
- dc — double crochet
- FPdc — front-post double crochet
- BPdc — back-post double crochet
- st/sts — stitch/stitches
- RS — right side
- WS — wrong side
An invisible decrease joins two stitches through their front loops before completing one single crochet; it is not required in this rectangular blanket.
Gauge and Finished Measurements
Work at least three complete four-stitch basketweave blocks before measuring gauge. The reconstruction target is approximately 8–9 post stitches and 5–6 rows per 10 cm after the fabric has relaxed.
Do not measure an unstretched foundation chain and assume that measurement predicts blanket width. Post stitches contract the fabric horizontally.
The published Yarnspirations super-bulky benchmark of 8 stitches × 5 rows per 4 inches provides a useful reference, while its Forever Fleece version is looser at 6.5 stitches × 4 rows per 4 inches. Chenille diameter and personal tension can therefore change finished measurements substantially.
Understanding the Four-Stitch Basketweave
The center uses groups of four post stitches.
One visible block is four stitches wide and four rows high. Adjacent blocks face in opposite directions:
4 raised-looking stitches → 4 recessed-looking stitches → repeat.
After four rows, the orientation reverses:
4 recessed-looking stitches → 4 raised-looking stitches → repeat.
This creates the woven appearance.
Basketweave patterns do not all use the same repeat. Hooked by Robin documents an 8-plus-4 foundation system, while Fiber Flux demonstrates a multiple-of-6 version and Raffamusa Designs uses groups of three post stitches. The reconstruction below deliberately uses four-stitch groups because those broader blocks more closely match the photograph.
Pattern — Step by Step
Foundation Chain
Yarn: sage green. Hook: 8 mm.
Ch 100.
Keep the chains loose and consistent. If necessary, make only the foundation chain with a 9 mm hook and return to 8 mm for Row 1.
Row 1 — Double Crochet Setup
Dc in the fourth chain from the hook.
Dc in every remaining chain across.
The skipped three chains count as the first dc.
98 dc total.
Turn.
Row 2 — Establish Basketweave
Ch 2. The turning chain does not count as a stitch.
Dc in first stitch.
Work:
*FPdc around each of next 4 sts, BPdc around each of next 4 sts* ×12.
Dc in final stitch.
98 stitches total: 1 edge dc + 96 post stitches + 1 edge dc.
Turn.
Row 3
Ch 2; turn.
Dc in first stitch.
Because the work has been turned, crochet around the posts in the orientation required to keep the same groups projecting on the blanket’s right side:
*BPdc around next 4, FPdc around next 4* ×12.
Dc in final stitch. (98)
Row 4
Ch 2; turn.
Dc in first stitch.
*FPdc around next 4, BPdc around next 4* ×12.
Dc in final stitch. (98)
Row 5
Ch 2; turn.
Dc in first stitch.
*BPdc around next 4, FPdc around next 4* ×12.
Dc in final stitch. (98)
Rows 2–5 complete the first four-row visual block.
Reverse the Blocks
Row 6
Ch 2; turn.
Dc in first stitch.
*BPdc around next 4, FPdc around next 4* ×12.
Dc in final stitch. (98)
Row 7
Ch 2; turn.
Dc in first stitch.
*FPdc around next 4, BPdc around next 4* ×12.
Dc in final stitch. (98)
Row 8
Ch 2; turn.
Dc in first stitch.
*BPdc around next 4, FPdc around next 4* ×12.
Dc in final stitch. (98)
Row 9
Ch 2; turn.
Dc in first stitch.
*FPdc around next 4, BPdc around next 4* ×12.
Dc in final stitch. (98)
Rows 6–9 complete the second visual block and reverse the woven direction.
Main Blanket Repeat
Repeat Rows 2–9 until the basketweave center measures approximately 132–134 cm long, ending after a complete four-row block.
For an exact row-based reconstruction, work through Row 73: Row 1 setup plus nine complete eight-row basketweave repeats.
Measure after Row 65. If your fabric has already reached 132–134 cm, stop after the next completed four-row visual block rather than forcing the blanket to an arbitrary row count.
Checking the Right-Side Texture
Lay the work flat after every four rows.
The right side should show alternating rectangular groups that appear to cross over and under neighboring blocks.
Each block must remain four stitches wide.
If a block suddenly contains three or five raised columns, undo the row to the point where the post stitch was worked around the wrong column.
Maintaining the 98-Stitch Count
The first and last stitches of every basketweave row are ordinary dc.
Between them sit exactly 96 post stitches.
Those 96 stitches divide into:
12 repeats × 8 stitches = 96.
Never work a post stitch around the turning chain.
Count the two plain edge stitches separately when checking a row.
Bottom Border Foundation
After completing the basketweave center, do not fasten off.
Ch 1.
Work one sc in every stitch across the final row. (98)
At the corner work (sc, ch 2, sc).
First Long-Side Border
Work down the long edge.
Place 2 sc around the edge of each dc/post-stitch row.
At the lower corner work (sc, ch 2, sc).
Continue across the foundation edge with one sc in each available foundation position.
Work the next corner as (sc, ch 2, sc).
Continue up the second long side at two sc per row edge.
Finish the final corner with (sc, ch 2, sc) and join.
Border Round 2
Ch 1.
Sc in every stitch around.
At each corner ch-2 space work:
(sc, ch 2, sc).
Join with a slip stitch.
Border Round 3
Ch 2. The chain does not count.
Hdc in every stitch around.
At each corner work:
(hdc, ch 2, hdc).
Join.
Border Round 4
Ch 1.
Work one sc in every hdc around.
At each corner space work:
(sc, ch 2, sc).
Join and fasten off with a 30 cm tail.
The finished border should measure approximately 2.5–3.5 cm deep and remain visually subordinate to the basketweave center.
Optional Raised Inner Border
The photograph shows a narrow raised line near the outer perimeter.
For additional definition, join yarn around a complete row of stitches approximately one round inside the edge.
Surface slip stitch around the blanket.
Keep the yarn loose enough that the blanket remains flat.
At each corner, ch 1 between the two corner slip stitches.
Fasten off.
Correct Front-Post Double Crochet
Yarn over.
Insert the hook from front to back and then back to front around the post of the designated stitch.
The stitch post should sit in front of the hook.
Yarn over and draw up a loop.
Yarn over, pull through two loops; yarn over again and pull through the remaining two loops.
A FPdc pushes the stitch column toward the working side.
Correct Back-Post Double Crochet
Yarn over.
Insert the hook from back to front and then front to back around the designated post.
The post sits behind the hook.
Draw up a loop and complete the dc normally.
A BPdc pushes that stitch column away from the working side.
Why Row Orientation Changes
The blanket turns after every row. That means a post that looks raised while working a right-side row is approached from the opposite direction on the next row.
This is why blindly repeating “FPdc over FPdc” does not necessarily maintain the same visible face.
Judge the groups relative to the finished blanket face. During the first four-row section, the same four-stitch columns should remain visually raised on the display side. During the next four rows, those columns become recessed and the neighboring groups become raised.
Adding Length
One complete eight-row repeat adds two woven block levels.
For a longer blanket, repeat Rows 2–9 until the center reaches the required measurement.
Always finish after a complete four-row visual block.
Stopping after one or two rows of a new block creates a visibly truncated basketweave section at the upper edge.
Adding Width
The central post-stitch field must remain divisible by 8.
The current blanket has:
96 post stitches + 2 edge stitches = 98 stitches.
Add eight working stitches for every additional basketweave repeat.
Because Row 1 has two fewer stitches than the foundation-chain count, add eight chains to the starting chain for every additional repeat.
Examples:
- Ch 84 produces 82 setup stitches: 80 post positions + 2 edges.
- Ch 100 produces 98 setup stitches: 96 post positions + 2 edges.
- Ch 116 produces 114 setup stitches: 112 post positions + 2 edges.
Reconstruction Yarn Estimate
The photograph appears comparable to a generous chair or sofa throw rather than a small lap blanket.
For approximately 115 × 140 cm, plan on roughly 1,450–1,650 m of #6 chenille.
Michele Webb’s published 45 × 55 inch blanket uses 1,460–1,540 yards of Bernat Blanket. Yarnspirations’ Basket Weave Crochet Blanket lists 1,720–1,760 yards of Bernat Blanket Tweeds. Those benchmarks show why a dense basketweave requires a substantially larger yarn allowance than a simple double-crochet throw of comparable dimensions.
Working with Chenille Yarn
Chenille can hide the post of a stitch, particularly after several dense rows.
Use your fingers to locate each post before inserting the hook.
Do not crochet by searching only for the top loops. FPdc and BPdc are worked around the vertical post below those loops.
Keep a locking marker in the first and final ordinary dc. Those markers prevent the edge stitches from disappearing into the thick fabric.
Preventing an Overly Stiff Blanket
Basketweave is inherently dense.
If the swatch stands upright or feels board-like, move from an 8 mm hook to a 9 mm hook.
Do not compensate by pulling each post stitch unusually tall. Artificially elongated stitches produce inconsistent blocks.
Make the hook adjustment at the swatching stage and recalculate the foundation width if necessary.
Preventing Loose Horizontal Bars
A common basketweave problem is an oversized yarn strand behind a BPdc group.
After inserting the hook around a post, bring the working yarn close to the fabric before drawing up the loop.
Keep every post stitch approximately the same height as the neighboring dc.
Do not tighten the final pull-through excessively because that can narrow the block at its top.
Edge Control
The two ordinary dc stitches act as selvedges.
They are intentionally excluded from the 4-FPdc/4-BPdc repeat.
Working post stitches around the first or final edge stitch causes the side to alternate between thick and thin sections.
Count:
1 edge + 12 eight-stitch repeats + 1 edge = 98.
That equation should remain unchanged throughout the center.
Assembly and Finishing
- Make a basketweave swatch using the 8 mm hook and super-bulky yarn, then wash or relax it according to the yarn-care instructions before measuring the final gauge.
- Chain 100 loosely and work Row 1 as 98 double crochets, counting the skipped three foundation chains as the first stitch.
- Establish twelve complete eight-stitch basketweave repeats between the two plain edge double crochets and mark both edge stitches.
- Work four rows with the first visual block orientation, then reverse the post groups for four rows to create the crossing basket structure.
- Repeat the eight-row sequence until the center reaches approximately 132–134 cm, stopping only after a complete four-row block.
- Check the blanket on a flat surface and correct any block containing fewer or more than four visible post columns before beginning the perimeter.
- Work the first border round around all four edges, placing two single crochets along every row end and a ch-2 turning space at each corner.
- Add one single-crochet round, one half-double-crochet round, and a final single-crochet round while maintaining the four corner spaces.
- Add the optional loose surface-slip-stitch line inside the border if a stronger framed appearance is wanted, then weave all tails through at least 8 cm of dense fabric.
- Lay the finished blanket flat, square the corners without stretching the post stitches, and allow the fabric to relax to approximately 115 × 140 cm.
The completed throw has a continuous four-stitch basketweave center, two stable selvedges, and a compact four-round perimeter with no seams or separately attached motifs.
7 Technical Tips
- The blanket loses a basket block at the edge: maintain exactly 98 stitches on every center row. The count must remain one plain edge stitch, 96 post stitches, and one plain edge stitch.
- The woven blocks become five stitches wide: place a marker after every eighth post position while learning the repeat. One misplaced FPdc shifts every following block across the row.
- The blanket contracts dramatically after Row 2: measure only after at least three complete basketweave blocks have been worked. Post stitches can reduce the apparent width substantially compared with the loose 100-chain foundation.
- The side edges bow inward: keep the first and last dc at the same height as the post stitches. A consistently shortened edge stitch can remove several centimeters of length over 70 or more rows.
- The texture switches direction mid-block: mark the first row of every four-row section with a locking marker. Reversing after three or five rows produces rectangular blocks instead of the near-square woven units shown in the photograph.
- The border ruffles: use two sc per row end only as the starting reconstruction ratio and inspect the edge after the first side. If the chenille gauge requires adjustment, change the pickup rate consistently on all four corresponding sections before adding later rounds.
- The chenille worming appears after tails are cut: weave each tail through at least 8 cm of dense post-stitch fabric and reverse direction twice. Cutting a slippery polyester tail immediately beside the final stitch gives it too little friction to remain buried.
Why Four-Stitch Blocks Match the Photograph
Basketweave crochet is a family of post-stitch arrangements rather than one fixed formula. Published tutorials demonstrate groups of three, four, and other widths.
The photographed throw shows large, strongly rectangular woven sections. Four post stitches give each band enough visual mass to reproduce that appearance with #6 yarn.
The four-row height is equally important. Changing direction every two rows would produce many small checks, while six or eight rows would create long vertical bars. Four stitches by four rows creates the large woven grid that dominates the reference.
Published Chunky Basketweave Blanket Benchmark
Michele Webb’s Chunky Basketweave Blanket uses Bernat Blanket super-bulky yarn and an 8 mm hook. Its published finished dimensions are 45 × 55 inches, or approximately 114 × 140 cm.
The pattern lists 1,460–1,540 yards and approximately 75 ounces of yarn. Those measurements are particularly useful because they are very close to the reconstruction dimensions chosen for the photographed sage blanket.
Yarnspirations Super-Bulky Benchmark
Yarnspirations’ Basket Weave Crochet Blanket specifies Bernat Blanket Tweeds, a 9 mm hook, and 1,720–1,760 yards. Its published gauge is 8 stitches × 5 rows per 4 inches.
A second Yarnspirations basketweave blanket uses Bernat Forever Fleece Tweeds, an 11.5 mm hook, and 1,200 yards. Its published pattern gauge is 6.5 stitches × 4 rows per 4 inches.
The difference between those two gauges demonstrates why the actual swatch must determine the foundation rather than yarn category alone.
Basketweave Stitch Benchmarks
Hooked by Robin’s published basketweave tutorial uses a foundation multiple of 8 plus 4 and a six-row repeat. The demonstration confirms the central technique: alternating FPdc and BPdc groups produce the woven appearance.
Fiber Flux demonstrates another basketweave structure using a multiple of 6 plus 4. Raffamusa Designs likewise explains that basketweave can be made in several block sizes and demonstrates groups of three post stitches.
Those differences are significant. There is no requirement that every basketweave project use the same group size, so the four-stitch reconstruction here is selected from the visible proportions of the uploaded blanket.
Making a Larger Throw
For approximately 130–135 cm width, begin with ch 116.
Row 1 then contains 114 stitches:
1 edge + 112 post positions + 1 edge.
The 112 central positions form 14 complete eight-stitch repeats.
Continue the same four-row block sequence until the desired length is reached.
Expect the yarn requirement to increase significantly because both width and total row count contribute to consumption.
Making a Lap Blanket
For a narrower version, begin with ch 84.
Row 1 contains 82 stitches.
The center then has:
1 edge + 80 post positions + 1 edge.
Those 80 post stitches form ten complete eight-stitch repeats.
Stop the center at approximately 100–110 cm before adding the same border.
Using a Different Yarn
Do not transfer the chain count directly to worsted or DK yarn.
Instead, make at least two complete basketweave repeats and measure their blocked width.
Calculate how many eight-stitch repeats are required for the intended blanket width, then add the two selvedge stitches and the necessary foundation chains.
Basketweave tutorials commonly permit different yarn weights because the post-stitch principle remains unchanged even when the finished scale changes.
Yarn Planning by Swatch Weight
Make a swatch at least 24 stitches × 16 rows.
Weigh it on a gram scale.
Calculate the swatch area in square centimeters, then compare it with the planned blanket area.
Multiply the estimated center consumption by approximately 1.10–1.15 to allow for the border, tails, swatching, and tension variation.
This method is particularly useful when using a chenille brand with different meterage from Bernat Blanket.
Care and Storage
Follow the yarn manufacturer’s laundering directions. Large chenille blankets become heavy when wet, so support the complete fabric when transferring it from the washer or basin.
Dry according to the yarn label and avoid hanging the saturated blanket from one edge. The weight can stretch the post stitches lengthwise.
For storage, fold along basket-block boundaries rather than compressing the blanket beneath heavy objects. Keep hook-and-loop fasteners, rough basket fibers, and exposed zippers away from chenille loops because they can snag the surface.
Sources
Ravelry — Chunky Basketweave Blanket by Michele Webb — super-bulky Bernat Blanket, 8 mm hook, 1,460–1,540 yards, 75 ounces, and 45 × 55 inch finished dimensions.
Ravelry — Basket Weave Crochet Blanket by Yarnspirations Design Studio — super-bulky Bernat Blanket Tweeds, 9 mm hook, 8 stitches × 5 rows per 4 inches, and 1,720–1,760 yards.
Ravelry — Basketweave Blanket by Yarnspirations Design Studio — super-bulky Bernat Forever Fleece Tweeds, 11.5 mm hook, 1,200 yards, and 6.5 stitches × 4 rows per 4 inches.
Hooked by Robin — Crochet Basketweave Stitch — documented 8-plus-4 foundation multiple and FPdc/BPdc basketweave technique.
Fiber Flux — Crochet Basketweave Stitch Tutorial — bulky-yarn basketweave reference using alternating post stitches and a multiple-of-6 construction.
Raffamusa Designs — Crochet Basketweave Stitch Tutorial — explanation of varying basketweave block sizes plus a three-post-stitch construction.
Banana Moon Studio — Basketweave Stitch Crochet Tutorial — documented multiple-of-6-plus-4 foundation and alternating FPdc/BPdc groups.
Ravelry — Basketweave Blanket by Ashley Leither — Aran-weight comparison using a 6.5 mm hook with baby and throw sizing.
Conclusion
The 98-stitch setup is the critical checkpoint: two plain edge stitches surround exactly 96 post stitches, giving twelve complete eight-stitch repeats. Work one four-row block before judging width, because the post stitches contract substantially compared with the foundation chain. Once the swatch matches the intended scale, repeat complete block sections until the center reaches about 132–134 cm and add the compact border. Your next step is to crochet a 24-stitch practice swatch and confirm that each woven unit stays four stitches wide. Save this chunky crochet basketweave blanket pattern to Pinterest or share the finished throw on Instagram with #SageBasketweaveBlanket. Would you keep the monochrome sage border or add a narrow cream finishing round?









