Introduction
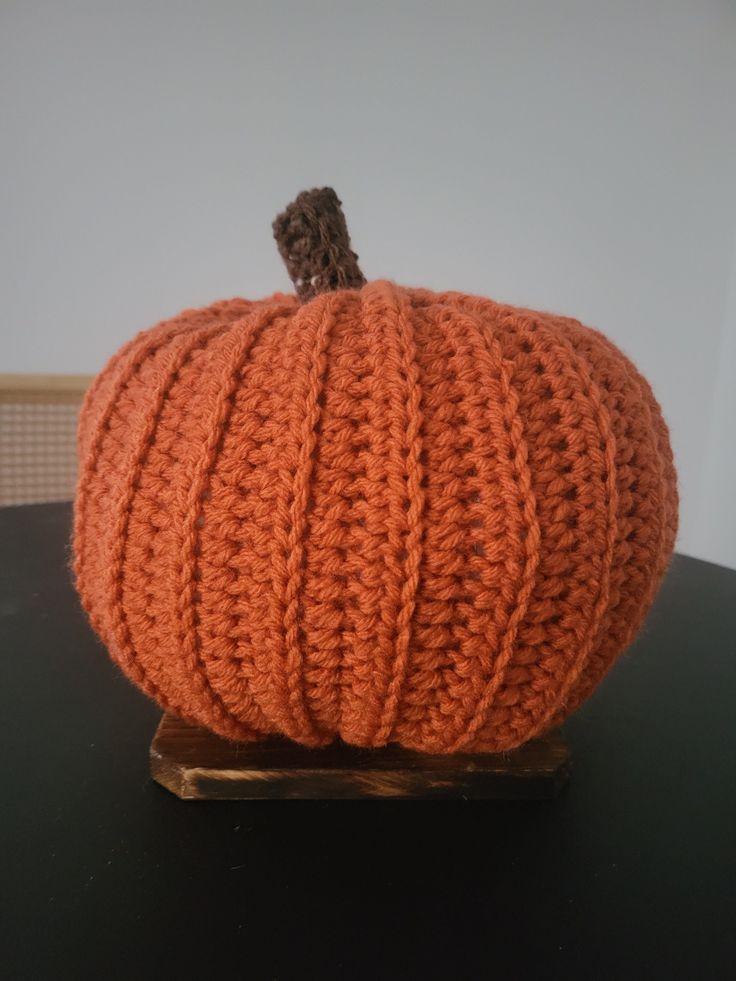
A pumpkin with twelve raised vertical ribs needs more circumference than height or it turns into an orange cylinder. This ribbed crochet pumpkin pattern uses worsted yarn, a 5 mm hook and a wide BLO rectangle to produce an approximately 28–30 cm pumpkin. The confident-beginner construction uses basic half double crochet, stuffing and external sculpting stitches to create a substantial fall decoration with a separate brown stem.
The Design: What Makes This Pumpkin Different
The reference has a broad, compressed profile rather than a round ball shape. That depends first on the rectangle proportions: the crocheted panel must be much longer than it is tall so the finished tube has enough circumference to spread outward after stuffing.
Second, every row is worked through the back loop. Those unused front loops create raised lines that rotate vertically after assembly, giving the fall crochet pumpkin its clearly segmented surface.
Third, long sculpting stitches run from top to bottom at regular intervals. The crocheted ridges supply texture, while the shaping yarn pulls selected sections inward to create deeper pumpkin valleys.
The stem is deliberately short. A tall narrow stem would make the body appear smaller and more spherical.
One common mistake is overstuffing the center. Excess filling pushes the grooves outward and converts a large crochet pumpkin into a nearly smooth ball.
Project Info at a Glance
| Skill Level | Time | Finished Size | Hook | Best For |
|---|---|---|---|---|
| Confident beginner | 4–6 hours | Approx. 28–30 cm wide × 22–25 cm high | 5 mm | Mantel, table, shelf, fall centerpiece |
Materials and Tools
Yarn
- Burnt orange — worsted/Aran #4 — approximately 150–200 g
- Dark brown — worsted #4 — approximately 10–20 g
- Orange scrap yarn — approximately 5–8 m reserved for sculpting grooves
Tools
- 5 mm crochet hook
- 4 mm crochet hook for the stem
- Polyester fiberfill, approximately 250–350 g depending on firmness
- Large tapestry needle
- Scissors
- Flexible measuring tape
- Stitch markers, optional
- Long upholstery needle, optional for sculpting
Abbreviations
- MR — magic ring
- ch — chain
- sc — single crochet
- hdc — half double crochet
- dc — double crochet
- fpdc — front post double crochet
- sl st — slip stitch
- BLO — back loop only
- st/sts — stitch/stitches
- RS — right side
- WS — wrong side
An invisible decrease is not needed because the pumpkin body is constructed from a flat rectangle rather than decreasing in rounds.
Understanding the Rectangle Proportion
The foundation chain determines the pumpkin’s approximate vertical dimension.
The number of rows determines circumference.
The photo has an especially broad profile, so this version aims for a panel approximately 23–25 cm tall × 58–64 cm long.
Do not rely on row count alone. Measure the actual fabric after approximately 40 rows.
Pattern — Step by Step
Pumpkin Body
Yarn: burnt orange.
The body is worked flat in rows.
Foundation
Ch 32.
Row 1
Starting in the 2nd ch from the hook:
Hdc in each chain across.
(31)
Ch 1, turn.
Row 2
Hdc BLO in each stitch across.
(31)
Ch 1, turn.
Rows 3–56
Repeat Row 2.
(31 stitches per row)
After Row 56, measure the panel.
Aim for approximately 58–64 cm along the ribbed edge.
If your fabric measures less than 58 cm, continue additional BLO rows while keeping exactly 31 stitches.
If it exceeds 64 cm substantially before Row 56, stop earlier.
The exact number of rows can vary because ribbing compresses differently with yarn fiber and tension.
Fasten off, leaving a 120 cm tail.
A long tail is intentional. It can be used for both seaming and gathering.
Checking the Ribbing
Lay the rectangle flat with the ridges running vertically from foundation edge to final edge.
Stretch it lightly side to side.
The ridges should open and return without leaving large gaps.
If the fabric becomes transparent when lightly stretched, the hook is too large for the yarn.
A pumpkin cover needs tighter fabric than a garment because white fiberfill should not show between stitches.
Seam the Body
Bring the first and last rows together.
Keep the ribs aligned.
Using the long tail and tapestry needle, mattress stitch through corresponding row-edge loops.
Alternatively, slip stitch both edges together with the crochet hook.
Continue from top to bottom.
Do not pull the seam tighter than the surrounding ribbing.
Turn the tube so the cleaner seam surface faces inward.
You now have an open cylinder.
Closing the Bottom
Thread a separate 80–100 cm length of orange yarn through the tapestry needle.
Work a running stitch around one open edge.
Catch approximately one stitch or row end every 8–10 mm.
Continue around the entire opening.
Pull firmly until the center closes.
Pass the needle across the gathered opening two or three times.
Knot securely.
Do not cut the remaining yarn yet if it is long enough to use for later sculpting.
Turn the gathered end downward.
Stuffing the Pumpkin
Add fiberfill in small handfuls.
Begin around the outside circumference.
Fill the bottom perimeter first, then the center.
Continue until the sides stand independently.
Stop before the pumpkin becomes hard.
The correct stuffing density allows the side wall to compress roughly 2–3 cm when pressed firmly with one hand and then recover.
If the pumpkin cannot be compressed at all, the sculpting thread will have difficulty forming deep valleys.
The photograph shows substantial rib definition, so moderate stuffing works better than maximum fill.
Closing the Top
Thread orange yarn through the second open edge with a running stitch.
Leave enough space to add or remove stuffing before closing completely.
Check the body from the side.
It should be wider than it is tall.
If the body looks narrow and upright, remove some center stuffing and redistribute it toward the lower sides.
When the profile is correct, pull the gathering yarn tight.
Pass the needle across the opening several times.
Knot securely.
Do not worry if a small central opening remains. The brown stem will cover it.
Sculpting the Pumpkin Sections
The crochet ribbing already creates many narrow raised lines. The reference also shows deeper major grooves.
Use strong orange yarn doubled if necessary.
Cut approximately 2 m.
Insert the needle through the center bottom and bring it out through the top center.
Run the yarn down the outside of the pumpkin.
Align it with one selected crochet groove.
Insert through the bottom center again and exit at the top.
Pull until the groove becomes visibly deeper.
Repeat around the pumpkin.
Create approximately 10–12 major sections.
Do not pull every groove with identical force immediately.
Shape opposite sides first:
12 o’clock → 6 o’clock
3 o’clock → 9 o’clock
Then divide the remaining spaces.
This distributes pressure more evenly and prevents the pumpkin from leaning.
Tie the sculpting yarn securely near the top where the stem will hide the knot.
Brown Stem
Yarn: dark brown. Hook: 4 mm.
Round 1
Make MR.
Work:
6 sc in MR. (6)
Round 2
Inc in each stitch.
(12)
Round 3
Sc BLO around.
(12)
Round 4
Sc around.
(12)
Round 5
Sc 2, dec.
Repeat 3 times.
(9)
Round 6
Sc around.
(9)
Round 7
Sc around.
(9)
Round 8
Sc around.
(9)
Fasten off, leaving a 30 cm sewing tail.
Do not stuff the stem heavily.
A small amount of fiberfill in the lower half is enough.
Flatten the upper end slightly or bend it to one side before attachment to reproduce the irregular natural-stem profile in the photo.
Optional More Textured Stem
For stronger bark-like texture, replace Rounds 6–8 with front-post double crochet.
Work one fpdc around each stitch post.
Keep the stem below approximately 6 cm tall for the reference proportions.
Attaching the Stem
Center the stem over the gathered top opening.
Pin it temporarily if needed.
Using the brown sewing tail, whipstitch through the stem base and orange body.
Take at least 10–12 attachment stitches around the base.
Pull each stitch firmly enough to remove gaps but not tightly enough to sink the stem into the pumpkin.
Pass the yarn through the pumpkin body once.
Bring the needle out several centimeters away.
Pull lightly and trim.
The yarn end will retract inside.
Assembly
- Check the finished orange rectangle for exactly 31 stitches in every row before seaming.
- Join the first and final rows into a tube while matching the raised ribs at the seam.
- Gather the lower opening with strong orange yarn and reinforce the center with two crossing stitches.
- Add fiberfill gradually, concentrating more material around the outside circumference than directly in the center.
- Gather the top while the stuffing is still adjustable, then confirm the body is wider than it is tall.
- Run the first sculpting strand vertically through the top and bottom centers and tighten one major groove.
- Add the remaining sculpting lines symmetrically until approximately 10–12 sections are defined.
- Crochet the brown stem and leave its base unstuffed enough to sit flat against the gathered top.
- Sew the stem over the center opening with at least 10–12 evenly spaced attachment stitches.
- Set the pumpkin on a flat surface, redistribute the stuffing by hand and flatten the base until it stands without rolling.
The finished pumpkin has a broad stuffed body, dense vertical ribbing, deeper sculpted sections and a short brown stem.
7 Technical Tips
- Cylinder shape: A rectangle that is too short along the row direction produces a tall pumpkin rather than a squat one. Aim for a panel approximately 23–25 cm high and 58–64 cm long before seaming.
- Lost edge stitches: Missing the final hdc gradually narrows the panel and makes the seam lean. Count all 31 stitches every 8–10 rows rather than waiting until the rectangle is finished.
- Visible stuffing: Loose BLO fabric can expose white fiberfill along the ridges. If the swatch opens widely under light hand tension, change from a 5 mm to a 4.5 mm hook.
- Flat ribs: Excessive stuffing pushes the external valleys outward. Stop filling when the body can still compress approximately 2–3 cm under firm hand pressure.
- Uneven sculpting: Tightening twelve grooves consecutively in one direction can pull the top center off-axis. Add grooves in opposing pairs before filling the intermediate sections.
- Weak gathered center: A single running stitch can tear through bulky gathering tension. Pass the closing yarn across the center opening at least two additional times before knotting.
- Oversized stem: A stem taller than roughly 6 cm changes the proportions of a 28–30 cm pumpkin. Keep the brown piece short and approximately 3–4 cm wide at its base.
Why BLO Ribbing Works
Back-loop-only crochet leaves the front loop of every stitch unused.
That unused loop creates a ridge.
When the rectangle is worked flat, the ridges run from one long edge to the other. After the short sides are joined, those lines wrap vertically around the pumpkin.
The advantage is predictable texture without post stitches across the full body.
It also creates stretch in the circumference direction.
That stretch is useful during stuffing because the panel expands outward without becoming equally tall.
Choosing the Pumpkin Width
The photo suggests a significantly larger pumpkin than common tabletop versions.
For a pumpkin approximately twice that visual width, scaling only the foundation chain is not enough.
Increase both dimensions of the rectangle.
More foundation stitches increase height.
More rows increase circumference.
The 31-stitch × 56-row sample provides enough material for a broad decorative pumpkin with standard worsted yarn, but gauge should control the final decision.
If the panel is already 25 cm tall after only 27 stitches, stop at that stitch count instead.
Measurements matter more than copying the chain number.
Controlling the Squat Shape
Three variables determine whether the result resembles the photo.
Rectangle ratio: More row width relative to panel height produces a broader body.
Stuffing position: Filling concentrated around the outside circumference creates width. A dense central column creates height.
Sculpting tension: Long top-to-bottom strands compress vertical height while deepening the side grooves.
Work with those three variables together.
Do not try to correct a tall pumpkin only by tightening sculpting strands. Excessive compression can collapse the top and bottom centers while leaving the side walls hard.
If the shape is wrong before sculpting, reopen the gathered top and redistribute the fiberfill first.
How Much Yarn Is Needed?
Published ribbed pumpkins vary substantially in yarn use.
For this enlarged version, begin with approximately 150–200 g of orange worsted yarn.
Reserve several meters before completing the body if the yarn supply is close.
Those reserved lengths are needed for closing and sculpting.
Brown stem yarn consumption is low. A 10–20 g scrap should provide ample material for the short stem.
Fiberfill consumption varies even more because brands differ in density.
A larger bag is preferable to compressing insufficient stuffing into the center.
Making a Smaller Pumpkin
For a medium tabletop pumpkin, use:
Ch 22–24
Work approximately 38–44 BLO rows.
Target rectangle:
16–18 cm tall × 36–42 cm long.
Use a 4–4.5 mm hook with worsted yarn.
The exact dimensions will still depend on the stitch sequence used.
For a mini pumpkin, switch to DK yarn and a smaller hook rather than reducing the rectangle to only a few very stiff rows.
Making a Larger Pumpkin
Bulky yarn is the easiest route to a centerpiece-sized version.
Using bulky #5 yarn:
- Start near a 6–6.5 mm hook
- Crochet a panel approximately 30 cm tall
- Continue rows until the long edge reaches approximately 70–75 cm
- Increase the stem proportionally to approximately 6–7 cm
Avoid very loose jumbo yarn if the goal is sharply defined narrow ribs.
The photo’s texture depends on many relatively close vertical ridges.
Stem Proportion and Placement
A pumpkin stem acts as a scale reference.
A very narrow stem makes the body appear unusually large.
A broad stem makes the pumpkin look miniature.
For a 28–30 cm pumpkin, aim for a stem base around 3–4 cm wide.
Height should sit near 4–6 cm.
Position it directly over the top gathering point but allow the upper section to tilt slightly.
The reference stem is not a perfectly vertical cylinder. Its irregularity makes the form more botanical.
To exaggerate that effect, insert the stuffing only into the lower stem rounds and leave the upper two rounds flexible.
Blocking and Storage
Do not wet-block the stuffed pumpkin.
Instead, shape it manually after assembly.
Set it on a flat surface.
Press downward gently with both hands.
Rotate one quarter turn.
Repeat until the lower surface is broad enough to stand reliably.
If one side projects farther than the others, massage the fiberfill away from that section toward the opposite side.
For seasonal storage, avoid compressing the pumpkin beneath heavy items.
Long-term compression can flatten the raised BLO ridges and permanently displace stuffing.
A breathable container is preferable for natural-fiber yarns.
Conclusion
Measure the ribbed rectangle before closing it: the long edge needs enough circumference to produce the wide profile shown here, while the 31-stitch height controls the vertical dimension. Stuff around the outer body first, gather both centers firmly, then add 10–12 sculpting lines in opposing pairs so the pumpkin stays symmetrical. Attach the brown stem only after the final grooves are set. Save this ribbed crochet pumpkin pattern to Pinterest and share a side view plus top view on Instagram using #BurntOrangeRibbedPumpkin. For this specific pumpkin, would you keep the short brown stem or make it longer and curved?









