Introduction
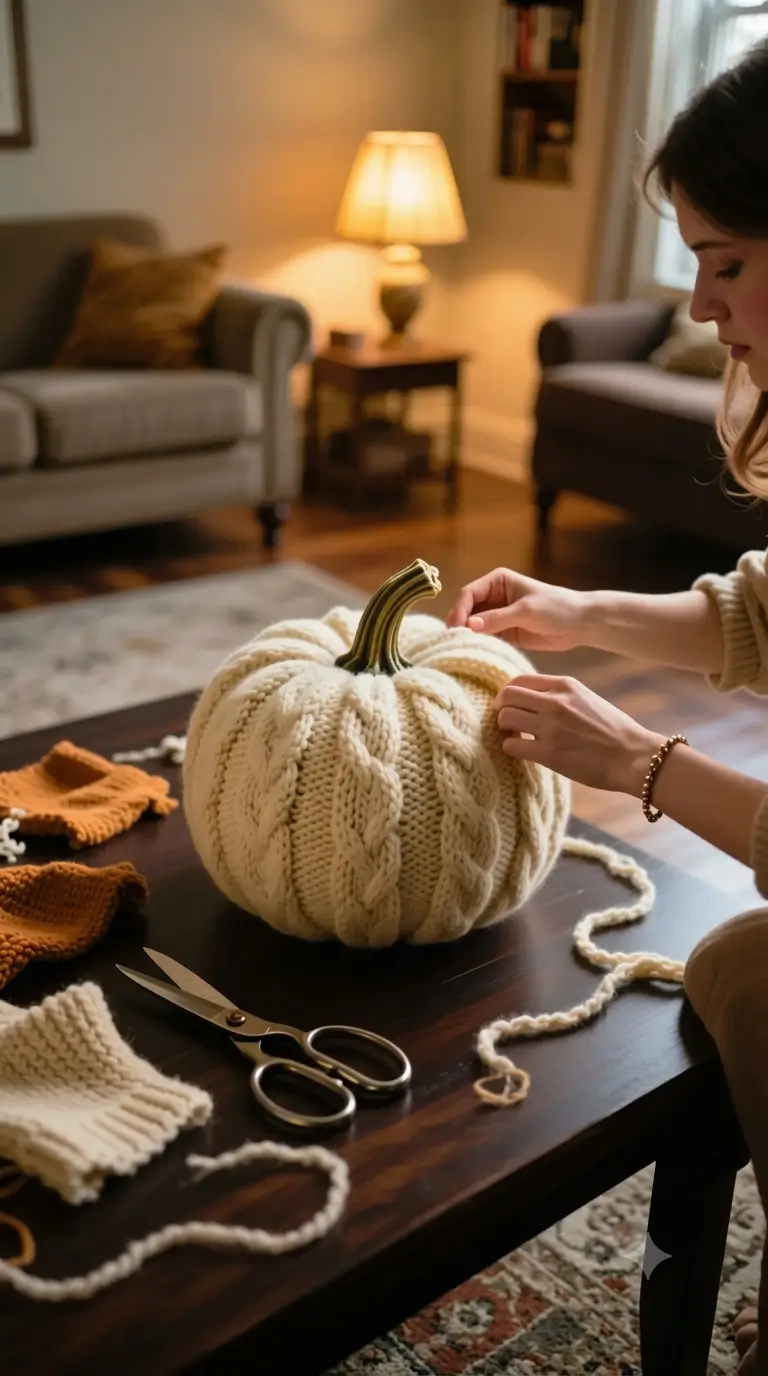
A pumpkin needs vertical lobes that pull toward a sunken crown; a plain sphere will not match the cable-ribbed gourd in the photo. This pumpkin amigurumi crochet pattern interprets that structure in super-bulky cream yarn with a 7 mm hook, a striped green-brown stem, and firm fiberfill. Target size is about 30.5 cm wide by 28 cm tall. Skill level is intermediate. Make it as reusable tabletop autumn decor.
The Design: What Makes This Pumpkin Different
The photographed pumpkin is unusually wide relative to its height, so the crochet body stops at a 42-stitch plateau rather than being extended into a tall oval. External cinching then compresses the crown and base, producing the broad lobes seen in the reference image. Six applied braids create the cable-like vertical relief that ordinary single-crochet shaping cannot reproduce.
A second decision concerns color. This large crochet pumpkin pattern uses cream as the dominant field and reserves olive, brown and tan for the stem, which keeps attention on construction rather than color blocking. The curved stem is narrow for most of its length and flares only at the base.
The common error with a ribbed crochet pumpkin is overstuffing before the ribs are tensioned. Once the core becomes rigid, the shaping yarn cannot pull the channels deeply enough.
Craft Passion also uses exterior yarn tension to create six pronounced pumpkin creases, while larger Bernat Blanket patterns confirm that bulky yarn can support a much bigger decorative form.
Project Info at a Glance
| Skill Level | Time | Finished Size | Hook | Best For |
|---|---|---|---|---|
| Intermediate | 4–6 hours | Approx. 30.5 cm wide × 28 cm tall | 7 mm | Tabletop fall decor, mantel display, seasonal centerpiece |
The size and hook selection are based on a comparable large super-bulky crochet pumpkin made with Bernat Blanket yarn.
Materials and Tools
Yarn
- Cream — super bulky #6 — allow about 545 g — Bernat Blanket or a similar dense blanket yarn.
- Olive green — super bulky #6 — about 10 g project allowance.
- Dark brown or tan — super bulky #6 — about 5 g project allowance for the stem stripes.
- Cream shaping yarn — cut six lengths approximately 120 cm each before assembly.
Tools
- 7 mm crochet hook
- Polyester fiberfill, approximately 350–450 g depending on firmness
- Long tapestry needle
- Locking stitch marker
- Scissors
- Six removable pins or clips for rib placement
No safety eyes are required because the photographed pumpkin has no face. A 7 mm hook with super-bulky yarn supports the oversized proportions required for this design.
Abbreviations
- MR — magic ring
- sc — single crochet
- inc — 2 sc in one stitch
- dec — invisible single-crochet decrease
- sl st — slip stitch
- ch — chain
- BLO — back loop only
- st / sts — stitch / stitches
- R — round
- Row — flat row
For an invisible decrease, insert the hook through the front loops of the next two stitches, yarn over, pull through both front loops, then complete the single crochet.
Pattern — Step by Step
Work the pumpkin body in a continuous spiral unless a section says otherwise.
Pumpkin Body
Yarn: cream. Construction uses the standard six-stitch amigurumi expansion system.
R1: 6 sc in MR (6)
R2: inc ×6 (12)
R3: (1 sc, inc) ×6 (18)
R4: (2 sc, inc) ×6 (24)
R5: (3 sc, inc) ×6 (30)
R6: (4 sc, inc) ×6 (36)
R7: (5 sc, inc) ×6 (42)
R8: sc around (42)
R9: sc around (42)
R10: sc around (42)
R11: sc around (42)
R12: sc around (42)
R13: sc around (42)
R14: sc around (42)
R15: (5 sc, dec) ×6 (36)
R16: (4 sc, dec) ×6 (30)
R17: (3 sc, dec) ×6 (24)
Begin stuffing. Fill the outer wall first, keeping the center slightly softer so the finished pumpkin can be compressed vertically.
R18: (2 sc, dec) ×6 (18)
R19: (1 sc, dec) ×6 (12)
Add the remaining stuffing now. The body should hold its round form while still yielding when squeezed from top to bottom.
R20: dec ×6 (6)
Fasten off. Leave a 70 cm tail and close the remaining six-stitch opening.
The 42-stitch plateau creates the large foundation required for the photographed shape, while super-bulky yarn supplies the physical scale. Vertical shaping is added after stuffing to convert the basic sphere into a low, segmented pumpkin.
Cable-Look Rib Braids — Make 6
Yarn: cream. These applied braids reproduce the raised cable-like panels visible on the reference pumpkin.
Each rib uses three narrow crocheted cords.
Cord A: ch 28. Beginning in the second chain from the hook, sl st in the back bump of each chain (27). Fasten off, leaving a 15 cm tail.
Cord B: Repeat Cord A (27).
Cord C: Repeat Cord A (27).
Place the three cords parallel and temporarily secure their starting ends together. Braid them with consistent, loose crossings until the finished braid measures approximately 24–26 cm without stretching.
Make six complete braids.
A dense three-cord braid provides more surface depth than a flat crocheted strip. Each finished cable should remain visibly raised above the pumpkin body instead of sinking into the stitches.
Stem
Yarn: olive green with brown or tan stripe changes.
R1: 6 sc in MR (6)
R2: sc around (6)
R3: sc around (6)
Change to brown or tan.
R4: sc around (6)
R5: sc around (6)
Change back to olive green.
R6: sc around (6)
R7: sc around (6)
R8: sc around (6)
Stuff the lower two-thirds lightly. Leave the upper third nearly unstuffed so the stem can bend.
R9: inc ×6 (12)
R10: sc around (12)
Fasten off. Leave a 35 cm tail for sewing.
Before attaching the stem, curve the narrow section by taking two small hidden stitches down one side and drawing them together slightly. The photographed stalk bends sideways instead of standing vertically, so a mild asymmetrical curve is part of the design.
Structural Rib Cinching — Make 6 Channels
Yarn: cream shaping strands. This stage is worked with a tapestry needle rather than a crochet hook.
Divide the pumpkin circumference into six equal sectors and mark each position with a removable pin or clip.
Thread one 120 cm cream yarn length through the tapestry needle. Insert it through the bottom center and bring it out through the top center. Carry the yarn down the outside of the body along the first marked sector.
Pass the needle back through the center of the pumpkin and pull the shaping strand until a visible groove forms.
Repeat the same process at the remaining five marked positions.
Apply enough tension to create six rounded lobes without compressing the body into sharp folds. Tie the shaping strands securely inside the top indentation or bury the knots beneath the future stem.
Assembly
- Place the stuffed body on a flat surface and press the top and bottom toward each other until the finished height is approximately 28 cm.
- Mark six equal rib positions around the circumference, spacing every mark approximately one-sixth of the body apart.
- Cinch the first body groove from crown to base, stopping when the surrounding lobe becomes rounded rather than sharply folded.
- Repeat the cinching process at the other five marks and compare the shape from directly above.
- Position one cable-look braid over each cinched groove, beginning approximately 2 cm below the crown opening.
- Sew every braid to the pumpkin with small hidden tacking stitches at 3–4 cm intervals. Avoid stitching through the full thickness of the stuffed body.
- Turn the pumpkin over and anchor the lower ends of all six braids around the bottom indentation.
- Shape the stem into a gentle curve, then center its 12-stitch flared base over the top opening.
- Sew through each of the 12 stem-base stitches, drawing the attachment down until the base sits inside the crown instead of resting above it.
- Bury all remaining yarn tails through the stuffed core. Trim each tail only after it has traveled at least 8 cm through the interior.
The pumpkin is complete when all six channels carry comparable tension and the stem base sits flush inside the crown.
7 Technical Tips for a Better Crochet Pumpkin
- Control stitch-marker drift. With super-bulky yarn, the first stitch can become difficult to distinguish after only two rounds. Move the locking marker immediately after every completed round instead of trying to locate the spiral later.
- Do not overstuff the body. A rigid center prevents the shaping strands from creating deep vertical channels. Stop adding fiberfill when the body still compresses approximately 3–4 cm between the crown and base.
- Use invisible decreases. Standard decreases can create visible horizontal bumps across R15–R20. Working through the front loops of the next two stitches keeps most of the reduction on the inside of the fabric.
- Keep this version faceless. The reference design has no safety eyes, so adding them changes the intended decorative structure. For a separate character-style pumpkin, 10–12 mm eyes are common in comparable amigurumi designs.
- Check chunky-yarn tension early. A 7 mm hook with blanket yarn should create fabric dense enough to hide the fiberfill. If gaps become wider than approximately 3 mm under light tension, test a 6.5 mm hook before continuing the body.
- Pin every braid before sewing. An unpinned cable can gradually rotate around the pumpkin as it is stitched down. Secure each braid at the crown, midpoint and base so its center stays aligned with one structural groove.
- Bury shaping tails deeply. Cutting a cinching strand close to the surface can release a lobe during handling. Pass each tail at least 8 cm through the stuffed interior before trimming it.
How to Adjust the Pumpkin Shape
The basic body can be changed without rewriting the increase sequence. For a flatter pumpkin, shorten the 42-stitch plateau by one or two rounds and apply slightly stronger vertical compression during assembly. For a taller pumpkin, add two additional rounds of 42 sc before beginning the decreases.
Do not add another increase round unless you also intend to increase the overall diameter. Moving from 42 to 48 stitches changes the circumference significantly when super-bulky yarn is used.
The six-lobe structure should remain consistent. Adding more than six exterior grooves will make each section narrower and move the result away from the broad cable panels visible in the reference image.
How to Keep the Pumpkin Wide and Stable
A large stuffed pumpkin can become nearly spherical if the center is packed too tightly. The intended profile is lower and wider. Concentrate most fiberfill near the outer wall while leaving a slightly softer vertical core through the middle.
After closing the body, place one hand on the crown and one beneath the base. Compress the piece gradually before installing the shaping strands. This redistributes the filling horizontally and prepares the body for the six external channels.
The bottom indentation also matters. Each shaping strand should pass through nearly the same central point underneath the pumpkin. If the strands exit at different positions, the finished piece may lean when placed on a table.
Creating the Cable-Look Surface
The raised ribs are the feature that separates this cream crochet pumpkin from a standard amigurumi sphere. Each three-cord braid adds a distinct vertical column without requiring true knitted cable construction.
Keep every braid relaxed during assembly. Stretching a braid before sewing makes it contract afterward, which can pull the top and bottom of the pumpkin together more strongly than the structural shaping strands.
Begin attaching each cable approximately 2 cm away from the exact crown center. This leaves enough open space for the flared stem base. At the bottom, direct all six braids toward the central indentation but avoid stacking their final stitches directly on top of one another.
Small hidden tacking stitches are enough. Sewing continuously along both edges can flatten the braid and remove the rounded cable effect.
Stem Position and Final Shaping
The stem should not stand exactly vertical. The reference pumpkin uses a longer stalk that curves noticeably to one side. Light stuffing in the lower section provides support, while the nearly empty upper section allows the stem to bend without forming a hard angle.
After sewing the base to the crown, rotate the pumpkin and inspect the stem from the front, side and top. Its curve should remain visible from the primary viewing angle without pulling the crown off center.
If the stem springs upright, take a hidden length of matching olive yarn through the inside of the curve. Anchor it several rounds lower, pull gently, and secure it inside the stalk.
Avoid excessive tension. The goal is a gradual bend rather than a folded stem.
Conclusion
Check the finished pumpkin from three angles before tying off the last shaping strand. The body should remain wider than it is tall, all six grooves should terminate close to the crown center, and each applied braid should track one groove from top to bottom.
Your next step is to photograph the pumpkin from directly above and compare the six lobe widths. Correct any uneven rib before burying the final tails.
Save the finished project to Pinterest and share the result on Instagram with #CableCreamPumpkin. For a second version, change one variable such as body color, rib thickness or stem length so the construction can be compared accurately.
Which stem profile matches your pumpkin better: the long curved stalk shown in the reference photo or a shorter upright stem? This pumpkin amigurumi crochet pattern can support either variation.









