Introduction
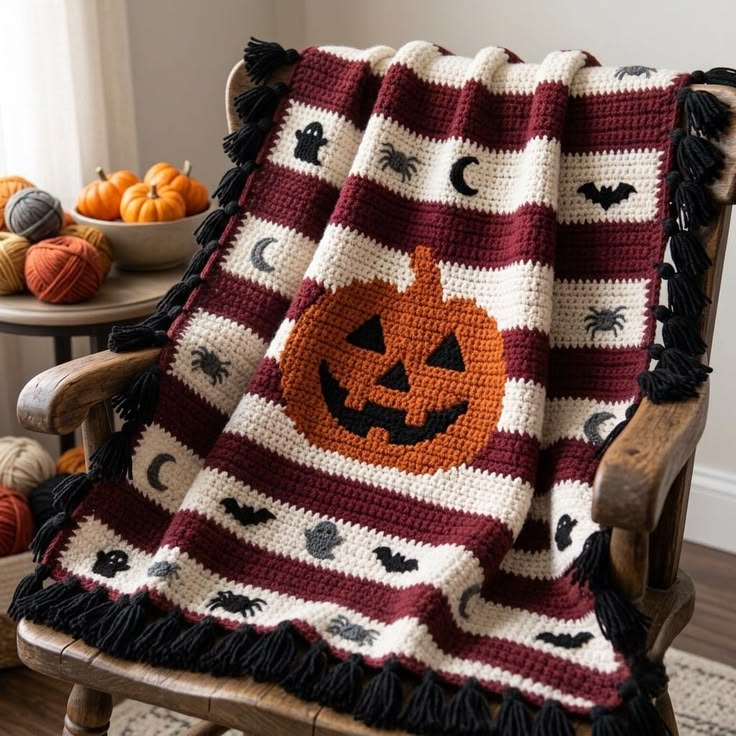
A Jack-o’-lantern thirty centimeters wide will buckle a striped blanket if its appliqué seam is pulled tighter than the cream panel beneath it. This Halloween crochet blanket pattern uses worsted yarn with 5 mm and 4 mm hooks to make an approximately 90 × 120 cm throw. Burgundy stripes, cream motif bands, small spooky appliqués and black fringe frame the large central pumpkin.
The Design: What Makes This Halloween Blanket Different
The base stays structurally simple: 121 single crochets are repeated across 168 rows, with burgundy and cream controlling the graphic layout. A large uninterrupted cream section is reserved near the center for the raised Jack-o’-lantern, while narrower cream stripes above and below receive smaller ghosts, bats, moons and spiders. That hierarchy matters. The pumpkin is intentionally several times larger than any secondary motif, so the blanket has one clear focal point instead of competing icons. Black fringe strengthens the dark facial details and outlines the pale edges without requiring another crocheted border several centimeters wide. One frequent failure in a striped Halloween crochet throw is sewing every appliqué through tightly spaced stitches. The background contracts around each motif, producing ripples that become more pronounced after the blanket is washed.
Project Info at a Glance
| Skill Level | Time | Finished Size | Hooks | Best For |
|---|---|---|---|---|
| Intermediate | 28–36 hours | Approx. 90 × 120 cm before fringe | 5.0 mm base / 4.0 mm appliqués | Halloween throws, chair blankets and seasonal displays |
Materials and Tools
Yarn
- Deep burgundy — worsted / Aran #4 — approximately 500–600 g — primary blanket stripes.
- Warm cream — worsted / Aran #4 — approximately 400–500 g — contrasting stripes and ghost motifs.
- Pumpkin orange — worsted / Aran #4 — approximately 100–130 g — large Jack-o’-lantern.
- Black — worsted / Aran #4 — approximately 120–150 g — facial features, bats and fringe.
- Charcoal gray — worsted / Aran #4 — approximately 20–30 g — spiders and optional moon accents.
Choose burgundy and cream yarns with nearly identical diameter and elasticity. The blanket base uses long uninterrupted rows, so even a small gauge difference between colors can make one stripe flare while the next contracts.
Tools
- 5.0 mm crochet hook — blanket base
- 4.0 mm crochet hook — appliqués
- Yarn needle
- Stitch markers
- Dressmaking pins
- Blocking mats
- Rust-resistant blocking pins
- Scissors
- Measuring tape
Abbreviations
- MR — magic ring
- ch — chain
- sc — single crochet
- hdc — half double crochet
- dc — double crochet
- sl st — slip stitch
- inc — increase
- dec — decrease
- BLO — back loop only
An invisible decrease is worked through the front loops of two neighboring stitches before one single crochet is completed through both loops.
Pattern — Step by Step
The blanket body is worked flat from the lower short edge upward. Maintain 121 stitches across every row.
Blanket Foundation
Yarn: deep burgundy — original reconstruction based on the proportions visible in the supplied image.
Foundation: ch 122.
Row 1: Starting in the second chain from the hook, sc across. (121)
Ch 1 and turn. The turning chain does not count as a stitch.
Target width: approximately 86–92 cm depending on gauge.
Lower Burgundy Band
Rows 2–12: sc across in burgundy. (121)
Change to cream at the end of Row 12.
Lower Cream Motif Band
Rows 13–24: sc across in cream. (121)
Change to burgundy.
Second Burgundy Band
Rows 25–36: sc across in burgundy. (121)
Second Cream Motif Band
Rows 37–48: sc across in cream. (121)
Third Burgundy Band
Rows 49–60: sc across in burgundy. (121)
Large Central Cream Panel
Rows 61–108: sc across in cream. (121)
This 48-row section receives the large Jack-o’-lantern.
Fourth Burgundy Band
Rows 109–120: sc across in burgundy. (121)
Upper Cream Motif Band
Rows 121–132: sc across in cream. (121)
Fifth Burgundy Band
Rows 133–144: sc across in burgundy. (121)
Top Cream Motif Band
Rows 145–156: sc across in cream. (121)
Top Burgundy Band
Rows 157–168: sc across in burgundy. (121)
Fasten off.
Target base measurement after light blocking: approximately 90 cm wide × 118–122 cm long.
Check the Blanket Base
Measure the width at the bottom, center and top.
The three measurements should differ by no more than approximately 10 mm.
Count the stitches at several color changes.
Every row must remain at 121 sc.
A single lost stitch repeated through later rows creates a diagonal side edge that becomes difficult to disguise with fringe.
Block the striped base before attaching any motif.
Large Orange Jack-o’-Lantern Body
Yarn: pumpkin orange — original shaped appliqué.
Foundation: ch 26.
Row 1: starting in second ch, sc across. (25)
Row 2: ch 1, turn, inc, 23 sc, inc. (27)
Row 3: inc, 25 sc, inc. (29)
Row 4: inc, 27 sc, inc. (31)
Row 5: inc, 29 sc, inc. (33)
Row 6: inc, 31 sc, inc. (35)
Rows 7–17: sc across. (35)
Row 18: dec, 31 sc, dec. (33)
Row 19: dec, 29 sc, dec. (31)
Row 20: dec, 27 sc, dec. (29)
Row 21: dec, 25 sc, dec. (27)
Row 22: dec, 23 sc, dec. (25)
Do not fasten off.
Large Pumpkin Edging
Sc evenly around the complete appliqué.
Place 2 sc in several stitches around the widest side curves if the edges pull inward.
Join with sl st.
Fasten off with approximately 100 cm remaining for attachment.
Target finished size: approximately 31–35 cm wide × 26–30 cm high.
Large Pumpkin Rib Lines
Yarn: matching orange.
Mark the vertical center.
Backstitch one line from the upper center to the lower center.
Add one curved line approximately 35–40 mm to the left and one matching line to the right.
Add two shallower outer lines if stronger segmentation is required.
Pull only until the orange fabric develops low channels.
Large Pumpkin Stem
Yarn: charcoal gray or brown.
Ch 8.
Row 1: starting in second ch, sc across. (7)
Rows 2–4: ch 1, turn, sc across. (7)
Fasten off with a 25 cm tail.
Sew the lower edge behind the upper center of the pumpkin.
Jack-o’-Lantern Left Eye
Yarn: black.
Ch 8.
Row 1: starting in second ch, sc across. (7)
Row 2: ch 1, turn, dec, 3 sc, dec. (5)
Row 3: dec, sc, dec. (3)
Row 4: sc3tog. (1)
Fasten off with a sewing tail.
Jack-o’-Lantern Right Eye
Repeat the left eye.
Rotate both triangles so their points angle slightly inward.
Jack-o’-Lantern Nose
Yarn: black.
Ch 6.
Row 1: sc in 5. (5)
Row 2: dec, sc, dec. (3)
Row 3: sc3tog. (1)
Fasten off.
Jack-o’-Lantern Mouth Foundation
Yarn: black.
Ch 30.
Starting in second chain, work:
sl st in 5, sc in 5, hdc in 9, sc in 5, sl st in 5.
Fasten off with a long sewing tail.
The changing stitch heights form the shallow smile.
Mouth Teeth — Make 5
Yarn: black.
Ch 5.
Starting in second ch, sc in 4.
Fasten off.
Attach the short pieces above and below the curved foundation, leaving cream-sized orange gaps that read as carved teeth.
Assemble the Large Jack-o’-Lantern
Pin both eyes about 7–8 cm apart.
Center the nose between them and approximately 3–4 cm lower.
Place the mouth roughly 5 cm below the nose.
Sew all black details to the orange pumpkin before attaching the complete pumpkin to the blanket.
This prevents black sewing yarn from showing on the reverse of the cream central panel.
Small Ghost Appliqué — Make 4
Yarn: warm cream.
R1: 6 sc in MR (6)
R2: inc ×6 (12)
R3: (sc, inc) ×6 (18)
Do not fasten off.
Row 1: ch 1, sc across 8 stitches of the circle. (8)
Row 2: ch 1, turn, inc, 6 sc, inc. (10)
Rows 3–4: sc across. (10)
Row 5: sl st, 3 dc in next, sl st, 3 dc in next, sl st, 3 dc in next, sl st.
Fasten off.
Embroider two small black eyes.
Target approximately 7–8 cm high.
Crescent Moon — Make 4
Yarn: charcoal gray or black.
R1: 6 sc in MR (6)
R2: inc ×6 (12)
R3: (sc, inc) ×6 (18)
R4: (2 sc, inc) ×6 (24)
Fasten off.
Make a smaller cream circle:
R1: 6 sc in MR (6)
R2: inc ×6 (12)
R3: (sc, inc) ×6 (18)
Offset the cream circle over one side of the dark disc by approximately 10–12 mm and sew it in place.
The exposed section forms a crescent.
Small Bat Body — Make 4
Yarn: black.
R1: 6 sc in MR (6)
R2: inc ×6 (12)
R3: (sc, inc) ×6 (18)
Fasten off.
Bat Wings — Make 8
Ch 8.
Starting in second ch, sl st, sc, hdc, dc, dc, hdc, sc.
Fasten off.
Sew one wing to each side of a bat body.
Target approximately 7–9 cm total width.
Spider Body — Make 4
Yarn: charcoal gray.
R1: 6 sc in MR (6)
R2: inc ×6 (12)
Fasten off.
Spider Legs
Yarn: charcoal gray.
For each leg, ch 5 and sl st back through all 4 chains.
Make four legs on each side of the 12-stitch body.
Keep the finished spider approximately 6–7 cm wide.
Arrange the Small Motifs
Place ghosts, moons, bats and spiders only on the narrow cream bands.
Alternate motif families rather than placing identical icons next to one another.
Leave approximately 8–10 cm between neighboring motif centers.
Rotate several moons and bats slightly so the bands do not look mechanically repeated.
Keep all motifs at least 25–30 mm from the blanket edge because the tassel fringe needs clear attachment space.
Attach the Large Pumpkin
Center the pumpkin within Rows 61–108.
Measure from the appliqué midpoint to both side edges.
The difference should remain below approximately 10 mm.
Pin the outer edge every 4–5 cm.
Sew with orange yarn through the pumpkin perimeter at approximately 10–12 mm intervals.
Leave most of the middle unattached so the ribbed surface stays raised.
Stop if the cream panel begins rippling around the pumpkin.
Attach the Small Halloween Motifs
Sew the ghost and moon bodies around their outer edges.
Tack bats through the center body and outer wing tips rather than sewing every wing edge flat.
Attach spider bodies firmly but leave the final few millimeters of several legs free.
Lay the blanket flat after each cream band is completed.
Correct any contraction before moving to the next band.
Black Tassel Fringe
Yarn: black.
Cut strands approximately 22–24 cm long.
Use four strands per tassel.
Fold each group in half.
Insert the folded center through a blanket edge stitch, pull the eight loose ends through the loop and tighten.
Space tassels approximately 20–25 mm apart along the two long sides and both short ends.
Trim the completed fringe to approximately 9–11 cm.
Assembly
- Crochet the 121-stitch by 168-row striped blanket base and block it to approximately 90 × 120 cm.
- Make the large orange pumpkin, add its rib lines, stem, triangular eyes, nose and curved black grin before blanket attachment.
- Make four cream ghosts, four crescent moons, four black bats and four charcoal spiders for the narrow cream bands.
- Center the large Jack-o’-lantern in the 48-row cream panel and pin its perimeter every approximately 4–5 cm.
- Sew the pumpkin around its outer edge using relaxed attachment stitches approximately 10–12 mm apart.
- Distribute the small motifs across the narrow cream stripes while keeping neighboring centers about 8–10 cm apart.
- Attach ghosts and moons around their perimeter, but leave portions of the bat wings and spider legs free for dimensional relief.
- Lay the blanket flat and correct any contracted appliqué seam before proceeding to the fringe.
- Add four-strand black tassels approximately 20–25 mm apart around the complete outer edge.
- Trim the fringe to approximately 9–11 cm, recheck the blanket dimensions and weave all remaining yarn tails into matching colors.
The completed blanket should have a centered dimensional Jack-o’-lantern, repeated small Halloween motifs across cream bands and dense black fringe framing the burgundy-and-cream stripes.
7 Technical Tips
- Side edges become diagonal: One missing stitch in a 121-stitch row carries through every later stripe. Count at every color change and correct the row before adding another 12-row band.
- Central panel puckers: The Jack-o’-lantern seam is tighter than the blanket fabric. Keep attachment stitches approximately 10–12 mm apart and stop tightening as soon as the orange edge touches the cream background.
- Pumpkin looks flat: Sewing through the entire center removes the dimensional rib effect. Attach primarily around the perimeter and leave at least the central 20–25 cm free from the background.
- Bat wings disappear: Stitching the complete wing edge turns the bat into a flat black patch. Attach each wing at the body, one midpoint and its outer tip while leaving the remaining edge free.
- Small motifs drift out of line: Uneven spacing is obvious across a horizontal cream stripe. Mark centers every approximately 8–10 cm before pinning the first appliqué.
- Fringe edge contracts: Tassel knots placed into every stitch pack too much yarn onto the border. Space each four-strand bundle approximately 20–25 mm apart and keep the knots equally tight.
- Blanket twists after washing: Burgundy and cream yarns with different stretch rates can pull the stripes in opposite directions. Make a two-color swatch and keep the blocked width difference below approximately 5 mm across 15 cm before starting the full base.
Why a Striped Base Works for This Design
The striped construction separates background structure from decorative detail. You can complete and block the entire throw before deciding the exact placement of every Halloween icon.
That method is less restrictive than a large tapestry chart because the Jack-o’-lantern can be moved several centimeters without changing a single base stitch.
It also simplifies color management. Burgundy and cream are the only colors carried through full-width rows; orange, black and gray appear only in separate motifs.
The result resembles the reference while avoiding dozens of bobbins or frequent color changes across 121 stitches.
Adjusting the Blanket Size
This Halloween crochet blanket pattern can be resized by changing both the foundation width and the number of stripe repeats.
For a smaller lap throw, begin with approximately 101 sc and remove one narrow stripe from the top and bottom.
For a wider sofa throw, increase the base to approximately 145–151 sc while retaining the same 12-row stripe depth.
Keep the central cream field about four times the depth of a standard stripe. That relationship preserves enough uninterrupted area for the large pumpkin.
Resize the Jack-o’-lantern after the base is blocked rather than before.
Changing the Halloween Motifs
The cream bands can support other small appliqués without altering the base.
A black cat head can replace one spider, while a small orange pumpkin can replace one moon.
Keep replacement motifs between approximately 6 and 9 cm across.
Icons much larger than that begin competing with the central Jack-o’-lantern.
Maintain at least four different motif families across the blanket so the repeated bands stay varied.
The central orange pumpkin should remain the only motif above approximately 20 cm.
Controlling the Pumpkin Relief
The orange pumpkin gains dimension from two separate factors: a free central surface and lightly tensioned rib lines.
Do not compensate for shallow ribs by pulling the embroidery harder.
Instead, lift each orange section with your fingers after the perimeter is sewn.
The center line may sit slightly deeper than the outer channels.
If the appliqué becomes narrower after adding the ribs, loosen those lines before attaching it to the blanket.
A reduction greater than approximately 5–8 mm indicates excessive rib tension.
Planning the Fringe
Black fringe adds considerable visual weight, so attach it only after every appliqué is finished.
Begin at the four corners and midpoint of each side.
Fill the spaces between those reference tassels until the distance reaches approximately 20–25 mm.
Trim the fringe after the blanket hangs vertically for several minutes.
Gravity changes the apparent length of yarn bundles, and trimming while the throw lies flat can leave the corner tassels longer than the side fringe.
Finishing and Blocking
Block the base before appliqué assembly and perform only a light final blocking afterward.
Pin the outside corners and stripe transitions rather than pressing the dimensional pumpkin flat.
Check both diagonals.
If one diagonal is substantially longer, reshape the blanket while damp and align the burgundy stripes horizontally.
Lift the pumpkin ribs, bat wings and spider legs after drying.
Finally, comb the black tassels with your fingers and trim any strands extending more than approximately 5 mm beyond the planned fringe line.
Conclusion
Block the striped base before sewing the Jack-o’-lantern because the pumpkin needs a fixed center line and stable cream panel. Your next step is to complete the 121-stitch by 168-row blanket, measure both diagonals and mark the midpoint of Rows 61–108 before making the large appliqué permanent. Add the smaller icons only after the pumpkin lies flat without puckering. Share the finished Halloween crochet blanket pattern project on Pinterest with the complete stripe layout visible, then post a close view of the pumpkin ribs and black fringe on Instagram using #StripedJackOLanternBlanket. For this blanket specifically, would you keep the burgundy stripes or change them to deep plum?









