Introduction
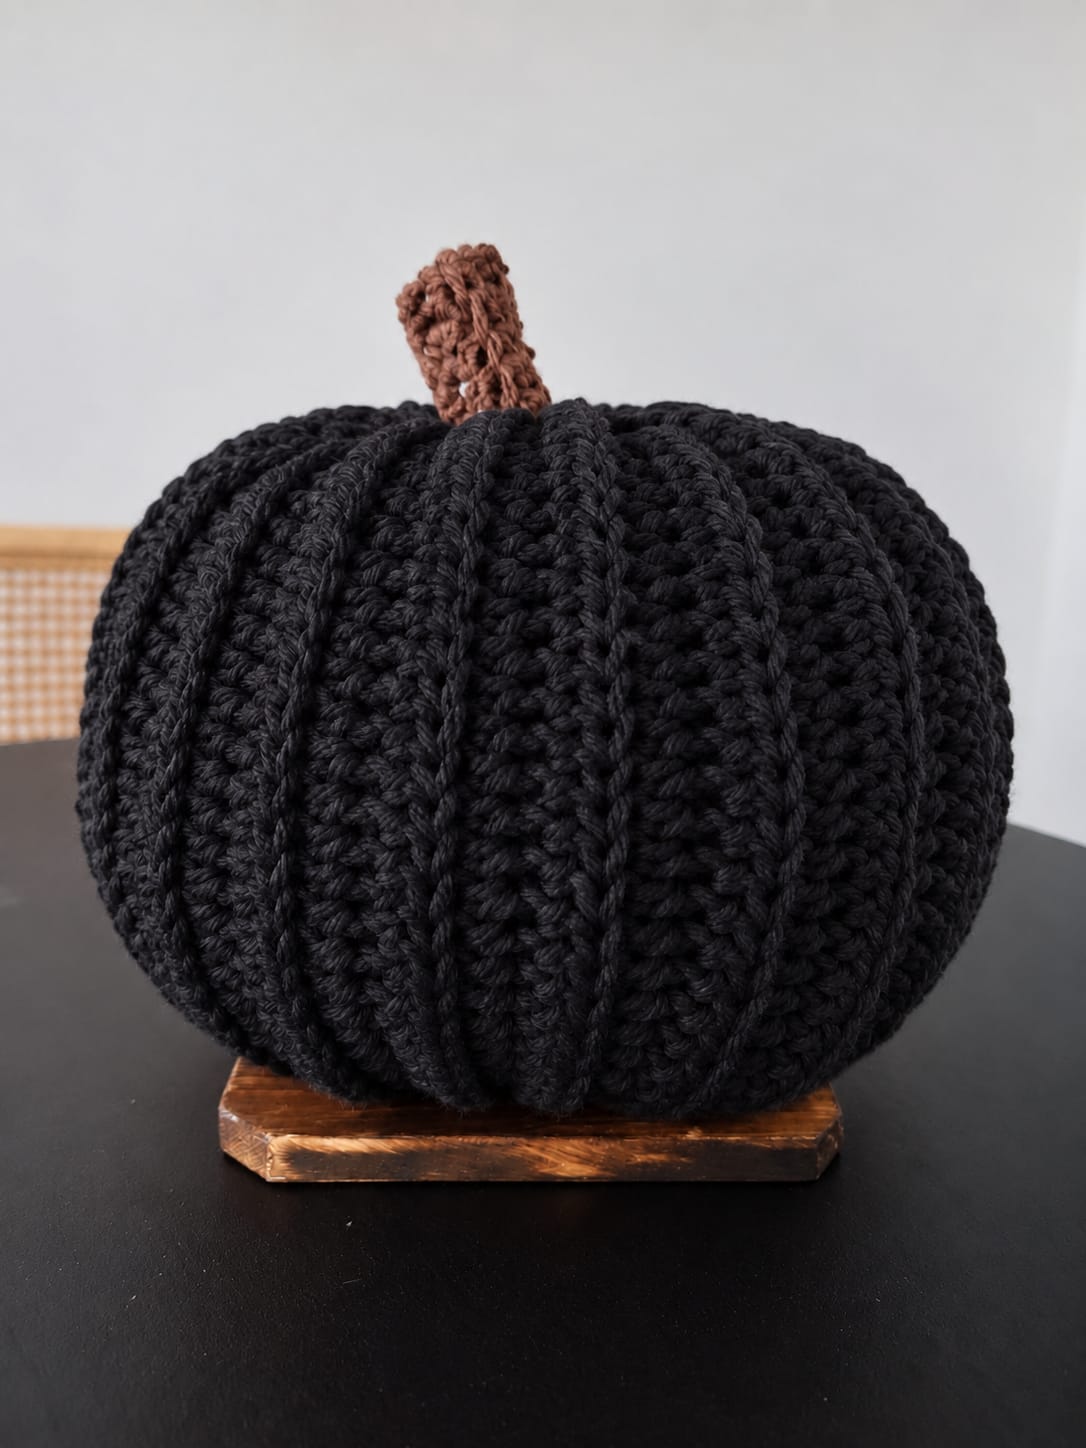
Black stitches erase shallow pumpkin grooves, so the ribs have to change the silhouette rather than depend on color contrast. This black crochet pumpkin pattern uses super-bulky yarn, a 9 mm hook, dense stuffing, and external sculpting to produce a large low pumpkin approximately 23 cm wide. A short brown crochet stem finishes the intermediate-level design. The oversized format makes it practical as freestanding Halloween or autumn table decor.
The Design: What Makes This Black Pumpkin Different
The reference has a broad, compressed body with roughly ten pronounced vertical sections rather than a nearly spherical amigurumi profile. That proportion starts with a wide textured rectangle: its long dimension becomes the pumpkin circumference, while the shorter dimension controls height. After seaming, both openings are gathered and the center is compressed vertically before the ribs are formed.
The second decision is texture. Raised vertical lines remain readable in black yarn because the body combines ribbed crochet with additional sculpting strands. Published chunky pumpkin patterns use the same rectangle-to-tube construction and external wrapping, with large examples around 23 cm wide. A contrasting brown crochet pumpkin stem also prevents the crown from disappearing against the dark body. The main failure mode is over-tightening the segmentation yarn. Deep channels are useful, but excessive tension creates narrow lobes and a hard center instead of the broad ribbed crochet pumpkin shown here.
Project Info at a Glance
| Skill Level | Estimated Time | Finished Size | Hook | Best For |
|---|---|---|---|---|
| Intermediate | 3–5 hours | Approx. 23 cm wide × 13 cm high | 9 mm | Halloween decor, shelves, tables, fall displays |
A published large super-bulky crochet pumpkin measures approximately 9 inches wide × 5 inches high and uses a 9 mm hook. Another category 6 design lists a large size around 9 inches wide × 6.5 inches high, making a target near 23 cm wide appropriate for this oversized black version.
Materials and Tools
Yarn
- Black — super bulky #6 — approximately 130–150 yd (119–137 m)
- Medium brown — super bulky #6 or doubled worsted yarn — approximately 12–18 yd (11–16 m)
- Black shaping yarn — reserve approximately 8–12 yd (7–11 m) from the main yarn supply
A published large chunky pumpkin uses 141 yards of category 6 yarn, while other super-bulky designs list approximately 120 yards for a large size. Those figures provide a practical purchasing range for a pumpkin close to the photographed scale.
Tools
- 9 mm crochet hook
- 8 mm crochet hook — optional for the stem
- Polyester fiberfill — approximately 180–250 g
- Long upholstery or doll needle
- Large tapestry needle
- Locking stitch markers
- Scissors
- Tape measure
Abbreviations
- ch — chain
- sc — single crochet
- hdc — half double crochet
- sl st — slip stitch
- BLO — back loop only
- FLO — front loop only
- st/sts — stitch/stitches
An invisible decrease is not needed because the pumpkin body is formed from a rectangle rather than increased and decreased in continuous rounds.
Gauge
Target approximately 8 stitches × 8 rows = 10 × 10 cm in firm crochet before stretching.
Exact gauge is less important than the finished rectangle dimensions. For the large pumpkin, aim for a rectangle approximately 25 cm high × 55–56 cm long.
Black yarn makes individual loops difficult to distinguish, so measure the fabric after every eight to ten rows rather than relying only on visual counting.
Pattern — Step by Step
Black Pumpkin Body
Yarn: black super bulky.
Ch 21.
Row 1: Hdc in second chain from hook and in every chain across. (20)
Row 2: Ch 1, turn. Hdc in first stitch, *sl st in next stitch, hdc in next stitch* across, ending with sl st in final stitch. (20)
Row 3: Ch 1, turn. Hdc in every stitch across. (20)
Row 4: Ch 1, turn. Working in the third loop/BLO, hdc in every stitch across. (20)
Row 5: Ch 1, turn. Hdc in every stitch across. (20)
Rows 6–40: Repeat Rows 2–5 until 40 rows have been completed. (20 stitches each row)
Do not fasten off.
The rectangle should measure approximately 25 × 55 cm. A few centimeters of variation are acceptable because the final dimensions depend on stuffing density and sculpting tension.
Why the Body Uses a Rectangle
The long rectangle creates vertical texture automatically after the short ends are joined.
Rows become the circumference of the pumpkin.
The 20-stitch width becomes its top-to-bottom dimension.
This construction also allows the finished body to spread sideways when stuffed, producing the low, broad silhouette visible in the reference.
Increasing a conventional amigurumi sphere to the same diameter would require substantially more stitch counting and would not automatically produce the same strong vertical rib structure.
Seaming the Pumpkin Body
Fold the rectangle so the two short edges meet with the right side facing inward.
Align all 20 stitches.
Slip stitch through the BLO of the front edge and FLO of the opposite edge.
Continue across all 20 stitches.
Fasten off, leaving approximately 120 cm of black yarn.
Turn the tube right side out.
The seam should disappear into the surrounding vertical texture.
Closing the Bottom
Thread the long black tail through a large tapestry needle.
Run the needle in and out around one open edge of the tube.
Place the gathering stitches approximately 1–1.5 cm apart.
Pull the yarn gradually.
Do not pull one side closed before the remaining circumference has begun gathering.
Continue tightening until the opening closes.
Pass through the gathered center several times.
Knot securely on the inside.
Stuffing the Pumpkin
Add fiberfill in small pieces.
Fill the outer circumference first.
Continue toward the center.
The sides should feel firm enough to resist finger pressure but should still compress when the shaping yarn is tightened.
Target approximately 180–250 g of stuffing for a 23 cm pumpkin, depending on fiberfill density.
Do not pack the upper opening completely full. Leave enough flexibility to gather the remaining edge.
Closing the Top
Cut approximately 120 cm of black yarn.
Thread the yarn through the upper edge using the same running-stitch method.
Pull the opening inward gradually.
Before closing completely, add additional stuffing where the crown feels soft.
Pull the opening closed.
Pass the needle through the gathered center several times.
Do not cut the yarn yet.
Compressing the Pumpkin
Push the long needle from the top center through the stuffing and out through the bottom center.
Return the needle from bottom to top.
Pull until the pumpkin height shortens by approximately 2–3 cm.
Repeat once.
Secure the compression yarn.
This creates the broad, flattened profile before individual ribs are sculpted.
Creating Ten Deep Pumpkin Ribs
The reference shows approximately ten pronounced sections.
Mark 10 evenly spaced positions around the circumference.
Cut approximately 250–300 cm of black shaping yarn, or work with separate shorter lengths if that is easier to control.
Thread the long needle.
Insert the needle through the bottom center and bring it out through the top center.
Wrap the yarn down the outside of the pumpkin along the first marked channel.
Insert through the bottom center and return through the top.
Pull until the groove measures approximately 8–12 mm deep.
Move to the next marker.
Repeat around the complete circumference.
Check the pumpkin from above after every two channels. The spacing should remain approximately equal.
After the tenth groove, pass the needle through the center again and knot the shaping yarn securely.
Adding Raised Surface Lines
The photographed pumpkin has particularly defined vertical lines. Surface crochet can strengthen those channels after sculpting.
Join black yarn at the lower center of one groove.
Surface slip stitch upward through the existing crochet fabric until reaching the crown.
Fasten off.
Repeat along each major channel.
Keep these slip stitches relaxed.
A tight surface chain shortens the outside of the pumpkin and can make one lobe narrower than its neighbors.
Brown Crochet Stem
Yarn: medium brown.
Ch 11.
Row 1: Sc in second chain from hook and across. (10)
Row 2: Ch 1, turn, BLO sc across. (10)
Row 3: Ch 1, turn, BLO sc across. (10)
Row 4: Ch 1, turn, BLO sc across. (10)
Row 5: Ch 1, turn, BLO sc across. (10)
Fasten off, leaving a 35 cm sewing tail.
Shaping the Stem
Fold the brown rectangle lengthwise.
Whipstitch the long edges together.
Add a small amount of fiberfill or several short brown yarn scraps.
Close the top with several stitches.
Leave the lower end open.
The finished stem should measure approximately 8–10 cm long.
Bend it slightly before attachment rather than forcing it to stand completely vertical.
Optional Wider Stem Base
For a more substantial attachment area, make a small brown disc.
R1: 6 sc in MR (6)
R2: inc ×6 (12)
R3: (1 sc, inc) ×6 (18)
Fasten off, leaving 30 cm.
Sew the stem to the center of the disc.
Attach the disc over the gathered crown.
This method covers the black closing stitches and helps a taller stem remain upright.
Assembly
- Complete the 20-stitch × 40-row black textured rectangle and confirm that its dimensions are approximately 25 × 55 cm.
- Join the two short ends to form a tube, keeping the seam aligned with the existing vertical rib texture.
- Gather one open end completely and secure the center before adding any fiberfill.
- Stuff the body evenly with approximately 180–250 g of fiberfill, concentrating material around the outer circumference.
- Gather the second opening and add additional stuffing before closing the final center gap.
- Compress the pumpkin vertically by approximately 2–3 cm with yarn passed from the crown through the bottom center.
- Mark ten equal positions around the circumference before beginning the external shaping process.
- Create all ten channels, keeping each groove approximately 8–12 mm deep and checking the spacing from above.
- Crochet and shape the brown stem, then sew it firmly over the gathered crown or optional 18-stitch stem-base disc.
- Weave every remaining tail through dense matching stitches and set the pumpkin on a flat surface to correct the lobe spacing.
The completed pumpkin should measure approximately 23 cm across, remain lower than it is wide, and display ten readable black lobes around a short contrasting brown stem.
7 Technical Tips
- The black ribs disappear: Make each sculpted channel approximately 8–12 mm deep instead of relying only on stitch texture. Black yarn absorbs visual contrast, so shallow grooves are difficult to read from several feet away.
- The pumpkin becomes too tall: Pass strong yarn through the top and bottom centers and compress the body by approximately 2–3 cm before segmenting it. Adding ribs first makes later height adjustment much harder.
- The final lobe is narrower than the others: Mark all ten channel positions before tightening the first shaping strand. Estimating the spacing while wrapping usually accumulates error around the circumference.
- Stuffing shows through the black fabric: Reduce the hook by 0.5–1 mm if visible gaps appear in the test swatch. Dark yarn makes pale polyester fiberfill especially noticeable between loose stitches.
- The bottom will not sit flat: Keep less stuffing directly against the gathered bottom center and more around the lower outer circumference. A hard mound under the center turns the pumpkin into a rocking shape.
- The stem falls sideways: Sew through a base at least 4–5 cm across instead of attaching only the narrow tube edge. A broad 18-stitch disc distributes the stem’s leverage over more of the crown.
- One surface rib pulls upward: Work the optional surface slip stitches with visibly relaxed loops. A tight vertical chain can shorten that section by more than 1 cm and distort the neighboring lobes.
Why Super-Bulky Yarn Works for This Pumpkin
The photographed pumpkin is large enough that thin yarn would require many more rows to produce comparable scale.
Category 6 yarn builds volume quickly and makes every vertical ridge physically substantial.
Published chunky pumpkin patterns use super-bulky yarn with 8–9 mm hooks and large sizes around 9 inches wide. One three-size pattern uses 141 yards for its large version, while another lists 120 yards for a similarly broad pumpkin.
A 9 mm hook is therefore a practical starting point.
If the selected black yarn is particularly soft or thin, an 8 mm hook can create denser fabric and prevent white stuffing from showing.
Choosing Black Yarn
Use a smooth matte black rather than heavily brushed or fuzzy yarn.
The surface structure matters more in black than in lighter colors.
A halo around the strand softens the boundaries between adjacent ridges.
Look for category 6 yarn with a compact twist and consistent diameter.
Charcoal can substitute for true black when maximum stitch visibility is required, but the photographed pumpkin reads as a deep neutral black.
Buy the complete body quantity from the same dye lot because differences between black dye lots can be visible under directional lighting.
Working with Black Crochet Yarn
Use strong directional light from the side rather than relying only on overhead room lighting.
Place a white towel or sheet of paper beneath the active row.
The light background makes the lower edges of black stitches easier to distinguish.
Use brightly colored stitch markers.
Count the 20 stitches after every four-row repeat.
Correct a missing stitch immediately. A rectangle that gradually narrows will produce a visible wedge after its short edges are joined.
How Much Yarn Does the Large Pumpkin Need?
Plan approximately 130–150 yards of super-bulky black yarn for the photographed scale.
A verified large chunky design uses 141 yards of Lion Brand Wool-Ease Thick & Quick. Another large super-bulky pumpkin lists approximately 120 yards.
Reserve shaping yarn before completing the rectangle.
The external channels consume more yarn than they appear to because every strand travels from the center to the outer circumference and back again.
Keep at least 8–12 yards aside if the same yarn will be used for ten channels and optional surface details.
How Firmly Should the Pumpkin Be Stuffed?
Under-stuffing produces collapsed areas between the ribs.
Over-stuffing makes the sculpting strands difficult to tighten.
Press the side with two fingers before closing the top.
The surface should compress approximately 1–2 cm and return toward its original shape.
Add stuffing around the circumference in small sections.
Rotate the pumpkin frequently.
A dense lump on one side becomes more obvious after the ten grooves divide the body into individual lobes.
Getting a Wide Pumpkin Instead of a Ball
The rectangle dimensions establish the basic proportion, but center compression completes it.
After both openings are closed, measure the height.
Push the top and bottom centers toward one another.
Run a long strand through both centers and tighten until the body becomes approximately 23 cm wide × 13 cm high.
Secure that proportion before adding the external grooves.
Do not depend on extreme rib tension to flatten the pumpkin. Rib strands should divide the body, not perform all of the compression.
Creating Even Pumpkin Sections
Ten lobes require ten evenly distributed channels.
View the pumpkin from directly above.
Mark opposite points first.
Divide each half into five approximately equal sections.
Place markers at the intended grooves rather than at the centers of the lobes.
After shaping the first five channels, stop and compare their depth.
Complete the remaining five only when the first half looks balanced.
If one channel is noticeably deeper, loosen it before securing the final knot.
Making an Eight-Lobe Version
For broader sections, use eight grooves instead of ten.
Mark the circumference at quarter points first.
Add one marker halfway between each quarter point.
Shape all eight channels to approximately 10–14 mm deep.
The resulting lobes will be wider and more exaggerated.
Eight sections work particularly well with extremely thick category 6 yarn because each lobe has more room for the bulky stitch texture.
Making a Smaller Black Pumpkin
Use a rectangle approximately 13 cm high × 28 cm long.
Ch 11.
Work 10 stitches across using the same four-row texture sequence.
Continue to approximately 20 rows.
Join, gather, and stuff using the same construction method.
A comparable published small super-bulky pumpkin measures approximately 13 cm wide × 7.5 cm high.
Use six or eight external grooves instead of ten so the small lobes do not become excessively narrow.
Making a Medium Black Pumpkin
For a medium version, begin with ch 15.
Work 14 stitches per row.
Continue for approximately 28 rows using the established texture sequence.
A published medium chunky pumpkin constructed with this method finishes around 18 cm wide × 10 cm high.
Use eight external channels.
Shorten the brown stem to approximately 6–7 cm so it remains proportional to the smaller body.
Changing the Stem Color
Brown produces the strongest match to the reference.
For a more natural fall palette, use chestnut, walnut, taupe, or cinnamon.
Olive green creates stronger contrast but shifts the design toward a fresher pumpkin appearance.
Black can also be used for a monochromatic version, although the crown becomes harder to distinguish from the body.
Keep the stem yarn close to the body yarn in thickness. A thin worsted stem on a super-bulky pumpkin can look undersized unless two strands are held together.
Making the Stem More Textured
BLO single crochet produces narrow vertical ribs after the rectangle is folded.
For a rougher stem, alternate BLO sc with regular sc rows.
A second option is surface slip stitching one line along the finished stem.
Do not add excessive surface texture to every side.
The photographed stem is visibly crocheted but remains simpler than the highly segmented black body.
Keeping the Bottom Flat
Before final shaping, place the pumpkin on a hard table.
Press downward gently.
Move stuffing away from the exact bottom center if it creates a rounded protrusion.
The lowest part of several lobes should contact the table simultaneously.
After the channels are tightened, check again.
If one lobe sits lower than the others, massage stuffing toward its neighbors rather than pulling its shaping strand tighter.
Fixing Uneven Ribs
Do not knot each channel permanently as soon as it is formed.
Create the full set first.
Rotate the pumpkin slowly.
Compare the depth and spacing of adjacent grooves.
Loosen any strand that has cut too deeply into the body.
Tighten shallow grooves by only a few millimeters at a time.
Once all sections look balanced, secure the shaping yarn at the bottom center where the knot will be least visible.
Care and Storage
Follow the washing instructions printed on the yarn label.
Spot cleaning is usually sufficient for a stuffed decorative pumpkin.
If the pumpkin becomes compressed during storage, massage the stuffing outward into each lobe before displaying it again.
Do not store heavy objects on top of the stem.
Keep the pumpkin in a container large enough that the ten sculpted sections are not flattened against the sides.
Before the next season, inspect the bottom shaping knot and stem attachment. Repair loose yarn before pulling or reshaping the body.
Conclusion
Black yarn makes the silhouette responsible for most of this pumpkin’s definition. Build the 20-stitch rectangle first, check its 25 × 55 cm dimensions, and create the broad profile through stuffing and center compression before tightening any ribs. Ten marked channels then produce the deep segmentation visible against the dark surface, while the short brown stem gives the crown a clear contrasting finish. Make a small swatch first if the selected super-bulky yarn differs significantly in thickness. Save this black crochet pumpkin pattern to Pinterest or share the finished version on Instagram with #LargeBlackCrochetPumpkin. Would you keep ten narrow lobes or reshape this specific black pumpkin with eight wider sections?









