Introduction
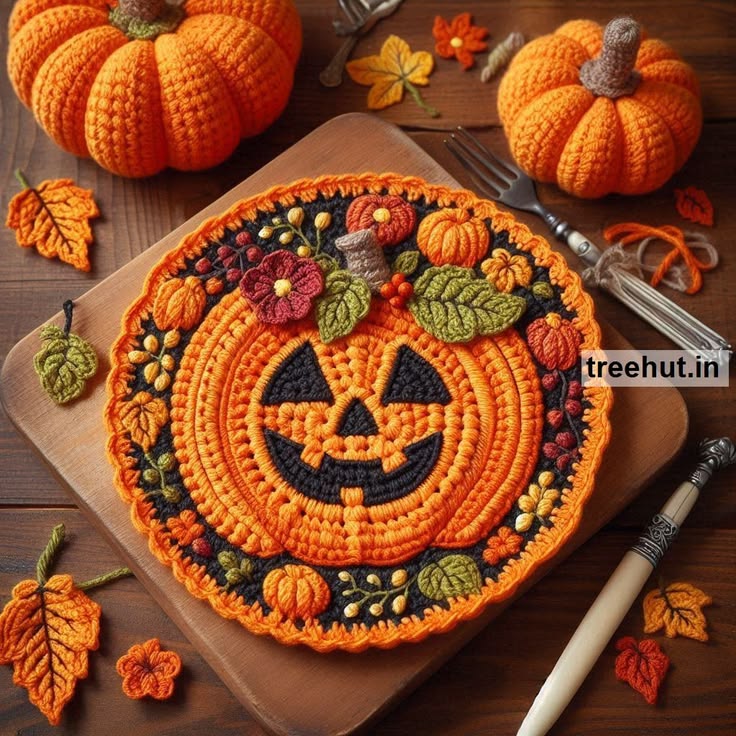
A jack-o’-lantern loses its grin if the pumpkin ribs pull the mouth out of alignment. This jack o lantern crochet placemat pattern uses worsted cotton and a 4 mm hook to make an approximately 32 cm round table mat. A raised orange pumpkin, black facial pieces, autumn leaves, miniature pumpkins and small flowers create an intermediate Halloween centerpiece that can also sit beneath a plate or serving bowl.
The Design: What Makes This Pumpkin Placemat Different
The central pumpkin is constructed separately from the black foundation, which gives the face more height than a tapestry-crochet design. Six surface-crochet ribs are added only after the orange pumpkin lies flat, so its oval shape can be corrected before the vertical channels become permanent. The black outer field performs two jobs: it increases contrast around the jack-o’-lantern and supplies a neutral attachment area for leaves, berries, flowers and miniature pumpkins. An orange scalloped edge then reconnects the border visually to the center. The decoration is intentionally asymmetrical. Larger leaves and flowers sit around the upper third, while smaller pumpkin and berry motifs fill lower spaces. One common mistake with a crochet pumpkin placemat is sewing every embellishment through all layers before checking flatness; concentrated stitching can cup the mat and lift the outer edge from the table.
Project Info at a Glance
| Skill Level | Time | Finished Size | Hook | Best For |
|---|---|---|---|---|
| Intermediate | 8–11 hours | Approx. 32 cm diameter | 4.0 mm | Halloween tables, fall centerpieces and decorative mats |
Materials and Tools
Yarn
- Pumpkin orange — worsted cotton / Aran #4 — approximately 70–85 g — large pumpkin, mini pumpkins and outer edging.
- Black — worsted cotton / Aran #4 — approximately 55–70 g — round foundation and jack-o’-lantern face.
- Olive green — worsted cotton / Aran #4 — approximately 20–25 g — leaves, vines and stems.
- Burgundy — worsted cotton / Aran #4 — approximately 8–12 g — large flower and berry accents.
- Rust red — worsted cotton / Aran #4 — approximately 8–12 g — flower and berries.
- Mustard yellow — worsted cotton / Aran #4 — approximately 5–8 g — flower centers and buds.
- Brown / taupe — worsted cotton / Aran #4 — approximately 5–8 g — central pumpkin stem.
Cotton gives the dimensional details better edge definition than a very fuzzy acrylic. Use similar yarn thicknesses for the black foundation and orange pumpkin so the finished layers expand at comparable rates.
Tools
- 4.0 mm crochet hook
- 3.5 mm crochet hook for tighter facial pieces if needed
- Tapestry needle
- Stitch markers
- Dressmaking pins
- Scissors
- Measuring tape
- Blocking mat and rust-resistant pins
Abbreviations
- MR — magic ring
- sc — single crochet
- inc — two stitches worked into the same stitch
- sl st — slip stitch
- ch — chain
- hdc — half double crochet
- dc — double crochet
- tr — treble crochet
- BLO — back loop only
- surface sl st — slip stitch worked onto the surface of completed crochet fabric
When a decrease is required in a three-dimensional appliqué, use the invisible decrease through the front loops of the next two stitches before completing one single crochet.
Pattern — Step by Step
Black Round Foundation
Yarn: black — based on standard flat-circle double-crochet expansion.
R1: 12 dc in MR, join with sl st (12)
R2: 2 dc in each st around (24)
R3: (dc, inc) ×12 (36)
R4: (2 dc, inc) ×12 (48)
R5: (3 dc, inc) ×12 (60)
R6: (4 dc, inc) ×12 (72)
R7: (5 dc, inc) ×12 (84)
R8: (6 dc, inc) ×12 (96)
R9: (7 dc, inc) ×12 (108)
R10: (8 dc, inc) ×12 (120)
Lay the circle on a flat table after R6, R8 and R10. If the edge begins to ripple, replace several increases with plain dc stitches. If the circle cups, add one or two extra increases spaced far apart.
Fasten off and weave in the tail.
Block to approximately 30–31 cm diameter. The final orange edging will add roughly another centimeter.
Large Orange Pumpkin Appliqué
Yarn: pumpkin orange — reconstruction based on flat oval shaping rather than a proprietary placemat pattern.
Ch 19.
R1: Starting in second ch, sc in next 17 ch, 3 sc in final ch; continue along opposite side, sc in next 16 ch, inc in final ch (38)
R2: inc, 15 sc, inc ×3, 15 sc, inc ×2 (44)
R3: (sc, inc), 15 sc, (sc, inc) ×3, 15 sc, (sc, inc) ×2 (50)
R4: (2 sc, inc), 15 sc, (2 sc, inc) ×3, 15 sc, (2 sc, inc) ×2 (56)
R5: sc around, placing 6 increases evenly around the two curved ends (62)
R6: sc around, placing 6 increases evenly around the curved ends (68)
R7: sc around (68)
Fasten off with a 90 cm sewing tail.
Target approximately 22–24 cm wide and 20–21 cm high. The photographed pumpkin occupies most of the foundation while leaving a black ring visible around the complete perimeter.
Shape the Pumpkin Top and Bottom
Thread a 50 cm orange strand.
Make one shallow gathering stitch through approximately 4 cm of the upper center edge.
Pull until the top center moves inward about 8–10 mm.
Repeat at the lower center with another strand.
Do not gather either section enough to create a folded edge.
The finished outline should read as a broad pumpkin rather than a perfect oval.
Raised Pumpkin Rib 1
Yarn: pumpkin orange.
Hold the working yarn behind the finished pumpkin appliqué.
Insert the hook near the lower center and pull a loop to the front.
Work loose surface slip stitches upward in a slight curve toward the upper center.
Stop approximately 10–15 mm before the gathered top edge.
Fasten off on the reverse.
Raised Pumpkin Rib 2
Repeat on the opposite side of the central axis.
Keep the widest space between Ribs 1 and 2 approximately 5–6 cm.
The center lobe should be the broadest visual section because the nose and mouth occupy this area.
Raised Pumpkin Ribs 3 and 4
Add one curved surface line outside each central rib.
Start approximately 3–4 cm from the lower center and finish 3–4 cm from the upper center.
Keep the surface stitches relaxed.
The orange appliqué must remain flat after every rib.
Raised Pumpkin Ribs 5 and 6
Place the final pair near the left and right outer curves.
Follow the pumpkin outline rather than running these lines vertically.
Stop the ribs before they reach the edge so the border remains smooth.
If any rib shortens the appliqué by more than approximately 5 mm, remove it and work the surface slip stitches more loosely.
Left Jack-O’-Lantern Eye
Yarn: black.
Ch 8.
Starting in second ch, sc in next 7 ch.
Turn.
Ch 1, dec, 3 sc, dec (5).
Turn.
Ch 1, dec, sc, dec (3).
Turn.
Ch 1, sc3tog (1).
Fasten off with a 25 cm sewing tail.
The finished triangle should measure approximately 4–4.5 cm across the base.
Right Jack-O’-Lantern Eye
Repeat the left eye.
Block both pieces before attachment so their base widths match within approximately 3 mm.
Triangle Nose
Yarn: black.
Ch 6.
Starting in second ch, sc across (5).
Turn.
Ch 1, dec, sc, dec (3).
Turn.
Ch 1, sc3tog (1).
Fasten off with a sewing tail.
Target approximately 3 cm across the lower edge.
Curved Black Mouth
Yarn: black.
Ch 27.
Starting in second ch:
sl st in next 3, sc in next 4, hdc in next 5, dc in next 2, hdc in next 5, sc in next 4, sl st in final 3.
Fasten off with a 50 cm tail.
Pin the strip into a broad upward-curving grin approximately 12–14 cm wide.
For the two raised mouth corners, curve the final 2–3 cm upward before sewing.
Lower Tooth Gap
The reference includes a small orange interruption at the lower center of the black grin.
Ch 4 with orange.
Starting in second ch, sc in next 3.
Fasten off.
Sew the short orange bar vertically over the lower center of the mouth strip so it resembles a carved tooth separation.
Central Brown Stem
Yarn: brown / taupe.
R1: 6 sc in MR (6)
R2: inc ×6 (12)
R3: sc around (12)
R4: sc around (12)
R5: sc around (12)
R6: (sc, dec) ×4 (8)
R7: sc around (8)
Stuff very lightly or leave unstuffed.
Flatten the lower 15 mm.
Fasten off with a 25 cm tail.
Large Olive Leaf — Make 2
Yarn: olive green.
Ch 10.
Starting in second ch:
sl st, sc, hdc, dc, 2 tr, dc, hdc, sc.
Work 3 sc into the final chain.
Continue along the opposite side:
sc, hdc, dc, 2 tr, dc, hdc, sc, sl st.
Fasten off with a 25 cm tail.
Embroider one central vein using matching green.
Small Olive Leaf — Make 2
Ch 7.
Starting in second ch:
sl st, sc, hdc, dc, hdc, sc.
Work 3 sc in final chain.
Repeat down the opposite side.
Fasten off with a sewing tail.
Target approximately 5–6 cm long.
Burgundy Flower
Yarn: burgundy with mustard center.
With mustard:
R1: 6 sc in MR (6)
Change to burgundy.
*Ch 4, hdc in second ch, dc in next ch, hdc in next ch, sl st in next base stitch.*
Repeat six times.
Fasten off with a 25 cm tail.
Rust Flower
Yarn: rust red.
R1: 6 sc in MR (6)
*Ch 3, hdc in second ch, sc in next ch, sl st into next base stitch.*
Repeat six times.
Add a mustard French-knot-style yarn center.
Small Orange Flower
Yarn: pumpkin orange.
R1: 5 sc in MR (5)
*Ch 3, hdc in second ch, sc in next ch, sl st in next base stitch.*
Repeat five times.
Fasten off with a sewing tail.
Mini Pumpkin — Make 3
Yarn: pumpkin orange.
R1: 6 sc in MR (6)
R2: inc ×6 (12)
R3: (sc, inc) ×6 (18)
R4: sc around (18)
R5: sc around (18)
R6: (sc, dec) ×6 (12)
R7: dec ×6 (6)
Stuff lightly.
Close the remaining hole.
Thread matching orange yarn from bottom to top three times at evenly spaced positions to create six shallow miniature lobes.
Add a short green or brown stem.
Burgundy Berries — Make 6
Yarn: burgundy or rust.
R1: 6 sc in MR (6)
R2: sc around (6)
R3: dec ×3 (3)
Fasten off.
Stuffing is not required at this size.
Mustard Buds — Make 8
Yarn: mustard yellow.
Ch 2.
Work 5 hdc into the second chain from the hook.
Sl st to first hdc.
Fasten off with a 10 cm tail.
Green Berry Stems
Yarn: olive green.
For each branch, ch 10–14.
Sl st back along the chain.
At two or three points, attach short 3-chain side branches.
Sew berries or mustard buds to the branch ends.
Orange Scalloped Border
Yarn: pumpkin orange.
Join orange to any stitch of the black foundation.
Work one round of sc evenly around, increasing only if needed to keep the mat flat.
For the final round:
*Skip 1 st, 5 dc in next st, skip 1 st, sl st in next st.*
Repeat around.
If the repeat does not divide evenly, adjust the final two scallops by skipping zero or two stitches instead of one.
Fasten off and weave in the tail.
Position the Jack-O’-Lantern Face
Pin the orange pumpkin in the center of the black foundation before attaching the face.
Leave approximately 3.5–4.5 cm of black visible around most of the pumpkin perimeter.
Place the eye triangles approximately 4–5 cm apart at their inner corners. Position the nose approximately 2–2.5 cm below the eye line.
Center the mouth beneath the nose. The widest part of the grin should extend slightly beyond the outside edges of the eyes.
Sew the black pieces only through the orange pumpkin layer first. This prevents facial attachment stitches from puckering the black foundation.
Attach the Main Pumpkin
Place the completed face appliqué on the black foundation.
Pin the top, bottom, left and right edges first.
Add four intermediate pins.
Sew around the orange perimeter using relaxed whip stitches spaced approximately 8–10 mm apart.
Do not pull the stitches tightly enough to sink the orange edge into the black foundation.
Arrange the Autumn Appliqués
Place the brown stem at the pumpkin crown first. Cluster the two large olive leaves around it, then position one burgundy flower and one mini pumpkin across the upper-left area.
Balance that weight with another mini pumpkin and green leaf toward the upper-right. Use the remaining mini pumpkin near the bottom edge.
Fill narrow spaces with rust flowers, berries and mustard buds rather than adding another large appliqué.
Keep at least 10–15 mm between the outermost decorations and the orange scalloped border.
Assembly
- Block the black foundation to approximately 30–31 cm diameter before attaching any raised parts.
- Complete the orange pumpkin appliqué, shape its upper and lower centers, then work all six raised surface-crochet ribs while the piece remains separate.
- Sew the two black eyes, triangle nose and curved mouth to the orange pumpkin before mounting it on the foundation.
- Center the completed jack-o’-lantern on the black circle and leave approximately 3.5–4.5 cm of background visible around the pumpkin.
- Attach the pumpkin perimeter with relaxed stitches spaced approximately 8–10 mm apart so the foundation does not cup.
- Sew the brown stem above the pumpkin and place the two largest green leaves around its base.
- Pin all flowers and mini pumpkins before sewing, concentrating the largest pieces around the upper third rather than spacing them mechanically around the circle.
- Add the remaining small leaves, berries and mustard buds into gaps while keeping every dimensional motif at least 10–15 mm inside the final border.
- Work the orange foundation round and scalloped edging only after the full arrangement has been checked on a flat surface.
- Steam or damp-block lightly from the reverse side, protecting dimensional flowers and mini pumpkins from direct pressure.
The finished mat should lie flat with a raised orange jack-o’-lantern centered inside a black autumn border and dimensional leaves, pumpkins, flowers and berries distributed around the perimeter.
7 Technical Tips
- Foundation becoming wavy: Too many increases in a flat circle create excess circumference. Check the mat after R6, R8 and R10 and remove an increase whenever the outer 3–4 cm begin forming visible ripples.
- Orange pumpkin cupping: Surface slip stitches worked too tightly shorten the appliqué vertically. Each raised rib should change the pumpkin height by less than approximately 5 mm after completion.
- Face looking crooked: Sewing one eye before positioning the mouth removes the visual reference needed for centering. Pin both eyes, nose and the full 12–14 cm grin before taking the first permanent facial stitch.
- Outer mat lifting from the table: Dense appliqué sewing can contract the black circle. Keep attachment stitches approximately 8–10 mm apart and avoid pulling the orange pumpkin edge into a raised ridge.
- Mini pumpkins twisting: A miniature stuffed pumpkin attached at one central point can rotate. Catch at least 15–20 mm of its lower edge with two separate sewing passes.
- Leaves losing definition: Sewing the complete perimeter makes the leaf merge into the background. Secure only the center vein and lower 10–15 mm when a raised leaf tip is wanted.
- Scalloped border ruffling: Five-double-crochet shells require enough foundation space. If the finished border projects more than approximately 10 mm from the black circle and begins rippling, increase the number of skipped stitches between selected shells.
Conclusion
Check the jack-o’-lantern face before attaching the autumn decorations because the pumpkin must remain the dominant shape once the black border fills with leaves and flowers. Next, pin the large orange appliqué to the foundation, verify that all six ribs remain flat and sew the face before mounting the pumpkin permanently. Add the larger botanical pieces first, then use berries and buds to fill smaller spaces. Share the finished jack o lantern crochet placemat pattern project on Pinterest with a straight overhead photograph, then post a close view of the raised ribs and autumn appliqués on Instagram using #HarvestJackOLanternCrochet. For this jack-o’-lantern specifically, would you keep the botanical border asymmetrical or mirror the decorations on both sides?









