Introduction
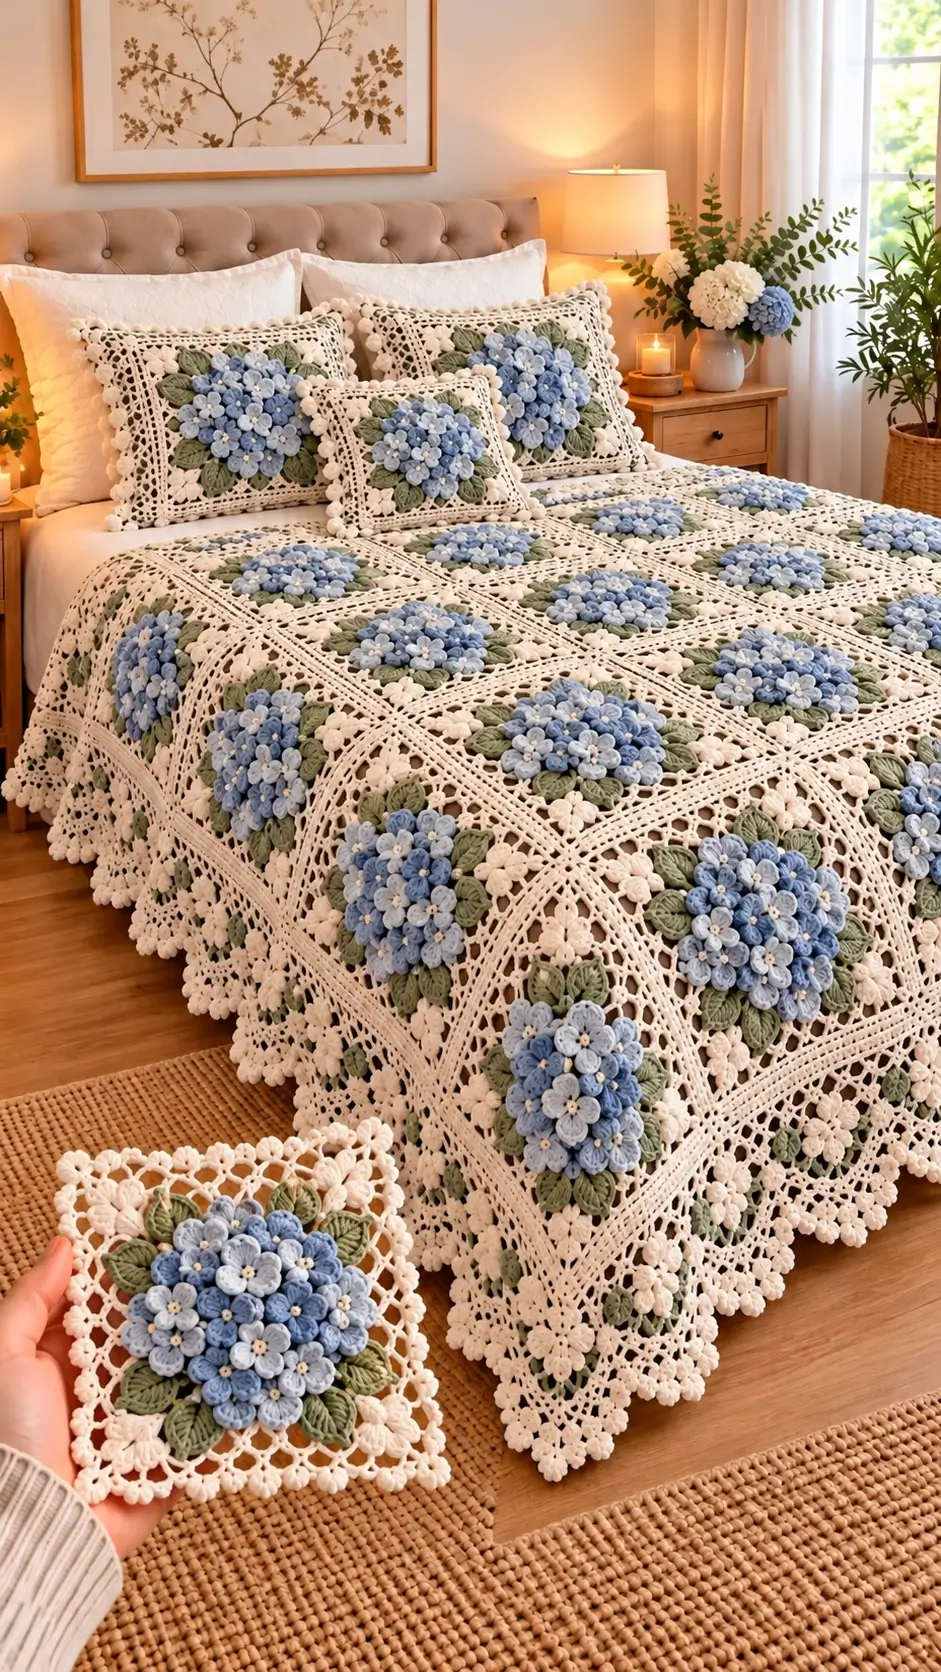
A blue hydrangea bloom is a cluster of four-petal florets, not one oversized flower. This hydrangea crochet blanket pattern builds that structure from small blue blossoms mounted over a sage-green disk, then frames each cluster in ivory lattice. The instructions use DK yarn, a 4.0 mm hook, and a target 15 cm square. Skill level: intermediate. Modular construction lets you size a bedspread and make matching cushion fronts without redesigning the motif.
The Design: What Makes This Hydrangea Different
The reference photo combines three distinct surfaces: raised blue florets, a compact ring of green leaves, and a comparatively flat ivory grid. Keep these layers separate. Stitching the flowerlets onto a green center, rather than crocheting a single bulky rosette, creates the densely clustered profile that identifies a hydrangea. Eight oval leaves establish a visible transition from blue petals to cream lace. The square is built with alternating open-chain and filled double-crochet rounds; the open rounds reduce stiffness where several motifs meet.
This 3D hydrangea granny square is an interpretation of the photo, not a recovered designer pattern. A frequent mistake in a raised flower crochet blanket is placing all the flowerlets in one ring. That produces a wreath with an empty center. Stagger the inner, middle, and outer florets instead, overlapping their edges slightly.
Project Info at a Glance
| Skill level | Time | Finished size | Hook | Best for |
|---|---|---|---|---|
| Intermediate | Record the time for one complete sample; whole-project time varies by motif count | 15 cm per square target, after blocking; not sample-tested | 4.0 mm design choice | Modular throws, bedspreads, cushion fronts |
A published hydrangea square by Anna Lisek on Ravelry measures 15 × 15 cm using 2 mm cotton macramé yarn and a 3.5 mm hook. That is an external comparison, not a gauge measurement for the original instructions here. The Craft Yarn Council recommends approximately 3.5–4.5 mm hooks for DK/light-worsted yarn. Make and block one full trial square before purchasing yarn for an entire bedspread.
Size planning: At an achieved 15 cm per motif, 6 × 8 squares give approximately 90 × 120 cm before edging; 10 × 12 give 150 × 180 cm; and 14 × 16 give 210 × 240 cm. These are calculations, not measurements of the pictured bedspread. The photo shows a substantial drop down both sides of the mattress, so measure the intended width including the drop before selecting the grid.
Materials and Tools
Yarn
Use the same yarn line and thickness across all colors. A smooth DK cotton or cotton-blend gives better petal definition than velvet or chenille. Stylecraft Special DK is one possible acrylic alternative; the palette matters more than the label. Do not combine markedly different yarn thicknesses within the same square.
- Ivory or warm cream — DK — grams to be determined by weighing a completed square — for the lace foundation, corner florets, seams, and border.
- Dusty blue — DK — weigh one square’s allocation — for approximately nine of the thirteen florets in each flower head.
- Powder blue — DK — weigh one square’s allocation — for four contrasting florets per square.
- Sage green — DK — weigh one square’s allocation — for the central disk and eight leaves.
- Soft white — DK — weigh one square’s allocation — for floret centers or optional accent stitches.
For a useful reference point, Lisek’s independently published 15 cm pattern lists 30 g for petals and 35 g for its square section. Those figures apply to that designer’s cotton-cord pattern, not to this DK adaptation. After making the first full block, weigh each color used and multiply by the planned number of motifs; then add 10–15% for joins, borders, and sampling. For example, 14 × 16 = 224 motifs, and nine decorated blocks require 117 blue florets if used for matching cushions.
Tools
- 4.0 mm crochet hook for the proposed DK design; change size if your blocked sample misses the target.
- Tapestry needle, sharp-point sewing needle if needed, locking stitch markers, scissors, measuring tape, and kitchen scale accurate to 1 g.
- Blocking mats and rustproof pins for matching all four edges before joining.
- Optional 45 cm pillow insert, backing fabric, zipper or envelope closure; no safety eyes, wire, or stuffing are required for the blanket.
Abbreviations and Stitch Notes
US crochet terms: MR = magic ring; ch = chain; sc = single crochet; hdc = half double crochet; dc = double crochet; inc = 2 sc in one stitch; sl st = slip stitch; sk = skip; sp = space; BLO = back loop only; R = round; RS = right side. Parentheses show repeat groups; stitch totals are given after each round. Corner ch-2 spaces and decorative ch-1 spaces are listed separately from actual stitch counts.
An invisible decrease is a technique for stuffed shapes, not needed in these flat motifs.
Pattern — Step by Step
Construction note: This is a new, photograph-inspired recipe, not a transcription of the original photographed design or of any linked commercial pattern. R1–R6 of the center disk are worked in a continuous spiral. From R7 onward, joined rounds keep the square corners aligned. The flowerlets and leaves are made separately and sewn on after blocking. Complete one entire sample, verify the fit of each piece, and record its weight before scaling up.
Ivory Lace Square with Green Center (Make One per Motif)
Yarn: sage green for R1–R6; ivory for R7–R15. Counts: original stitch arithmetic; yarn and hook category referenced against the Craft Yarn Council.
Green central disk — continuous spiral
R1: 6 sc in MR (6 sc).
R2: inc × 6 (12 sc).
R3: (1 sc, inc) × 6 (18 sc).
R4: (2 sc, inc) × 6 (24 sc).
R5: (3 sc, inc) × 6 (30 sc).
R6: (4 sc, inc) × 6 (36 sc). Join with sl st and fasten off green.
Ivory square — joined rounds
R7: Join ivory in any stitch of R6. Work (dc in next 8 stitches, 2 dc + ch 2 + 2 dc in next stitch) × 4 (48 dc; four ch-2 corners). Join.
R8: Dc in every dc; at each ch-2 corner work (2 dc, ch 2, 2 dc) (64 dc; four corners). Join.
R9: Across each 16-dc side, work (dc in next dc, ch 1, skip next dc) × 8. In each corner work (2 dc, ch 2, 2 dc) (48 dc, 32 ch-1 spaces; four corners). Join.
R10: Dc in every dc and every ch-1 space; work (2 dc, ch 2, 2 dc) in each corner (96 dc; four corners). Join.
R11: Across each 24-dc side, work (dc in next dc, ch 1, skip next dc) × 12. Repeat the four corner groups (64 dc, 48 ch-1 spaces; four corners). Join.
R12: Dc in every dc and every ch-1 space; work the same corner groups (128 dc; four corners). Join.
R13: Across each 32-dc side, work (dc in next dc, ch 1, skip next dc) × 16. Repeat the corner groups (80 dc, 64 ch-1 spaces; four corners). Join.
R14: Dc in every dc and every ch-1 space; work the same corner groups (160 dc; four corners). Join.
R15: Sc in every dc; in each corner work (sc, ch 2, sc) (168 sc; four ch-2 corners). Join and fasten off.
For each new round, begin immediately after a corner, complete that side, and work the next corner; use a standing dc or appropriate starting chain. Turning chains and joins do not count as additional stitches. The 15 cm target depends on yarn and tension. Leave a 20 cm tail for seaming. Block the square to the measured size without stretching the central disk out of round.
Small Four-Petal Blue Florets (Make 13 per Motif)
Yarn: white or ivory center, then dusty blue for nine flowers and powder blue for four. Source: original four-petal arrangement using standard stitch construction.
R1: With white, work 6 sc in MR (6 sc). Join and change to blue.
R2: inc × 6 (12 sc).
R3: (Sl st in next sc, ch 2, work 2 hdc + 1 dc + 2 hdc in next sc, ch 2, sl st in next sc) × 4 (four petals; 20 hdc/dc and 8 anchoring sl sts).
Each repeat consumes three of R2’s twelve stitches. The chains lift the petal; they are not counted as single-crochet stitches. Fasten off and leave a 15 cm sewing tail. Position one flower at the disk center, four around it, then eight farther out. Vary the direction of the petal openings to hide gaps. Do not pull every sewing stitch tight enough to flatten the flower.
Sage Leaves (Make 8 per Motif)
Yarn: sage green. Source: original oval-leaf construction.
Foundation: ch 9 (nine chains).
R1: Starting in the second chain, work 1 sc, 1 hdc, 4 dc, 1 hdc, 1 sc. Rotate the work and crochet into the unworked loops along the opposite side of the foundation: 1 sc, 1 hdc, 4 dc, 1 hdc, 1 sc (16 stitches). Join with sl st.
R2: (Sc in next 7 stitches, 3 sc in next stitch) × 2 (20 sc). Join and fasten off.
Leave a 15 cm tail. Fold each oval gently along its center line and stitch the inner end to the green disk, with the rounded tip pointing toward the ivory frame. Place one leaf at each compass point and the remaining four diagonally. If you want a stronger vein, surface-slip-stitch a short line through the leaf center using a second shade of green.
Small Ivory Corner Flowers (Make 4 per Motif)
Yarn: ivory. Source: original four-petal stitch construction.
R1: 6 sc in MR (6 sc).
R2: inc × 6 (12 sc).
R3: (Sl st in next sc, ch 2, 2 hdc + 1 dc + 2 hdc in next sc, ch 2, sl st in next sc) × 4 (four petals; 20 hdc/dc and 8 sl sts).
Fasten off with a 15 cm tail. Sew one flower between the main blue cluster and each corner, making the attachment through the solid stitches rather than across the open mesh. These ivory accents reproduce the light floral punctuation visible between the blue clusters in the reference image.
Joining the Blanket Squares
Use ivory yarn and a mattress stitch for a relatively flat, nearly hidden seam. Arrange the squares with all hydrangea clusters pointing outward and all edges blocked to the same measurement. Align R15 edge stitches exactly; sew through corresponding loops rather than pulling through large mesh openings. Join each horizontal row, then connect the rows vertically.
This method is documented in Underground Crafter’s mattress-stitch tutorial. A firmer flat slip-stitch join is also an option, but it changes seam width and may alter the final dimensions. Lay out at least four squares and make a test seam before joining a bed-sized grid.
Openwork Border and Small Picots
Yarn: ivory. Source: original edging plan; stitch totals depend on the joined panel’s perimeter.
R1: Join in an outer corner. Sc evenly around the blanket’s edge, placing 3 sc in each outer corner (perimeter count to be measured after joining).
R2: Work sc in the next five sc, then ch 3 and sl st in the first chain to create a picot; repeat along each straight side. At each corner, make one additional picot and distribute the remaining stitches evenly (one picot per five sc, plus corner adjustment).
Do not skip underlying border stitches when making the picot. Stop after each side and check that the lace lies flat. Fasten off with a 20 cm tail and weave it back through several stitches of the same color. The photograph has a more elaborate bobble-and-loop edging; the picot border is a simplified, structurally stable alternative.
Matching Hydrangea Cushion Front (Optional)
For a crochet hydrangea cushion cover, make a 3 × 3 panel of 15 cm squares to produce a front approximately 45 × 45 cm before its edging. To mimic the photo’s single central bouquet, decorate the middle square with thirteen florets and eight leaves, and leave the surrounding eight squares ivory-only with green centers omitted. Alternatively, decorate all nine squares for a denser floral cushion.
Make the back from two overlapping pieces of matching fabric, or use nine plain crochet squares and add a zipper. Compare the finished face with the actual insert; a seam allowance is needed when cutting fabric. The cushion repeats the blanket’s ivory lattice while avoiding the discomfort of a heavily textured flower head on the reverse.
Assembly
- Complete the first square: Block R15 and record its actual width, height, and each yarn color’s consumed weight.
- Choose the bedspread grid: Measure the mattress width, desired side drop, and finished length; divide the target dimensions by the blocked motif size.
- Make matching backgrounds: Finish every central disk and ivory frame before attaching the raised decoration.
- Prepare the flower heads: Crochet thirteen blue florets for each fully decorated square and group them by their planned color placement.
- Arrange the face: Pin one floret in the center, four at middle positions, and eight in an offset outer ring.
- Attach the foliage: Sew eight sage leaves behind each flower cluster without closing the open ivory squares.
- Add the corner details: Fix the four ivory florets to their assigned positions, then check all decorative tails on the reverse.
- Join the blanket: Lay the blocked squares in rows and use aligned mattress seams; inspect every four-square intersection before moving on.
- Finish the accessories: Assemble the matching cushion fronts, then install backing fabric or crocheted backs and any closures.
- Work the final edge: Crochet the perimeter border, weave the remaining tails, and block the complete textile flat.
The completed bedspread consists of repeated, seamed hydrangea motifs with raised flower heads and a continuous ivory outer edge.
7 Technical Tips
- Stitch-marker drift: Mark the first stitch of every spiral round; missing a round-start by one stitch displaces the R7 corners. Recount the green disk at 36 sc before changing colors.
- Overfilled center: Do not add stuffing under the hydrangea cluster, because it creates a hard mound on a bedspread. The overlapping flowerlets already provide the required three-dimensional relief.
- Unnecessary decreases: Invisible decreases are not used in this flat-square construction, and adding them will narrow the central disk. Keep the six-stitch increase progression through R6 exactly as written.
- Premature attachment: Pin the blue petals only after the cream square has been blocked. Sewing first can pull the 15 cm square into a concave shape.
- Velvet-tension mismatch: Substituting velvet yarn for DK can hide the small white flower centers and change the finished square width. If using velvet, crochet a full new sample instead of assuming the 4.0 mm hook or 15 cm target will hold.
- Unpinned seams: Pin two matching 42-sc side edges at their corners and midpoints before sewing. Joining mismatched stitch positions introduces ripples that accumulate across a 14-column panel.
- Short woven tails: Leave at least 15 cm on individual leaves and florets and 20 cm on large joining sections. Weave ends through multiple directions on the wrong side, away from open ch-1 spaces.
Conclusion
Measure one fully blocked motif before deciding how many repeats will cover the bed. A 15 cm target makes the arithmetic convenient, but yarn thickness, flower attachment, and seam tension can all change the finished width. Record grams consumed by ivory, blue, green, and white on the first complete square; use those figures to calculate the purchase quantity for the selected grid. This hydrangea crochet blanket pattern also provides a consistent visual system for cushion fronts. Save the square layout to Pinterest, and share a finished close-up on Instagram with #BlueHydrangeaCrochetBlanket. Which arrangement preserves the most realistic hydrangea shape: thirteen florets per square, or a denser outer ring?