Introduction
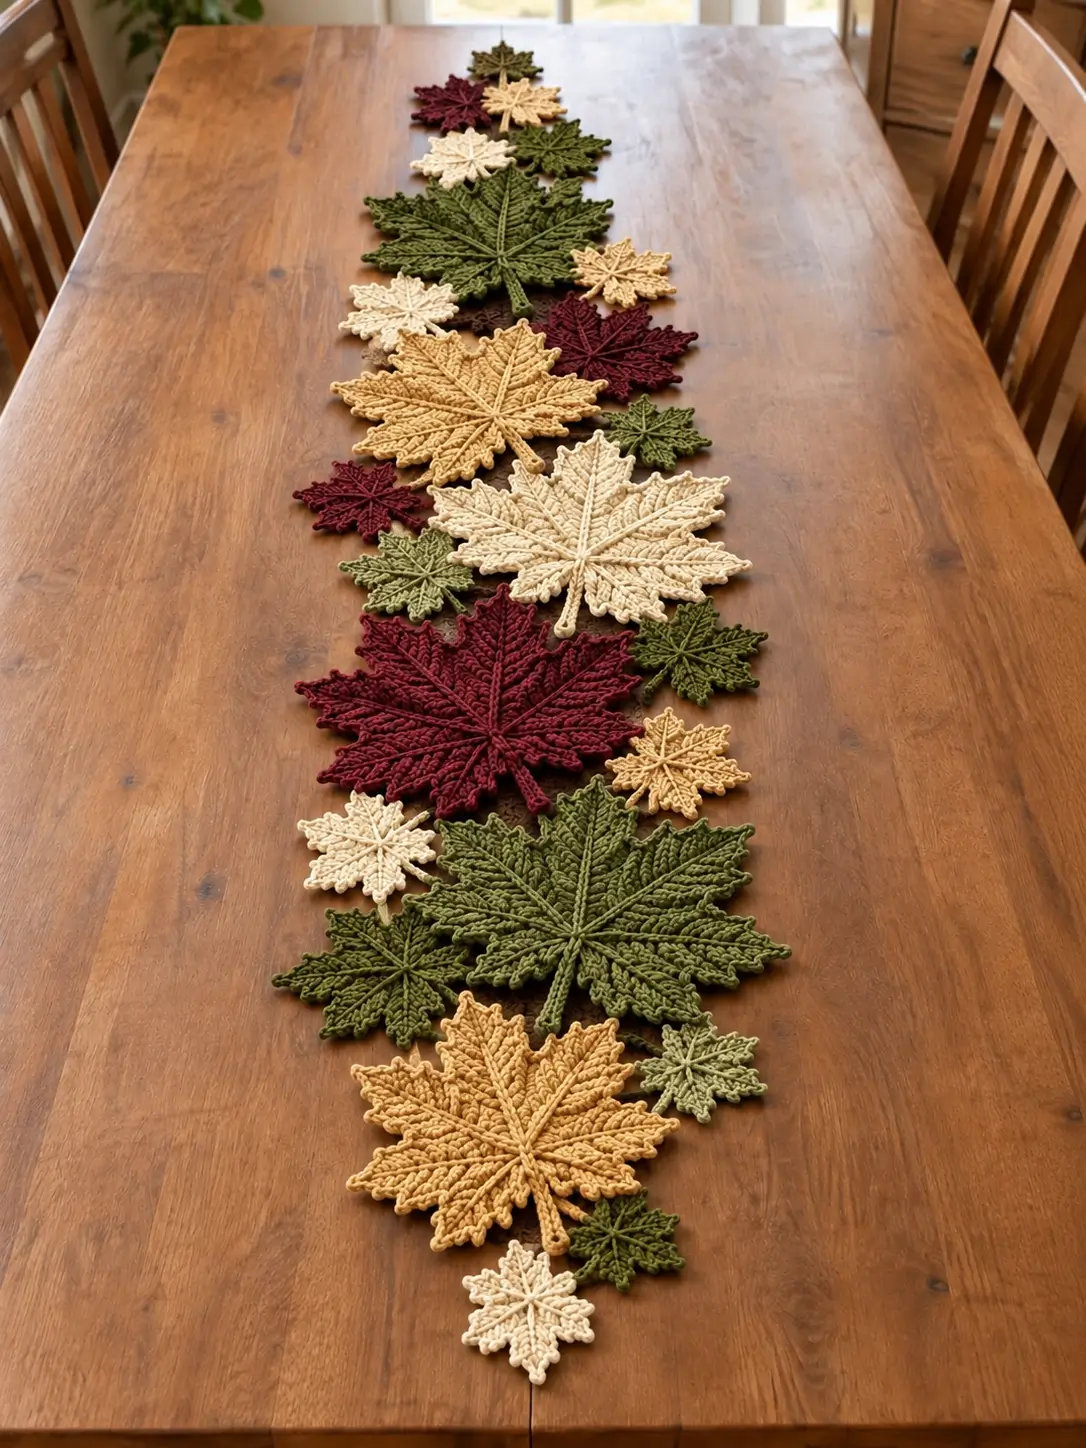
A maple-leaf runner stops reading as foliage when neighboring points are buried under too much overlap. This crochet maple leaf table runner pattern uses separate large and small leaves in olive, burgundy, ochre and cream, arranged as a narrow continuous centerpiece. Raised veins define each lobe while short stems reinforce the botanical structure. Use worsted cotton with a 4 mm hook for an intermediate modular project that can be lengthened to fit the table.
The Design: What Makes This Maple Leaf Runner Different
The photographed runner has no rectangular crochet foundation. Individual leaves become the runner itself. Large maple leaves establish the main rhythm, while smaller motifs occupy gaps between their points and keep the composition narrow enough for a dining table.
Scale is deliberately mixed. The largest leaves have a dominant center point, substantial upper side lobes, shorter lower lobes and pronounced surface veins. Small leaves repeat the same geometry at roughly half the diameter. That repetition is more important than making every motif identical.
Published maple-leaf motifs range from about 8 cm with worsted yarn to approximately 14 cm with light worsted yarn, while DK versions can reach 15–17 cm depending on construction. For this autumn crochet table runner, larger photo-inspired motifs around 18–22 cm create the strongest focal points, with small leaves around 9–12 cm.
Project Info at a Glance
| Skill Level | Construction | Large Leaf | Hook | Best For |
|---|---|---|---|---|
| Intermediate | Separate overlapping motifs | Approx. 18–22 cm | 4.0 mm | Dining tables, consoles and autumn displays |
The dimensions are targets for this photo-inspired construction. Published worsted-weight maple-leaf appliqués commonly use a 4 mm hook, while a lighter worsted Irish-crochet-style leaf is documented at approximately 5 × 5.5 inches with a 3.25 mm hook. Make and block one leaf before calculating the complete runner.
Materials and Tools
Yarn
- Olive green — worsted weight #4 cotton — approximately 100–150 g
- Deep burgundy — worsted weight #4 cotton — approximately 75–100 g
- Warm ochre — worsted weight #4 cotton — approximately 75–100 g
- Natural cream — worsted weight #4 cotton — approximately 75–100 g
These quantities are planning allowances rather than measured consumption from the photographed runner. A published small worsted maple leaf uses approximately 5 g per motif, demonstrating why weighing your first large and small leaves is the better method for calculating total yarn.
Tools
- 4.0 mm crochet hook
- Worsted weight #4 cotton yarn
- Yarn needle
- Scissors
- Locking stitch markers
- Tape measure
- Blocking mats
- Rust-resistant pins
Abbreviations
- MR — magic ring
- ch — chain
- sl st — slip stitch
- sc — single crochet
- hdc — half double crochet
- dc — double crochet
- tr — treble crochet
- dtr — double treble crochet
- st/sts — stitch/stitches
- sp — space
- FO — fasten off
An invisible decrease is worked through the front loops of two neighboring stitches before completing one sc, reducing the ridge produced by a standard decrease.
Pattern — Large Maple Leaf
This is an original photo-inspired construction rather than a transcription of a published maple-leaf pattern. The leaf is built from a central foundation, five shaped lobes, a pointed perimeter and surface-crocheted veins.
Central Foundation
Yarn: olive, burgundy, ochre or cream.
Round 1: Make a MR. Work 6 sc into the ring. Join with sl st. (6)
Round 2: Work 2 sc in each stitch around. Join. (12)
Round 3: (Sc in next st, 2 sc in next st) ×6. Join. (18)
Round 4: (Sc in next 2 sts, 2 sc in next st) ×6. Join. (24)
The compact center anchors all five lobes and provides enough fabric for the raised veins to meet without creating a bulky knot.
Large Center Lobe
Join yarn across the upper-center section.
Row 1: Ch 1, sc across 8 sts. (8)
Row 2: Ch 1, 2 sc in first st, sc across, 2 sc in final st. (10)
Row 3: Ch 2, hdc across. (10)
Row 4: Ch 2, 2 hdc in first st, hdc across, 2 hdc in final st. (12)
Rows 5–8: Ch 2, hdc across. (12)
Row 9: Hdc2tog, hdc across to final 2 sts, hdc2tog. (10)
Row 10: Repeat reduction. (8)
Row 11: Reduce at both ends. (6)
Row 12: Hdc2tog, hdc in next 2 sts, hdc2tog. (4)
Row 13: Hdc2tog twice. (2)
Row 14: Sc2tog. (1)
Ch 2 and sl st into the second chain from the hook to sharpen the tip.
FO.
Upper Left Lobe
Join yarn beside the center lobe.
Row 1: Ch 1, 7 sc. (7)
Row 2: Increase at both ends. (9)
Row 3: Hdc across. (9)
Row 4: Increase at both ends. (11)
Rows 5–7: Hdc across. (11)
Row 8: Reduce at both ends. (9)
Row 9: Reduce at both ends. (7)
Row 10: Reduce at both ends. (5)
Row 11: Hdc2tog, hdc, hdc2tog. (3)
Row 12: Taper the remaining stitches to one point.
FO.
Upper Right Lobe
Repeat the upper-left lobe instructions on the opposite side.
Lay the leaf flat after completing the lobe. Its two upper side points should sit at approximately the same horizontal level.
Lower Left Lobe
Row 1: Join yarn and work 7 sc. (7)
Row 2: Increase at both ends. (9)
Row 3: Hdc across. (9)
Row 4: Increase at both ends. (11)
Rows 5–6: Hdc across. (11)
Row 7: Reduce at both ends. (9)
Row 8: Reduce at both ends. (7)
Row 9: Reduce at both ends. (5)
Row 10: Hdc2tog, hdc, hdc2tog. (3)
Row 11: Taper to one point.
FO.
Lower Right Lobe
Repeat the lower-left lobe instructions.
The five main points should now form a recognizable maple silhouette: one tall center point, two medium upper lobes and two shorter lower lobes.
Filling the Lobe Junctions
Join matching yarn at the first gap between lobes.
Work sc down the side of one lobe.
Use sl st at the deepest part of the valley.
Work sc or hdc upward along the next lobe.
Where a wider opening remains, bridge it with dc anchored into both neighboring sections.
Repeat around the leaf.
Do not completely fill the valleys. Deep indentations are necessary for the five points to remain readable after the leaves overlap in the runner.
Pointed Maple-Leaf Edging
Work one continuous border around the leaf.
Use sc along straight sections.
For a small serration work:
(sc, ch 2, sl st into second ch from hook, sc)
At each major lobe tip work:
(hdc, ch 3, sl st in second ch, sl st in next ch, hdc)
Work a tight sl st at the deepest point of every valley.
Add secondary points irregularly along the large lobes rather than spacing them mechanically. The reference leaves have botanical serration rather than a repeated picot border.
Raised Central Vein
Place the finished leaf right side up.
Join matching yarn at the lower center.
Work loose surface slip stitches from the base toward the central lobe.
Follow the center axis.
Stop approximately 5–8 mm before the upper point.
FO on the wrong side.
Surface crochet is particularly effective for maple-leaf veins because it adds a raised line without requiring a second sewn cord. Keep the loops relaxed; excessive surface-crochet tension contracts the leaf.
Upper Branch Veins
Join matching yarn near the lower third of the central vein.
Surface sl st diagonally toward the left upper lobe.
Stop before reaching the serrated edge.
FO.
Repeat toward the right upper lobe.
Both branches should angle outward from the central spine rather than beginning at the exact same point.
Lower Branch Veins
Join yarn near the base of the central vein.
Work surface sl sts toward the lower-left lobe.
Repeat toward the lower-right lobe.
The completed large leaf now has five dominant raised ribs.
Secondary Veins
Add short branches to the major ribs.
Begin approximately halfway along a primary vein.
Work 3–5 surface slip stitches toward the nearest edge.
Stop approximately 1 cm before the perimeter.
Repeat where additional texture is required.
The large motifs in the reference use strong vein definition, so these shorter branches help fill the broad lobes without changing the silhouette.
Large Leaf Stem
Join matching yarn at the lower center.
Ch 12.
Beginning in the second chain from the hook, sc in each chain back toward the leaf. (11 sc)
Sl st securely into the leaf base.
For a thicker stem, turn and work sl st back along the opposite side of the foundation.
FO leaving a 15 cm tail.
Small Maple Leaf Pattern
The smaller motifs repeat the same visual structure without reproducing every row of the large leaf.
Small Leaf Center
Round 1: 6 sc in MR. (6)
Round 2: 2 sc in each st around. (12)
Round 3: (Sc, inc) ×6. (18)
Small Center Lobe
Row 1: Work 6 sc across the upper center. (6)
Row 2: Increase at both ends. (8)
Rows 3–5: Hdc across. (8)
Row 6: Reduce at both ends. (6)
Row 7: Reduce at both ends. (4)
Row 8: Hdc2tog twice. (2)
Row 9: Sc2tog. (1)
Small Upper Side Lobes
For each side:
Row 1: 5 sc. (5)
Row 2: Increase at both ends. (7)
Rows 3–4: Hdc across. (7)
Row 5: Reduce at both ends. (5)
Row 6: Reduce toward a point. (3)
Row 7: Taper to one stitch.
Small Lower Lobes
Join yarn at each lower side.
Row 1: 4 sc. (4)
Row 2: Increase at both ends. (6)
Rows 3–4: Hdc across. (6)
Row 5: Reduce at both ends. (4)
Row 6: Reduce to a point.
Finishing the Small Leaf
Work sc around the perimeter.
Add ch-2 picots at the five main points and selected secondary points.
Work sl st into every valley.
Add one central surface-slip-stitch vein and four shorter branches.
Ch 7 for the stem, sc back along the chain and attach to the base.
Block to approximately 9–12 cm across.
Blocking the Maple Leaves
Blocking determines whether the motifs read as maple leaves or irregular stars.
Dampen one completed leaf.
Pin the top center point first.
Pin the two upper side points next.
Pull the lower lobes outward and slightly downward.
Push every valley toward the center and pin it.
Pin secondary points only after the five main lobes are positioned.
Arrange the stem last.
For the large motif, target approximately 18–22 cm across. For small leaves, target approximately 9–12 cm.
Allow every motif to dry completely before removing the pins.
Suggested Color Distribution
The photograph uses olive as the dominant shade, followed by cream, ochre and burgundy.
For a runner approximately 140–160 cm long, begin with:
- 4 large olive leaves
- 2 large ochre leaves
- 2 large cream leaves
- 1–2 large burgundy leaves
- 5 small olive leaves
- 4 small cream leaves
- 3 small ochre leaves
- 3 small burgundy leaves
This is a layout starting point rather than a fixed motif count. Runner length changes according to leaf size and the amount of overlap.
Planning the Table Runner
Lay every blocked leaf on the table before joining anything.
Place the large motifs first.
Rotate consecutive leaves so their stems and center points do not all face the same direction.
Overlap neighboring large leaves by approximately 3–5 cm.
Insert small leaves into open spaces along the sides.
Keep the composition narrow enough that plates and place settings can sit on the table without resting on thick crochet motifs.
A finished width of approximately 28–35 cm works well for many dining tables.
Building a Natural Layout
Avoid placing colors in a strict repeating sequence.
Do not arrange olive, cream, burgundy and ochre in identical four-leaf repeats.
Instead, distribute olive leaves through the complete length, then add cream motifs to lighten selected sections.
Place burgundy leaves farther apart because their dark value attracts attention.
Use ochre between green and burgundy sections where a softer transition is required.
The runner should look balanced from a distance without becoming mathematically symmetrical.
Joining the Large Leaves
Thread a yarn needle with matching yarn.
Overlap two leaves by approximately 3–5 cm.
Sew through the back loops of the overlapping fabric.
Use several short attachment zones rather than stitching continuously around the overlap.
Attach near one lobe, the center region and another lobe.
This allows the free points to remain dimensional while preventing the motifs from rotating.
Keep all sewing stitches on the wrong side whenever possible.
Adding the Small Leaves
Position a small leaf where two larger motifs create an unwanted opening.
Overlap approximately 1–2 cm.
Sew through two or three secure points.
Do not sew every small lobe to the runner.
Leaving several points free preserves the layered appearance visible in the reference photograph.
Using the Stems as Structural Joins
A stem can cross the edge of a neighboring leaf and become an additional attachment point.
Position the stem naturally.
Use matching yarn to tack it down in two locations.
Avoid sewing the entire stem flat.
Leaving the final centimeter unattached gives the arrangement a more dimensional outline while still keeping the runner stable.
Checking the Runner Width
Measure the arrangement every 30–40 cm while joining.
If the runner begins widening, rotate the next large leaf so its broad upper lobes point more along the length of the table.
If the runner becomes too narrow, turn the next motif slightly sideways.
This method changes width without altering the leaf pattern itself.
For the reference style, keep most of the arrangement within approximately 28–35 cm.
How to Lengthen the Runner
Modular construction makes length adjustment simple.
Add one large leaf near either end.
Overlap it by approximately 3–5 cm.
Add one or two small leaves around the join.
A large 20 cm leaf with 4 cm of overlap adds roughly 16 cm of usable runner length when positioned primarily along the lengthwise axis.
Repeat until the desired measurement is reached.
Estimating Yarn More Accurately
Complete and block one large leaf and one small leaf.
Weigh each motif on a digital kitchen scale.
If a large leaf weighs 28 g and the runner requires nine:
28 g × 9 = 252 g
If a small leaf weighs 10 g and the runner requires fifteen:
10 g × 15 = 150 g
The motif total would be approximately 402 g before allowing extra yarn for sampling, joining and gauge variation.
This method is more reliable than estimating consumption from the photograph.
Creating Strong Raised Veins
The raised ribs are especially prominent in the photographed large leaves.
Surface slip stitch provides a narrow corded line.
For additional relief, work a second line immediately beside the first central vein.
Do not double every branch. Too much surface crochet adds unnecessary stiffness and can make the leaf curl.
After completing the veins, lay the leaf flat for several minutes.
If one lobe rises more than approximately 5 mm, loosen or redo the branch leading toward that lobe.
Making the Runner Reversible
The front naturally has stronger raised veins than the reverse.
For a cleaner back, weave each surface-crochet tail into stitches of the same motif rather than carrying yarn between branches.
Keep joining stitches short and confined to overlapping areas.
Do not knot several colors together at one junction.
The reverse will not match the textured front, but careful finishing makes it presentable when the runner shifts during use.
Assembly
- Crochet one large maple leaf and complete its pointed edging, stem and five primary raised veins.
- Block the master motif and record its finished width before making the remaining large leaves.
- Crochet and block the smaller maple leaves, keeping their lobe proportions consistent with the large version.
- Make the remaining motifs in olive, cream, ochre and burgundy according to the planned color balance.
- Arrange the large leaves along the table first, rotating their center lobes to create an irregular flowing line.
- Add small leaves to the larger negative spaces while keeping the total runner width within the chosen range.
- Join neighboring large motifs across several short overlapping areas rather than sewing entire edges together.
- Tack small leaves and selected stems to the arrangement while leaving several outer points free.
- Measure the runner and add extra motifs at either end until the required table length is reached.
- Lay the completed runner flat, reshape the exposed points and lightly block any joining areas that shifted during assembly.
The completed runner should lift as one piece while still looking like a loose arrangement of individually defined maple leaves.
7 Technical Tips for a Better Maple Leaf Runner
- Keep the center lobe approximately 15–20% longer than the upper side lobes. Equal points turn a recognizable maple silhouette into a generic star shape.
- Stop every primary surface vein about 5–8 mm before the lobe tip. Running a thick vein into the final picot can make the point curl upward.
- Overlap large leaves by approximately 3–5 cm. Less overlap can make the runner unstable, while excessive overlap hides the pointed outlines that define the design.
- Limit small-leaf overlap to roughly 1–2 cm. These motifs are gap fillers; burying half of each small leaf adds yarn weight without contributing visible detail.
- Keep the overall runner near 28–35 cm wide. A wider centerpiece can interfere with place settings on a standard dining table.
- Check every surface vein before fastening off. If its lobe rises more than about 5 mm from the table, the vein is contracting the fabric and should be loosened.
- Secure each major overlap in at least three separate places. A single attachment point behaves like a hinge and allows neighboring leaves to rotate when the runner is moved.
Choosing the Autumn Color Palette
The reference palette works because the colors vary strongly in value without introducing bright orange.
Olive provides the dominant botanical color. Burgundy supplies the darkest accents. Ochre introduces a warm mid-tone, while natural cream creates the lightest areas.
Use the same yarn line for all four shades when possible. Equal fiber content and thickness make the blocked leaves more consistent.
A useful starting distribution is approximately 35% olive, 25% cream, 20% ochre and 20% burgundy.
Exact percentages are less important than preventing one dark color from forming a continuous stripe down the runner.
Making a Shorter Centerpiece
The same motifs can create a compact centerpiece rather than a full-length runner.
Begin with three large leaves.
Overlap them diagonally.
Add approximately four to six small leaves around the edges.
A cluster built from 18–22 cm large motifs can produce a centerpiece roughly 55–70 cm long, depending on overlap.
No change to the individual leaf pattern is required.
Making a Long Dining-Table Runner
For a runner around 150 cm, arrange the motifs directly on the intended table before sewing.
Start with seven to nine large leaves.
Space the strongest colors first.
Fill the remaining sections with olive and cream.
Add approximately twelve to sixteen small leaves where needed.
Do not attempt to reach the final measurement by stretching the motifs. Add another leaf instead.
Finishing and Care
Inspect the reverse after joining.
Secure every yarn tail through at least several centimeters of matching stitches.
Trim only after confirming that the joining points remain stable when the runner is lifted.
Follow the yarn manufacturer’s washing instructions.
After washing, reshape the runner on a flat surface.
Pin the largest leaves first, then reposition the small leaves and stems.
Do not stretch the entire runner to a fixed rectangle. Its irregular outer edge is part of the design.
Allow the crochet to dry fully before returning it to the table.
Conclusion
The success of this crochet maple leaf table runner pattern depends on preserving each silhouette after the motifs are joined. Make one large and one small leaf first, block them, and use those measurements to plan the complete arrangement. Keep the center lobes dominant, the valleys deep and the surface veins loose enough for every motif to remain flat. Then arrange olive, cream, ochre and burgundy leaves with controlled 3–5 cm overlaps rather than building a solid rectangular base. Your next step is to crochet and weigh the two master motifs before calculating yarn for the full runner. Share the finished centerpiece on Pinterest or Instagram with #AutumnMapleLeafRunner. Which color would you use for the largest central leaf?