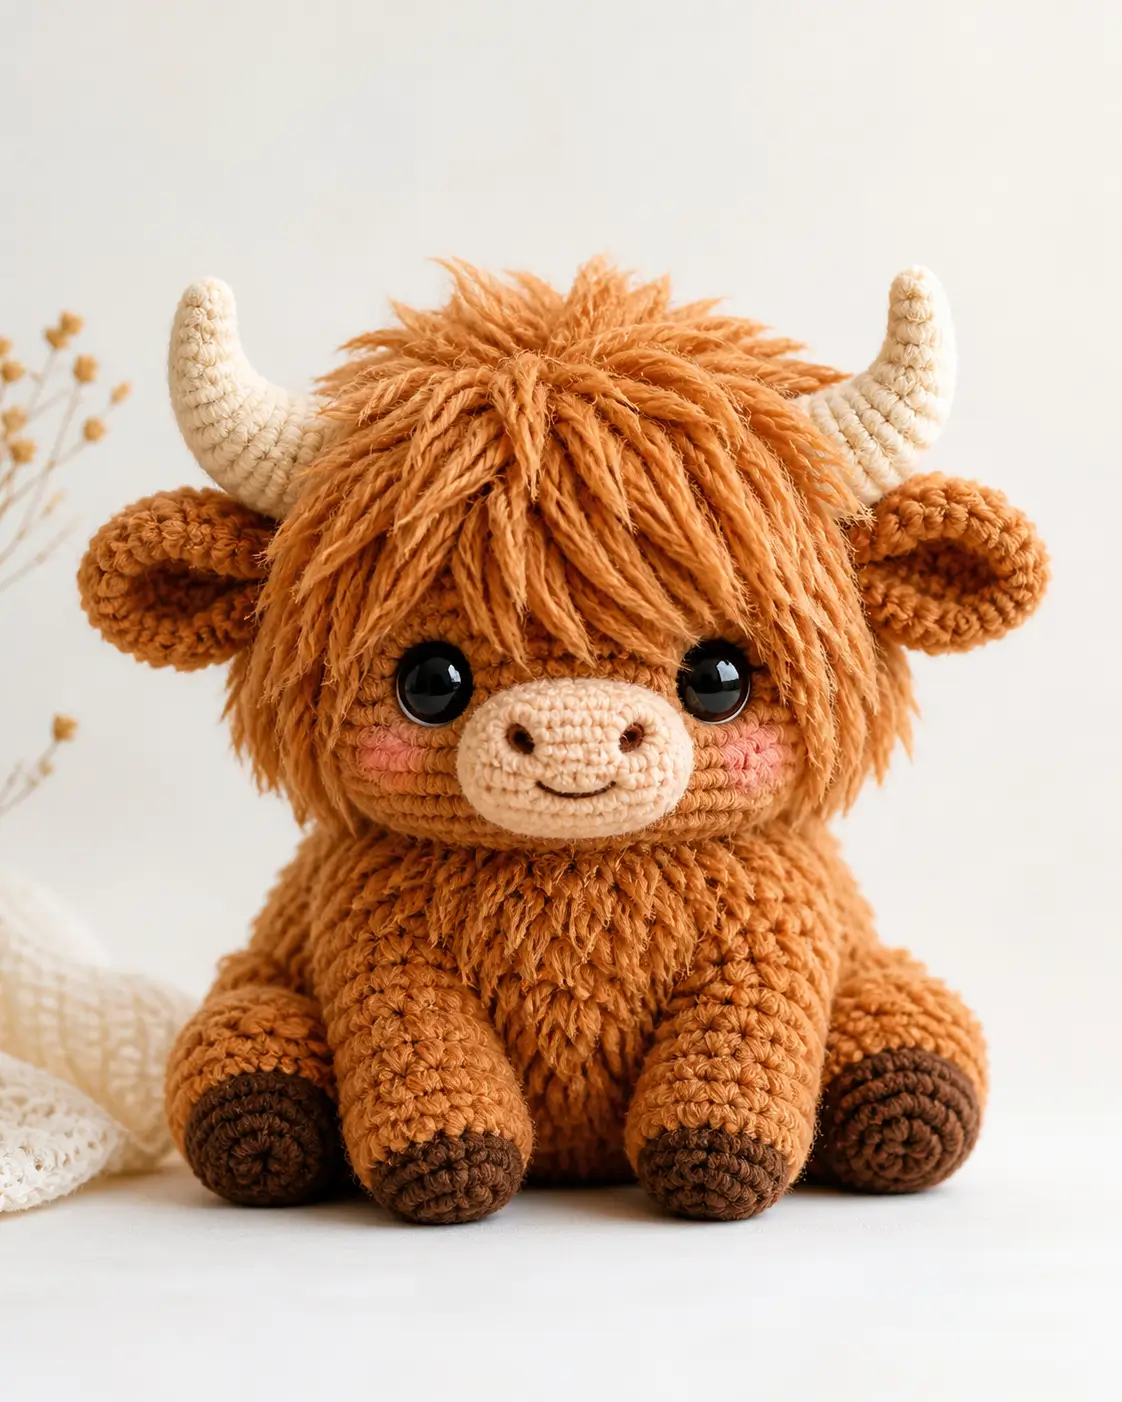
A Highland cow hides its eyes under a forward mop, so the horn angle has to read before the face does. This Highland cow amigurumi crochet pattern uses DK yarn, a 3.5 mm hook, 14 mm safety eyes, and small fringe sections to finish near 21 cm sitting. You will make it at an advanced beginner level for market stock or a nursery shelf; the maker then checks symmetry before the mane goes on.
The Design: What Makes This Highland Cow Different
This design keeps the head broad but not spherical, because the muzzle, cheeks, horns, and fringe all sit on the same front plane. A 36-stitch head plateau gives enough width for 14 mm eyes without pushing the ears too far back. The body uses the same medium plateau, then closes tighter so the toy sits low with the back legs forward. That supports a fuzzy Highland cow amigurumi look without turning the body into a round bear shape. The horns are worked straight, then curved during sewing; that keeps the stitch count clean and the silhouette readable. One common error in a crochet Highland cow tutorial is setting the horns after the hair. That hides the horn base and makes the face look crowded, especially on a Highland cow plush pattern with large eyes.
Project Info at a Glance
| Skill Level | Time | Finished Size | Hook | Best For |
|---|---|---|---|---|
| Advanced beginner | 5–7 hours | About 20–21 cm sitting | 3.5 mm | Farm animal sets, nursery shelves, market plush stock |
Materials and Tools
Yarn
- Ginger brown — DK — 75 g — Paintbox Cotton DK Soft Fudge, Brava Worsted used lightly, or similar smooth acrylic/cotton blend.
- Dark brown — DK — 10 g — hoof pads and nostril embroidery.
- Cream or beige — DK — 5–10 g — muzzle and horns.
- Pink — DK scraps — cheek patches.
- Optional brushed ginger yarn — DK scraps — forelock and chest beard when a fuzzier photo match is needed.
Tools
- Hook 3.5 mm
- 14 mm safety eyes
- Polyester stuffing
- Tapestry needle
- Stitch markers
- Pins
- Scissors
- Black or dark brown embroidery thread
Abbreviations
MR = magic ring; sc = single crochet; inc = 2 sc in one stitch; dec = invisible decrease; sl st = slip stitch; ch = chain; BLO = back loop only; st = stitch; R = round or row.
Work invisible decrease through front loops only so the decrease line stays compact on the muzzle and body.
Pattern — Step by Step
Work in a continuous spiral unless a row or fold is named.
Head
Yarn: ginger brown
R1: 6 sc in MR (6)
R2: inc ×6 (12)
R3: (1 sc, inc) ×6 (18)
R4: (2 sc, inc) ×6 (24)
R5: (3 sc, inc) ×6 (30)
R6: (4 sc, inc) ×6 (36)
R7–R13: sc around (36)
R14: (4 sc, dec) ×6 (30)
R15: sc around (30)
R16: (3 sc, dec) ×6 (24)
R17: (2 sc, dec) ×6 (18)
R18: (1 sc, dec) ×6 (12)
R19: dec ×6 (6)
Insert safety eyes between R10 and R11, 7 stitches apart. Stuff firmly before R18, then close the opening after R19.
Fasten off. Leave a 20 cm tail only if extra closing stitches are needed.
Body
Yarn: ginger brown
R1: 6 sc in MR (6)
R2: inc ×6 (12)
R3: (1 sc, inc) ×6 (18)
R4: (2 sc, inc) ×6 (24)
R5: (3 sc, inc) ×6 (30)
R6: (4 sc, inc) ×6 (36)
R7–R12: sc around (36)
R13: (4 sc, dec) ×6 (30)
R14–R15: sc around (30)
R16: (3 sc, dec) ×6 (24)
R17: sc around (24)
R18: (2 sc, dec) ×6 (18)
R19: (1 sc, dec) ×6 (12)
R20: dec ×6 (6)
Stuff the lower body firmly enough to sit, then add lighter stuffing near the neck so the head does not tilt backward.
Fasten off. Leave a 30 cm tail for sewing.
Front Legs / Arms
Yarn: dark brown for hoof, ginger brown for leg
Make 2.
R1: With dark brown, 6 sc in MR (6)
R2: inc ×6 (12)
R3: (1 sc, inc) ×6 (18)
R4: BLO sc around (18)
R5: sc around (18)
R6: (1 sc, dec) ×6 (12)
R7–R12: Change to ginger brown, sc around (12)
R13: dec ×6 (6)
Stuff the hoof only. Leave the upper arm soft so it sits flat against the body.
Fasten off. Leave a 25 cm tail.
Back Legs
Yarn: dark brown for hoof, ginger brown for leg
Make 2.
R1: With dark brown, 6 sc in MR (6)
R2: inc ×6 (12)
R3: (1 sc, inc) ×6 (18)
R4: (2 sc, inc) ×6 (24)
R5: BLO sc around (24)
R6: sc around (24)
R7: (2 sc, dec) ×6 (18)
R8–R11: Change to ginger brown, sc around (18)
R12: (1 sc, dec) ×6 (12)
R13: sc around (12)
R14: dec ×6 (6)
Stuff the hoof and the first two ginger rounds. Keep the top slightly flat for a seated pose.
Fasten off. Leave a 30 cm tail.
Ears
Yarn: ginger brown
Make 2.
R1: 6 sc in MR (6)
R2: inc ×6 (12)
R3: (1 sc, inc) ×6 (18)
R4–R5: sc around (18)
R6: (1 sc, dec) ×6 (12)
R7: sc around (12)
R8: Fold flat and sc through both layers ×6 (6)
Do not stuff. Pinch the base so the ear cups forward.
Fasten off. Leave a 25 cm tail.
Horns
Yarn: cream
Make 2.
R1: 6 sc in MR (6)
R2–R4: sc around (6)
R5: inc ×6 (12)
R6–R7: sc around (12)
Stuff only the base. After sewing, pull one side of the horn down with two hidden stitches to create the upward curve.
Fasten off. Leave a 30 cm tail.
Oval Muzzle
Yarn: cream or beige
Ch 6.
R1: 2 sc in second ch from hook, sc in next 3 ch, 3 sc in last ch, work underside, sc in next 3 ch, sc in starting ch (12)
R2: inc ×2, sc 3, inc ×3, sc 3, inc ×1 (18)
R3: (2 sc, inc) ×6 (24)
R4–R5: sc around (24)
R6: (2 sc, dec) ×6 (18)
Stuff lightly. Embroider two nostrils 5 stitches apart and a shallow mouth under the center line before sewing the muzzle to the head.
Fasten off. Leave a 35 cm tail.
Cheek Patches
Yarn: pink
Make 2.
R1: 6 sc in MR (6)
R2: inc ×6, sl st to first st (12)
Keep flat. Sew one patch under each eye, slightly behind the muzzle edge.
Fasten off. Leave a 15 cm tail.
Shaggy Forelock and Chest Beard
Yarn: ginger brown or brushed ginger yarn
Forelock, make 15 strands.
R1: For 5 long strands, ch 17, turn, sl st in second ch from hook and each ch across (16)
R2: For 6 medium strands, ch 13, turn, sl st in second ch from hook and each ch across (12)
R3: For 4 short strands, ch 9, turn, sl st in second ch from hook and each ch across (8)
Leave two tails on every strand. Tie or sew the long strands between the horns first, then layer medium and short strands toward the eyes.
Chest beard panel.
R1: Ch 9, sc in second ch from hook and each ch across (8)
R2–R6: Ch 1, turn, sc across (8)
Add 12 larks-head fringe strands, each 12 cm long, through the panel. Brush lightly only if the yarn can tolerate it.
Fasten off. Leave a 30 cm tail.
Tail
Yarn: ginger brown with dark brown tassel
R1: Ch 9, sc in second ch from hook and each ch across (8)
Cut six 10 cm dark brown strands. Fold them through the tail tip and trim to 2 cm.
Fasten off. Leave a 20 cm tail.
Accessory from Photo
No separate toy accessory is visible in the photo. Do not add a bow, bell, scarf, or flower crown when matching the reference image.
Assembly
- Pin the head above the body with the eye line level and the closed head point facing down.
- Attach the body to the underside of the head using the body tail, adding stuffing at the neck if a gap forms.
- Center the muzzle across R11–R15 of the head, then sew around the oval without pulling the cream stitches inward.
- Place the cheek patches under the eyes, one stitch away from the muzzle edge, and sew with pink tails.
- Set the front legs on the body front from R11–R15, with 8–10 stitches between their upper edges.
- Fix the back legs to the lower body from R4–R7 so the dark hoof pads face forward.
- Pin ears on both sides of the head at R9–R11, then sew the folded bases flat.
- Add horns inside the ears, leaving 4 stitches between horn bases across the forehead.
- Sew the forelock between and in front of the horns, attach the chest beard panel to the center body, and place the tail at the back around R8.
- Weave in every tail, trim the mane to just above the eyes, and remove visible pins.
The finished Highland cow sits at about 20–21 cm when made with DK yarn and a 3.5 mm hook.
7 Technical Tips
- Stitch marker drift can move the muzzle off center by 3–4 stitches. Reset the marker at the back of the head after R6 and again before placing the eyes.
- Loose stuffing at the neck creates a backward head tilt. Pack a firm ring of fiberfill into the top 2 cm of the body before closing.
- A bulky visible decrease line will show across the forehead under the mane. Use front-loop invisible decreases on R14–R19 of the head.
- Eye placement after closing the head risks cracked safety-eye washers or uneven spacing. Insert 14 mm eyes between R10 and R11 while the opening is still wide.
- Velvet or faux-fur tension can hide missed stitches in the forelock. Count every chain strand before sewing and keep long strands at 16 stitches.
- Unpinned horns often twist outward like goat horns. Pin both horn bases with exactly 4 stitches between them before sewing the first side.
- Short tail weaving can pull out during handling. Run each tail through at least 3 cm of stuffed fabric, then change direction once before trimming.
Conclusion
Use the first finished cow as a gauge sample before making a herd. Measure the sitting height, check the eye spacing, and note the exact mane length that keeps the eyes partly visible. For a closer photo match, trim the center forelock last, after the horns and ears are sewn. Save this Highland cow amigurumi crochet pattern to Pinterest, then post the finished front-view photo on Instagram with the hashtag #HighlandCowAmigurumi. The next practical step is to test one ear and one horn in your chosen yarn before starting the full head. Should the forelock cover both eyes, or should one glossy eye stay fully visible?









