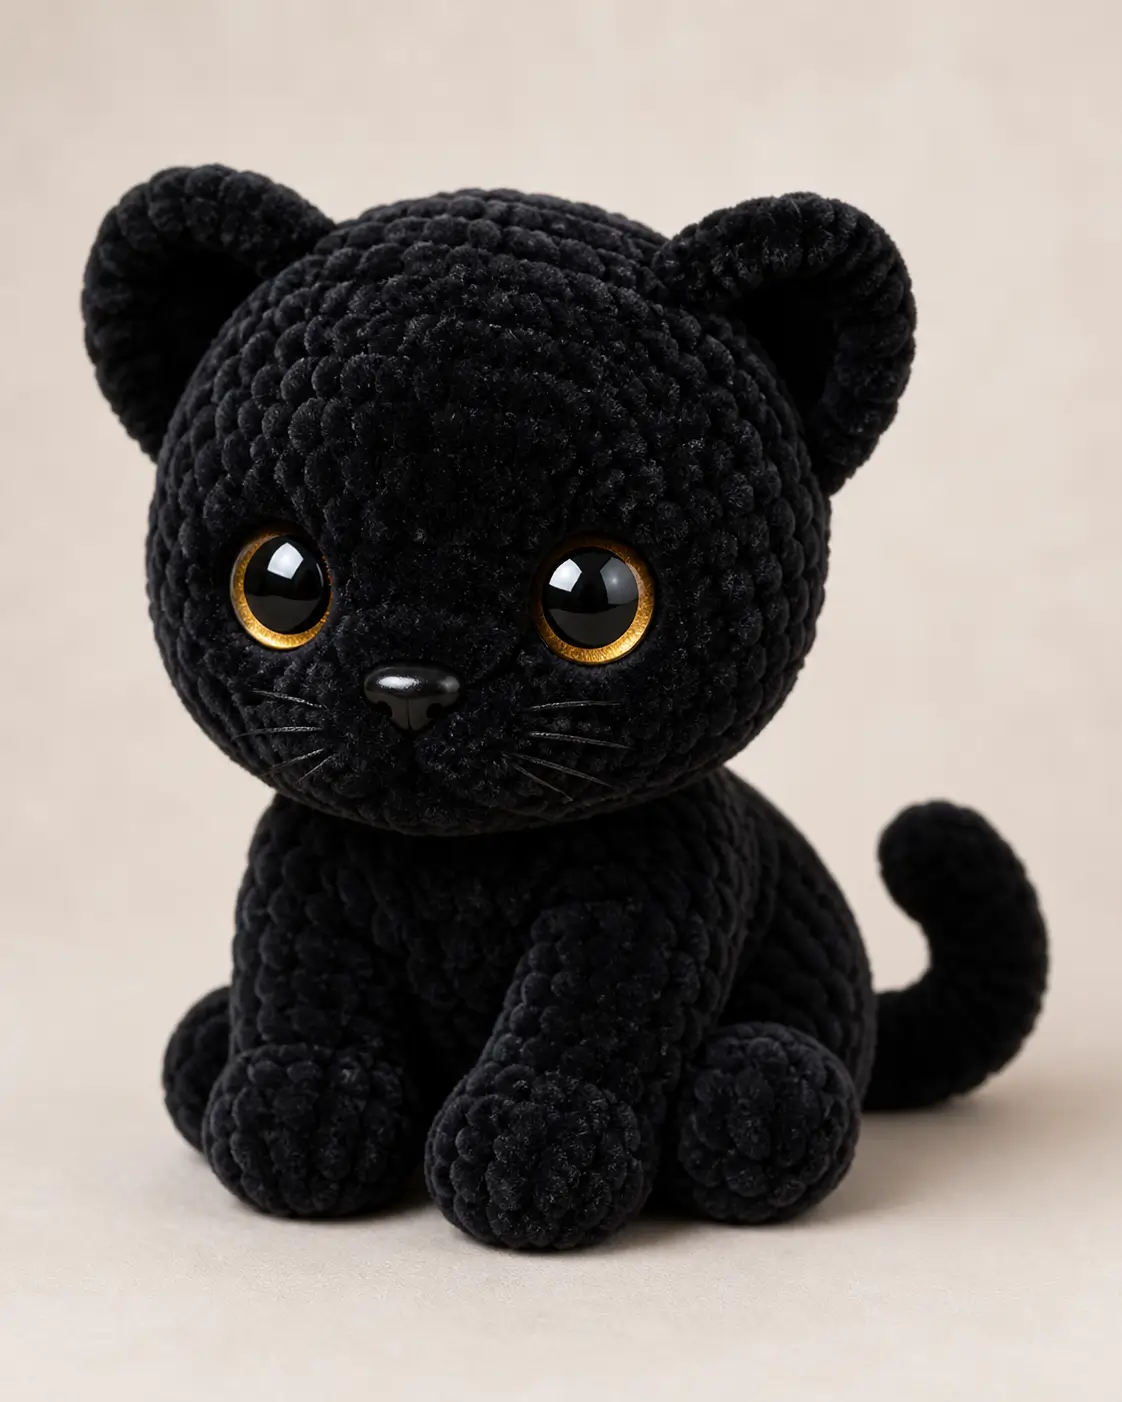
A black cat disappears into its own stitch shadows unless the face breaks the silhouette. This black cat amigurumi crochet pattern uses black velvet yarn, gold safety eyes, a plastic nose, whiskers, and a 5 mm hook for a 21 cm sitting cat. The build is intermediate because dark plush yarn hides stitches. Make it as a shelf sitter where the curled tail braces the body.
The Design: What Makes Nocturne Different
This design puts the head first. A black cat needs large facial landmarks, so the head reaches a 42-stitch plateau while the body stays narrower at 36 stitches. That contrast gives the black cat crochet plush its kitten-like proportion without tipping forward. The ears are short cones, not flat triangles, because velvet yarn rounds every edge after sewing. A flat ear can vanish against the head. The cheek patches are same-color discs placed under the eyes; they raise the muzzle just enough to hold whiskers. Most crochet black cat pattern drafts fail at the face stage by using ordinary black eyes on black yarn. Gold cat eyes solve that contrast problem, and they also match the photo’s main visual feature. This velvet cat amigurumi needs pinned symmetry before any tail is woven in.
Project Info at a Glance
| Skill Level | Time | Finished Size | Hook | Best For |
|---|---|---|---|---|
| Intermediate | 8–10 hours | 21 cm seated | 5 mm | Shelf sitter, Halloween cat amigurumi, black cat display plush |
The time estimate is taken from comparable intermediate black cat plush sizing; the finished size and hook match a verified Bernat Velvet black cat reference.
Materials and Tools
Yarn
- Black — bulky velvet / chenille — under 150 g — Bernat Velvet Blackbird, Premier Parfait Chunky Black, or a similar plush polyester yarn.
- Gold — DK or worsted cotton — 2–5 g — for optional eye rims if the safety eyes do not already have gold irises.
- Black embroidery thread — light amount — for whiskers and nose line.
- Dark gray — small scrap — optional whisker substitute when black thread disappears against the face.
Tools
- Hook 5 mm
- 18 mm amber cat safety eyes
- 12–15 mm black safety nose
- Polyester stuffing
- Yarn needle
- Stitch markers
- Pins
- Scissors
- Optional pipe cleaner for tail display only, never for toys meant for children
A 5 mm hook and Bernat Velvet sizing are verified for a 21 cm black cat, while 18 mm safety eyes appear in comparable super-bulky black cat references.
Abbreviations
- MR = magic ring
- sc = single crochet
- inc = increase, 2 sc in one stitch
- dec = decrease, 2 stitches worked together
- sl st = slip stitch
- ch = chain
- BLO = back loop only
- FLO = front loop only
- rnd = round
For an invisible decrease, insert the hook through the front loop of each of the next 2 stitches, yarn over, pull through both front loops, yarn over again, and pull through both loops on the hook.
Pattern — Step by Step
Continuous spiral unless a row instruction says otherwise. Place the marker in the first stitch of every round. The stitch math below is original and follows a 6-stitch amigurumi base with 6-stitch increase and decrease changes.
Head
Yarn: black velvet — Source: Standard amigurumi math; size reference verified from 21 cm velvet black cat data.
R1: 6 sc in MR (6)
R2: inc ×6 (12)
R3: (sc, inc) ×6 (18)
R4: (2 sc, inc) ×6 (24)
R5: (3 sc, inc) ×6 (30)
R6: (4 sc, inc) ×6 (36)
R7: (5 sc, inc) ×6 (42)
R8: sc around (42)
R9: sc around (42)
R10: sc around (42)
R11: sc around (42)
R12: sc around (42)
R13: sc around (42)
R14: sc around (42)
Place the eyes between R10 and R11, 9 stitches apart. Place the nose centered between the eyes, about 2 rounds lower. Add the washers before decreasing.
R15: (5 sc, dec) ×6 (36)
R16: (4 sc, dec) ×6 (30)
R17: (3 sc, dec) ×6 (24)
R18: (2 sc, dec) ×6 (18)
R19: (sc, dec) ×6 (12)
R20: dec ×6 (6)
Fasten off. Close the hole and weave the tail through the head.
Body
Yarn: black velvet — Source: Standard amigurumi math.
R1: 6 sc in MR (6)
R2: inc ×6 (12)
R3: (sc, inc) ×6 (18)
R4: (2 sc, inc) ×6 (24)
R5: (3 sc, inc) ×6 (30)
R6: (4 sc, inc) ×6 (36)
R7: sc around (36)
R8: sc around (36)
R9: sc around (36)
R10: sc around (36)
R11: sc around (36)
R12: sc around (36)
R13: sc around (36)
Stuff the lower body firmly. Keep the neck slightly softer so the head can sit flat.
R14: (4 sc, dec) ×6 (30)
R15: (3 sc, dec) ×6 (24)
R16: (2 sc, dec) ×6 (18)
R17: (sc, dec) ×6 (12)
R18: dec ×6 (6)
Fasten off. Leave a 35 cm tail for joining.
Front Legs
Make 2. Yarn: black velvet — Source: Standard amigurumi math.
R1: 6 sc in MR (6)
R2: inc ×6 (12)
R3: (sc, inc) ×6 (18)
R4: sc around (18)
R5: sc around (18)
R6: sc around (18)
R7: sc around (18)
R8: sc around (18)
R9: (sc, dec) ×6 (12)
R10: sc around (12)
R11: sc around (12)
Stuff the paw end only. Leave the upper half lightly filled so the leg sits close to the body.
Fasten off. Leave a 25 cm tail on each leg.
Back Legs
Make 2. Yarn: black velvet — Source: Standard amigurumi math.
R1: 6 sc in MR (6)
R2: inc ×6 (12)
R3: (sc, inc) ×6 (18)
R4: sc around (18)
R5: sc around (18)
R6: sc around (18)
R7: sc around (18)
R8: (sc, dec) ×6 (12)
R9: sc around (12)
Flatten the open edge slightly before sewing. The roundest side faces forward as the paw.
Fasten off. Leave a 30 cm tail.
Ears
Make 2. Yarn: black velvet — Source: Standard amigurumi math; cone style chosen to match plush rounded ears.
R1: 6 sc in MR (6)
R2: sc around (6)
R3: inc ×6 (12)
R4: sc around (12)
R5: (sc, inc) ×6 (18)
R6: sc around (18)
R7: (2 sc, inc) ×6 (24)
R8: sc around (24)
Do not stuff. Flatten each ear with the seam line centered at the back.
Fasten off. Leave a 30 cm tail.
Cheek Patches
Make 2. Yarn: black velvet — Source: Standard amigurumi math.
R1: 6 sc in MR (6)
R2: inc ×6 (12)
R3: (sc, inc) ×6 (18)
Sl st to close (18)
These are same-color raised muzzle pads, not colored cheeks. Sew them under the eyes so their inner edges touch below the nose.
Fasten off. Leave a 20 cm tail.
Gold Eye Rims
Make 2. Yarn: gold DK cotton — Source: visual accessory from photo; measurement adjusted to 18 mm eyes.
Ch 18, join with sl st without twisting (18)
R1: sc in each ch around (18)
Sl st into first sc (18)
Test around the eye before locking the washer. If the ring crowds the post, sew it around the eye after the head is closed.
Fasten off. Leave a 15 cm tail.
Tail
Yarn: black velvet — Source: Standard amigurumi math; curled tail reference confirmed in black cat pattern sources.
R1: 6 sc in MR (6)
R2: sc around (6)
R3: sc around (6)
R4: sc around (6)
R5: sc around (6)
R6: sc around (6)
R7: sc around (6)
R8: sc around (6)
R9: sc around (6)
R10: sc around (6)
R11: sc around (6)
R12: sc around (6)
R13: sc around (6)
R14: sc around (6)
R15: sc around (6)
R16: sc around (6)
R17: sc around (6)
R18: sc around (6)
Do not overstuff. Bend into a loose C-shape before sewing; display wire may be inserted only when the plush is not for a child.
Fasten off. Leave a 35 cm tail.
Whiskers
Make 6. Material: black embroidery thread or dark gray thread — Source: photo feature.
Cut six strands, each 9 cm long. Thread three strands through each cheek patch after the patches are sewn. Knot inside the velvet surface if the needle can pass through the head; otherwise secure each strand with a tiny backstitch hidden under the cheek patch.
Trim the whiskers to 3.5–4 cm on each side after the face is complete.
Assembly
- Pin the head to the body with the head tilted 5–8 mm forward.
- Sew the body to the head through the final 12-stitch neck area, passing through each join twice.
- Sew both cheek patches under the nose, with their inner edges touching at the center line.
- Add or tighten the gold eye rims around the safety eyes.
- Stitch a short vertical line under the nose using black embroidery thread.
- Sew the front legs to the upper body, starting 2 rounds below the neck.
- Attach the back legs to the lower body so the paws sit flat on the surface.
- Pin the ears between head rounds R4 and R8, then sew around each base twice.
- Attach the tail at the back lower body and curve it upward along the right side.
- Add whiskers last, trim both sides evenly, and bury every yarn tail inside the body.
The finished black cat sits at about 21 cm when made with bulky velvet yarn and a 5 mm hook.
7 Technical Tips
- Mark the first stitch with a locking marker on every round. Failure mode: black velvet hides the round join, and one missed first stitch rotates the eye line by half a stitch every few rounds.
- Check the 42-stitch head plateau after R7, R10, and R14. Failure mode: a 40- or 44-stitch head will make the eyes sit unevenly even when the washers are placed correctly.
- Stuff the head to tennis-ball firmness before R18. Failure mode: a soft head caves around the safety-eye washers and makes the gold irises point downward.
- Place the eyes before R15, not after the head is closed. Exact placement: between R10 and R11, with 9 stitches between the eye posts.
- Work all head decreases in FLO invisible decrease. Failure mode: standard decreases create black ridges that catch light across the forehead and muzzle.
- Pin the ears with 16 stitches between the inner ear bases. Failure mode: closer spacing makes the cat look like a bear because plush yarn rounds the ear tips.
- Sew the tail with a 35 cm yarn tail and anchor it through a square of 4 body stitches. Failure mode: a curled tail sewn to one stitch will pull loose when the cat is repositioned.
Conclusion
Finish the face before judging the body shape. On an all-black plush cat, the silhouette depends on gold eyes, raised cheek patches, and the angle of the ears more than on color changes. The next practical step is to crochet the head first, install the eyes at R10–R11, then photograph the face under bright side light before closing the piece. Save this black cat amigurumi crochet pattern to Pinterest and post the finished cat on Instagram with the tail side visible. Use hashtag #NocturneBlackCat. Which detail changes the cat more on your version: wider gold eye rims or a tighter curl in the tail?









