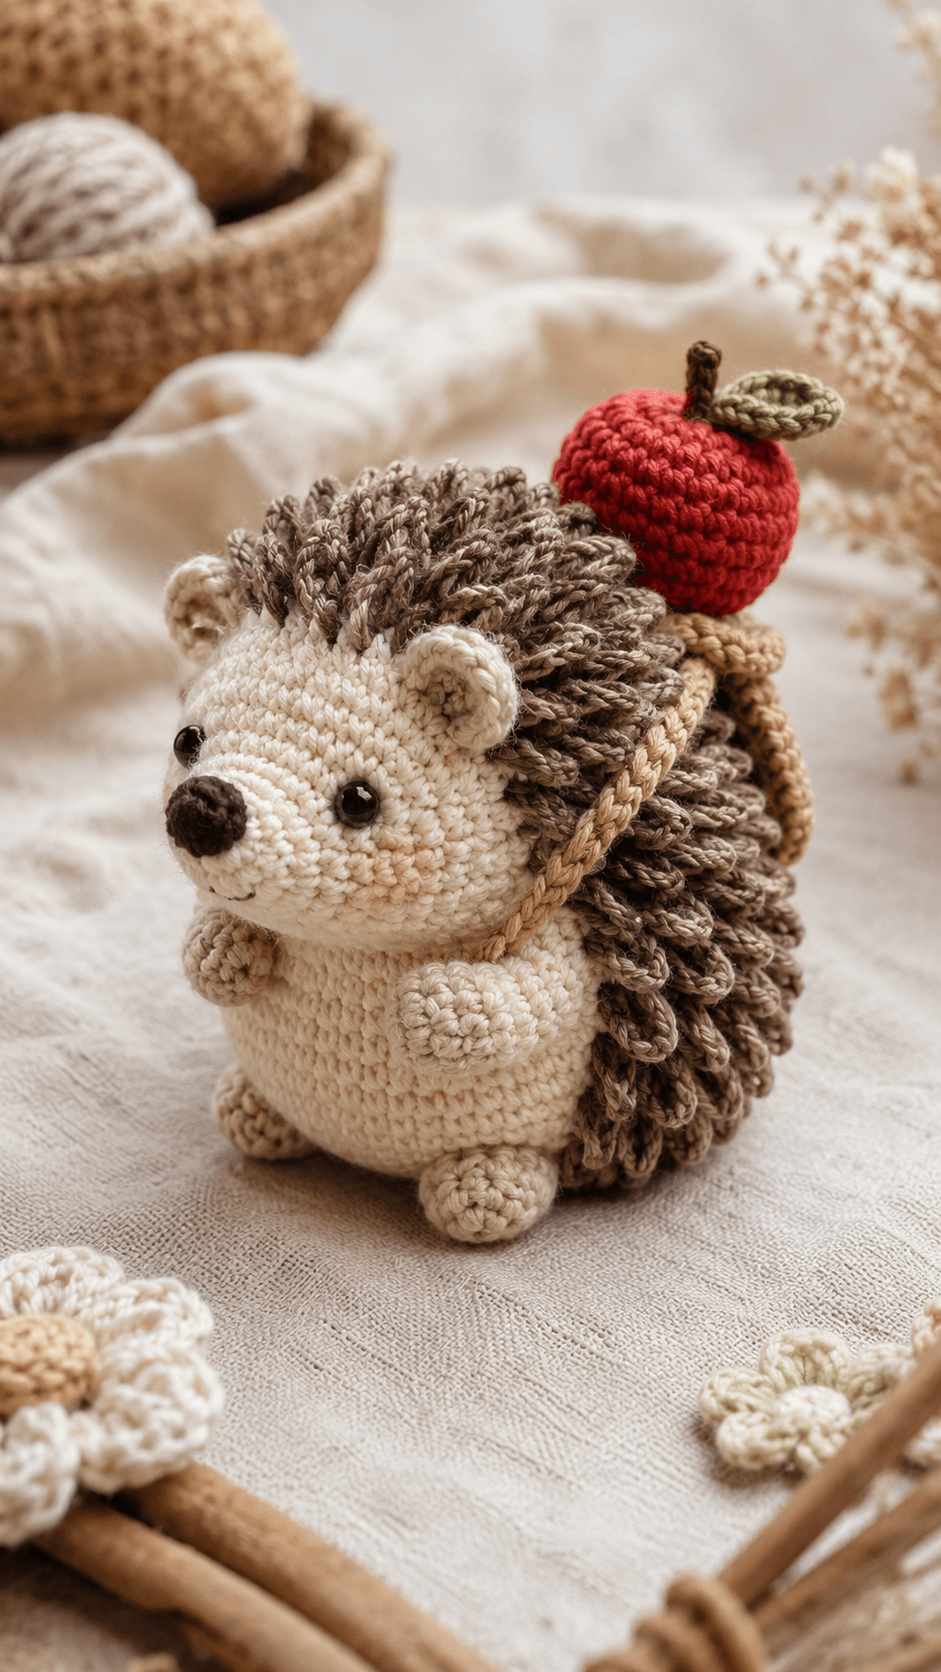
Hedgehogs are identified from the back before the face. That spine line has to do most of the work. This hedgehog amigurumi pattern uses a compact cream body, a warm taupe-brown back worked with looped spines, small rounded ears, short paws, and a tiny apple backpack that shifts the design from plain woodland plush to storybook toy. The structure suits intermediate crocheters who can manage clean shaping, controlled loop stitches, and tight assembly on a small standing figure.
The Design: What Makes This Hedgehog Different
This hedgehog is built around contrast, not complexity. The cream face and belly keep the front soft and readable, while the loop-stitch back creates a dense spine field that immediately fixes the species. Without that strong texture break, the figure reads like a generic bear or hamster with a long nose.
The second design choice is the body proportion. The torso is short, rounded, and almost cylindrical from the front, but the side view stays deeper through the back than through the chest. That matters in a woodland amigurumi because hedgehogs carry most of their visual volume behind the face line.
The third choice is the accessory. The apple backpack adds narrative and gives the side seam a purpose. One common mistake with a hedgehog amigurumi pattern is attaching the arms too low and the spines too far forward. That crowds the muzzle and removes the clean cream face patch that keeps the expression clear.
Project Info at a Glance
| Skill Level | Time | Finished Size | Hook | Best For |
|---|---|---|---|---|
| Intermediate | 5–8 hours | Approx. 14–18 cm tall | 2.5–3.25 mm | Woodland decor, nursery shelves, gift sets |
Materials and Tools
Yarn
- Cream — DK or light worsted — 40–50 g — cotton or cotton blend
- Taupe brown — DK or light worsted — 35–45 g — for spines and back
- Red — DK — 8–10 g — for apple
- Leaf green — DK — 2–3 g — for apple leaf
- Dark brown — small amount — for nose and stem
Tools
- Hook 2.5 mm to 3.25 mm
- Safety eyes 8 mm or 9 mm
- Polyfill stuffing
- Tapestry needle
- Stitch markers
- Small brush optional for softening loop spines
Abbreviations
- MR = magic ring
- sc = single crochet
- inc = increase
- dec = invisible decrease
- sl st = slip stitch
- ch = chain
- BLO = back loop only
- FLO = front loop only
- lp st = loop stitch
Use invisible decrease on the head, body, and apple. It reduces bulk and keeps the surface cleaner around visible shaping lines.
Construction Overview
This hedgehog is made in separate parts. The head is worked first in cream with a narrow muzzle and a round crown. The body is a compact oval form with a cream front and a brown back section covered in loop stitches. Small ears, arms, and feet are added after stuffing. The apple is made as a separate mini accessory and attached to a crocheted strap so it reads as a backpack rather than a loose prop.
Pattern — Step by Step
Work in a continuous spiral unless noted.
Head (Make 1)
Yarn: cream
- R1: 6 sc in MR (6)
- R2: inc x6 (12)
- R3: (sc, inc) x6 (18)
- R4: (2 sc, inc) x6 (24)
- R5: (3 sc, inc) x6 (30)
- R6: (4 sc, inc) x6 (36)
- R7–R11: sc around (36)
- R12: (4 sc, dec) x6 (30)
- R13: sc around (30)
- R14: (3 sc, dec) x6 (24)
- Insert eyes between R9 and R10, spaced 8 sts apart.
- R15: (2 sc, dec) x6 (18)
- Stuff firmly.
- R16: (sc, dec) x6 (12)
- R17: dec x6 (6)
Fasten off. Close opening.
Body (Make 1)
Yarn: cream for front, taupe brown for back section
- R1: 6 sc in MR (6)
- R2: inc x6 (12)
- R3: (sc, inc) x6 (18)
- R4: (2 sc, inc) x6 (24)
- R5: (3 sc, inc) x6 (30)
- R6: (4 sc, inc) x6 (36)
- R7–R9: sc around (36)
- R10: Change to brown across the back half of the round and cream across the front half. sc around (36)
- R11–R15: sc around, keeping front cream and back brown (36)
- R16: (4 sc, dec) x6 (30)
- R17: sc around (30)
- R18: (3 sc, dec) x6 (24)
- Stuff the base firmly.
- R19: (2 sc, dec) x6 (18)
- R20: sc around (18)
Fasten off with a long tail for sewing to head.
Spine Panel / Looped Back (Work onto body)
Yarn: taupe brown
- Attach brown yarn at the back of the body around R8.
- Work lp st evenly down the back in vertical and slightly staggered rows, covering the brown half from upper body to lower back.
- Keep the cream side visible from the face line through the belly.
Do not place loops too close to the side seam. Leave a clean cream edge at both cheeks.
Muzzle Bump (Optional, Make 1)
Yarn: cream
- R1: 6 sc in MR (6)
- R2: inc x6 (12)
- R3: sc around (12)
Lightly stuff. Sew to lower front of head. Embroider nose in dark brown.
Ears (Make 2)
Yarn: cream
- R1: 6 sc in MR (6)
- R2: (sc, inc) x3 (9)
- R3: sc around (9)
Flatten. Fasten off with tail for sewing.
Arms (Make 2)
Yarn: cream
- R1: 6 sc in MR (6)
- R2–R5: sc around (6)
Stuff very lightly. Flatten top. Fasten off with tail.
Feet (Make 2)
Yarn: cream
- R1: 6 sc in MR (6)
- R2: (sc, inc) x3 (9)
- R3: sc around (9)
Lightly stuff. Flatten slightly. Fasten off with tail.
Apple (Make 1)
Yarn: red
- R1: 6 sc in MR (6)
- R2: inc x6 (12)
- R3: (sc, inc) x6 (18)
- R4–R6: sc around (18)
- R7: (sc, dec) x6 (12)
- Stuff lightly.
- R8: dec x6 (6)
Fasten off. Close. Embroider a slight indentation at top and bottom.
Apple Stem (Make 1)
Yarn: dark brown
- Ch 4.
- Sl st back along chain.
Sew to top of apple.
Apple Leaf (Make 1)
Yarn: leaf green
- Ch 6.
- Starting in 2nd ch from hook: sc, hdc, dc, hdc, sc.
- Work along opposite side of chain: sc, hdc, dc, hdc, sc.
Fasten off. Sew beside stem.
Backpack Strap (Make 1)
Yarn: beige or taupe
- Ch 26–30 depending on final fit.
- Sl st back along chain for a firm cord.
Fasten off with long tails.
Assembly
- Sew the head to the body with the cream face centered over the cream belly.
- Attach the ears at the top sides of the head, slightly behind the eye line.
- Sew the muzzle bump to the lower front if using it, then embroider the nose.
- Attach the arms high on the upper body, close to the cream chest panel.
- Sew the feet near the lower front edge so the figure sits upright.
- Work or adjust the looped spines so the back remains fuller than the front.
- Sew the backpack strap diagonally over the shoulders and around the back.
- Attach the apple to the upper back on the strap line.
- Check that the apple sits above the spine field, not inside it.
- Shape the toy by hand and redistribute stuffing through the lower body if needed.
The figure should stand in a compact upright pose with the apple visible in three-quarter view.
7 Technical Tips
- Mark the center front before adding the spines. If loop stitches cross the cheek line, the cream face patch narrows and the hedgehog loses species definition.
- Use 8 mm or 9 mm eyes only. Larger eyes flatten the muzzle visually and make the face read more like a bear cub.
- Stuff the lower body more firmly than the head. A soft base tips backward once the backpack is attached.
- Keep each loop stitch close in height. Mixed loop length makes the back look ragged rather than dense.
- Attach the arms one round below the neck seam. Lower than that, and the toy looks short-armed and front-heavy.
- Fit the strap before sewing the apple down. A strap that is too loose slides into the spine field and disappears.
- Weave ends into the body core, not the outer loops. Loose ends trapped in the spine panel are difficult to hide cleanly.
Conclusion
A hedgehog amigurumi pattern works when the cream face stays open, the back stays dense with texture, and the silhouette remains fuller behind the head than in front of it. Focus on clean side boundaries for the spines, compact limb placement, and a high accessory position for the apple backpack. That combination keeps the toy readable from every angle. For the closest match to the sample, use a soft cream body, warm taupe looped spines, a rounded muzzle, and a bright red apple placed high on the back strap.









