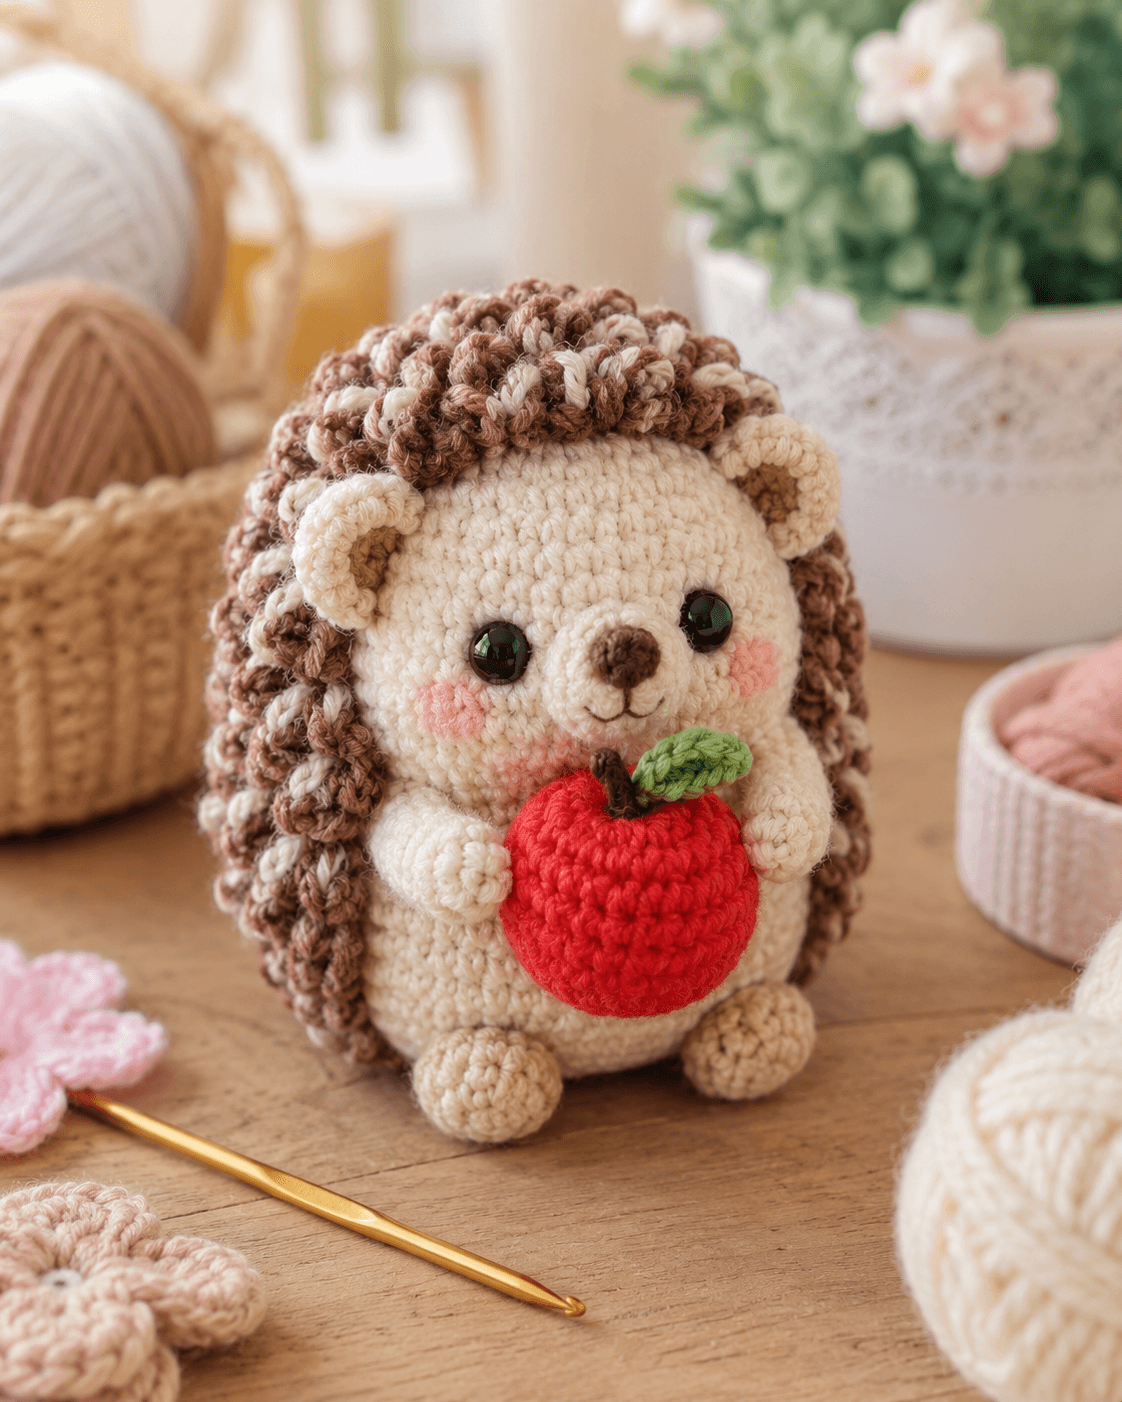
Hedgehog quills read as texture first, shape second. This hedgehog amigurumi crochet pattern is built around a smooth cream face, a rounded seated body, layered brown-and-cream back strips, and a small apple accessory. Use DK to light-worsted yarn with a 3.0 mm hook for a compact finish. The project suits an intermediate maker because placement controls the character more than stitch variety.
The Design: What Makes This Hedgehog Different
This hedgehog is not a flat oval with spikes added as an afterthought. The face stays open and pale, while the textured back wraps from crown to lower body in dense looped strips that imitate soft quills instead of sharp points. That decision matters because a real hedgehog silhouette depends on contrast between the clean snout area and the heavier outer coat. The second choice is the apple placement. It sits high against the belly, so the arms angle inward and help frame the face. A third choice is the short snout. Too much projection turns the head into a bear. Too little leaves the front flat. One common mistake in a crochet hedgehog pattern is sewing the quill section too far forward. Then the forehead disappears and the eyes look crowded.
Project Info at a Glance
| Skill Level | Time | Finished Size | Hook | Best For |
|---|---|---|---|---|
| Intermediate | 6–8 hours | About 15–18 cm seated | 3.0 mm | Shelf decor, gift make, seasonal display |
Materials and Tools
Yarn
- Cream — DK or light worsted — about 45 g — for head, body, ears, arms
- Light beige — same weight — about 15 g — for feet and inner ear detail
- Brown variegated or brown + cream held by color changes — same weight — about 60–70 g — for quill strips
- Red — same weight — about 12 g — for apple
- Green — scrap amount — for leaf
- Dark brown — scrap amount — for nose, mouth, stem
- Pink — scrap amount — for cheek patches
Tools
- Hook 3.0 mm
- 9 mm safety eyes
- Polyester stuffing
- Tapestry needle
- Stitch markers
- Scissors
Abbreviations
MR = magic ring, sc = single crochet, inc = increase, dec = decrease, sl st = slip stitch, ch = chain, BLO = back loop only, FO = fasten off. Use invisible decrease on visible shaping rounds so the cream face stays smooth around the muzzle and eye area.
Pattern — Step by Step
Continuous spiral unless noted.
Head (Make 1)
Yarn: cream — Standard amigurumi math adapted to photo proportions
R1: 6 sc in MR (6)
R2: inc x6 (12)
R3: [sc, inc] x6 (18)
R4: [2 sc, inc] x6 (24)
R5: [3 sc, inc] x6 (30)
R6: [4 sc, inc] x6 (36)
R7–12: sc around (36)
R13: [4 sc, dec] x6 (30)
R14: sc around (30)
R15: [3 sc, dec] x6 (24)
R16: sc around (24)
Insert eyes between R10 and R11, about 7 stitches apart. Stuff firmly before closing.
R17: [2 sc, dec] x6 (18)
R18: [sc, dec] x6 (12)
R19: dec x6 (6)
FO. Leave a 25 cm tail.
Body (Make 1)
Yarn: cream — Standard amigurumi math adapted to seated shape
R1: 6 sc in MR (6)
R2: inc x6 (12)
R3: [sc, inc] x6 (18)
R4: [2 sc, inc] x6 (24)
R5: [3 sc, inc] x6 (30)
R6: [4 sc, inc] x6 (36)
R7–11: sc around (36)
R12: [4 sc, dec] x6 (30)
R13–14: sc around (30)
R15: [3 sc, dec] x6 (24)
R16: sc around (24)
Stuff the base densely so the hedgehog sits level. Keep the top third slightly softer for easier head attachment.
R17: [2 sc, dec] x6 (18)
R18: sc around (18)
FO. Leave a 30 cm tail.
Snout (Make 1)
Yarn: cream — Short muzzle for the pictured face
R1: 6 sc in MR (6)
R2: inc x6 (12)
R3–4: sc around (12)
R5: [sc, dec] x4 (8)
Stuff lightly. Embroider the nose on the front center before sewing to the head.
FO. Leave a 25 cm tail.
Ears (Make 2)
Yarn: cream
R1: 6 sc in MR (6)
R2: [sc, inc] x3 (9)
R3: sc around (9)
Add a small inner ear stitch detail in beige or brown after sewing.
FO. Leave a 15 cm tail.
Arms (Make 2)
Yarn: cream
R1: 6 sc in MR (6)
R2: [sc, inc] x3 (9)
R3–5: sc around (9)
R6: [sc, dec] x3 (6)
R7: sc around (6)
Stuff only the lower half. Flatten the top edge.
FO. Leave a 20 cm tail.
Legs (Make 2)
Yarn: light beige
R1: 6 sc in MR (6)
R2: inc x6 (12)
R3–4: sc around (12)
R5: [sc, dec] x4 (8)
Stuff lightly so the feet stay rounded but not rigid. Flatten the top edge.
FO. Leave a 20 cm tail.
Cheek Patches (Make 2)
Yarn: pink — Flat circles
R1: 6 sc in MR (6)
R2: inc x6 (12)
FO. Leave a 12 cm tail.
Center Quill Panel (Make 1)
Yarn: brown variegated — Worked in rows with loop texture
Ch 10.
Row 1: starting in 2nd ch from hook, sc 9, ch 1, turn (9)
Row 2: loop sc in each st across, ch 1, turn (9)
Row 3: sc in each st across, ch 1, turn (9)
Row 4: loop sc in each st across, ch 1, turn (9)
Row 5: sc in each st across, ch 1, turn (9)
Row 6: loop sc in each st across, ch 1, turn (9)
Row 7: sc in each st across, ch 1, turn (9)
Row 8: loop sc in each st across, ch 1, turn (9)
Row 9: sc in each st across
Use slightly loose tension on loop rows so the panel curves over the head and back without pulling.
FO. Leave a 35 cm tail.
Side Quill Panels (Make 2)
Yarn: brown variegated
Ch 8.
Row 1: starting in 2nd ch from hook, sc 7, ch 1, turn (7)
Row 2: loop sc in each st across, ch 1, turn (7)
Row 3: sc in each st across, ch 1, turn (7)
Row 4: loop sc in each st across, ch 1, turn (7)
Row 5: sc in each st across, ch 1, turn (7)
Row 6: loop sc in each st across, ch 1, turn (7)
Row 7: sc in each st across, ch 1, turn (7)
Row 8: loop sc in each st across
Make the loops on the same side for both panels so the texture faces outward after sewing.
FO. Leave 25 cm tails.
Apple (Make 1)
Yarn: red — Rounded accessory from the photo
R1: 6 sc in MR (6)
R2: inc x6 (12)
R3: [sc, inc] x6 (18)
R4: [2 sc, inc] x6 (24)
R5: [3 sc, inc] x6 (30)
R6–8: sc around (30)
R9: [3 sc, dec] x6 (24)
R10: [2 sc, dec] x6 (18)
Stuff firmly to keep the apple round.
R11: [sc, dec] x6 (12)
R12: dec x6 (6)
FO. Leave a 25 cm tail.
Apple Leaf (Make 1)
Yarn: green
Ch 6.
Row 1: starting in 2nd ch from hook, sl st, sc, hdc, sc, sl st
FO. Leave a 12 cm tail.
Apple Stem (Make 1)
Yarn: dark brown
Ch 4.
Row 1: starting in 2nd ch from hook, sl st 3
FO. Leave a 10 cm tail.
Assembly
- Sew the head to the body with the face angled only slightly downward.
- Pin the snout centered between the eyes and low enough to leave room for cheek patches.
- Sew the snout in place, adding a pinch of stuffing during the last section if needed.
- Attach the ears to the upper sides of the head, just behind the eye line.
- Sew the cheek patches below and slightly outside each eye.
- Attach the center quill panel from the top of the forehead over the crown to the lower back.
- Sew one side quill panel on each side so the cream face remains visible from the front.
- Sew the arms to the upper body and angle them inward toward the belly center.
- Attach the legs low on the front body so the hedgehog sits upright without rocking.
- Sew the apple to the hands and belly, then attach the stem and leaf at the top.
The finished hedgehog should sit on both feet, with the apple held high and the quill panels framing the face instead of covering it.
7 Technical Tips
- Keep the safety eyes on the same horizontal line. A difference of even one round changes the expression and makes the snout look twisted.
- Do not overbuild the snout. On a 12-stitch muzzle, extra stuffing pushes the nose too far forward and shifts the apple away from the chest.
- Pin the quill panels before sewing any tail ends. If the front edge crosses closer than about 1 cm to the eye, the forehead disappears.
- Use a stitch marker on every loop-stitch row. Missing one loop in a 7-stitch side panel creates a visible flat gap in the texture.
- Stuff the body base more firmly than the head. A soft lower section causes the toy to lean backward once the apple is attached.
- Sew the arms after testing apple position. If the hands sit more than 2 cm apart, the apple floats instead of looking held.
- Weave the quill-panel tails across several cream body stitches, not only inside the panel itself. That spreads tension and stops the textured strips from lifting at the edges.
Conclusion
This hedgehog amigurumi crochet pattern depends on contrast, not complexity. The cream face stays compact, the back texture adds volume, and the apple gives the front view a clear focal point. Make the body and head first, test the quill coverage with pins, and only then fix the accessory placement. That order keeps the face open and the silhouette balanced. Share the finished piece on Pinterest and Instagram with #HedgehogWithAppleAmigurumi. One practical question remains: did your quill panels stop high enough to keep both ears fully visible from the front?









