Introduction
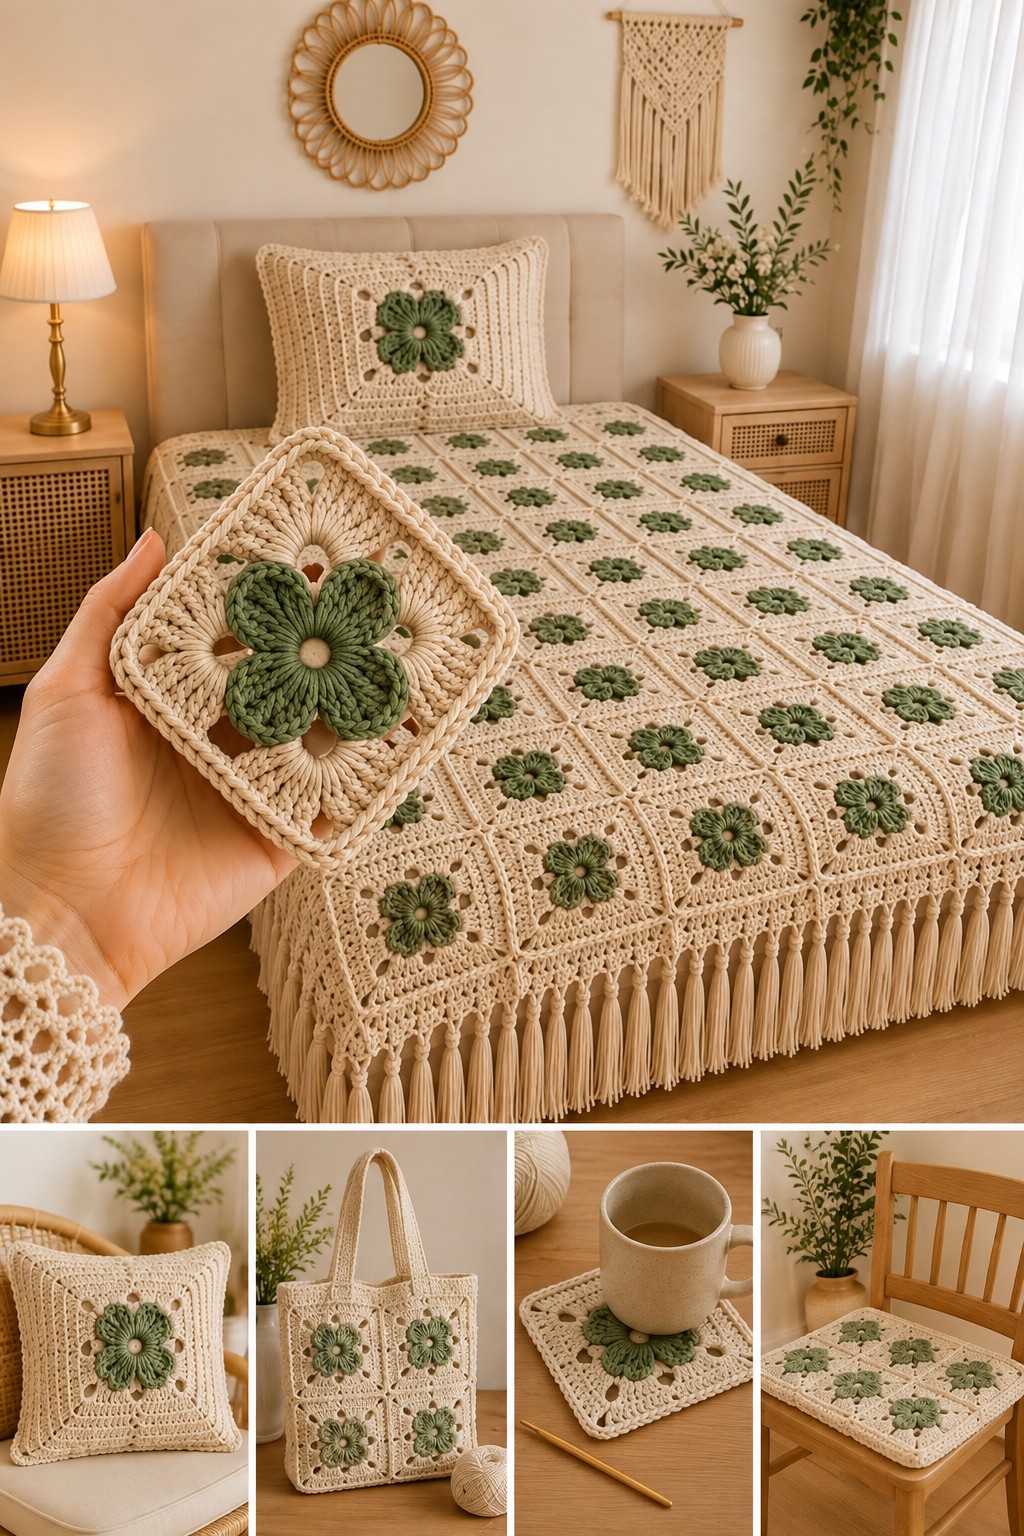
Five sage petals must stay raised while the cream square surrounding them blocks completely flat. This green flower granny square crochet pattern uses DK cotton or cotton-blend yarn and a 4 mm hook for 14–16 cm motifs. Approximately 120 squares form the photographed-style bedspread, while a pillow, tote, mug mat and chair pad repeat the same floral construction on smaller projects.
The Design: What Makes This Flower Square Different
The flower occupies only the central section of the motif, leaving a wide cream background around the five raised petals. That proportion matters because the bedspread contains many repeats; an oversized flower would turn the joined field into a dense textured surface. Open chain spaces separate the flower from the square corners and give the cream section room to lie flat. The sage flower granny square uses only two principal colors, so shape carries more visual weight than color changes. Cream also continues through the joins, border and tassels, turning the background into one continuous grid. The same raised flower appears on the bedspread, tote, mug mat and chair pad, while the cushion scales the center motif upward. A frequent error is adding excess foundation stitches behind the petals, which causes the finished center to dome.
Project Information at a Glance
| Skill Level | Time | Finished Size | Hook | Best For |
|---|---|---|---|---|
| Intermediate | 60–80 hours for full set | Approx. 165–180 × 200–220 cm bedspread | 4.0 mm | Bedspreads, cushions, bags and coordinated home decor |
Materials and Tools
Yarn
- Warm cream or ivory — DK/light-worsted cotton or cotton blend — approximately 2,000–2,400 g for the complete set
- Sage or muted olive green — matching DK/light-worsted yarn — approximately 650–850 g
For accurate purchasing, crochet and weigh one fully blocked motif first. Multiply its cream and green weights separately by the planned square total, then add separate allowances for seams, border, tassels and accessories.
Tools
- 4.0 mm crochet hook
- Large-eye yarn needle
- Scissors
- Locking stitch markers
- Blocking mats
- Rust-resistant pins
- Measuring tape
- 18 cm cardboard tassel template
Abbreviations
- MR — magic ring
- ch — chain
- sl st — slip stitch
- sc — single crochet
- hdc — half double crochet
- dc — double crochet
- tr — treble crochet
- sp — space
- ch-sp — chain space
- RS — right side
- WS — wrong side
This flat motif does not require an invisible decrease; the square is shaped through stitch height, chain spaces and corner placement.
Pattern — Step by Step
Make one complete test square before starting production. Block it to 14–16 cm and use that finished measurement as the template for every other motif.
Cream Flower Center
Yarn: warm cream.
R1: 10 sc in MR (10)
Join with sl st to the first sc. Fasten off.
Raised Sage Petals
Yarn: sage green.
Join in any center stitch. Each petal uses two stitches from R1.
Petal 1: ch 3, 4 tr in first st, 4 tr in next st, ch 3, sl st in same second st.
Petals 2–5: repeat across each following pair of center stitches.
Five raised petals should surround the cream center.
Fasten off.
Do not flatten the petals while working the background. Fold each one gently toward the center when reaching behind it.
Foundation Behind the Flower
Yarn: cream.
Join around the base behind one green petal.
R3: ch 1, sc around petal base, ch 3; *sc around next petal base, ch 3* ×4; join.
You should have five anchoring sc and five ch-3 spaces.
Flower Transition Round
R4: sl st into first ch-3 sp, ch 3, 4 dc in same sp; *ch 2, 5 dc in next ch-3 sp* ×4; ch 2, join.
The piece will still look rounded or slightly pentagonal.
Convert the Flower to a Square
R5: ch 1, distribute sc around the transition round while creating four ch-3 corner spaces at equal intervals.
Place the same number of sc between each pair of corners.
Lay the small motif flat before continuing. The flower center should sit at the intersection of both diagonals.
First Cream Expansion Round
R6: sl st into first corner, (ch 3, 2 dc, ch 2, 3 dc) in corner; *ch 1, work 3-dc groups into side spaces as required, ch 1, (3 dc, ch 2, 3 dc) in next corner* around; join.
Second Cream Expansion Round
R7: sl st to corner, (ch 3, 2 dc, ch 2, 3 dc) in corner; work one 3-dc cluster in each side ch-space, separated by ch 1; repeat the corner sequence around.
Join.
Openwork Round
R8: ch 4, skip 1 st, dc in next st; *ch 1, skip 1 st, dc in next st* along each side. Work (dc, ch 2, dc) in every corner.
Join.
Stabilizing Edge
R9: ch 1, sc in each dc and each ch-1 sp; work (2 sc, ch 2, 2 sc) in every corner.
Fasten off.
The blocked square should measure approximately 14–16 cm. If it is smaller, add one cream expansion round before the stabilizing edge rather than altering the flower.
Blocking the Flower Squares
Pin all four corners to the target dimension first.
Measure both diagonals. Keep their difference below approximately 5 mm.
Add pins at each side midpoint.
Shape the green petals by hand and allow the motif to dry completely.
Bedspread — Make Approximately 120 Squares
Arrange ten motifs across and twelve motifs down.
At an average blocked size of 15 cm, 120 motifs create a main field near 150 × 180 cm before joining and border width are added.
For more side drop, add another full column rather than changing only selected motifs.
Flat Cream Joining
Yarn: cream.
Place two blocked squares side by side with RS facing up.
Insert the hook through corresponding outer loops and work loose sl sts across the entire side.
The completed seam must remain the same length as the blocked square edge.
Join vertical columns first. Complete all horizontal seams afterward.
Border Round 1
Yarn: cream.
R1: sc evenly around the complete joined field, working 3 sc in each corner.
Count opposite edges before moving to the next round.
Border Round 2
R2: ch 3, dc in each st; work (2 dc, ch 2, 2 dc) in every corner.
Openwork Border
R3: ch 4, skip 1, dc in next; *ch 1, skip 1, dc in next* around. Work (dc, ch 3, dc) in each corner.
Lace Expansion
R4: work 2 dc in every ch-1 sp; in each corner ch-3 sp work (3 dc, ch 3, 3 dc).
Scalloped Final Border
R5: *skip 2 sts, 5 dc in next st, skip 2 sts, sl st in next st* around.
Adjust only the corner spacing where needed to keep the scallops flat.
Fasten off.
Cream Tassels — Make 32–40
Wrap yarn around an 18 cm cardboard template 20–24 times.
Cut the strands along one edge.
Fold the bundle in half.
Tie approximately 2 cm below the fold.
Wrap a separate strand six to eight times around the tassel neck.
Trim each tassel to approximately 14–16 cm.
Attach at equal intervals across the foot and side edges.
Matching Floral Pillow
The photographed pillow uses one enlarged central flower rather than a dense grid of standard squares.
Make the same five-petal flower with either thicker yarn or additional stitches in each petal.
Continue cream square-expansion rounds until the panel measures approximately 42–46 cm.
Add two openwork cream rounds around the outside.
Pillow Back
Make two cream rectangles approximately the width of the front panel and two-thirds of its height.
Overlap the panels by 10–12 cm.
Place behind the floral front and sc through both layers around all four sides.
Flower Granny Square Tote
Make eight standard motifs.
Join four motifs in a 2 × 2 block for the front.
Repeat for the back.
Join the two panels along both sides and the bottom.
Work three rounds of sc around the upper opening.
Tote Handles — Make Two
Ch until the strap measures approximately 55–65 cm.
Row 1: sc from second ch across.
Rows 2–4: ch 1, turn, sc across.
Fasten off.
Attach each handle across approximately 5 cm of the upper bag edge.
Single-Square Mug Mat
Make one flower square.
Add one extra cream sc round around the perimeter.
Block to approximately 15–17 cm.
Leave the edges unfringed so the cup can sit on a flat surface.
Four-Square Chair Pad
Make four standard flower squares.
Join them in a 2 × 2 arrangement.
Add two cream sc rounds around the perimeter.
Target finished size: approximately 30–34 cm square.
Assembly
- Block every standard motif to the same 14–16 cm measurement before joining.
- Arrange approximately 120 squares in a ten-by-twelve grid with all green petals facing upward.
- Join the vertical columns with flat cream slip stitches, checking seam length after every few squares.
- Join all horizontal rows and inspect each four-square intersection for compressed corners.
- Work the five cream border rounds around the full bedspread after confirming opposite edge counts.
- Attach 32–40 tassels at repeated intervals and trim them to one 14–16 cm finished length.
- Complete the large-flower pillow and attach its overlapping cream back panels.
- Join the eight tote motifs into two panels, seam the bag and attach both handles.
- Finish the single-square mug mat and four-square chair pad, then block each piece to square measurements.
- Record the finished motif measurement, motif count and border depth before storing the project notes.
The finished set should repeat one raised sage flower against a flat cream background while maintaining square corners and an even joining grid.
7 Technical Tips
- Flower doming: If the center rises more than approximately 5 mm above the cream background before blocking, reduce the foundation stitches behind the petals.
- Square mismatch: A 5 mm difference is visible where four motifs meet. Block every square against one fixed template rather than measuring them independently.
- Flattened petals: Pressing the flower directly removes its raised profile. Pin the cream background flat and reshape the five green petals by hand.
- Short joining seams: A seam 1 cm shorter than the blocked edge will gather a complete strip. Compare each finished join with an unjoined square side.
- Border waves: Excess foundation stitches produce ruffling. Keep corresponding opposite-edge stitch totals identical before working the lace rounds.
- Uneven tassels: Differences of 2 cm are visible across a straight bed edge. Use the same 18 cm wrapping card for every bundle.
- Stretching tote handles: A narrow cotton handle can lengthen under load. Work at least four dense sc rows and attach each end across approximately 5 cm.
Keeping the Raised Flower Dimensional
The green petals should project from the background without forcing the entire center upward. Work the petals firmly, then use slightly more relaxed tension for the cream foundation behind them.
The most sensitive stage occurs where the five-part flower is converted into a four-corner square. Place the four corners according to the visual center rather than blindly treating the pentagonal foundation as four equal sections.
Block a test motif immediately. A correction made here prevents the same diagonal distortion from appearing across 120 squares.
Choosing Yarn and Hook Size
DK yarn with a 4 mm hook produces a useful balance between defined petals and a flexible bedspread. Cotton makes the openwork particularly clear, while a cotton blend can reduce overall weight.
If your first motif measures less than 14 cm after blocking, add another cream round. If it exceeds 16 cm significantly, test a 3.5 mm hook before rewriting the flower.
Use the same yarn family for both colors. A heavier green yarn can pull the flower center forward and change the blocked dimensions.
Planning Yarn for 120 Squares
Large modular bedspreads should be estimated from a physical sample rather than a general yardage formula. Make one finished square, weigh it, and separate the approximate green and cream usage if possible.
Multiply that measurement by 120. Add cream for every seam, five border rounds and up to 40 tassels.
Accessories require another allowance. The tote alone uses eight motifs, while the pillow has a much larger cream background than one standard square.
Joining the Floral Squares
The photograph shows a relatively quiet cream grid between motifs. A flat slip-stitch seam produces less relief than a raised single-crochet join and therefore keeps attention on the dimensional flowers.
Join only after blocking. Small size differences that look harmless in separate pieces become much more noticeable across a ten-square row.
At each four-corner intersection, avoid extra decorative chains. The join should remain compact.
Building the Lace Border
The first perimeter round controls the final shape. Spread the bedspread flat after R1 and correct any wave or inward pull before continuing.
The openwork round adds visual continuity with the holes surrounding each floral center. A denser dc round between open sections strengthens the edge before the final scallops.
Add tassels only after the completed border has been blocked. Otherwise the fringe weight can pull damp corners out of alignment.
Using the Motif for a Pillow
Increasing one flower rather than repeating many standard squares creates the coordinated cushion visible in the image. The flower remains recognizable, but the scale changes.
Keep the same sage and cream yarns. Expand the background evenly from all four corners until it matches the insert.
An overlapping envelope back allows the cover to be removed without adding hardware to the openwork edge.
Making the Tote and Mug Mat
Four standard squares produce one compact tote face. An identical four-square back keeps the bag balanced and gives the flower motif equal visibility from either side.
The mug mat requires only one square. Use cotton for this piece because it provides a stable surface and works well for table textiles.
Add a dense sc perimeter to the mug mat instead of the bedspread’s lace and tassels.
Making the Four-Square Chair Pad
A 2 × 2 layout produces roughly 30 cm when the individual squares average 15 cm. The outer rounds can then bring the pad closer to the chair-seat dimensions.
The chair piece should have less border depth than the blanket. Long fringe would interfere with the seat edge.
If the raised petals feel too prominent for a functional chair pad, substitute dc for tr in the green petal round only on that accessory.
Finishing Checks
Spread the full bedspread on a flat surface and inspect the cream joining grid before looking at individual flowers. Rows should remain straight from edge to edge.
Compare several green flowers next. Their petal diameter and center position should remain consistent even if minor hand-crochet variation is visible.
Check the accessories against the bedspread under the same light. Matching cream and sage dye lots help the separate pieces read as one coordinated collection.
Conclusion
Measure one blocked motif, the raised flower diameter and the completed bedspread before storing the project notes. Those dimensions make another green flower granny square crochet pattern easier to scale for a different mattress or accessory. The next concrete task is to crochet one test square, block it to 14–16 cm and weigh it before purchasing yarn for all 120 motifs. Photograph a close-up flower and the complete set for Pinterest, then share the finished work on Instagram with #SageFlowerGrannySet. Would you repeat the same sage green throughout the bedspread or alternate two muted green shades?
Sources
- Mama in a Stitch — Flower Granny Square Crochet Pattern, published April 2026.
- Ravelry — JTcreations Flower Granny Square, published July 2024.
- Just Be Crafty — 2026 3D flower granny-square blanket with join-as-you-go construction and scalloped border.
- Little Duck Crochet — DK granny-square construction using a 4 mm hook.
- Made in K-Town — African Flower Square using DK cotton and a 3.5 mm hook, approximately 11.5 cm.
- Lilla Björn Crochet — established granny-square joining methods.
- Just Be Crafty — joined floral granny-square blanket with scalloped border.
- Ravelry and Etsy — current flower-granny-square competition and accessory references.









