<article>

<h1>Green Flower Granny Square Crochet Pattern for a Bedspread Set</h1>

<h2>Introduction</h2>

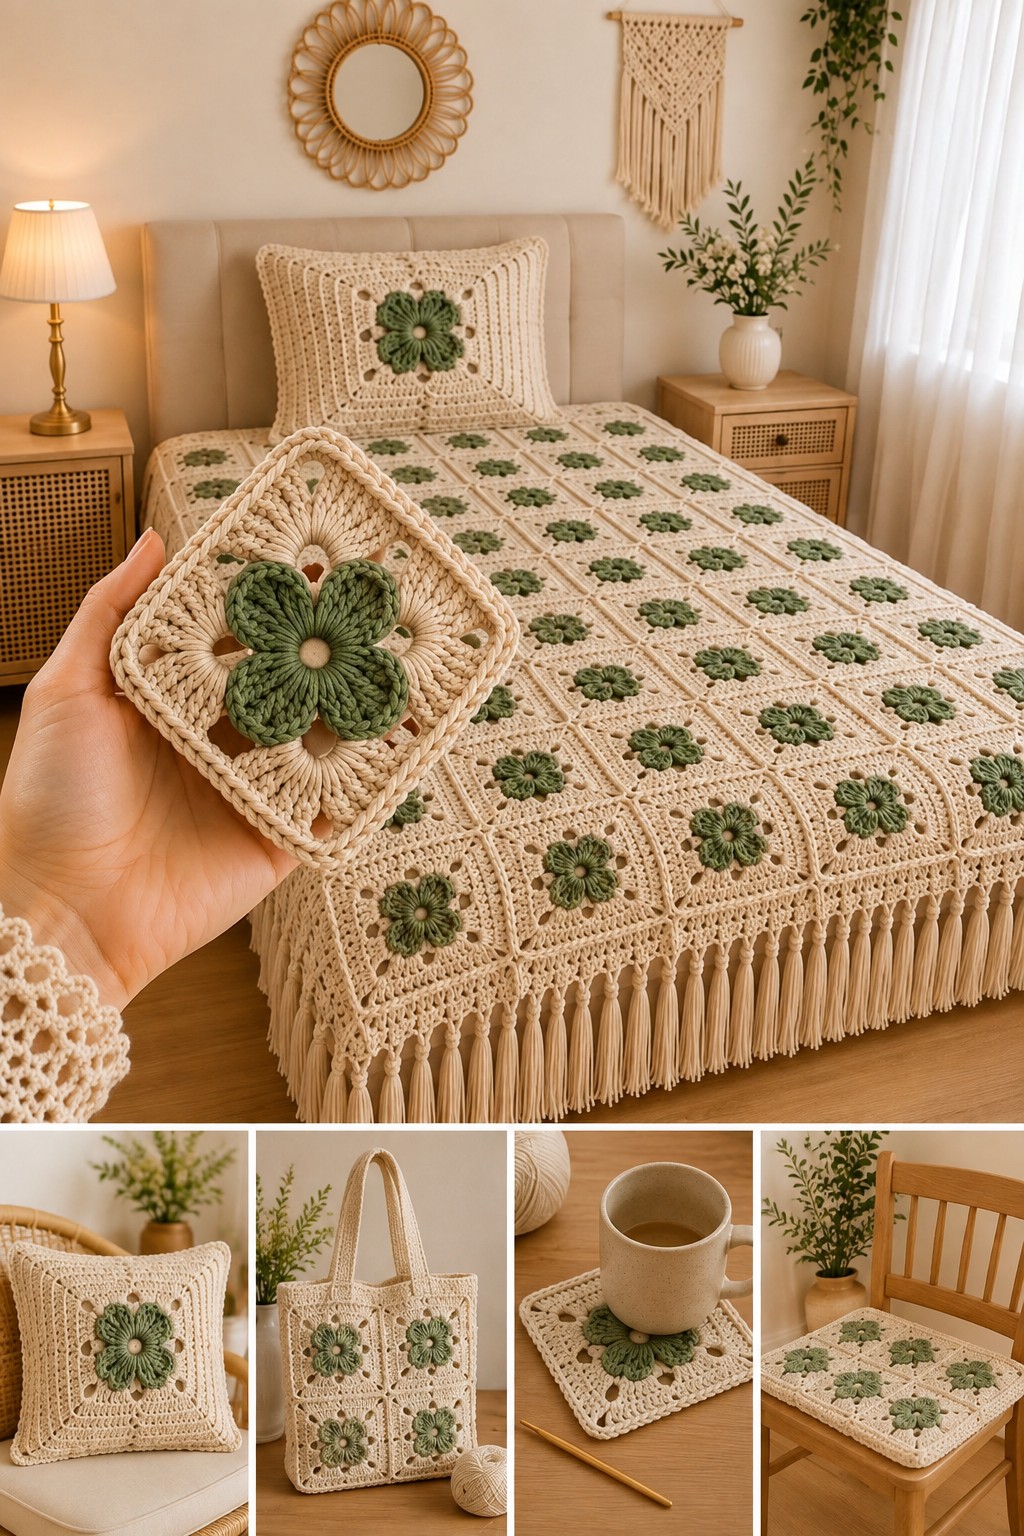
<p>Five green petals have to stay raised after the cream square around them is blocked flat. This green flower granny square crochet pattern uses DK cotton or cotton-blend yarn with a 4 mm hook to produce motifs approximately 14–16 cm wide. A 120-square bedspread, lace border, tassels, pillow, tote, mug mat and chair pad turn the same flower construction into a coordinated intermediate home-crochet set.</p>

<h2>The Design: What Makes This Flower Square Different</h2>

<p>The green flower is deliberately compact, leaving a broad cream field around it instead of filling most of the square. Five dimensional petals rise from a small central ring, while open chain spaces between the floral section and square corners keep the surrounding fabric visually light. The outer cream rounds perform most of the structural work because they determine final size and provide consistent joining edges. This sage flower granny square also relies on one restrained color change: green flower, cream background. No additional accent colors compete with the raised petals. The floral crochet bedspread repeats that exact arrangement across the mattress, then carries it into smaller accessories. One common mistake is adding too many stitches behind the petals. Excess stitches make the flower center dome upward and prevent the finished square from blocking to a flat 90-degree corner.</p>

<h2>Project Information at a Glance</h2>

<table>
<thead>
<tr>
<th>Skill Level</th>
<th>Time</th>
<th>Finished Size</th>
<th>Hook</th>
<th>Best For</th>
</tr>
</thead>
<tbody>
<tr>
<td>Intermediate</td>
<td>60–80 hours for complete set</td>
<td>Approx. 165–180 × 200–220 cm bedspread</td>
<td>4.0 mm</td>
<td>Bedspreads, coordinated room decor and modular accessories</td>
</tr>
</tbody>
</table>

<p>A current light-DK floral granny-square reference measures approximately 14 × 14 cm with a 4 mm hook, while another DK cotton flower square measures 11.5 cm with a 3.5 mm hook. Those published dimensions support a 14–16 cm target after blocking for the larger square visible in this project.</p>

<h2>Materials and Tools</h2>

<h3>Yarn</h3>

<ul>
<li><strong>Warm cream or ivory — DK/light-worsted cotton or cotton blend — approximately 2,000–2,400 g for the full coordinated set</strong></li>
<li><strong>Sage or olive green — matching DK/light-worsted yarn — approximately 650–850 g for flowers and accessory motifs</strong></li>
</ul>

<p>A current 14 cm light-DK flower square uses approximately 25 g of yarn. Treat that as a planning reference rather than a fixed consumption figure because raised petals, border depth, fiber content and joining method all change total usage.</p>

<h3>Tools</h3>

<ul>
<li><strong>4.0 mm crochet hook</strong></li>
<li><strong>Large-eye yarn needle</strong></li>
<li><strong>Scissors</strong></li>
<li><strong>Locking stitch markers</strong></li>
<li><strong>Blocking mats</strong></li>
<li><strong>Rust-resistant pins</strong></li>
<li><strong>Measuring tape</strong></li>
<li><strong>Cardboard tassel guide approximately 18 cm long</strong></li>
</ul>

<h2>Abbreviations</h2>

<ul>
<li><strong>MR</strong> — magic ring</li>
<li><strong>ch</strong> — chain</li>
<li><strong>sl st</strong> — slip stitch</li>
<li><strong>sc</strong> — single crochet</li>
<li><strong>hdc</strong> — half double crochet</li>
<li><strong>dc</strong> — double crochet</li>
<li><strong>tr</strong> — treble crochet</li>
<li><strong>sp</strong> — space</li>
<li><strong>ch-sp</strong> — chain space</li>
<li><strong>RS</strong> — right side</li>
<li><strong>WS</strong> — wrong side</li>
</ul>

<p>Keep decreases out of the flat square itself; shaping is created through stitch height, cluster placement and chain spaces rather than amigurumi-style reduction.</p>

<h2>Pattern — Step by Step</h2>

<p>Make one complete test square before beginning the bedspread. Block that motif to the intended finished size, then use it as the measurement standard for every remaining square.</p>

<h3>Flower Center</h3>

<p><em>Yarn: warm cream.</em></p>

<p>
R1: 10 sc in MR (10)
</p>

<p>Join with sl st to the first sc.</p>

<p>Fasten off.</p>

<h3>Raised Green Petals</h3>

<p><em>Join sage green in any stitch.</em></p>

<p>Each petal uses two center stitches.</p>

<p>
Petal 1: ch 3, work 4 tr in same st, 4 tr in next st, ch 3, sl st in same second st.<br>
Petals 2–5: repeat the same sequence across each following pair of stitches.
</p>

<p>Five complete raised petals should surround the cream center.</p>

<p>Fasten off green.</p>

<p><em>Do not press the petals flat while working later rounds. Fold each petal temporarily toward the center when inserting the hook behind it.</em></p>

<h3>Behind-the-Flower Foundation Round</h3>

<p><em>Yarn: cream.</em></p>

<p>Join behind one petal at the flower base.</p>

<p>
R3: ch 1, sc around the base of the first petal, ch 3; *sc around base of next petal, ch 3* around.
</p>

<p>Join.</p>

<p>You now have five anchoring sc and five ch-3 spaces behind the raised flower.</p>

<h3>Transition Round</h3>

<p>
R4: sl st into first ch-3 sp, ch 3, 4 dc in same sp; *ch 2, 5 dc in next ch-3 sp* around; ch 2, join.
</p>

<p>The round remains roughly pentagonal at this stage. The following round converts it into four corners.</p>

<h3>Square-Shaping Round</h3>

<p>
R5: ch 1, sc in next 3 sts, ch 3, skip 2 sts, sc in next 3 sts; continue distributing sc around the floral round so four ch-3 corner spaces are positioned at approximately 90-degree intervals.
</p>

<p>Finish with the same stitch total on each side between corner spaces.</p>

<p><em>Pin the piece flat before continuing. Adjust one stitch toward or away from a corner if needed so the flower sits centrally.</em></p>

<h3>First Cream Granny Round</h3>

<p>
R6: sl st into first corner ch-3 sp, ch 3, 2 dc, ch 2, 3 dc in same corner; *ch 1, 3 dc in next side sp as required, ch 1, (3 dc, ch 2, 3 dc) in next corner* around.
</p>

<p>Join.</p>

<h3>Second Cream Granny Round</h3>

<p>
R7: sl st to corner, (ch 3, 2 dc, ch 2, 3 dc) in corner; work 3-dc groups into each side ch-space separated by ch 1; repeat the corner sequence at all four corners.
</p>

<p>Join.</p>

<h3>Openwork Expansion Round</h3>

<p>
R8: ch 4, skip 1 st, dc in next st; *ch 1, skip 1, dc in next st* along each side. In every corner work (dc, ch 2, dc).
</p>

<p>Join.</p>

<h3>Final Stabilizing Round</h3>

<p>
R9: ch 1, sc in every dc and ch-1 sp; work (2 sc, ch 2, 2 sc) in each corner.
</p>

<p>Fasten off.</p>

<p>The target blocked size is approximately 14–16 cm. A current lacy flower granny square made with light DK yarn and a 4 mm hook measures 14 cm, providing a practical benchmark for this project.</p>

<h3>Blocking Each Square</h3>

<p>Pin all four corners first.</p>

<p>Measure both diagonals. They should differ by no more than approximately 5 mm.</p>

<p>Add pins along the sides until every edge measures the same length.</p>

<p>Allow cotton motifs to dry completely before removing them.</p>

<h3>Bedspread — Make Approximately 120 Squares</h3>

<p>Arrange the motifs in a grid of approximately 10 squares across × 12 squares long.</p>

<p>At 15 cm per blocked square, the unbordered field measures approximately 150 × 180 cm before accounting for joining and border width.</p>

<p>For a wider bed, add an entire column rather than increasing only the final rounds of selected squares.</p>

<h3>Flat Cream Joining</h3>

<p><em>Yarn: cream.</em></p>

<p>Place two squares RS up beside one another.</p>

<p>Insert the hook through corresponding outer loops and work a loose slip stitch across the seam.</p>

<p>Keep the joined seam equal to the blocked side length.</p>

<p>Join all vertical seams first, then all horizontal seams.</p>

<p>Single-crochet joins are also established for floral granny blankets, but a flat slip-stitch seam matches the relatively low cream grid in the supplied design more closely.</p>

<h3>Bedspread Border — Foundation</h3>

<p><em>Yarn: cream.</em></p>

<p>
R1: sc evenly around the complete blanket, working 3 sc in each corner.
</p>

<p>Count opposite edges and correct any large difference before continuing.</p>

<h3>Border Round 2</h3>

<p>
R2: ch 3, dc in each st around; work (2 dc, ch 2, 2 dc) in each corner.
</p>

<h3>Openwork Border Round</h3>

<p>
R3: ch 4, skip 1, dc in next; *ch 1, skip 1, dc in next* around. Work (dc, ch 3, dc) in each corner.
</p>

<h3>Lace Border Round</h3>

<p>
R4: in each ch-1 sp work 2 dc; in each corner ch-3 sp work (3 dc, ch 3, 3 dc).
</p>

<h3>Scalloped Final Edge</h3>

<p>
R5: *skip 2 sts, 5 dc in next st, skip 2 sts, sl st in next st* around, adjusting spacing slightly at corners.
</p>

<p>Fasten off.</p>

<h3>Cream Tassels — Make Approximately 32–40</h3>

<p>Wrap cream yarn around an 18 cm cardboard guide 20–24 times.</p>

<p>Cut the strands across one end.</p>

<p>Fold the bundle in half and tie approximately 2 cm below the folded top.</p>

<p>Wrap a second strand around the neck six to eight times.</p>

<p>Trim the finished tassel to approximately 14–16 cm.</p>

<p>Attach tassels at evenly repeated intervals along the foot and side edges of the bedspread.</p>

<h3>Matching Pillow Front</h3>

<p>The pillow in the reference enlarges the same floral language rather than using a dense 3 × 3 grid.</p>

<p>Make one enlarged five-petal flower with doubled or bulkier yarn.</p>

<p>Work cream square-expansion rounds around it until the panel measures approximately 42–46 cm.</p>

<p>Add two or three cream openwork rounds around the edge.</p>

<h3>Pillow Back</h3>

<p>Work two cream rectangular panels in dc.</p>

<p>Each should measure the full pillow width and approximately two-thirds of its height.</p>

<p>Overlap the panels by 10–12 cm to form an envelope closure.</p>

<p>Sc through the pillow front and back layers around all four sides.</p>

<h3>Four-Square Tote Bag — Make Eight Squares</h3>

<p>Make eight standard flower squares.</p>

<p>Join four in a 2 × 2 arrangement for the front and four for the back.</p>

<p>Join the two panels along both sides and lower edge.</p>

<p>Work 3–4 rounds of sc around the upper opening.</p>

<h3>Tote Handles — Make Two</h3>

<p>Ch until the strap measures approximately 55–65 cm.</p>

<p>
Row 1: sc in second ch and across.<br>
Rows 2–4: ch 1, turn, sc across.
</p>

<p>Fasten off.</p>

<p>Sew each strap to the inside upper edge across an attachment area of approximately 5 cm.</p>

<h3>Single-Square Mug Mat</h3>

<p>Make one standard flower square.</p>

<p>Add one additional cream sc round.</p>

<p>Block to approximately 15–17 cm.</p>

<p>Do not add tassels because loose fringe can interfere with the cup base.</p>

<h3>Four-Square Chair Pad</h3>

<p>Make four flower squares.</p>

<p>Join in a 2 × 2 arrangement.</p>

<p>Work two cream sc rounds around the outside.</p>

<p>Target final size: approximately 30–34 cm square.</p>

<p>For a larger chair, add extra perimeter rounds rather than changing the four central motifs.</p>

<h2>Assembly</h2>

<ol>
<li>Block every bedspread motif to one fixed 14–16 cm template and compare both diagonal measurements before joining.</li>
<li>Arrange approximately 120 squares in a 10 × 12 grid with every raised green flower facing upward.</li>
<li>Join the vertical motif columns with cream flat slip-stitch seams, keeping every seam equal to the blocked edge length.</li>
<li>Join the horizontal rows and inspect all four-square intersections for gaps or compressed corners.</li>
<li>Work the cream foundation, openwork and scalloped border rounds around the complete bedspread.</li>
<li>Attach 32–40 cream tassels at equal intervals and trim all finished fringe against one 14–16 cm guide.</li>
<li>Complete the enlarged-flower pillow and attach its overlapping cream back panels.</li>
<li>Join eight standard motifs into two 2 × 2 tote panels, seam the bag and attach both straps securely.</li>
<li>Finish one single-square mug mat and one 2 × 2 chair pad, blocking both pieces flat before use.</li>
<li>Record the finished square size and exact number of motifs so another piece can be reproduced at the same scale.</li>
</ol>

<p>The completed collection should repeat the same sage five-petal flower and warm-cream background across every piece while maintaining flat square edges around the raised floral centers.</p>

<h2>7 Technical Tips</h2>

<ul>
<li><strong>Flower doming:</strong> Too many stitches behind the five petals can make the center rise like a bowl. The blocked flower base should remain within approximately 5 mm of the surrounding cream fabric.</li>

<li><strong>Square-size drift:</strong> A difference greater than 5 mm becomes visible where four cream corners meet. Block every motif against the same measured template.</li>

<li><strong>Petal flattening:</strong> Pressing a hot iron directly onto raised cotton petals removes their dimensional profile. Block the square around the flower and reshape each petal by hand.</li>

<li><strong>Join contraction:</strong> A seam even 1 cm shorter than its blocked edge can gather an entire row. Lay each newly joined strip flat before beginning the next seam.</li>

<li><strong>Border ruffling:</strong> Too many stitches in the foundation round produce waves that later lace rounds cannot hide. Count opposite edges and keep corresponding totals equal.</li>

<li><strong>Tassel mismatch:</strong> A 2 cm difference is visible across the straight foot edge of a bedspread. Use one 18 cm wrapping card for every tassel and trim them together after attachment.</li>

<li><strong>Tote strap stretch:</strong> Cotton straps narrower than about 3 cm may lengthen under load. Work at least four dense sc rows and sew each handle across roughly 5 cm of the bag edge.</li>
</ul>

<h2>Controlling the Raised Five-Petal Flower</h2>

<p>The flower has to remain dimensional without pulling the square center out of shape. Work the petals firmly, but use a slightly more relaxed tension when creating the cream foundation behind them.</p>

<p>The transition from five petals to four square corners is the most important shaping stage. Pin the small motif after that round instead of waiting until the complete square is finished.</p>

<p>If the flower sits off-center, move one foundation stitch toward the narrow side before working the granny rounds. Correcting alignment early prevents a diagonal flower from being locked into every later round.</p>

<h2>Choosing Yarn and Hook Size</h2>

<p>Current floral-square references support DK cotton with hooks in the 3.5–4 mm range. Dadá's Primavera square uses 125 m/50 g cotton with a 3.5 mm hook, while a current lacy flower square uses light DK yarn and a 4 mm hook for a 14 cm result.</p>

<p>The 4 mm specification used here targets the clean cream eyelets and substantial green petals visible in the reference. If the square finishes below 14 cm, add another cream expansion round before the final sc edge.</p>

<p>If it exceeds 16 cm, test a 3.5 mm hook before reducing the stitch architecture.</p>

<h2>Planning Yarn Quantity</h2>

<p>A current 14 cm flower square lists about 25 g of light-DK yarn. Multiplying a measured sample is more accurate than estimating the entire bedspread from skein labels alone.</p>

<p>Make one complete blocked square, weigh it, and record how much green and cream it uses separately. Multiply those figures by the planned motif count, then add yarn for joining, border and tassels.</p>

<p>The cream total is substantially larger because the background, seams, border, tassels and accessory construction all rely on the same color.</p>

<h2>Joining the Flower Squares</h2>

<p>Published tutorials use several valid systems, including single crochet and join-as-you-go methods. Single crochet adds a visible ridge; flat joining keeps the field calmer and leaves more attention on the raised flowers.</p>

<p>Work every seam with the squares already blocked. Joining unblocked motifs first can lock small gauge differences into the finished bedspread.</p>

<p>At four-square intersections, do not add extra chains unless the center begins to pull. The joining grid in the reference remains compact.</p>

<h2>Building a Flat Lace Border</h2>

<p>The first perimeter round controls every later border round. Correct rippling immediately rather than hoping the scallops will disguise it.</p>

<p>A floral-granny blanket tutorial from Just Be Crafty also combines joined flower squares with a scalloped border, showing how the two techniques work together in finished blankets.</p>

<p>Place the deepest scallops along the outer edge only. Adding heavy lace between motifs would compete with the green flower texture.</p>

<h2>Making the Matching Pillow</h2>

<p>The pillow carries one large green flower rather than dozens of small motifs. That shift in scale prevents the coordinated room from looking mechanically repeated.</p>

<p>Use the same five-petal construction but increase the yarn thickness or add extra stitches to each petal. Continue the cream square rounds until the front reaches the pillow insert dimensions.</p>

<p>An envelope back keeps the cover removable without adding a zipper to the crochet fabric.</p>

<h2>Using the Square for a Tote and Mug Mat</h2>

<p>A 2 × 2 arrangement creates a compact tote face while keeping the flower size identical to the bedspread. Repeat that layout on the back so the bag remains balanced.</p>

<p>One square is already large enough for the mug mat shown in the image. Add a dense perimeter round because cup mats need a firmer outer edge than bedspread motifs.</p>

<p>For any surface that will hold hot tableware, use cotton yarn rather than heat-sensitive synthetic fibers.</p>

<h2>Making the Chair Pad</h2>

<p>Four joined squares reproduce the chair pad visible in the reference. The 2 × 2 arrangement measures roughly 28–32 cm before outer edging when each motif is around 14–16 cm.</p>

<p>Keep the pad flatter than the bedspread by reducing the final border depth. Thick tassels are unnecessary on a chair seat.</p>

<p>If the flowers feel too raised for sitting, work the chair-pad petals with hdc instead of treble stitches while retaining the original flower colors.</p>

<h2>Finishing Checks</h2>

<p>Spread the complete bedspread on a flat surface and inspect the joining grid first. Every row should run horizontally without visible narrowing where several seams meet.</p>

<p>Check the green flowers next. Their five petals should remain open and comparable in diameter rather than collapsing toward the cream center.</p>

<p>Inspect the accessories last. The pillow, tote, mug mat and chair pad should all use the same cream tone and green dye lot so they read as one coordinated set.</p>

<h2>Conclusion</h2>

<p>Measure one fully blocked square and record its green-flower diameter before storing the project notes. Those two dimensions make another green flower granny square crochet pattern easier to scale for cushions, bags or a different mattress. Lay the finished bedspread flat before trimming the tassels, then photograph one close-up square alongside the complete set. Save the project to Pinterest and share the finished pieces on Instagram with <strong>#SageFlowerGrannySet</strong>. The next practical step is to crochet and block one gauge square before buying yarn for all 120 motifs. Would you keep the sage-green flowers shown here or use several graduated olive shades across the bedspread?</p>

<h2>Sources</h2>

<ul>
<li>Mama in a Stitch — 2026 Flower Granny Square Crochet Pattern and step-by-step tutorial.</li>
<li>Adore Crea — Lacey Flower Granny Square: light DK yarn, 4 mm hook, approximately 14 × 14 cm and about 25 g per square.</li>
<li>Dadá's Place — Primavera Flowers Granny Square: 100% cotton, 125 m/50 g and 3.5 mm hook.</li>
<li>Janie Crow — floral granny square using DK organic cotton and a 4 mm hook.</li>
<li>Just Be Crafty — Dainty Daisy Granny Square and separate joining/scalloped-border tutorial.</li>
<li>Lilla Björn Crochet — documented single-crochet method for joining granny squares.</li>
<li>Ravelry — current Flower Granny Squares collection and free 2024 flower-square pattern.</li>
<li>Etsy and Pinterest — current green flower granny-square competition and discovery references.</li>
</ul>

</article>