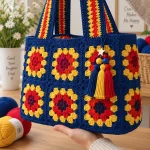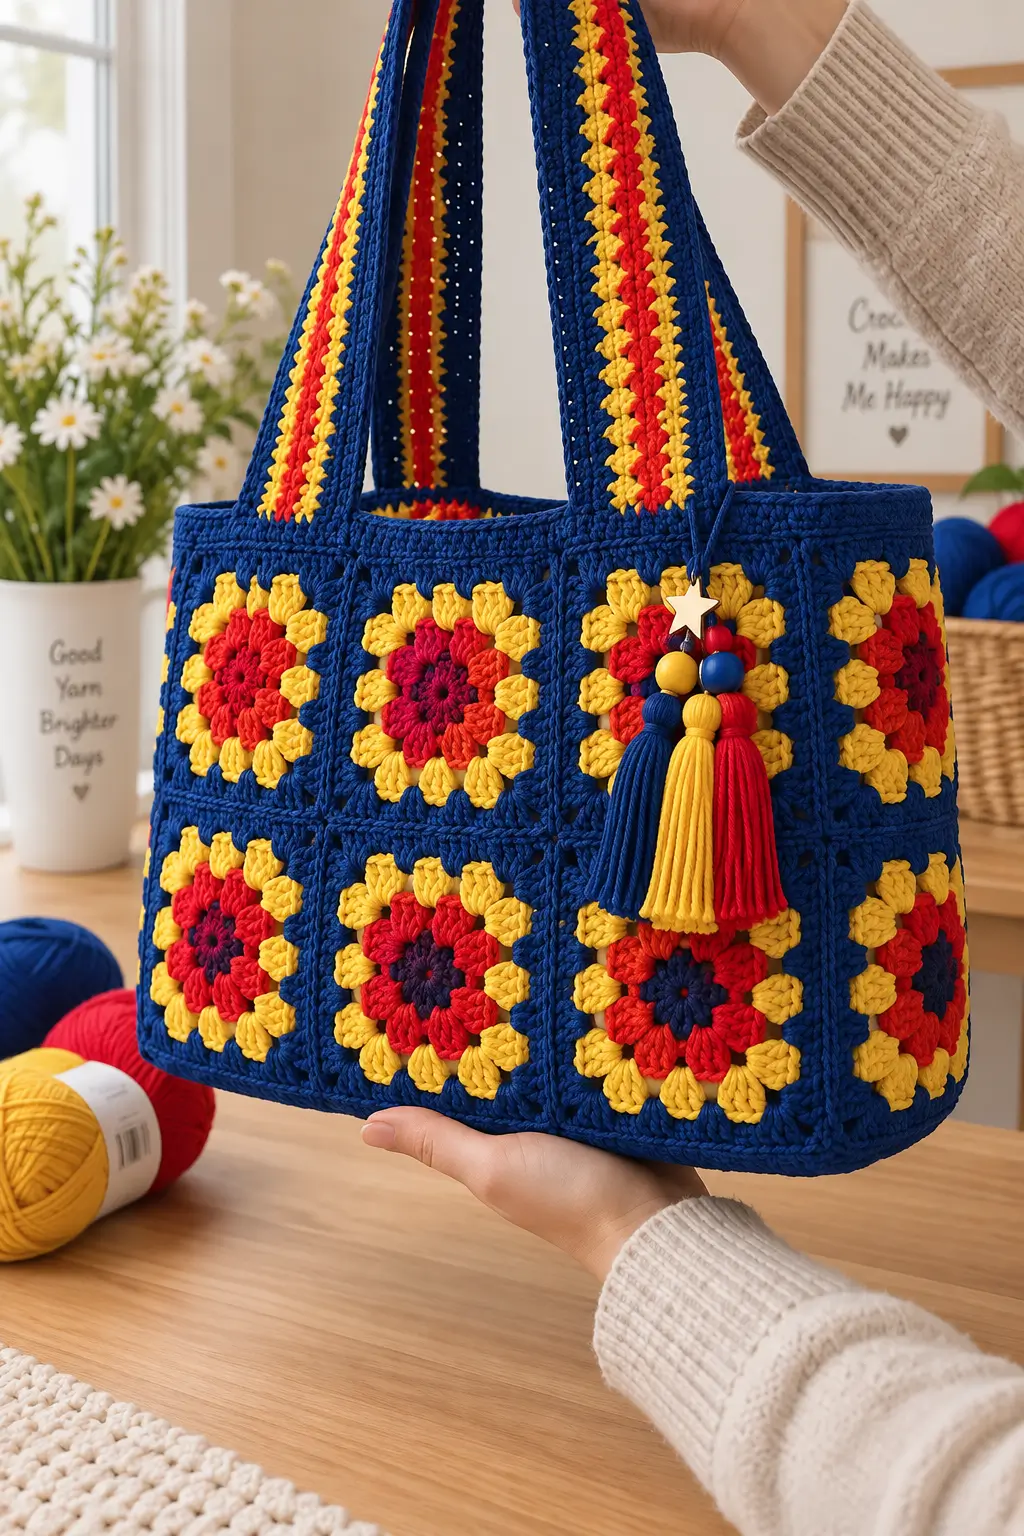
Twelve flower-centered squares turn this navy tote into a grid rather than a conventional single-panel crochet bag. This granny square tote bag crochet pattern uses worsted yarn, a 5 mm hook and a target body size of about 36 × 30 cm. It suits an intermediate maker familiar with double crochet and joining. The wide handles and reinforced upper edge make the construction practical for carrying yarn or lightweight daily items.
The Design: What Makes This Granny Square Tote Different
The photograph depends on three structural decisions. First, each motif has a compact dark center surrounded by red petals, yellow outer stitches and a broad navy frame. That color sequence makes individual squares readable after joining. Second, navy is repeated between every motif rather than reserved for the perimeter; the grid therefore becomes part of the design and also gives the bag visual structure.
Third, the handles are considerably wider than cord-style handles. Their width spreads the load across more stitches at the upper edge.
A frequent mistake when making a floral granny square bag is joining motifs before their dimensions match. Even a 5 mm discrepancy accumulates across three or four squares. Block all motifs to one measurement before assembly. This matters particularly on a rectangular granny square shoulder bag, where misaligned horizontal seams remain conspicuous.
Project Info at a Glance
| Skill Level | Time | Finished Size | Hook | Best For |
|---|---|---|---|---|
| Intermediate | 10–14 hours | Approx. 36 × 30 cm body | 5 mm | Yarn or everyday project tote |
The dimensions are a photo-inspired construction target. Final measurements depend on yarn, hook, individual motif size and blocking.
Materials and Tools
Yarn
For a firm bag similar to the photographed version, choose worsted or Aran cotton, a cotton-acrylic blend, or another yarn that produces a stable granny-square fabric.
- Navy blue: worsted/Aran, approximately 300–350 g
- Golden yellow: worsted/Aran, approximately 100–120 g
- Bright red: worsted/Aran, approximately 90–110 g
- Burgundy or dark purple: worsted/Aran, approximately 20–30 g
- Tassel yarn: use remaining navy, yellow and red yarn
The yarn quantities are project estimates. Actual consumption changes with yarn density, motif dimensions, handle length and joining method.
Tools
- 5 mm crochet hook
- Tapestry needle
- Scissors
- Locking stitch markers
- Blocking pins and mat
- Tape measure
- Optional fabric lining
- Optional magnetic snap
- Decorative beads
- Optional star charm
Abbreviations
- MR – magic ring
- ch – chain
- sc – single crochet
- hdc – half double crochet
- dc – double crochet
- sl st – slip stitch
- st/sts – stitch/stitches
- sp – space
- ch-sp – chain space
- RS – right side
- BLO – back loop only
An invisible decrease is primarily an amigurumi technique and is not required for this square-based bag construction.
Granny Square Tote Bag Crochet Pattern – Step by Step
This project does not use continuous amigurumi spirals. The granny squares are worked in joined rounds because distinct corners and controlled color changes are required.
Floral Granny Square – Make 24
Yarn: burgundy, red, yellow and navy.
A 24-square layout provides 12 motifs for the front and 12 for the back. Aim for approximately 9 cm per blocked square to produce a body close to 36 cm wide after joining four motifs across.
Round 1 – Burgundy: Make a MR. Ch 3, work 11 dc into the ring. Join with sl st to the top of the beginning ch-3. (12 dc)
Pull the center firmly closed.
Round 2 – Red: Join red in any stitch. Ch 3, 1 dc in the same st, then work 2 dc in each remaining stitch around. Join. (24 dc)
This round forms the dense red flower section visible in the design.
Round 3 – Yellow: Join yellow. Ch 3, dc in the same stitch, ch 1, skip 1 st; repeat 2 dc in next st, ch 1, skip 1 st around. Join. (12 two-dc groups, 12 ch-1 spaces)
Round 4 – Navy: Join navy in any ch-1 space. Ch 3, 2 dc, ch 2, 3 dc in the same space to form the first corner.
Work 3 dc in each of the next two ch-1 spaces. In the following space work (3 dc, ch 2, 3 dc) to form another corner.
Repeat the side-and-corner sequence around until four corners have been formed. Join with sl st.
Place the motif on a flat surface after this round. It should lie flat rather than cup or form pronounced waves.
Round 5 – Navy: Sl st to the first corner space. Ch 3, 2 dc, ch 2, 3 dc in the corner. Work 3 dc in every space between clusters across the side. In each corner work (3 dc, ch 2, 3 dc). Repeat around and join.
Fasten off, leaving approximately a 15 cm tail when the tail will be used for joining.
Block every finished motif to the same measurement. Approximately 9 cm is the target for this version.
Front Panel
Yarn: navy.
Arrange 12 finished squares in a 4 × 3 grid.
Place every square right side up and check the flower orientation before joining. The regular grid makes incorrectly rotated or misaligned motifs particularly noticeable.
Join four squares horizontally to create each row. Join the three completed rows vertically.
You can use mattress stitch, whip stitch through corresponding loops or a flat slip-stitch join.
After assembly, work one round of sc around the entire panel in navy. Work (sc, ch 1, sc) at each outer corner.
Fasten off.
Back Panel
Make and assemble another 12 squares exactly as described for the front panel.
A solid navy rectangle can be substituted if you want to reduce the number of motifs, but using 12 additional flower squares produces a more consistent front-and-back design.
Joining the Sides and Bottom
Yarn: navy.
Place the front and back panels together with the edges carefully aligned.
Starting at the upper-left corner, join navy and work sc through both layers down the first side.
Continue across the complete bottom edge and then work upward along the opposite side.
Do not close the top edge.
For a raised decorative seam, make the join with the right sides facing outward. For a less visible seam, place the panels with the wrong side facing outward during joining and turn the bag afterward.
Fasten off.
Top Border
Yarn: navy.
Join navy at one side seam.
Round 1: Sc evenly around the complete bag opening. Join with sl st.
Round 2: Ch 1, sc in every st around. Join.
Round 3: Ch 1, BLO sc in every st around. Join.
Round 4: Ch 1, sc in every st around. Join.
The four-round border creates a denser attachment zone for the handles and reinforces the upper opening.
Before fastening off, place the bag flat and check that the upper edge has not contracted.
Wide Shoulder Handles – Make 2
Yarn: navy.
The pictured bag uses broad, flat handles instead of narrow cords.
Row 1: Ch 11. Sc in second ch from hook and across. (10 sc)
Rows 2–70: Ch 1, turn, sc across. (10 sc)
Begin measuring the handle after approximately 60 rows. Continue until it measures roughly 52–58 cm, or adjust the length to fit the intended shoulder drop.
Edging: Sc evenly along one long edge. Work 3 sc around the short end, sc along the second long edge, then work 3 sc around the final short end.
Fasten off and leave approximately a 30 cm sewing tail.
Red and Yellow Handle Stripes
Yarn: yellow and red.
The reference bag has narrow colored lines running along its navy handles. Surface crochet provides a practical way to reproduce this detail without replacing the dense strap structure.
Surface-slip-stitch one yellow line lengthwise approximately two or three stitches from the handle edge.
Add one red surface-crochet line beside the yellow.
Add another yellow line beside the red stripe when the handle width allows.
Keep the surface stitches relaxed. Excessively tight slip stitches will shorten the decorative surface and make the handle curl.
Handle Reinforcement Tabs – Make 4
Yarn: navy.
Row 1: Ch 9, sc in second ch from hook and across. (8 sc)
Rows 2–6: Ch 1, turn, sc across. (8 sc)
Fasten off with approximately a 25 cm tail.
Position one reinforcement tab behind each handle end inside the bag. Sew through the handle, upper border and reinforcement tab together.
The tab distributes pulling force across a larger section of the upper border.
Three-Color Tassels – Make 3
Make one navy tassel, one yellow tassel and one red tassel.
Cut a piece of cardboard approximately 10 cm high.
Wrap the selected yarn around the cardboard 35–45 times.
Pass a separate strand underneath the wraps at the top and knot it firmly.
Cut through the loops along the opposite edge.
Wrap another yarn strand around the bundle approximately 1.5 cm below the top knot. Knot securely and conceal the yarn ends inside the tassel.
Trim the finished tassel to approximately 8–9 cm.
Repeat the same process with the other two colors.
Tassel Charm Cord
Yarn: navy.
Chain approximately 30 stitches or continue until the cord measures about 15–18 cm.
Starting in the second chain from the hook, slip stitch back through every chain.
Fasten off.
Thread or attach the optional star charm and decorative beads to the cord. Attach the navy, yellow and red tassels beneath the beads.
Secure individual components separately so that failure of one knot does not release the entire charm.
Optional Fabric Lining
A lining prevents smaller objects from pushing through the spaces between crochet clusters and can reduce stretching during regular use.
Cut two fabric rectangles approximately 2 cm wider and 2 cm taller than the completed crochet panels.
Place the fabric pieces together and sew both side seams and the bottom seam with approximately a 1 cm seam allowance.
Fold the upper raw edge toward the wrong side and press it flat.
Insert the lining into the crochet bag.
Hand-sew the lining just below the navy upper border. Keep the stitches within the dense navy section so they are less visible from the exterior.
Assembly
- Block all 24 floral motifs to the same target measurement before joining.
- Arrange 12 squares in a four-across by three-high grid for the front panel.
- Repeat the layout with the remaining 12 squares for the back panel and align corresponding horizontal seams.
- Join each panel separately, then work a navy perimeter round around both panels.
- Place the panels together and join both sides and the bottom while leaving the upper edge completely open.
- Crochet the four-round navy upper border and check that it remains flat.
- Position both handles symmetrically by measuring outward from the center of each panel rather than estimating their placement visually.
- Place one reinforcement tab behind every handle end and sew securely through the handle, border and tab.
- Attach the red, yellow and navy tassels to the charm cord, then add the optional beads and star charm.
- Insert the optional lining, weave yarn tails through several directional changes and trim them only after checking every structural seam.
The completed tote should have two aligned granny-square panels, a dense navy upper border, two wide shoulder handles and a removable three-color tassel charm.
7 Technical Tips for a Better Granny Square Tote
- Control motif-size drift. Block every square to within approximately 2–3 mm of the same width. A 5 mm discrepancy repeated across four motifs can alter the panel width by roughly 2 cm.
- Prevent loose joining seams. Match corresponding corner spaces before joining each row. An extra joining stitch on one motif can cause the completed seam to buckle.
- Control handle stretch. Work the straps in dense single crochet and target approximately 52–58 cm before attachment. Test the handle length before sewing both ends permanently.
- Reinforce handle attachment. Spread each handle attachment across approximately eight upper-edge stitches or use a reinforcement tab of equivalent width. Attaching a wide handle through only two or three stitches concentrates the load in a small section of the rim.
- Prevent flower-center puckering. Close the magic ring firmly without pulling until the 12 double-crochet stitches overlap. A distorted first round can push the red and yellow rounds away from the center.
- Stop the panels from twisting. Pin all four corners and the midpoint of every side before joining the front and back. Alignment points prevent one panel from gradually shifting relative to the other.
- Secure structural yarn tails. Weave joining and handle tails at least 7–10 cm through multiple stitch directions. Avoid cutting a structural tail directly beside its final knot.
Finishing the Granny Square Tote Bag
Check every joining seam before weaving in the final tails. Place the empty bag on a flat surface and compare the left and right sides. The two handles should begin at matching positions, and the horizontal granny-square seams should remain level across the front and back.
If the upper border flares outward, the final rounds contain too many stitches. If it pulls inward, additional stitches are required around the opening. Correct this before permanently attaching the handles.
Steam or wet-block the finished bag according to the yarn manufacturer’s care instructions. Cotton motifs generally respond well to blocking, but the bag should not be stretched beyond its intended dimensions.
Conclusion
The navy yarn performs three structural jobs in this design: it frames the flower motifs, strengthens the joins and forms the upper border and handles. Before making all 24 motifs for this granny square tote bag crochet pattern, complete one flower square and block it to the 9 cm target. Adjust the hook or tension at that stage rather than after the panels are assembled. Photograph the finished tote square-on to show the motif alignment, then share the result on Pinterest or Instagram with #PrimaryColorGrannyTote. For a second version, decide which detail to change first: the red-and-yellow flower sequence or the navy background?