Introduction
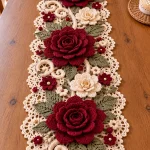
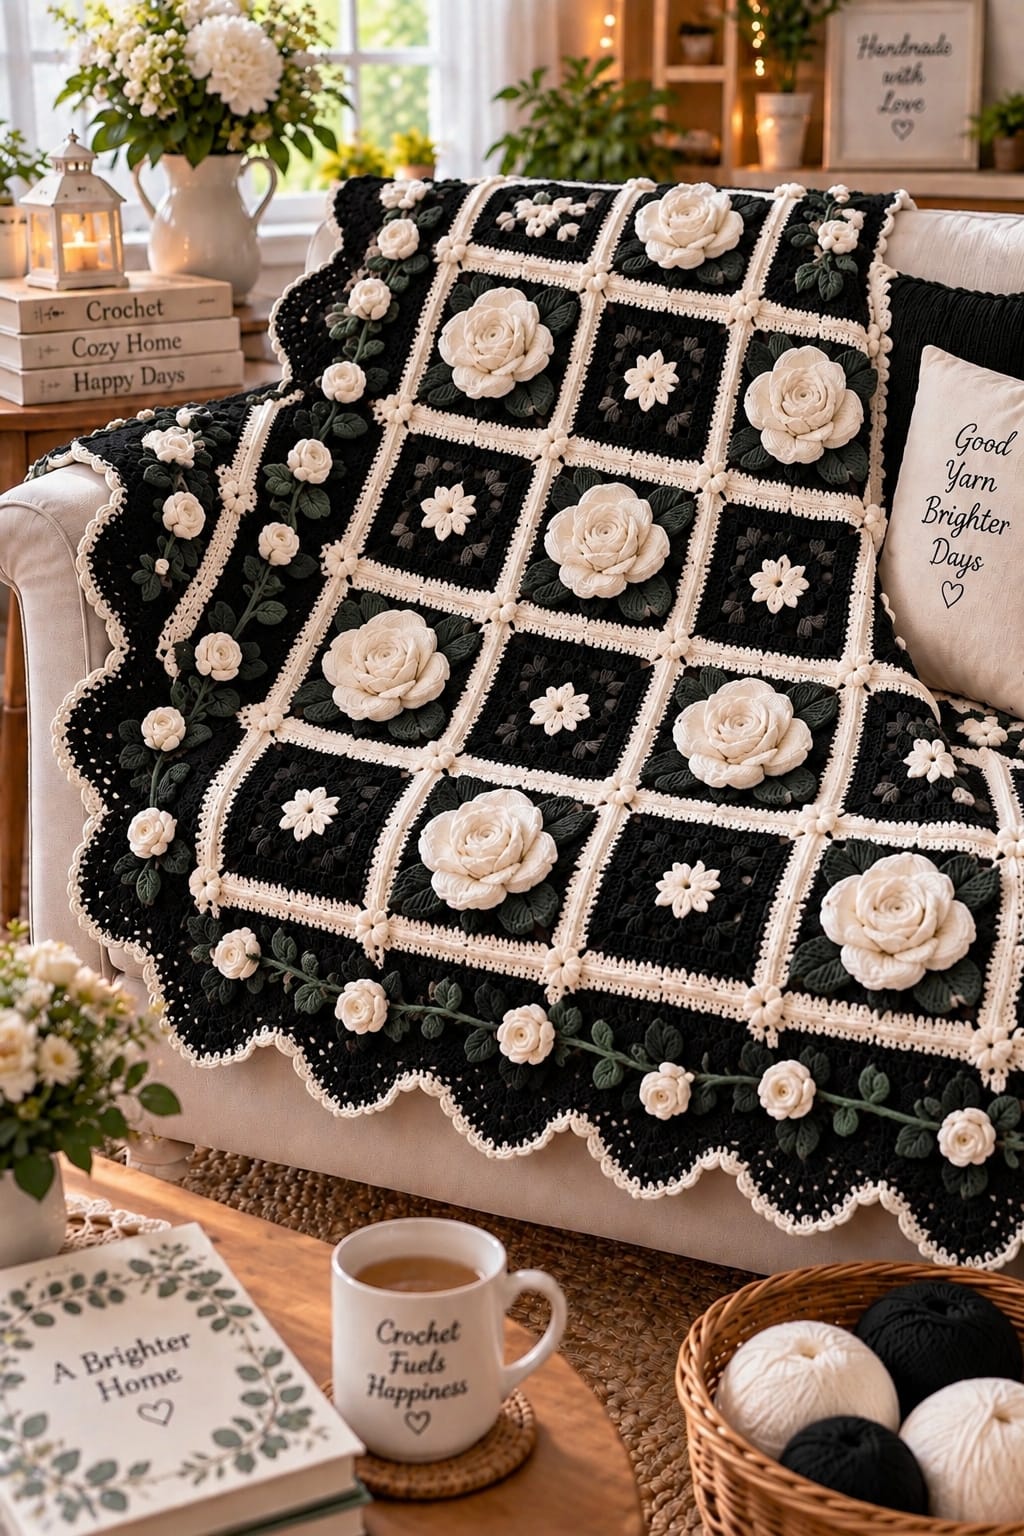
Raised ivory roses turn the black squares of this blanket into individual floral panels rather than ordinary granny motifs. This crochet rose blanket pattern combines black square blocks, cream joining bands, dimensional roses, dark green leaves, smaller flowers and a scalloped floral border. The modular construction lets you adjust the finished dimensions by adding or removing squares before joining the blanket.
The Design: What Makes This Crochet Rose Blanket Different
The blanket uses two alternating square treatments. The primary blocks carry large three-dimensional ivory roses surrounded by dark green leaves. Secondary blocks use smaller cream flowers and understated foliage, preventing the surface from becoming uniformly heavy.
Cream joining strips provide strong contrast between the black squares. Small raised flowers placed at the intersections disguise the joins and repeat the floral texture without adding another color.
The outer border changes the scale again. Instead of ending with a plain frame, the design uses black scallops edged in cream, plus a continuous green vine with smaller ivory roses. A common construction problem is attaching the large roses before the squares have been joined. Their depth makes seaming difficult. Complete and join the black squares first, then attach the dimensional motifs.
Project Info at a Glance
| Skill Level | Construction | Approx. Size | Hooks | Best For |
|---|---|---|---|---|
| Intermediate / Advanced | Joined square motifs with applied flowers | Approx. 125 × 155 cm | 4.5–5 mm blanket; 3.5–4 mm motifs | Sofa throw, decorative bed throw |
The dimensions are adjustable. A 4 × 5 arrangement produces 20 main squares, while a larger 5 × 6 layout requires 30. Always measure a blocked square before calculating the final blanket size.
Materials and Tools
Yarn
- Black worsted or aran yarn — approximately 1,200–1,500 g for squares and border.
- Ivory worsted or aran yarn — approximately 700–900 g for joins, roses, flowers and edging.
- Dark sage or forest green worsted yarn — approximately 350–500 g for leaves, vines and foliage.
- Dark gray-green yarn — optional 50–100 g for secondary foliage details.
These quantities are working estimates for a large floral throw. Dimensional roses consume considerably more yarn than flat appliqués, so purchase additional ivory yarn when increasing the number of rose squares.
Tools
- 5 mm crochet hook for the main squares
- 4 mm crochet hook for large roses
- 3.5–4 mm crochet hook for leaves and small flowers
- Yarn needle
- Scissors
- Locking stitch markers
- Blocking mats
- Rust-resistant blocking pins
- Tape measure
Abbreviations
- MR — magic ring
- ch — chain
- sl st — slip stitch
- sc — single crochet
- hdc — half double crochet
- dc — double crochet
- tr — treble crochet
- BLO — back loop only
- sp — space
- st / sts — stitch / stitches
Keep the corner chain spaces relaxed. Tight corner chains pull square motifs into a diamond shape and make the cream joining bands visibly uneven.
Black Crochet Blanket Square
Yarn: black.
Make the required number of squares before beginning assembly. For a 4 × 5 throw, make 20 squares.
Square Center
Round 1: MR, ch 3, work 2 dc into ring, ch 2. *3 dc, ch 2* three more times. Join with sl st. (4 groups)
Round 2: Sl st to first corner. Ch 3, 2 dc, ch 2, 3 dc in same corner. Ch 1. In each remaining corner work 3 dc, ch 2, 3 dc, with ch 1 between corners. Join.
Round 3: Sl st to corner. Work 3 dc, ch 2, 3 dc in corner. Ch 1, 3 dc in next ch-1 sp, ch 1. Repeat around.
Rounds 4–8: Continue in established granny-square construction, working 3 dc, ch 2, 3 dc in every corner and 3 dc in each side space, with ch 1 between groups.
Fasten off.
Solid Framing Rounds
The reference blanket uses substantial black fields around the floral motifs rather than highly open granny squares.
Join black yarn to any corner.
Round 9: Ch 1. Sc in every stitch and chain space around. Work 3 sc in each corner. Join.
Round 10: Ch 3. Dc in each stitch around, working 5 dc in the center corner stitch. Join.
Round 11: Ch 1. Sc around, working 3 sc in each corner. Join.
Fasten off and weave in the tail.
Block every square to the same measurement before joining. A target around 24–27 cm per square works well for a large throw, but use the measurement produced by your yarn and gauge.
Cream Joining Border on Each Square
Join ivory yarn at any corner of a blocked black square.
Round 1: Ch 1. Sc evenly around. Work 3 sc in each corner. Join.
Round 2: Ch 3. Dc in each stitch around. Work dc, ch 2, dc in each corner stitch. Join.
Round 3: Ch 1. Sc around, working 3 sc in each corner space.
Fasten off.
Repeat on every square.
Joining the Blanket Squares
Arrange the squares in four columns and five rows for the reference-style layout.
Place two neighboring squares with wrong sides together.
Using ivory yarn, join corresponding edge stitches with slip stitches.
Continue joining squares into horizontal rows first.
Join the completed rows vertically.
Keep the joining tension slightly looser than normal crochet tension. A tight seam causes the cream bands to rise above the black squares.
Small Flowers at the Square Intersections
Make enough to cover the visible four-square intersections.
Round 1: 6 sc in MR. Join. (6)
Round 2: In each stitch work sl st, ch 2, 2 dc, ch 2, sl st.
Fasten off with a 20 cm sewing tail.
Position one small ivory flower over selected joining intersections and sew through the center only.
Large Ivory Crochet Rose
Make approximately 8–10 for a 4 × 5 blanket.
The largest roses should cover much of a square without reaching the cream joining border.
Rose Center
Round 1: 6 sc in MR. Join. (6)
Round 2: Inc ×6. Join. (12)
First Petal Layer
Create six ch-3 spaces behind the center stitches.
In each ch-3 space work:
Sc, hdc, 3 dc, hdc, sc.
Second Petal Layer
Working behind the first petals, make six ch-5 spaces.
In each space work:
Sc, hdc, 2 dc, 3 tr, 2 dc, hdc, sc.
Third Petal Layer
Create eight ch-6 spaces behind the previous layer.
In each space work:
Sc, hdc, 3 dc, 4 tr, 3 dc, hdc, sc.
Outer Petal Layer
Create ten ch-7 spaces around the back of the flower.
In each space work:
Sc, hdc, 3 dc, 5 tr, 3 dc, hdc, sc.
Fasten off with a 60 cm sewing tail.
Shape the center petals upward. Curve the middle petals outward and allow the final layer to lie flatter against the blanket.
Large Dark Green Leaves
Make approximately 3–5 leaves for each large rose.
Foundation: Ch 15.
Beginning in second ch from hook work:
Sl st, sc, hdc, dc, dc, tr, tr, tr, dc, dc, hdc, sc, sc, sl st.
At the tip work ch 2, sl st in second ch from hook.
Rotate the leaf and work into the unused loops of the foundation chain.
Mirror the stitch sequence down the opposite side.
Sl st at the base.
Fasten off with a 25 cm tail.
Leaf Vein
Thread a separate strand of dark green or gray-green yarn through a needle.
Surface-stitch from the leaf base to its tip along the foundation chain.
Add two or three short diagonal vein stitches on each side.
Small Ivory Daisy-Style Flower
Make approximately 8–12 for the secondary squares.
Round 1: 8 sc in MR. Join. (8)
Round 2: *Ch 5, starting in second ch work sl st, sc, hdc, dc; sl st into next base st.* Repeat around.
Fasten off with a 20 cm tail.
This produces eight narrow petals around a compact center.
Secondary Foliage
The squares with small flowers need less foliage than the large rose blocks.
Foundation: Ch 9.
Starting in second ch work:
Sl st, sc, hdc, dc, dc, hdc, sc, sl st.
At the tip work a ch-2 picot.
Rotate and mirror the sequence along the opposite side.
Fasten off with a long tail.
Make approximately two to four small leaves for each secondary floral square.
Arranging the Floral Squares
Do not place a large rose on every square. Alternating large and small motifs keeps the blanket flexible and prevents the finished surface from becoming excessively heavy.
For a 4 × 5 layout, begin with a checkerboard-style distribution.
Place a large ivory rose on the first square of Row 1, then a small flower on the neighboring square.
Reverse the order on Row 2.
Continue alternating while checking the overall arrangement from several steps away.
The exact sequence can be adjusted so the largest roses do not form rigid diagonal lines.
Attaching the Large Roses
Pin all leaves before attaching the rose.
Arrange approximately three to five leaves around each flower, allowing their tips to remain visible beyond the petals.
Sew the leaves through their central vein and base.
Position the rose over the leaf bases.
Attach each large rose at approximately six to eight points around its lowest petal layer.
Do not stitch through the upper half of the petals.
Leaving the outer edges free preserves the three-dimensional flower profile.
Floral Vine for the Outer Border
The reference blanket uses a green vine carrying smaller ivory roses around much of the outer edge.
Yarn: dark sage green.
Foundation: Ch until the vine matches one side of the blanket.
Row 1: Starting in second ch, sl st in each chain across.
Fasten off with a long sewing tail.
Make separate vine sections for each side rather than one extremely long cord. Separate sections are easier to position around corners.
Small Border Leaves
Make enough to space along the vine approximately every 5–8 cm.
Foundation: Ch 8.
Starting in second ch work:
Sl st, sc, hdc, dc, hdc, sc, sl st.
Ch 2 and sl st in the second chain for the tip.
Rotate and mirror the sequence along the opposite side.
Fasten off with a 15 cm tail.
Small Border Rose
Make approximately 15–25 depending on blanket dimensions.
Foundation: Ch 31.
Row 1: Dc in fourth ch from hook. *Ch 1, skip 1 ch, dc in next.* Repeat across.
Turn.
In the first four ch-spaces work:
Sc, 3 dc, sc.
In each remaining space work:
Sc, hdc, 4 dc, hdc, sc.
Fasten off with a 30 cm tail.
Roll the strip from the smaller petals toward the larger petals.
Sew through the foundation edge several times to secure the flower.
Attaching the Border Vine
Pin the vine approximately 3–5 cm inside the outer scalloped edge.
Sew through the vine every few centimeters.
Position small leaves in alternating directions along the cord.
Add one small ivory rose approximately every 10–15 cm, varying the exact spacing around corners.
The border flowers should remain smaller than the roses on the central squares.
Black Outer Border
Join black yarn at any corner of the assembled blanket.
Round 1: Ch 1. Sc evenly around the full blanket. Work 3 sc in each corner. Join.
Round 2: Ch 3. Dc in each stitch around. Work 5 dc in each corner center stitch. Join.
Round 3: Ch 5, skip 2 sts, sc in next st. Repeat around, adjusting slightly near corners to maintain even spacing.
Round 4: Sl st into first ch-5 sp. Work 7 dc in the space, sc in next ch-5 sp. Repeat around.
This establishes the broad scalloped outline.
Ivory Scalloped Edging
Join ivory yarn at the beginning of any black scallop.
Work sc across the lower stitches of the scallop.
At the center of each scallop work:
Sc, ch 3, sl st in first ch, sc.
Continue in sc to the valley.
Sl st into the valley and repeat around.
Fasten off and weave in the tail.
The ivory edging should trace the black scallops rather than forming a separate wide border.
Optional Corner Flowers
If the four blanket corners appear visually empty after the floral vine has been attached, add one small ivory flower to each corner.
Round 1: 6 sc in MR. (6)
Round 2: Work sl st, ch 3, 3 dc, ch 3, sl st in each stitch.
Fasten off.
Sew through the center and leave the petal edges free.
Assembly
- Crochet all black square foundations, add their ivory framing rounds and block every square to identical dimensions.
- Arrange the squares in the final grid and join them with ivory yarn before attaching any dimensional flowers.
- Cover selected square intersections with small ivory joining flowers.
- Pin the large dark green leaves onto the primary floral squares and sew them through their central veins.
- Attach the large ivory roses at six to eight base points, leaving the outer petals free.
- Add the small daisy-style flowers and secondary foliage to the remaining black squares.
- Crochet the black outer border and complete the final ivory scalloped edging.
- Position the green floral vine inside the scalloped border and sew it securely around the blanket perimeter.
- Add small leaves and rolled ivory roses along the border vine, checking that no flower folds underneath the blanket edge.
- Weave all attachment tails into dense stitches, inspect the back for visible crossing strands and lightly block the border without flattening the roses.
The finished blanket should retain a flat square framework beneath the raised floral motifs, with the largest roses concentrated inside the cream grid.
Making the Blanket Larger
Modular construction makes resizing easier than altering individual square stitch counts.
For a larger bed throw, add another column or row of complete squares.
If one blocked square measures 25 cm, adding one column increases the central width by approximately 25 cm before border adjustments.
A 5 × 6 layout uses 30 squares. Keep the proportion of large rose squares to secondary flower squares close to one-to-one so the blanket does not become excessively heavy.
Recalculate the floral border only after the complete square grid has been assembled.
Making a Smaller Sofa Throw
Use a 3 × 4 layout for a compact decorative throw.
Twelve 25 cm squares create a central panel approximately 75 × 100 cm before joining allowances and borders.
Use approximately six large rose squares and six secondary floral squares.
Reduce the number of border roses accordingly.
The scalloped edge can remain the same depth even when the central grid is smaller.
Controlling the Weight of the Blanket
Three-dimensional flowers add substantially more yarn than flat surface embroidery.
Do not attach a large rose to every square unless the blanket is intended primarily for display.
Alternate raised roses with flatter flower motifs.
Keep leaves to one layer whenever possible.
The border roses should also remain smaller than the central flowers.
If the finished blanket becomes difficult to drape, remove several secondary appliqués rather than changing the structural squares.
Keeping the Squares Flat
Dimensional flowers can pull a square inward when attachment stitches are too tight.
Block the square before adding the rose.
Pin the flower in place.
Sew through the rose base without pulling the yarn until the black square puckers.
After every two or three attachment points, place the square flat and check its corners.
If the corners begin lifting, loosen the most recent stitches before continuing.
Color Variations
Black, ivory and dark sage create the high-contrast botanical appearance shown in the reference image.
For a softer version, replace black with charcoal and use warm cream flowers.
A romantic variation can use burgundy squares, ivory roses and olive leaves.
For a lighter blanket, use an ivory foundation with dusty rose flowers and sage foliage, but keep the joining bands darker so the individual square structure remains visible.
Limit the palette to three main colors when using many dimensional motifs. Additional colors can compete with the strong texture.
7 Technical Tips for a 3D Crochet Rose Blanket
- Block every square to the same measurement. A difference greater than about 1 cm becomes obvious once the cream joining bands create a visible grid.
- Join the complete blanket before attaching large roses. A rose projecting several centimeters above the square makes flat seam alignment much harder.
- Use six to eight attachment points on each large rose. A single center attachment allows a heavy flower to rotate and pull the black square out of shape.
- Keep at least 2 cm between the rose and joining band. Petals extending directly over the cream seam hide the grid and can become trapped during folding.
- Pin leaves before sewing. At least one-third of each leaf should remain visible beyond the rose, or the foliage will disappear beneath the outer petals.
- Keep border scallops equal in depth. Measure several finished scallops; a difference greater than approximately 1 cm creates a visibly uneven lower edge.
- Weave tails through dense black or ivory stitches. Carry each tail for at least 4–5 cm and avoid crossing open border spaces where the yarn can show from the front.
Blocking the Finished Blanket
Do not flatten the entire finished blanket under heavy pressure after the roses have been attached.
Instead, block the structural areas selectively.
Pin the cream joining bands so they remain straight.
Shape the black scallops around the perimeter and pin each ivory-edged point.
Arrange large rose petals by hand rather than pressing them flat.
Pull the leaves outward enough to reveal their tips and central veins.
Allow the blanket to dry completely before removing the pins.
Care and Storage
A heavily embellished crochet blanket requires more space during washing and drying than a flat granny-square throw.
Follow the care instructions for the yarn used.
When hand washing, support the weight of the wet blanket instead of lifting it from one edge.
Dry flat whenever the fiber instructions permit.
Reshape the roses and leaves while damp.
For storage, fold along the cream joining bands rather than directly through the centers of the largest roses. Avoid placing heavy objects on top of the folded blanket.
Conclusion
Build this blanket as a modular textile first and a floral surface second. Crochet and block every black square, add the contrasting ivory frames, and complete the full grid before attaching any dimensional decoration. Place the large roses across alternating squares, use smaller flowers to reduce weight, and keep dark green leaves visible beyond the petal edges. Finish the structure with black scallops, ivory edging and a smaller floral vine around the perimeter. Save this crochet rose blanket pattern to Pinterest and share the finished throw on Instagram with #BlackAndWhiteRoseBlanket. For this design, would you keep every large rose ivory or add one burgundy focal rose?