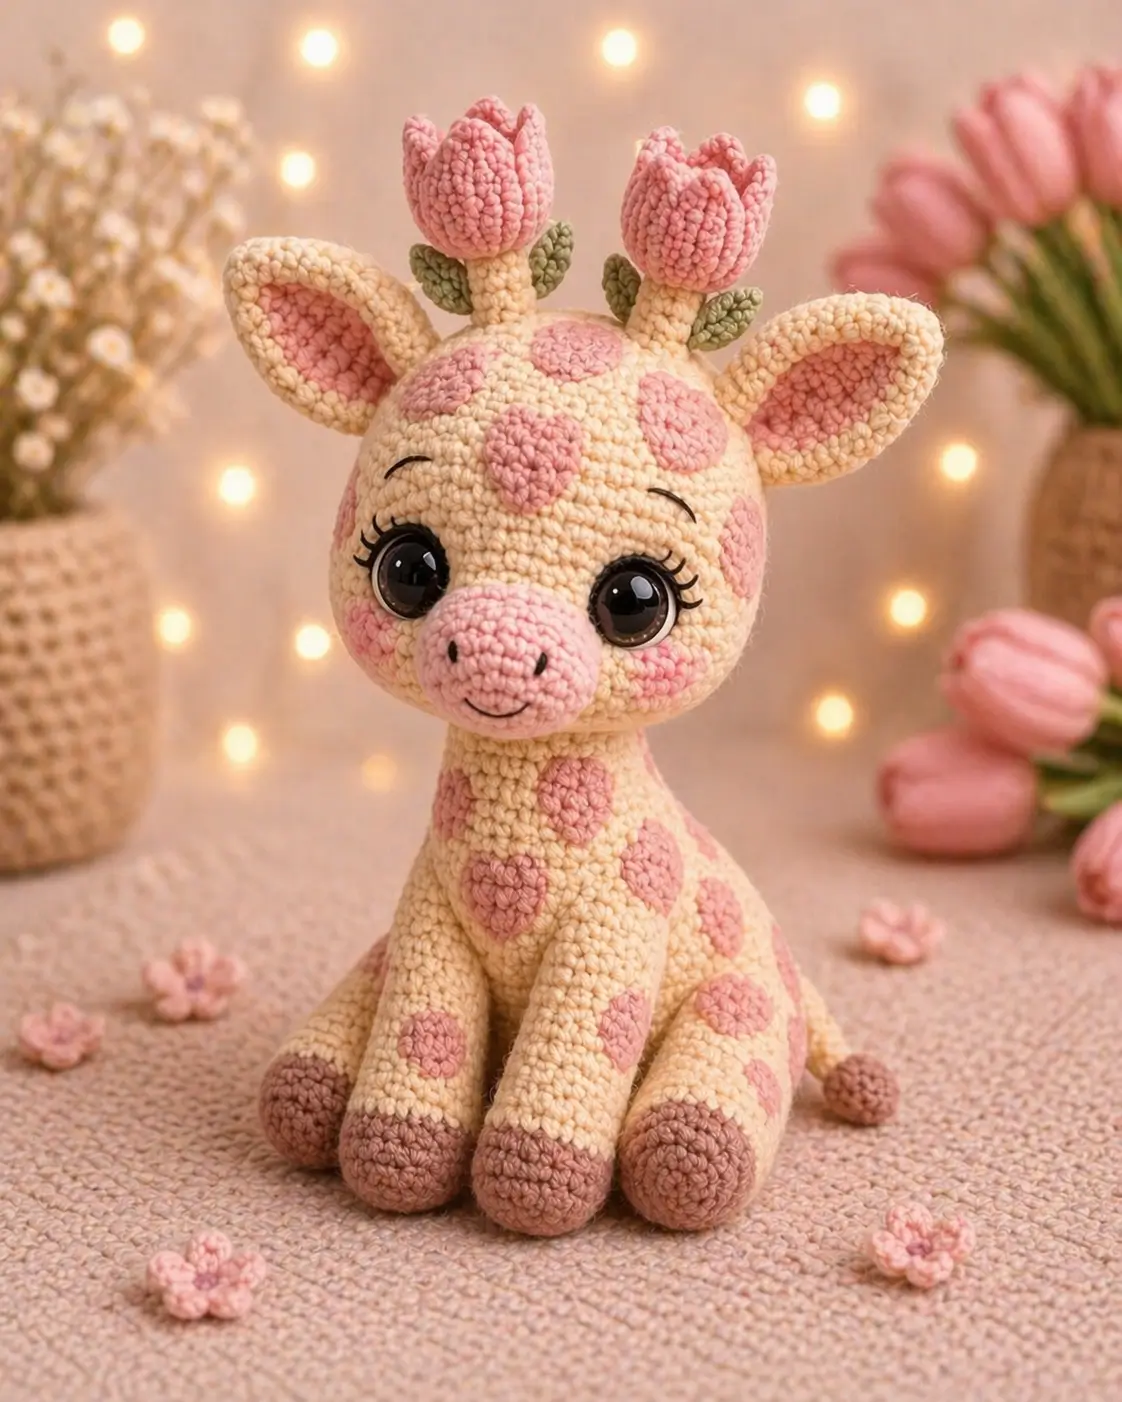
A giraffe without ossicones reads like a deer, so the tulip stems have to do two jobs at once. This giraffe amigurumi crochet pattern builds a seated floral giraffe in cream, pink, taupe, and sage using chenille-style yarn, a 4 mm hook, and 16 mm eyes, with a target height around 33 cm and an intermediate finish suited to nursery decor or styled product photos.
The Design: What Makes This Giraffe Different
You need a short neck here, not a tall safari silhouette, because the photo shows a seated toy with the head carried close to the chest. On the finished piece, that reduced neck length keeps the eyes facing forward and stops the floral top from pulling the profile backward. The second structural choice is ear scale. Oversized ears widen the crown line so the tulips do not make the head look narrow. A third choice is appliqué spotting instead of color changes in the round. That keeps chenille tension more consistent and matches the soft-edged patches visible in the image. A common failure in a plush giraffe crochet pattern is packing the neck too hard. In a typical giraffe crochet tutorial, that turns the upper body into a rigid column instead of the soft chest-to-head taper this version needs.
Project Info at a Glance
| Skill Level | Time | Finished Size | Hook | Best For |
|---|---|---|---|---|
| Intermediate | 4–6 hrs baseline | 33 cm | 4.0 mm | Nursery shelf, baby gift, styled photo prop |
Comparable plush giraffe references place the build at about 33 cm with a 4.0 mm hook and 16 mm eyes, while an XL giraffe kit in chenille lands near 30 cm and 4–6 hours. The tulip appliqués add finishing time beyond the simpler references.
Materials and Tools
Yarn
- Cream / pale butter yellow — super bulky chenille — main color, about 100–200 g reference range — HIMALAYA Dolphin Baby or similar
- Dusty pink — chenille or velvet contrast — small amount for snout, cheeks, spots, and tulips
- Taupe brown — chenille contrast — small amount for hooves and tail tip
- Sage green — velvet or cotton accent — small amount for leaves
Tools
- Hook 4.0 mm
- 16 mm safety eyes
- Polyfill stuffing
- Tapestry needle
- Stitch markers
- Black embroidery thread
- Pins or clips
The verified material reference here is the plush chenille giraffe format: super bulky chenille, 4 mm hook, and 16 mm eyes. The extra pink and green colors are photo-led additions for the floral version.
Abbreviations
MR / sc / inc / dec / sl st / ch / BLO / hdc / dc
Work every decrease as an invisible decrease through the front loops only; this keeps the neck, snout, and hoof transitions from opening into visible gaps.
Pattern — Step by Step
Continuous spiral unless noted. The pattern below is an original giraffe amigurumi crochet pattern drafted from the submitted photo, using verified reference sizing for yarn weight, hook choice, and eye size.
Head (Make 1)
Yarn: cream — Source: photo analysis + standard amigurumi math
R1: 6 sc in MR (6)
R2: inc x6 (12)
R3: (sc, inc) x6 (18)
R4: (sc 2, inc) x6 (24)
R5: (sc 3, inc) x6 (30)
R6: (sc 4, inc) x6 (36)
R7: sc around (36)
R8: sc around (36)
R9: sc around (36)
R10: sc around (36)
R11: sc around (36)
R12: sc around (36)
R13: (sc 4, dec) x6 (30)
R14: (sc 3, dec) x6 (24)
R15: (sc 2, dec) x6 (18)
R16: (sc, dec) x6 (12)
R17: dec x6 (6)
Insert the eyes between R9 and R10, about 8 sts apart. Stuff firmly before R15 and add more stuffing before R16.
Fasten off. Leave a 20 cm tail.
Snout (Make 1)
Yarn: dusty pink — Source: photo analysis + standard amigurumi math
R1: 6 sc in MR (6)
R2: inc x6 (12)
R3: (sc, inc) x6 (18)
R4: sc around (18)
Lightly stuff during sewing so the muzzle sits proud of the face without turning into a sphere.
Fasten off. Leave a 20 cm tail.
Cheek Patches (Make 2)
Yarn: dusty pink — Source: photo analysis + standard amigurumi math
R1: 6 sc in MR (6)
R2: inc x6 (12)
Fasten off cleanly. Leave a 12 cm tail.
Front Legs / Front Limbs (Make 2)
Yarn: taupe then cream — Source: photo analysis + standard amigurumi math
R1: 6 sc in MR (6)
R2: inc x6 (12)
R3: (sc, inc) x6 (18)
R4: BLO sc around (18)
R5: sc around (18)
R6: sc around (18)
R7: change to cream; (sc, dec) x6 (12)
R8: sc around (12)
R9: sc around (12)
R10: sc around (12)
R11: sc around (12)
R12: sc around (12)
R13: sc around (12)
R14: sc around (12)
R15: sc around (12)
R16: sc around (12)
Stuff the hoof hard and the upper third lightly. Flatten the opening.
Fasten off. Leave an 18 cm tail.
Back Legs (Make 2)
Yarn: taupe then cream — Source: photo analysis + standard amigurumi math
R1: 6 sc in MR (6)
R2: inc x6 (12)
R3: (sc, inc) x6 (18)
R4: BLO sc around (18)
R5: sc around (18)
R6: sc around (18)
R7: change to cream; (sc, dec) x6 (12)
R8: sc around (12)
R9: sc around (12)
R10: sc around (12)
R11: sc around (12)
R12: sc around (12)
R13: sc around (12)
R14: sc around (12)
Stuff the hoof hard. Keep the top half softer so the leg can angle forward in a seated pose.
Fasten off. Leave an 18 cm tail.
Body (Make 1)
Yarn: cream — Source: photo analysis + standard amigurumi math
R1: 6 sc in MR (6)
R2: inc x6 (12)
R3: (sc, inc) x6 (18)
R4: (sc 2, inc) x6 (24)
R5: (sc 3, inc) x6 (30)
R6: (sc 4, inc) x6 (36)
R7: sc around (36)
R8: sc around (36)
R9: sc around (36)
R10: (sc 4, dec) x6 (30)
R11: sc around (30)
R12: sc around (30)
R13: (sc 3, dec) x6 (24)
R14: sc around (24)
R15: sc around (24)
R16: (sc 2, dec) x6 (18)
R17: sc around (18)
R18: sc around (18)
R19: sc around (18)
R20: sc around (18)
R21: sc around (18)
Stuff the seat and lower chest firmly. Keep the neck section dense enough to hold the head, but not rigid.
Fasten off. Leave a 25 cm tail.
Ears Outer (Make 2)
Yarn: cream — Source: photo analysis + standard amigurumi math
R1: 6 sc in MR (6)
R2: inc x6 (12)
R3: (sc, inc) x6 (18)
R4: (sc 2, inc) x6 (24)
R5: sc around (24)
R6: sc around (24)
R7: (sc, dec) x6 (18)
R8: sc around (18)
R9: (sc, dec) x6 (12)
R10: sc around (12)
Do not stuff. Flatten and pinch the base to create the ear point.
Fasten off. Leave an 18 cm tail.
Ear Inserts (Make 2)
Yarn: dusty pink — Source: photo analysis + standard amigurumi math
R1: 6 sc in MR (6)
R2: inc x6 (12)
R3: (sc, inc) x6 (18)
R4: sc around (18)
Fasten off. Leave a 15 cm tail.
Ossicone Stems (Make 2)
Yarn: cream — Source: photo analysis + standard amigurumi math
R1: 6 sc in MR (6)
R2: sc around (6)
R3: sc around (6)
R4: sc around (6)
R5: sc around (6)
R6: sc around (6)
R7: sc around (6)
Add only a touch of stuffing. These need to stay upright, not bulky.
Fasten off. Leave a 15 cm tail.
Tulip Petals (Make 10)
Yarn: dusty pink — Source: photo analysis
Row 1: Ch 5. Starting in 2nd ch from hook, sl st, sc, hdc, 3 dc in last ch; work down the opposite side of the foundation with hdc, sc, sl st. (9)
Make 5 petals for each tulip. Overlap them slightly during assembly so the flower reads as a closed cup, not an open daisy.
Fasten off. Leave a 10 cm tail.
Leaf Appliqués (Make 4)
Yarn: sage green — Source: photo analysis
Row 1: Ch 6. Starting in 2nd ch from hook, sl st, sc, hdc, sc, sl st. (5)
Fasten off. Leave a 10 cm tail.
Spot Appliqués
Yarn: dusty pink — Source: photo analysis + standard amigurumi math
Large Spots (Make 7)
R1: 6 sc in MR (6)
R2: inc x6 (12)
R3: (sc, inc) x6 (18)
Fasten off cleanly.
Small Spots (Make 10)
R1: 6 sc in MR (6)
R2: inc x6 (12)
Stretch a few large spots slightly while sewing to imitate the longer patches on the forehead and body.
Fasten off cleanly. Leave a 12 cm tail on each.
Tail (Make 1)
Yarn: cream with taupe tip — Source: photo analysis + standard amigurumi math
R1: 6 sc in MR (6)
R2: sc around (6)
R3: sc around (6)
R4: sc around (6)
R5: sc around (6)
Cut 4 strands of taupe yarn, fold in half, and lark’s-head them through the end for the tuft.
Fasten off. Leave an 18 cm tail.
Face Embroidery
Yarn: black embroidery thread — Source: photo analysis
Embroider a 2-st nostril on each side of the snout. Add a 3-st curved smile centered below the nostrils, a soft arch above each eye, and 3 outer lashes per eye.
Assembly
- Sew the snout to the lower front of the head, centering it across R9–R13, and add a pinch of stuffing before the last third of the seam closes.
- Attach the cheek patches below and slightly outside each eye, then work the nostrils, smile, and brow embroidery.
- Join the head to the body, matching the front center of the head with the front center of the chest.
- Sew the front legs to the body so the hooves sit parallel and touch the floor at the same level.
- Sew the back legs wider and slightly forward, using the lower side seams of the body as the anchor line for a seated pose.
- Stitch the pink ear inserts to the cream ears, pinch each ear at the base, and sew the ears to the head slightly below the tulip line.
- Sew the two ossicone stems to the crown of the head, leaving a small gap between them.
- Overlap 5 petals around the top of each stem, sew 2 leaves at the base of each flower, and angle both tulips slightly outward.
- Attach the tail at the rear center seam and distribute the spots across the forehead, cheeks, chest, front legs, side body, and upper haunches to match the photo balance.
- Check the front view, side view, and floor contact; then tighten, knot, and bury every remaining tail inside the body.
The finished giraffe should sit without tipping once the back legs angle forward and the neck is packed firmly.
7 Technical Tips
- Stitch marker drift: Move the marker every round, not every few rounds. On a 36-stitch head, even a one-stitch drift will shift the face center and make the snout sit off-axis.
- Stuffing firmness in the neck: Pack the body through R16, then add neck stuffing in short plugs, not one large wad. A single hard plug creates a visible cylinder under the head.
- Invisible decrease quality: Work every dec through front loops only and pull the working yarn snug after the stitch closes. Standard decreases leave larger holes, which are easy to see around the muzzle and hoof transition.
- Eye placement timing: Install the eyes before the head drops below 24 stitches. Waiting until the decrease rounds start makes it harder to lock washers evenly and often pushes the eyes too high.
- Velvet or chenille tension: Use a smaller hook than the yarn label would usually suggest, then stop and stretch one test round in your fingers. If stuffing shows through R6 on the head, the fabric is too open for a clean plush finish.
- Pinning the tulips: Pin both stems first, then pin all 10 petals before sewing any one flower permanently. Tulips that angle too far inward read like antlers instead of ossicones.
- Tail weaving: Split the tail end and bury it in two directions through at least 4 cm of body stitches. One short straight bury can work loose because the tail sits on a high-rub point at the back seam.
Conclusion
This version works best when you finish the face first, pin the floral crown next, and only then commit to final sewing. Photograph the toy from the front and side before locking the tulips in place, because profile balance is the whole point of this adaptation. After assembly, save one clean front-view image for Pinterest and one side-view image for Instagram so the tulip silhouette is readable in both feeds. Use #TulipGiraffePattern. The next step is simple: make one sample, note your exact eye spacing and tulip angle, and save those numbers with the pattern. When you look at the side view, do the tulip stems still read as giraffe ossicones in this giraffe amigurumi crochet pattern?









