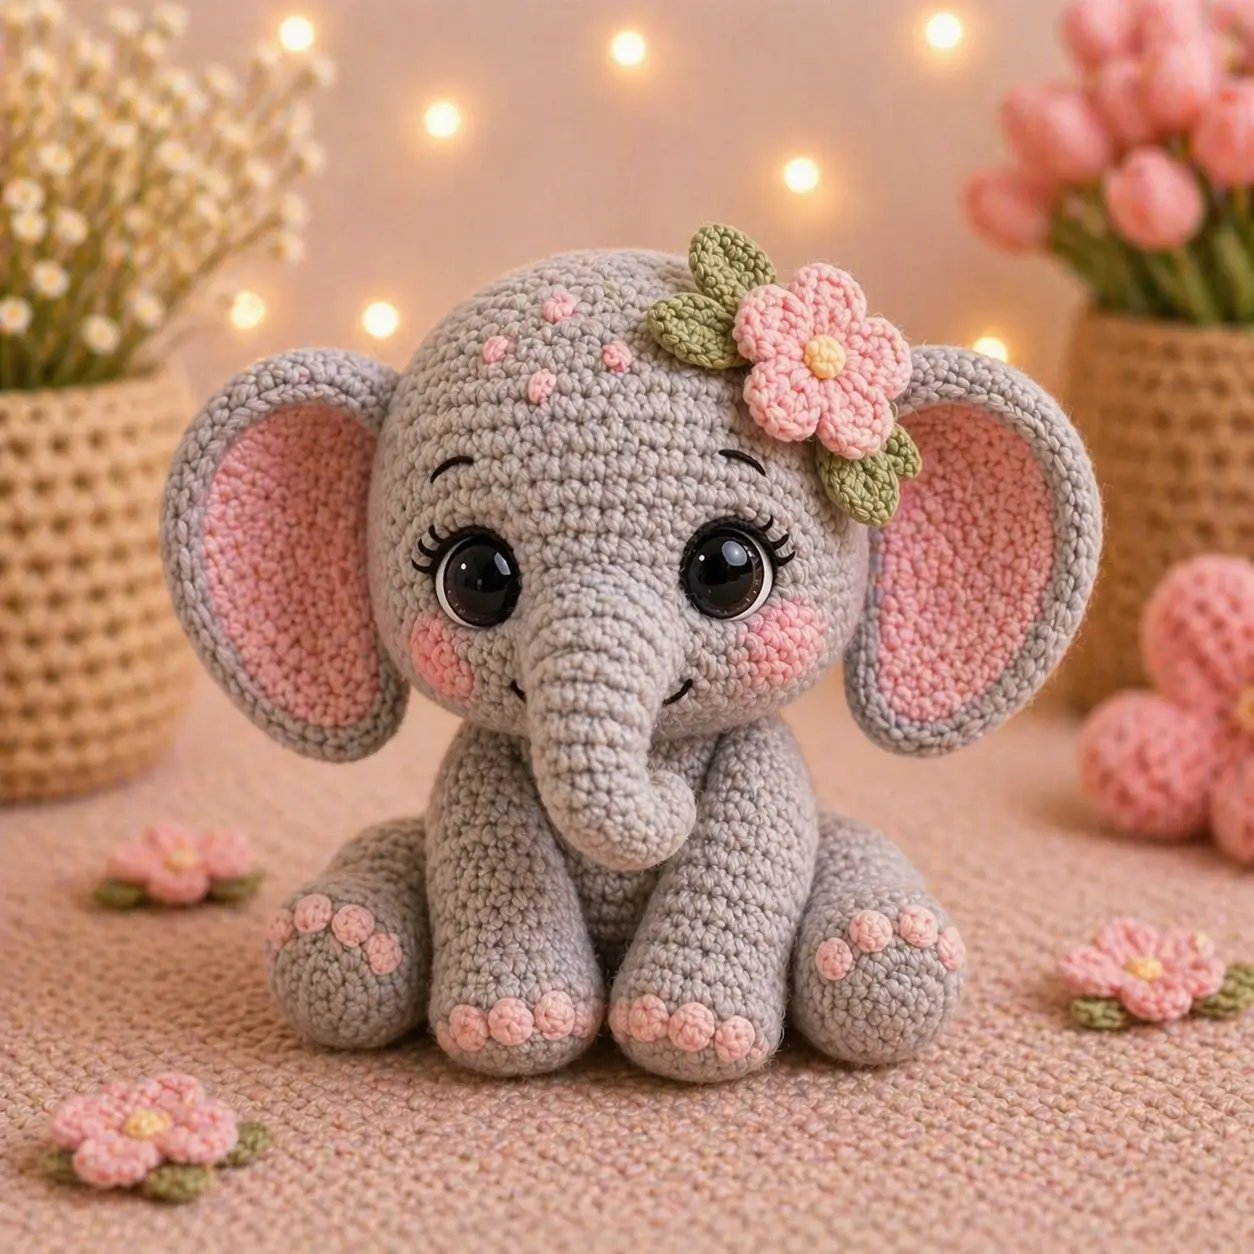
An elephant only reads as an elephant when the trunk drops below the eyes and the ears outrun the cheeks. This elephant amigurumi crochet pattern uses DK to light worsted yarn, a 3.5 mm hook, and 18 mm eyes for a sitting plush about 15–20 cm tall. Skill level is advanced beginner to intermediate. It suits a nursery shelf or baby-shower gift.
The Design: What Makes This Elephant Different
You are balancing trunk length against ear spread from the first round. First, the trunk widens in two stages so the tip stays narrow while the upper section has enough fabric to sew cleanly into the face; that keeps the mouth area from collapsing. Second, the ears use a gray outer shell and a smaller pink insert because elephants lose scale fast when the inner ear touches the edge. Third, the head holds a medium 36-stitch plateau for several rounds, which gives room for large eyes without forcing the cheeks too low. Many sitting elephant amigurumi examples online either go mini, stand on four legs, or flatten the face into a ragdoll profile. The common mistake is eye placement that sits too high and too wide. Then the trunk reads short, and the forehead stops matching a baby elephant amigurumi silhouette.
Project Info at a Glance
| Skill Level | Time | Finished Size | Hook | Best For |
|---|---|---|---|---|
| Advanced beginner to intermediate | 6–8 hours | 15–20 cm sitting | 3.5 mm | Nursery shelf, baby shower, safari set |
Materials and Tools
For a close photo match, keep the yarn matte and smooth rather than fuzzy. This build works best in DK to light worsted yarn, with about 100 g main color and about 25 g contrast.
Yarn
- Light gray — DK / light worsted — 100 g — smooth cotton
- Blush pink — DK / light worsted — 20 g — same line
- Sage green — DK / light worsted — 5 g — same line
- Butter yellow — DK / light worsted — 2 g — same line
Tools
- Hook 3.5 mm
- 18 mm safety eyes
- Polyester stuffing
- Yarn needle
- Stitch markers
- Black embroidery thread
Abbreviations
MR / sc / inc / dec / sl st / ch / BLO / hdc / dc
Work invisible decrease through the front loops only; a regular decrease leaves a visible ridge across the forehead, trunk base, and body crown.
Pattern — Step by Step
This elephant amigurumi crochet pattern is worked in continuous spiral rounds unless noted. The draft below is built with standard amigurumi math and a medium 36-stitch plateau. Keep stitches tight, move a marker every round, and stuff in stages instead of waiting until the opening narrows.
Head
Yarn: light gray
R1: 6 sc in MR (6)
R2: inc x6 (12)
R3: (sc, inc) x6 (18)
R4: (2 sc, inc) x6 (24)
R5: (3 sc, inc) x6 (30)
R6: (4 sc, inc) x6 (36)
R7: sc around (36)
R8: sc around (36)
R9: sc around (36)
R10: sc around (36)
R11: sc around (36)
R12: sc around (36)
R13: sc around (36)
R14: (4 sc, dec) x6 (30)
R15: (3 sc, dec) x6 (24)
R16: (2 sc, dec) x6 (18)
R17: (sc, dec) x6 (12)
R18: dec x6 (6)
Insert 18 mm safety eyes between R9 and R10, spaced 10 sts apart. Stuff firmly before the final three decrease rounds.
Fasten off. Leave 15 cm tail.
Body
Yarn: light gray
R1: 6 sc in MR (6)
R2: inc x6 (12)
R3: (sc, inc) x6 (18)
R4: (2 sc, inc) x6 (24)
R5: (3 sc, inc) x6 (30)
R6: (4 sc, inc) x6 (36)
R7: sc around (36)
R8: sc around (36)
R9: sc around (36)
R10: sc around (36)
R11: (4 sc, dec) x6 (30)
R12: sc around (30)
R13: (3 sc, dec) x6 (24)
R14: sc around (24)
R15: (2 sc, dec) x6 (18)
R16: sc around (18)
R17: (sc, dec) x6 (12)
R18: dec x6 (6)
Stuff the lower half firmer than the upper half so the plush sits without the body folding backward.
Fasten off. Leave 25 cm tail.
Front Legs (Make 2)
Yarn: blush pink, then light gray
R1: 6 sc in MR with blush pink (6)
R2: inc x6 (12)
R3: (sc, inc) x6 (18)
R4: sc around (18)
R5: sc around (18)
R6: sc around (18)
R7: sc around (18)
R8: sc around (18)
R9: sc around (18)
R10: sc around (18)
R11: (sc, dec) x6 (12)
R12: sc around (12)
R13: sc around (12)
R14: sc around (12)
Change to light gray after R5. Stuff the foot and lower leg firmly. Leave the top third softer so the legs angle forward instead of sticking straight out.
Fasten off. Leave 20 cm tail.
Back Legs (Make 2)
Yarn: blush pink, then light gray
R1: 6 sc in MR with blush pink (6)
R2: inc x6 (12)
R3: (sc, inc) x6 (18)
R4: (2 sc, inc) x6 (24)
R5: sc around (24)
R6: sc around (24)
R7: (2 sc, dec) x6 (18)
R8: sc around (18)
R9: sc around (18)
R10: sc around (18)
R11: (sc, dec) x6 (12)
R12: sc around (12)
Change to light gray after R6. Pack the foot firmly and keep the upper section light. Flatten the opening before sewing so the leg reads as a seated haunch, not a cylinder.
Fasten off. Leave 20 cm tail.
Outer Ears (Make 2)
Yarn: light gray
Ch 7.
R1: starting in 2nd ch from hook, sc 5, 3 sc in last ch, sc 4 on opposite side, inc in last st (14)
R2: inc, sc 4, inc x3, sc 4, inc x2 (20)
R3: sc, inc, sc 4, (sc, inc) x3, sc 4, (sc, inc) x2 (26)
R4: sc 2, inc, sc 4, (sc 2, inc) x3, sc 4, (sc 2, inc) x2 (32)
R5: sc 3, inc, sc 4, (sc 3, inc) x3, sc 4, (sc 3, inc) x2 (38)
R6: sc around (38)
Do not overstuff. These should stay flat with only a slight pinch at the top edge.
Fasten off. Leave 25 cm tail.
Inner Ears (Make 2)
Yarn: blush pink
Ch 6.
R1: starting in 2nd ch from hook, sc 4, 3 sc in last ch, sc 3 on opposite side, inc in last st (12)
R2: inc, sc 3, inc x3, sc 3, inc x2 (18)
R3: sc, inc, sc 3, (sc, inc) x3, sc 3, (sc, inc) x2 (24)
R4: sc 2, inc, sc 3, (sc 2, inc) x3, sc 3, (sc 2, inc) x2 (30)
Fasten off. Leave 20 cm tail.
Trunk
Yarn: light gray
R1: 6 sc in MR (6)
R2: sc around (6)
R3: sc around (6)
R4: inc x6 (12)
R5: sc around (12)
R6: sc around (12)
R7: sc around (12)
R8: (sc, inc) x6 (18)
R9: sc around (18)
R10: sc around (18)
R11: sc around (18)
R12: sc around (18)
R13: sc around (18)
R14: sc around (18)
R15: sc around (18)
Stuff lightly, especially in the upper half. A loose fill keeps the lower curve soft and stops the trunk from pushing the eyes outward.
Fasten off. Leave 30 cm tail.
Cheek Patches (Make 2)
Yarn: blush pink
R1: 6 sc in MR (6)
R2: inc x6 (12)
Fasten off. Leave 15 cm tail.
Mini Dots (Make 17)
Yarn: blush pink
R1: 6 sc in MR (6)
Join with sl st to first sc.
Use 12 for the toes and 5 for the forehead. Fasten off. Leave 10 cm tail.
Flower Center (Make 1)
Yarn: butter yellow
R1: 6 sc in MR (6)
Join with sl st to first sc.
Fasten off. Leave 10 cm tail.
Flower (Make 1)
Yarn: blush pink
R1: 6 sc in MR (6)
R2: [sl st in next st, ch 2, 2 dc, ch 2, sl st in same st] x6 (6 petals)
Fasten off. Leave 20 cm tail.
Leaves (Make 4)
Yarn: sage green
Ch 6.
Row 1: starting in 2nd ch from hook, sl st, sc, hdc, sc, sl st (5)
Fasten off. Leave 15 cm tail.
Assembly
- Pin the head to the top center of the body, keeping the face vertical and the body seam hidden at the back. Sew all the way around with the body tail.
- Place the trunk on the lower center of the head. The top of the trunk should sit just below the eye line.
- Sew the cheek patches under the eyes, one on each side of the trunk base. Keep the lower edge of each patch level with the smile line.
- Embroider the smile in black under the trunk and add two short curved brows above the eyes. Keep both brows within the upper third of the face.
- Sew each inner ear to an outer ear, centered so a gray rim stays visible all around. Pinch a small pleat at the top of each ear and tack it in place.
- Attach the ears to the head with the top edges around rounds 4 to 6. Angle them slightly forward so the inner pink section faces front.
- Sew the front legs to the lower front of the body. Leave a narrow center gap so the trunk can hang between them without touching.
- Sew the back legs to the side-rear body and test the seat on a flat surface before locking the last stitches. All four feet should contact the surface or sit within a few millimeters of it.
- Sew the flower to the upper right head area, add the yellow center, and tuck the four leaves under the petals. Attach five mini dots to the forehead and three mini dots to each foot.
- Check the balance, add a little extra stuffing by needle where needed, and weave every tail through at least three stitch paths before trimming. The elephant should sit upright with the trunk centered and the ears level.
7 Technical Tips
- Mark the first stitch of every round, especially on the head. One missed move shifts the eye line by 1–2 stitches and throws the trunk off center.
- Pack the head firmer than the body. Soft stuffing behind 18 mm eyes makes the sockets sink and the cheek patches wrinkle.
- Use invisible decrease on every visible shaping round. A regular decrease leaves a diagonal ridge that shows on the trunk base and across the forehead.
- Install the eyes between rounds 9 and 10, 10 stitches apart. Higher placement makes the trunk look short, and wider placement erases the cheek area.
- Pin each ear before sewing and keep the top edge around rounds 4 to 6 of the head. If the ear drops lower than that, the flower cluster pulls the face sideways.
- When swapping to velvet or chenille, keep the same stitch counts but go up only to a 4 mm hook and reduce the eyes to 14–16 mm. Larger eyes on fuzzy yarn usually crowd the trunk seam.
- Weave every accessory tail through at least three separate stitch paths. Single-pass weaving is the usual reason toe dots and leaf tips loosen after handling.
Conclusion
Start with the ears and trunk before final assembly, then dry-pin the whole face from both the front view and the side view. That step corrects most proportion errors before any seam becomes permanent. Once finished, post one straight-on image and one profile image to Pinterest and Instagram so the ear width and trunk curve read clearly. Use #PetalElephantPattern to group the project with matching nursery animals. The next practical move is a giraffe or hippo in the same gray-pink palette. This elephant amigurumi crochet pattern is built for repeat use with color changes, not structural rewrites. Did you keep the trunk tightly curled, or shape it with a softer forward bend?









