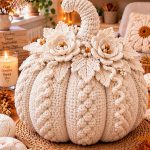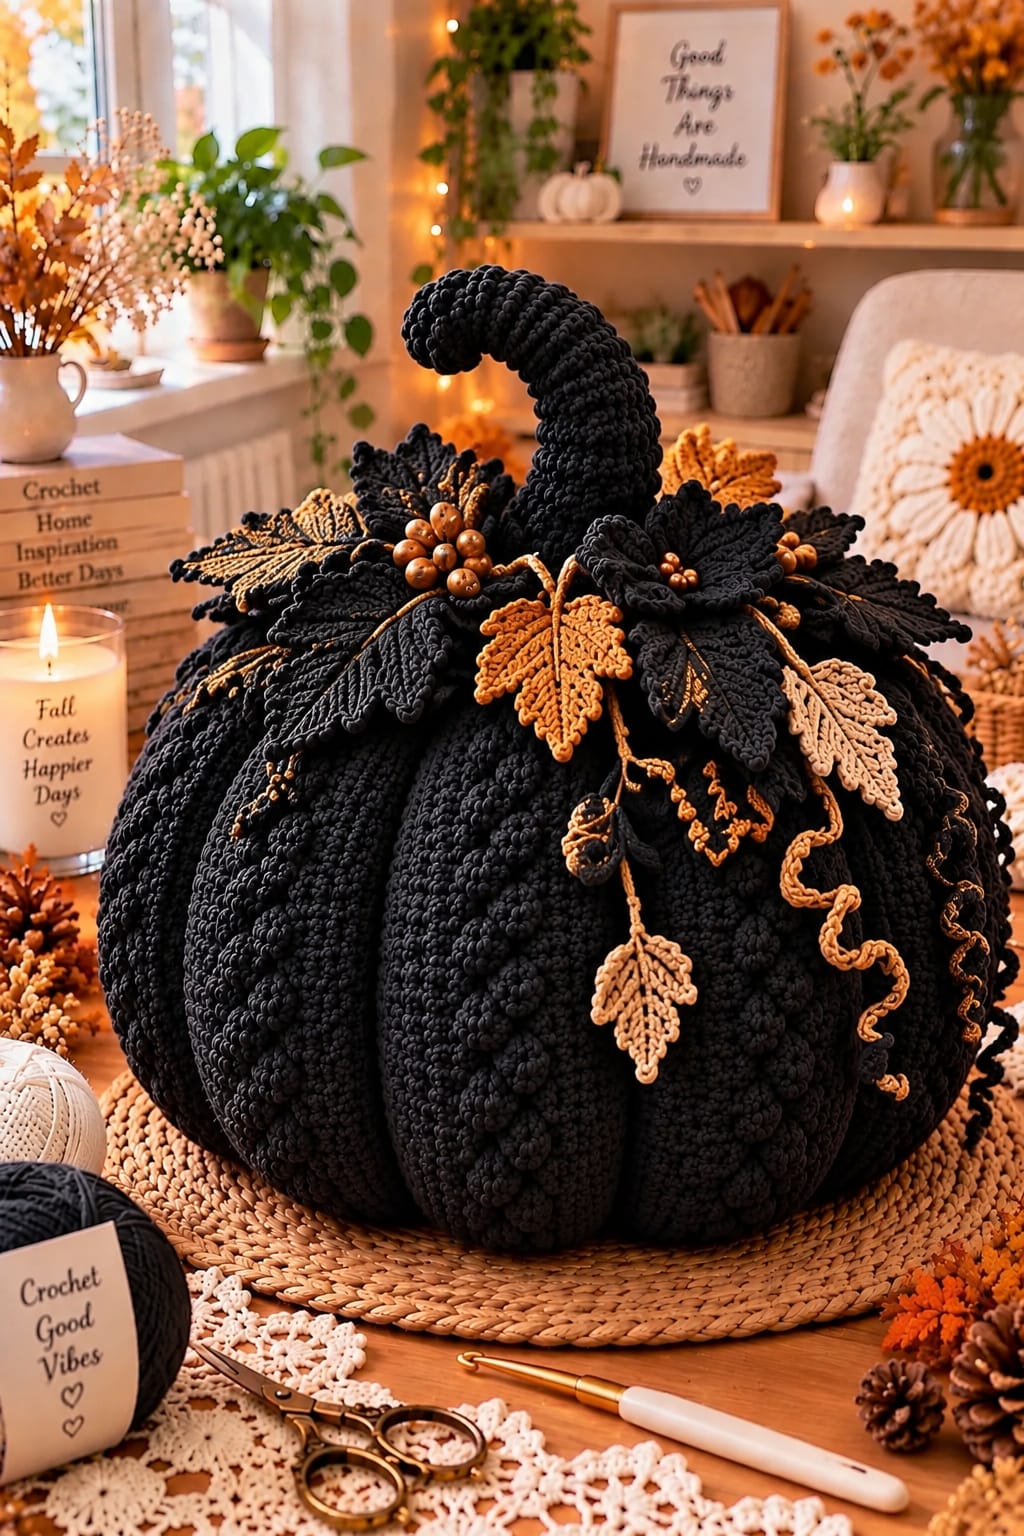
A black pumpkin this large needs pronounced vertical ribs or its silhouette becomes a featureless sphere. This giant black crochet pumpkin pattern builds a heavily sculpted body beneath a tall curved stem, layered black foliage, ochre leaves, cream accents and curling vines. The photo-inspired decoration targets approximately 40–45 cm across and 48–55 cm high including the stem. Super-bulky yarn and a 7–8 mm hook create the required scale.
The Design: What Makes This Black Pumpkin Different
The body depends on deep external sculpting rather than color changes. Broad black lobes surround a compressed center, creating enough shadow between sections for the pumpkin structure to remain readable despite the single dark color.
A second structural decision is the oversized hooked stem. It rises well above the leaf crown, so the upper portion is stuffed lightly enough to curve while the base remains firm. Around it, layered crochet autumn leaves extend horizontally and partially cover the pumpkin shoulders.
Ochre, tan and cream details prevent the crown from disappearing against the black body. Long vines add narrow vertical lines between the broad ribs. The common mistake with a large crochet pumpkin is overstuffing: a rigid body resists sculpting and produces shallow grooves.
Project Info at a Glance
| Skill Level | Time | Finished Size | Body Hook | Yarn |
|---|---|---|---|---|
| Intermediate | 12–16 hours | Approx. 40–45 cm wide × 48–55 cm high | 7–8 mm | Super Bulky #6 |
These measurements are targets for a photo-inspired reconstruction rather than measurements taken from the photographed object. Yarn thickness, hook size, stuffing density and sculpting tension will change the final dimensions.
Materials and Tools
Yarn
- Black — Super Bulky #6 — approximately 750–900 g for the pumpkin body
- Black — Super Bulky #6 — approximately 120–160 g for the stem and large leaves
- Ochre/caramel — Bulky #5 — approximately 60–80 g for leaves and vines
- Warm cream — Bulky #5 — approximately 30–40 g for accent leaves
- Dark brown — Bulky #5 — approximately 20–30 g for optional crown details
Allow approximately 1–1.2 kg of yarn for the complete decoration. Keep extra black yarn available for sculpting because the strands must travel repeatedly through and around the oversized body.
Tools
- 7–8 mm crochet hook — pumpkin body
- 6 mm crochet hook — stem
- 4.5–5.5 mm crochet hook — leaves and vines
- Polyester fiberfill — approximately 1–1.4 kg
- Long upholstery needle
- Large tapestry needle
- Locking stitch markers
- Sharp scissors
- Tape measure
Abbreviations
- MR — magic ring
- ch — chain
- sc — single crochet
- hdc — half double crochet
- dc — double crochet
- tr — treble crochet
- inc — 2 sc in one stitch
- dec — invisible decrease
- sl st — slip stitch
- BLO — back loop only
- st/sts — stitch/stitches
For an invisible decrease, work through the front loops of the next two stitches before completing one single crochet through both loops.
Gauge and Construction
A practical target is approximately 9–10 single crochet stitches per 10 cm with the selected super-bulky yarn. The fabric needs to remain dense enough that pale stuffing cannot be seen through the black stitches.
The body is crocheted first as one large stuffed form. External strands are then pulled from the bottom center to the crown to divide it into approximately ten prominent lobes.
Complete the sculpting before attaching any leaves. Once the crown has been covered, accessing the center for tension adjustments becomes considerably more difficult.
Giant Black Crochet Pumpkin Pattern
Black Pumpkin Body
Yarn: black. Work continuously in a spiral.
R1: 6 sc in MR. (6)
R2: inc ×6. (12)
R3: (sc, inc) ×6. (18)
R4: (2 sc, inc) ×6. (24)
R5: (3 sc, inc) ×6. (30)
R6: (4 sc, inc) ×6. (36)
R7: (5 sc, inc) ×6. (42)
R8: (6 sc, inc) ×6. (48)
R9: (7 sc, inc) ×6. (54)
R10: (8 sc, inc) ×6. (60)
R11: (9 sc, inc) ×6. (66)
R12: (10 sc, inc) ×6. (72)
R13: (11 sc, inc) ×6. (78)
R14: (12 sc, inc) ×6. (84)
R15–R32: Sc in every stitch around. (84)
The long plateau creates the oversized rounded body. Measure across the piece periodically rather than relying only on the round count.
R33: (12 sc, dec) ×6. (78)
R34: (11 sc, dec) ×6. (72)
R35: (10 sc, dec) ×6. (66)
R36: (9 sc, dec) ×6. (60)
Begin stuffing. Fill the lower perimeter first and distribute small pieces of fiberfill around the walls.
R37: (8 sc, dec) ×6. (54)
R38: (7 sc, dec) ×6. (48)
R39: (6 sc, dec) ×6. (42)
Add stuffing around the sides but leave the central core moderately compressible.
R40: (5 sc, dec) ×6. (36)
R41: (4 sc, dec) ×6. (30)
R42: (3 sc, dec) ×6. (24)
Finish most of the stuffing now. Correct flat areas before the opening becomes narrow.
R43: (2 sc, dec) ×6. (18)
R44: (sc, dec) ×6. (12)
R45: dec ×6. (6)
Fasten off with a 35 cm tail. Thread through the six remaining front loops and close firmly.
Sculpting the Ten Pumpkin Ribs
Cut a doubled strand of strong black yarn approximately 250–300 cm long. Thread it through the upholstery needle.
Pass the needle from the bottom center through the crown. Bring the yarn down the outside of the body and return through the bottom center.
Pull until the strand begins to sink into the fabric. Do not fully tighten it yet.
Repeat at approximately equal intervals until ten channels surround the pumpkin. Then work around the body a second time, gradually tightening each channel.
The widest portions of neighboring lobes should remain similar in size. Massage stuffing away from each channel while increasing tension.
Knot the sculpting strands at the crown. The foliage will hide the fastening point.
Tall Curved Black Stem
Yarn: black. Use a 6 mm hook.
R1: 6 sc in MR. (6)
R2: inc ×6. (12)
R3: (sc, inc) ×6. (18)
R4: BLO sc around. (18)
R5–R10: Sc around. (18)
R11: 13 sc, sl st in next 5 sts. (18)
R12: Sc around. (18)
R13: 12 sc, sl st in next 6 sts. (18)
R14–R15: Sc around. (18)
R16: 11 sc, sl st in next 7 sts. (18)
R17: Sc around. (18)
R18: (sc, dec) ×6. (12)
R19–R25: Sc around. (12)
R26: 8 sc, sl st in next 4 sts. (12)
R27–R30: Sc around. (12)
R31: dec ×6. (6)
Fasten off and close the tip.
Stuff the first two-thirds firmly. Reduce the stuffing progressively toward the upper end, then bend the stem into a hook before attaching it.
Large Black Oak-Style Leaves — Make 8
Yarn: black.
Row 1: Ch 18.
Starting in the second chain from the hook work:
Sl st, sc, hdc, dc, tr in next 3 chains, dc, hdc, sc, then continue toward the end with mirrored stitch heights.
Work 3 sc in the final chain and continue along the opposite side of the foundation.
Row 2: Work around the leaf using repeating groups of (sc, hdc, 2 dc, hdc, sc) to form rounded lobes.
Place a sl st between neighboring lobes to create deeper indentations.
Row 3: Sl st along the center foundation from base toward tip to create the prominent vein.
Fasten off. Leave approximately 30 cm for attachment.
Ochre Oak Leaves — Make 4
Yarn: ochre or caramel.
Ch 16.
Use the same construction as the black oak leaf, reducing each long stitch section slightly to produce a smaller finished leaf.
Work approximately five pronounced lobes on each side.
Finish with a pointed tip and raised central vein.
Fasten off. Leave a 25 cm tail.
Cream Accent Leaves — Make 3
Yarn: warm cream.
Row 1: Ch 14.
Starting in the second chain:
Sl st, sc, hdc, dc, tr in next 4 chains, dc, hdc, sc, then 3 sc in the final chain.
Continue along the opposite side using the mirrored sequence.
Row 2: Sc around. At the tip work (sc, ch 2, sc).
Row 3: Sl st along the center foundation to create a raised vein.
Fasten off with a 25 cm sewing tail.
Small Black Crown Leaves — Make 6
Yarn: black.
Ch 11.
Starting in the second chain work:
Sl st, sc, hdc, dc in next 3 chains, hdc, sc, then 3 sc in the final chain.
Mirror the stitch sequence along the opposite side.
Sc once around the complete leaf and add a ch-2 point at the tip.
Fasten off.
Ochre Curling Vines — Make 5
Yarn: ochre.
Ch 35.
Starting in the second chain from the hook, work 3 sc into every chain.
The strip will twist into a corkscrew automatically.
For a more irregular curl, work 4 sc into every third chain through the final 10 chains.
Fasten off. Leave approximately 20 cm for attachment.
Long Hanging Vine — Make 2
Ch 50 with ochre or black yarn.
Work 3 sc into each chain.
Allow the resulting spiral to twist naturally rather than forcing every coil in the same direction.
Fasten off with a 25 cm tail.
Small Berry Cluster
The crown in the reference includes rounded warm-brown accents between the leaves. For a completely crocheted version, make approximately 9–12 small yarn berries.
Berry — Make 9–12
Yarn: ochre or warm brown.
R1: 6 sc in MR. (6)
R2: Sc around. (6)
Add a tiny amount of stuffing or a short yarn scrap.
R3: Dec ×3. (3)
Fasten off and close.
Join berries into groups of three or four before sewing them into the foliage.
Optional Hanging Leaf Sprigs
Ch 30 with ochre yarn.
Sl st back through approximately 8 chains to create the first stem section.
At the next position, ch 8 and crochet one small pointed leaf using sc, hdc, dc, hdc and sc around the chain.
Return to the main stem and continue downward.
Add two or three leaves at irregular intervals.
Make two sprigs and leave long tails at their upper ends.
Assembly
- Finish stuffing, closing and sculpting the black pumpkin before attaching any decorative components.
- Center the curved black stem over the crown and sew through its lower two rounds using several firm attachment points.
- Arrange the eight large black leaves around the stem, allowing their tips to extend beyond the pumpkin shoulders.
- Add the smaller black leaves between gaps and sew each leaf at the base plus one additional point approximately 2 cm outward.
- Position the ochre leaves asymmetrically across the front and sides so they remain visible against the black foliage.
- Add the cream leaves in separate areas rather than clustering all three together.
- Sew the berry groups close to the stem base and between overlapping leaves.
- Attach short ochre vines beneath the foliage and allow their lower sections to hang freely over the pumpkin ribs.
- Add the two long vines and optional hanging leaf sprigs near opposite sides of the crown.
- Hide remaining yarn tails beneath the leaf layers, reshape the stem curve and separate overlapping foliage.
The completed pumpkin should have a broad ten-lobed black body, a tall hooked stem and a layered crown in black, ochre and cream.
7 Technical Tips for a Giant Black Crochet Pumpkin
- Visible stuffing: Stretch a 10 cm section of the black fabric before filling the body. If pale fiberfill shows through the openings, reduce the hook by approximately 0.5–1 mm.
- Shallow pumpkin channels: Keep the central stuffing slightly softer than the outer circumference. A rigid center prevents the sculpting strands from sinking deeply enough to define the ten lobes.
- Unequal ribs: Mark all ten sculpting positions around the crown before tightening any strand fully. A spacing error of 2–3 cm becomes much more noticeable at the widest circumference.
- Leaning stem: Attach through at least the lower two stem rounds instead of sewing only through its final edge. The tall curved structure creates sideways pressure at the base.
- Rotating leaves: Anchor large leaves at two points approximately 2 cm apart. One attachment stitch allows a heavy black leaf to turn underneath its neighbors.
- Lost dark details: Place ochre or cream accents between neighboring black components. Black vines positioned entirely over black ribs can disappear visually even when their crochet texture is different.
- Stretched corkscrews: Sew only the upper 1–2 cm of each curling vine. Attaching the complete spiral removes its coil and converts it into a flat strip.
How to Get Deep Pumpkin Ribs
The photograph depends heavily on the contrast between broad lobes and narrow channels. The channels should therefore be established after stuffing rather than being simulated only with surface slip stitches.
Insert the upholstery needle through the exact bottom center and bring it out through the crown. Pulling from off-center shifts the entire lobe arrangement and can make the pumpkin lean.
Create all ten channels at moderate tension first. Inspect the pumpkin from above, then tighten the strands progressively in a second pass.
If one groove remains too shallow, move some stuffing away from that line with your fingers before increasing yarn tension. A second sculpting strand can be added to the same groove when necessary.
Stuffing an Oversized Crochet Pumpkin
Large crochet forms need distributed stuffing rather than one compact central mass. Insert small handfuls and push them against the lower walls first.
Continue around the circumference in layers. Check each area by pressing from the outside and add filling where the fabric collapses too easily.
The final body should remain compressible under firm hand pressure. If it becomes rigid before closing, remove some fiberfill from the center.
Inspect the base before completing the last decrease rounds. It needs enough stuffing to remain broad and stable after the sculpting yarn compresses the body vertically.
Creating the Curved Stem
The stem should not be stuffed uniformly. Firm stuffing belongs in the lower half where the structure needs support.
Reduce the amount through the middle and use very little near the tip. Bend the stem while the final rounds remain accessible.
The asymmetrical slip-stitch sections shorten one side of the tube and encourage the hook shape. Rotate the curve before sewing so the tip points toward the most open area of the crown rather than directly over a large leaf.
Arranging the Autumn Leaf Crown
Begin with the largest black leaves because they establish the total diameter of the crown. Arrange them around the stem without creating a perfectly symmetrical star.
Add smaller black leaves next to cover attachment points. Ochre leaves can then be placed over selected dark areas where their outlines remain clear.
Use cream sparingly. Two or three light components create stronger contrast than distributing cream evenly around the entire crown.
Pin every component before sewing. View the pumpkin from the front and both sides because the broad crown can look balanced from above while appearing heavily weighted to one side at table level.
Making the Pumpkin Smaller
For a medium version, stop the body increases at 60 stitches. Work 12–14 plain rounds, then reverse the increase sequence with six decreases per decrease round.
For a smaller decorative pumpkin, stop at 42 stitches and shorten the plateau to approximately 9–11 rounds.
Scale the stem and foliage at the same time. A 30 cm pumpkin paired with the full-size hooked stem will become top-heavy and visually disproportionate.
Alternative Autumn Color Palettes
The black body provides a neutral background for several seasonal palettes. For a restrained version, combine black with camel, oatmeal and dark olive.
A stronger Halloween palette can use black, burnt orange and antique gold. Keep the orange concentrated in leaves and vines rather than covering the entire crown.
For a cooler version, combine charcoal black with taupe, mushroom beige and muted sage. The body construction and sculpting method remain unchanged.
Finishing and Display
Turn the pumpkin and inspect all ten channels. Tighten any sculpting strand that has relaxed during crown assembly.
Check the stem by moving it gently from side to side. If the base shifts independently from the body, add another hidden attachment round beneath the black leaves.
Separate the layered leaves and reshape the corkscrew vines by hand. Avoid pulling the spirals downward because the extra tension can permanently lengthen them.
Support the pumpkin underneath when moving it. Do not lift the finished decoration by its stem, leaves or hanging vines.
Conclusion
Complete the black body and establish all ten sculpted channels before beginning the crown. That finished rib structure determines where the longest leaves and hanging vines can sit without hiding the pumpkin shape. Make the curved stem and one large black leaf next, then pin them temporarily to check their scale against the body before producing the remaining foliage. Save this giant black crochet pumpkin pattern to Pinterest or share the finished project on Instagram with #BlackAutumnCrochetPumpkin. For this particular black pumpkin, would you keep the crown mostly monochrome or increase the number of ochre leaves around the curved stem?