Introduction
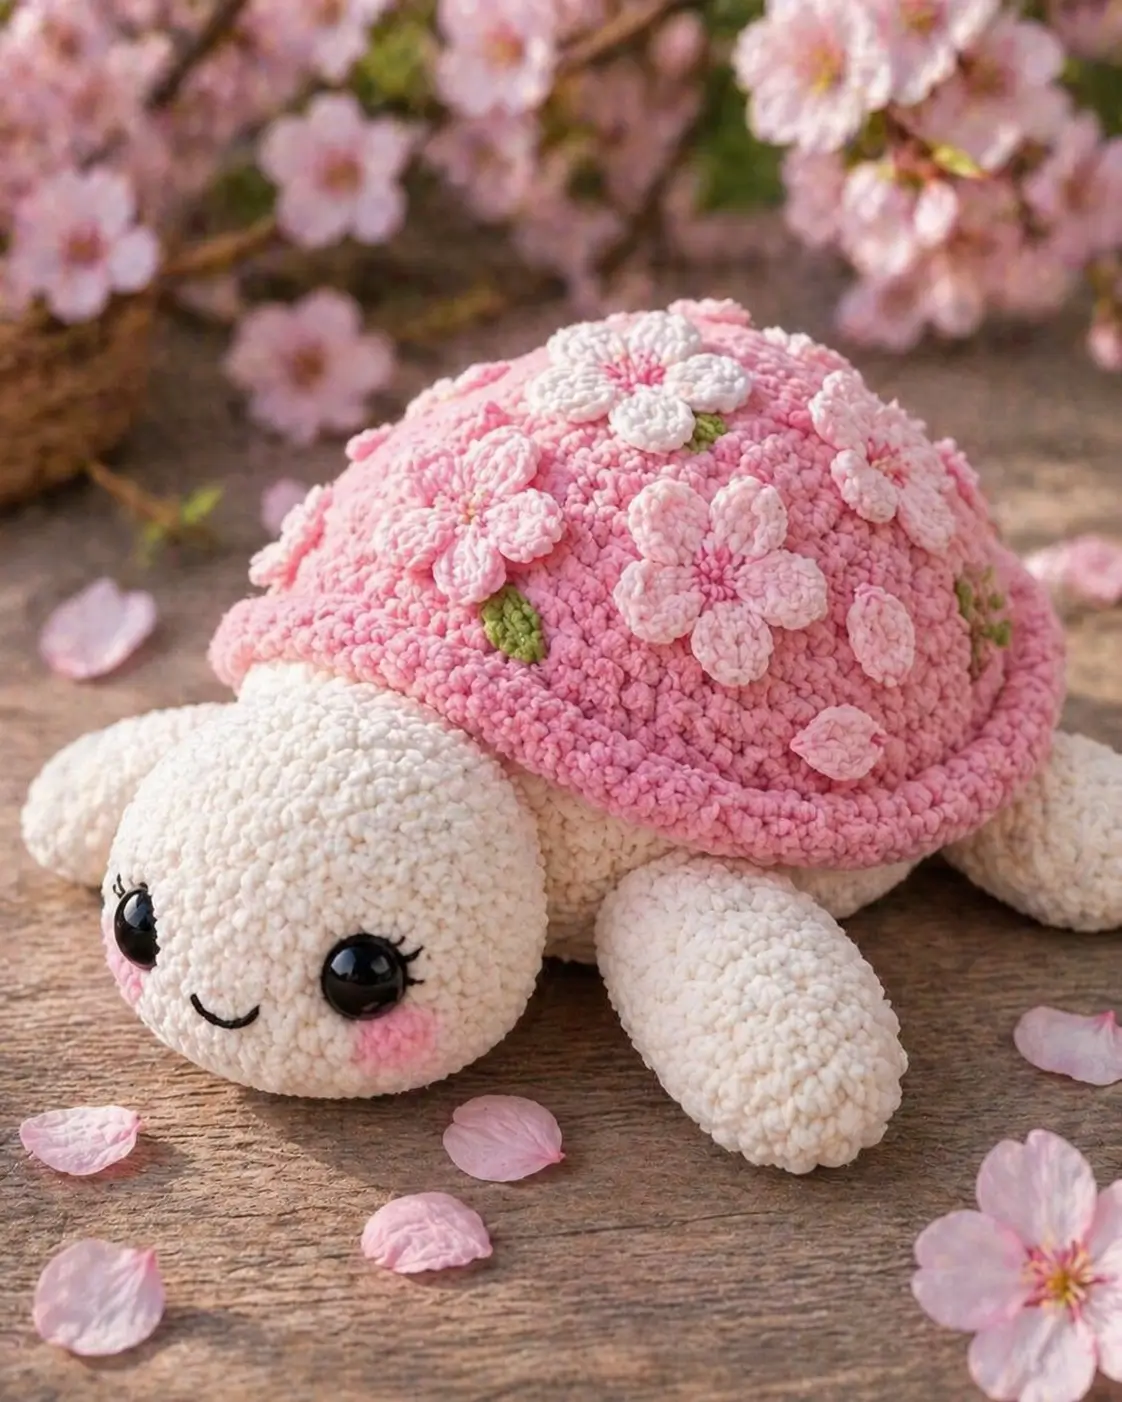
A turtle shell covered in sakura flowers needs a wide dome, not a flat oval. This pink cherry blossom turtle amigurumi uses chunky chenille yarn, a 4.0 mm hook, 12 mm safety eyes, and photo-estimated shaping for a 17 cm finished plush. The pattern is intermediate because the shell, flowers, leaves, and face all need controlled placement.
Quick Answer: pink cherry blossom turtle amigurumi
Make this floral turtle by crocheting a cream head and flippers, a pink domed shell, small layered blossoms, and green leaves. Use chunky chenille yarn, a 4.0 mm hook, 12 mm safety eyes, firm polyfill stuffing, and MR 6 increase math for round, stable amigurumi shaping.
Table of Contents
- What Makes This Turtle Unique
- Project Info at a Glance
- Materials and Tools
- Abbreviations
- Pattern Step by Step
- Assembly
- FAQ
- Best Yarn for This Turtle
- Crochet Hook Size Guide
- 7 Technical Tips
- Quick Reference Card
What Makes This Turtle Unique
The main design issue is shell balance. A turtle with a floral shell becomes top-heavy when the flowers are sewn across the crown, so the underside needs a firm oval body and the shell rim needs a wider final round. The photo shows the head set low and forward, which keeps the face visible while the shell remains the dominant form. The cherry blossoms are not embroidered; they are raised appliqués, which means each flower adds height and weight.
The most common error when sewing this turtle head is placing it too high under the shell rim. That makes the turtle look like a round pillow with eyes instead of a low sea turtle form. A 36-stitch head and 48-stitch shell give the best scale match for a 17 cm floral turtle.
Project Info at a Glance
Quick answer: This turtle amigurumi measures about 17 cm long, uses a 4.0 mm hook, and takes approximately 5–6 hours.
| Skill Level | Time | Finished Size | Hook | Yarn Weight |
|---|---|---|---|---|
| Intermediate | 5–6 hours | 17 cm long | 4.0 mm | Chunky chenille |
Materials and Tools
Yarn
- Cream chenille yarn — chunky weight — 45 g for head, underside, and flippers
- Pink chenille yarn — chunky weight — 35 g for the shell and rim
- Pale pink yarn — chunky or worsted — 15 g for blossoms
- White yarn — chunky or worsted — 10 g for accent blossoms
- Green yarn — worsted or chenille scrap — 3 g for leaves
- Black embroidery thread — mouth and eyelashes
- Pink embroidery thread or blush yarn — cheeks
Tools
- 4.0 mm crochet hook
- 12 mm safety eyes
- Polyfill stuffing
- Yarn needle
- Stitch markers
- Sewing pins
- Scissors
Save this pattern to your Pinterest board before starting — you’ll need to reference the stitch counts throughout.
Abbreviations
| Short | Full Term |
|---|---|
| MR | Magic Ring |
| sc | Single crochet |
| inc | Increase, 2 sc in same stitch |
| dec | Invisible decrease |
| sl st | Slip stitch |
| ch | Chain |
| BLO | Back loop only |
| FLO | Front loop only |
| hdc | Half double crochet |
| st | Stitch |
The invisible decrease pulls the front loops of two stitches together before completing one single crochet. This closes shaping rounds with fewer gaps than a standard decrease, which matters on the cream face and the pink shell edge.
Pattern Step by Step
Work in a continuous spiral unless a section states otherwise. Count every round before moving on.
Head — Make 1
Yarn: cream.
R1: 6 sc in MR (6)
R2: inc × 6 (12)
R3: [sc, inc] × 6 (18)
R4: [sc 2, inc] × 6 (24)
R5: [sc 3, inc] × 6 (30)
R6: [sc 4, inc] × 6 (36)
R7: sc around (36)
R8: sc around (36)
R9: sc around (36)
R10: sc around (36)
R11: [sc 4, dec] × 6 (30)
R12: [sc 3, dec] × 6 (24)
Insert safety eyes between R7 and R8, 9 stitches apart.
R13: [sc 2, dec] × 6 (18)
Stuff firmly.
R14: [sc, dec] × 6 (12)
R15: dec × 6 (6)
Fasten off. Leave a 20 cm tail for sewing.
Cream Underside Body — Make 1
Yarn: cream.
R1: 6 sc in MR (6)
R2: inc × 6 (12)
R3: [sc, inc] × 6 (18)
R4: [sc 2, inc] × 6 (24)
R5: [sc 3, inc] × 6 (30)
R6: [sc 4, inc] × 6 (36)
R7: sc around (36)
R8: sc around (36)
R9: sc around (36)
R10: sc around (36)
R11: [sc 4, dec] × 6 (30)
R12: [sc 3, dec] × 6 (24)
R13: [sc 2, dec] × 6 (18)
Stuff firmly but keep the top surface slightly flattened. Fasten off with a long tail.
Pink Shell Dome — Make 1
Yarn: pink.
R1: 6 sc in MR (6)
R2: inc × 6 (12)
R3: [sc, inc] × 6 (18)
R4: [sc 2, inc] × 6 (24)
R5: [sc 3, inc] × 6 (30)
R6: [sc 4, inc] × 6 (36)
R7: [sc 5, inc] × 6 (42)
R8: [sc 6, inc] × 6 (48)
R9: sc around (48)
R10: sc around (48)
R11: sc around (48)
R12: sc around (48)
R13: sc around (48)
R14: [sc 6, dec] × 6 (42)
R15: [sc 5, dec] × 6 (36)
Do not close. Stuff lightly only at the crown. The underside body will fill the lower volume.
Shell Rim
Join pink yarn to front loop of R15.
R1: sc around (36)
R2: [sc 5, inc] × 6 (42)
R3: sc around (42)
Sl st to close. Fasten off. This rim creates the rolled edge visible around the shell.
Front Flippers — Make 2
Yarn: cream.
R1: 6 sc in MR (6)
R2: inc × 6 (12)
R3: [sc, inc] × 6 (18)
R4: sc around (18)
R5: sc around (18)
R6: [sc 4, dec] × 3 (15)
R7: sc around (15)
R8: [sc 3, dec] × 3 (12)
R9: sc around (12)
R10: sc around (12)
Lightly stuff the rounded end only. Flatten the open edge. Fasten off with a 15 cm tail.
Back Flippers — Make 2
Yarn: cream.
R1: 6 sc in MR (6)
R2: inc × 6 (12)
R3: [sc, inc] × 6 (18)
R4: sc around (18)
R5: [sc 4, dec] × 3 (15)
R6: [sc 3, dec] × 3 (12)
R7: sc around (12)
R8: sc around (12)
Lightly stuff and flatten. Fasten off with a tail for sewing.
Large Cherry Blossom — Make 2
Make one pale pink and one white.
Flower Center
Yarn: darker pink.
R1: 6 sc in MR (6)
R2: inc × 6 (12)
Fasten off and leave a 10 cm tail.
Petals — Make 5 Per Flower
Yarn: pale pink or white.
R1: 6 sc in MR (6)
R2: inc × 6 (12)
R3: [sc, inc] × 6 (18)
R4: sc around (18)
R5: [sc, dec] × 6 (12)
Flatten each petal. Sew five petals around the center with the narrow ends meeting under the center disc.
Small Cherry Blossom — Make 4
Center
Yarn: darker pink.
R1: 6 sc in MR (6)
Fasten off.
Petals — Make 5 Per Flower
Yarn: pale pink or white.
R1: 6 sc in MR (6)
R2: inc × 6 (12)
R3: sc around (12)
R4: [sc, dec] × 4 (8)
Flatten each petal. Sew five petals around the center.
Loose Shell Petals — Make 6
Yarn: pale pink.
R1: 6 sc in MR (6)
R2: inc × 6 (12)
R3: [sc, inc] × 6 (18)
R4: [sc, dec] × 6 (12)
Flatten into an oval. Sew as scattered petals on the shell.
Green Leaves — Make 5
Yarn: green.
Row 1: ch 7, starting in second ch from hook: sc 2, hdc 3, 3 sc in last ch, work other side: hdc 3, sc 2 (13)
Row 2: sl st around leaf edge (13)
Fasten off. Pin leaves partly under blossoms before sewing.
Cheek Patches — Make 2
Yarn: soft pink or use embroidery.
R1: 6 sc in MR (6)
R2: inc × 6 (12)
Fasten off. Do not stuff. Sew below each safety eye. A lighter option is to apply yarn blush with duplicate stitch.
Embroidered Mouth and Eyelashes
Use black embroidery thread. Stitch the mouth between R10 and R11 of the head. Make the smile 4 stitches wide. Add two short eyelash lines beside each eye. Keep each line under 1 cm so the face remains balanced.
Assembly
- Pin the cream underside body under the pink shell. The shell should overhang the body by 0.5–1 cm on all sides.
- Sew the shell to the underside using mattress stitch through the lower shell loops and upper underside rounds. Add stuffing before the final 5 cm closes.
- Pin the head to the front opening under the shell rim. The eye line should sit slightly below the shell edge.
- Sew the head with a full circle of stitches, then sew a second reinforcing pass through the lower neck.
- Attach front flippers at the front left and front right underside, angled forward.
- Attach back flippers near the rear shell curve, angled outward.
- Sew the two large flowers first: one near the crown and one front-right from the viewer angle.
- Add small flowers around the shell, keeping at least 1 cm between appliqués so the pink shell remains visible.
- Slide green leaves under two or three flower edges before sewing them down.
- Sew loose petals between flowers. Keep them flat so they do not compete with the raised blossoms.
- Attach cheek patches below the eyes, then embroider the mouth and eyelashes.
- Weave every yarn tail through the stuffing in four different directions before trimming.
Final check: the turtle should rest on the underside body, not on the flippers. If the flippers carry the weight, resew them higher against the shell edge.
Frequently Asked Questions
Is this cherry blossom turtle crochet pattern suitable for beginners?
This version is better for confident beginners moving into intermediate work. The head, underside, and flippers use basic amigurumi math, but the raised flowers and shell placement need careful pinning. Practice the flower appliqués before sewing them to the shell.
What materials are needed for this cherry blossom turtle crochet pattern?
You need pink, cream, pale pink, white, and green yarn; a 4.0 mm hook; 12 mm safety eyes; fiberfill; stitch markers; scissors; and a yarn needle. Sewing pins are also recommended for checking flower placement before stitching.
What size safety eyes should I use for this turtle?
Use 12 mm safety eyes for a 17 cm chunky turtle. Smaller DK turtles often use 8 mm eyes, while jumbo plush turtles need larger eyes. Scale the eyes to the head width, then check placement before locking the backs.
Can I sell items I make from this pattern?
You can sell finished items made from this KROCHIFY version in small handmade quantities. Do not resell the written pattern, images, article text, or charts. Credit KROCHIFY when listing the finished plush online.
Best Yarn for This Turtle
The shell needs a yarn that can support raised cherry blossoms without collapsing. Chunky chenille gives the photo-matched plush texture and covers stitch definition, which works well for the rounded shell and cream face. The tradeoff is visibility: chenille makes small flower petals harder to count.
Chunky chenille is the closest match for the photo. Use it for the cream body and pink shell. It produces a full 17 cm turtle with a soft rim and rounded flippers.
Worsted cotton works better for flowers and leaves. Cotton gives clearer petal edges and holds small leaf points. For this turtle, mixing chenille for the body with cotton for appliqués gives cleaner detail than chenille alone.
DK cotton makes a smaller turtle with sharper stitches. It is useful when you want a compact version, but the finished turtle will not have the same plush volume as the photo model.
Best choice for this design: chunky chenille for the turtle, worsted cotton for flowers, and a firm stuffing level under the shell crown.
Crochet Hook Size Guide for This Turtle
Hook size controls fabric density more than yarn label alone. For this 17 cm turtle, start with a 4.0 mm hook and chunky chenille yarn. That pairing creates a dense face and shell without making the flowers too stiff.
If stuffing shows through the cream head, drop to 3.5 mm. If the shell feels rigid and difficult to shape, move to 4.5 mm and add firmer stuffing. The most sensitive part is the shell rim: a loose hook makes the rim flare too far, while a tight hook pulls the rim under the shell.
For a 17 cm turtle amigurumi finished size, the shell should reach 48 stitches at its widest point. For a turtle amigurumi stitch count check, every increase round in this pattern adds 6 stitches, and every decrease round removes 6 stitches.
7 Technical Tips
- Mark the first stitch of every round. Chenille hides stitch legs. Move the marker at the start of each round, especially on the pink shell where 48 stitches are repeated across several rounds.
- Stuff the shell in layers. Add a thin layer at the crown, then a second layer after the underside is half sewn. Overstuffing before sewing pushes the shell into a dome that sits too high.
- Pin the head before closing the shell seam. The head needs to sit under the shell rim. Sewing the shell closed first limits access and makes the neck harder to reinforce.
- Keep flowers off the shell edge. Raised flowers near the rim pull the shell outward. Place the largest flowers on the top third of the dome.
- Use cotton for leaves when available. Green chenille leaves can look bulky. Cotton or acrylic leaves lie flatter and give clearer leaf points.
- Do not lock the eyes until both are checked from above. A turtle head is wide and low, so eye symmetry can look correct from the front but uneven from the top.
- Weave tails through stuffed sections, not under appliqués only. Flower tails hidden under petals can work loose. Pass each tail through the shell stuffing before trimming.
Quick Reference Card
| Finished Size | 17 cm long |
|---|---|
| Hook | 4.0 mm |
| Yarn Weight | Chunky chenille |
| Main Yarn | Cream 45 g; pink 35 g |
| Accent Yarn | Pale pink 15 g; white 10 g; green 3 g |
| Safety Eyes | 12 mm |
| Head | R1–R15, 6 to 36 to 6 |
| Shell | R1–R15, 6 to 48 to 36 |
| Flippers | 4 total |
| Flowers | 2 large, 4 small |
| Skill Level | Intermediate |
| Time | 5–6 hours |
Bookmark or pin this card for quick reference while crocheting.
Conclusion
The pink cherry blossom turtle amigurumi works best when the shell is built first as a stable dome, then decorated after all main sewing is complete. Finish the structure before adding flowers, because appliqués make the shell harder to handle during assembly. After the turtle is assembled, check whether it rests on the cream underside rather than the flippers. If it rocks forward, remove a small amount of stuffing from the shell crown or resew the rear flippers slightly higher.
Share your finished work on Pinterest and Instagram with #SakuraTurtleAmigurumi and #KROCHIFYpattern.









