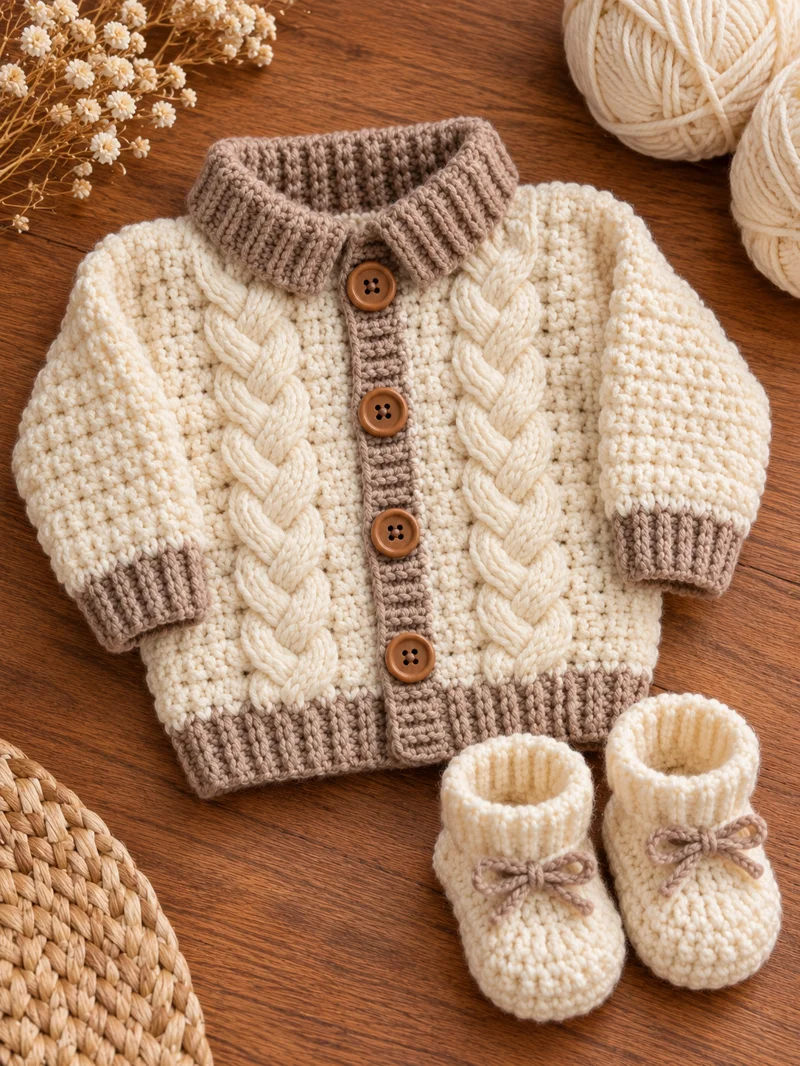
This cream baby cardigan uses two raised cable panels, a contrasting taupe collar, four front buttons, and matching crochet booties. The design combines a textured body with ribbed edging for a structured finish. This crochet baby cardigan and booties pattern is written as an original, photo-inspired project for intermediate crocheters. The sample instructions target approximately 3–6 months, with final measurements controlled by gauge.
The Design: What Makes This Baby Set Different
The cardigan has three defining construction details. First, two vertical cable panels frame the front opening. These cables create depth without requiring a separate decorative layer. Second, the taupe ribbing forms a continuous visual border around the neckline, button opening, cuffs, and lower hem. Third, the booties repeat the cardigan colors, using cream for the main fabric and taupe for the bows.
A common problem with crochet baby cardigans is excessive bulk at the shoulders. This design uses relatively flat textured stitches between the cable panels to control thickness. The sleeves are worked separately and attached after the body panels are joined.
The matching crochet baby booties have rounded toes, shaped insteps, and folded ankle cuffs. Their proportions are intended to complement the cardigan rather than reproduce its cable texture. The result is a coordinated two-piece baby crochet outfit.
Project Information at a Glance
| Feature | Details |
|---|---|
| Skill level | Intermediate |
| Estimated time | 12–18 hours |
| Target age | 3–6 months |
| Cardigan chest | Approximately 48 cm |
| Cardigan length | Approximately 27 cm |
| Bootie sole | Approximately 10–11 cm |
| Suggested hook | 4 mm |
| Yarn | Worsted weight, category 4 |
| Construction | Flat panels, joined sleeves, shaped booties |
These measurements are design targets, not measurements verified from the photograph. Make a gauge swatch and adjust the foundation chains and row counts before producing a wearable garment.
Materials and Tools
Yarn
- Cream worsted-weight yarn: approximately 220–280 g for the cardigan and booties.
- Taupe worsted-weight yarn: approximately 60–90 g for the collar, cuffs, button bands, hem, and bows.
- Suggested fiber: machine-washable cotton-acrylic blend or another baby-appropriate yarn with a smooth finish.
Choose yarn with consistent thickness. Highly fluffy fibers can obscure cable stitches and make the front panels difficult to read. A smooth yarn also helps maintain even tension around buttonholes and shaped bootie toes.
Tools
- 4 mm crochet hook, adjusted to obtain gauge.
- Four washable buttons, approximately 15–18 mm, securely attached.
- Tapestry needle for joining and weaving ends.
- Stitch markers for cable placement and shaping.
- Measuring tape for checking finished dimensions.
- Scissors and rust-resistant sewing pins.
Baby safety: Buttons and decorative bows may become choking or entanglement hazards if detached. Attach them securely, inspect them before every use, and remove the bows if they cannot be made completely secure. Do not use loose ties or long cords on infant footwear. The cardigan and booties are not sleepwear.
Abbreviations and Crochet Stitches
- ch: Chain
- sc: Single crochet
- hdc: Half double crochet
- dc: Double crochet
- sl st: Slip stitch
- inc: Two stitches worked into one stitch
- dec: Decrease
- BLO: Back loop only
- FPdc: Front post double crochet
- BPdc: Back post double crochet
- FPtc: Front post treble crochet
- RS: Right side
- WS: Wrong side
An invisible decrease is made through the front loops of two adjacent stitches and reduces the visible gap at the decrease point.
Gauge and Sizing
Begin with a 15 cm square worked in the main textured stitch. Wash and dry the swatch according to the yarn label before measuring the central 10 cm.
The working target is approximately 16 stitches and 14 rows per 10 cm in half double crochet. This is a planning gauge rather than a tested gauge for the complete cable fabric.
For the cardigan, aim for a finished chest circumference of about 48 cm. The back panel should measure approximately 24 cm across, and each front panel should measure approximately 12 cm across before the button bands are added. Check these widths directly because raised cable stitches may draw the fabric inward.
Measure the intended wearer or compare the project against a well-fitting garment. Age labels alone do not provide reliable sizing.
How to Crochet the Baby Cardigan
Step 1: Back Panel
Yarn: Cream.
Work the back panel from the lower edge toward the shoulders.
Foundation: Ch 40.
Row 1: Hdc in the second chain from the hook and in each remaining chain. Turn. (39)
Rows 2–30: Ch 1, hdc in each stitch across. Turn. (39)
Continue until the panel measures approximately 24 cm wide and 22 cm long, or adjust the row count to match the target dimensions.
For a textured appearance, alternate ordinary hdc rows with rows worked in the back loops. Avoid changing stitch counts when switching techniques.
Fasten off, leaving a 30 cm tail for shoulder assembly.
Step 2: Left Front Panel
Yarn: Cream.
Foundation: Ch 21.
Row 1: Hdc in the second chain from the hook and across. Turn. (20)
Rows 2–4: Ch 1, hdc across. Turn. (20)
Rows 5–30: Maintain 20 stitches while incorporating a raised cable panel approximately six stitches wide, positioned away from the front opening.
Work the surrounding stitches in hdc. For the cable section, use front post stitches and cross groups of three stitches at regular intervals. Practice the crossing sequence on a separate swatch before placing it in the garment.
Measure the panel after several crossings. If the cable contracts noticeably, adjust the side stitches or hook size rather than stretching the panel during assembly.
Fasten off with a long sewing tail.
Step 3: Right Front Panel
Yarn: Cream.
Repeat the left front panel with the cable positioned symmetrically.
Foundation: Ch 21.
Row 1: Hdc in the second chain from the hook and across. Turn. (20)
Rows 2–4: Ch 1, hdc across. Turn. (20)
Rows 5–30: Maintain 20 stitches and place the raised cable on the opposite side of the panel.
Both fronts must finish at the same height. Count rows and compare the panels while they lie flat. Do not compensate for unequal lengths by pulling one shoulder seam tighter.
Fasten off, leaving a 30 cm sewing tail.
Step 4: Sleeves (Make Two)
Yarn: Cream.
These sleeves are worked flat and sewn into tubes.
Foundation: Ch 25.
Row 1: Hdc in the second chain from the hook and across. Turn. (24)
Rows 2–4: Ch 1, hdc across. Turn. (24)
Row 5: Ch 1, inc, hdc in the next 22 stitches, inc. Turn. (26)
Rows 6–9: Hdc across. Turn. (26)
Row 10: Inc, hdc in the next 24 stitches, inc. Turn. (28)
Rows 11–14: Hdc across. Turn. (28)
Row 15: Inc, hdc in the next 26 stitches, inc. Turn. (30)
Rows 16–20: Hdc across. Turn. (30)
Row 21: Inc, hdc in the next 28 stitches, inc. Turn. (32)
Rows 22–24: Hdc across. Turn. (32)
Check sleeve length against the intended arm measurement. Add or remove plain rows before joining the sleeve seam.
Make the second sleeve identically.
Step 5: Taupe Sleeve Cuffs
Yarn: Taupe.
Work each cuff as a separate ribbed strip.
Foundation: Ch 9.
Row 1: Sc in the second chain from the hook and across. Turn. (8)
Rows 2 onward: Ch 1, sc BLO across. Turn. (8)
Repeat until the strip fits around the sleeve opening without excessive tension.
Join the short edges of the strip and sew the ribbing to the sleeve cuff. Repeat for the second sleeve.
Keep the cuff stretchy enough for a baby’s hand to pass through comfortably.
Step 6: Lower Ribbed Hem
Yarn: Taupe.
The lower hem is worked as a long ribbed strip.
Foundation: Ch 11.
Row 1: Sc in the second chain from the hook and across. Turn. (10)
Row 2: Ch 1, sc BLO across. Turn. (10)
Repeat Row 2 until the strip reaches the full lower circumference of the assembled cardigan.
Attach the ribbing with small, evenly spaced stitches. Avoid gathering the body fabric. If the hem pulls inward sharply, add more ribbing rows before completing the seam.
Step 7: Ribbed Collar
Yarn: Taupe.
Foundation: Ch 13.
Row 1: Sc in the second chain from the hook and across. Turn. (12)
Row 2: Ch 1, sc BLO across. Turn. (12)
Repeat Row 2 until the ribbed strip fits around the neckline.
Pin the collar to the neckline at the center back, shoulder seams, and both front edges. Sew it in place while distributing the fabric evenly.
Fold the collar outward to form the broad turned edge shown in the reference image.
Step 8: Front Button Bands
Yarn: Taupe.
Work a narrow ribbed band for each front opening using the same BLO single crochet method as the collar.
For the button side, make a solid strip and sew four buttons along its centerline. Space the buttons evenly, keeping the first and last buttons clear of the collar and lower hem.
For the opposite side, incorporate four buttonholes. Each buttonhole should be sized for the selected button and tested before the band is attached permanently.
Check that the cardigan fronts overlap without twisting. Button placement should follow the final garment dimensions rather than a fixed distance taken from the photograph.
How to Crochet the Matching Baby Booties
The booties use an oval sole, a raised upper section, and a folded ankle cuff. Work both pieces with the same hook and yarn tension.
Step 9: Crochet Bootie Soles (Make Two)
Yarn: Cream.
Foundation: Ch 12.
Round 1: Starting in the second chain from the hook, work 10 sc, 3 sc in the final chain, 9 sc along the opposite side, and 2 sc in the first chain. (24)
Round 2: Inc, 9 sc, inc in each of the next 3 stitches, 9 sc, inc in each of the next 2 stitches. (30)
Round 3: 1 sc, inc, 9 sc, (1 sc, inc) three times, 9 sc, (1 sc, inc) twice. (36)
Round 4: Sc in each stitch around. (36)
Measure the sole. The target is approximately 10–11 cm long. If the sole differs substantially from this length, change hook size or foundation length and recalculate the shaping before proceeding.
Step 10: Bootie Sides
Yarn: Cream.
Round 5: Sc BLO around. (36)
Rounds 6–7: Sc in each stitch around. (36)
Round 8: 12 sc, dec six times, 12 sc. (30)
Round 9: 10 sc, dec five times, 10 sc. (25)
Round 10: Sc around. (25)
Round 11: 8 sc, dec four times, 9 sc. (21)
Round 12: Sc around. (21)
The decreases form the rounded toe. Mark the center front before working each decrease round so that the shaping remains symmetrical.
Do not stuff the booties. They must remain flexible and allow space for the baby’s toes.
Step 11: Folded Ankle Cuffs
Yarn: Cream.
Round 13: Sc around. (21)
Rounds 14–18: Sc BLO around. (21)
Round 19: Sc around. (21)
Fasten off and weave the yarn tail through several stitches on the inside of the cuff.
Fold the upper section outward. Check that the ankle opening stretches comfortably and does not create a tight band.
Step 12: Taupe Decorative Bows
Yarn: Taupe.
The reference image shows one small bow on the front of each bootie.
For a decorative bow, make a short chain and form two compact loops with the ends secured behind the center wrap. Keep every loop small and attach the bow firmly with several sewing passes.
For infant use, a flat embroidered bow is the safer alternative because it avoids loose loops and detachable ties. Do not leave long yarn ends hanging from the booties.
Assembly Instructions
- Lay the cardigan back panel flat with the right side facing upward.
- Position both front panels over the back panel, aligning the shoulders and lower edges.
- Sew the shoulder seams while leaving sufficient space for the neck opening.
- Join the side seams, leaving matching armhole openings on both sides.
- Fold each sleeve lengthwise and sew its underarm seam.
- Pin the sleeves into the armholes and attach them with evenly spaced stitches.
- Attach the lower hem ribbing, sleeve cuffs, and folded collar.
- Sew the front button bands in place and test all four buttonholes.
- Finish the booties, checking that both soles and ankle openings match.
- Weave in all yarn ends, inspect every seam and attachment, and wash the finished set according to the yarn label.
The completed project consists of one cream cable-style cardigan and two matching booties with contrasting taupe details.
7 Technical Tips for Better Results
- Mark the cable boundaries. A misplaced cable crossing can shift the entire vertical panel. Use stitch markers at both edges of each cable section.
- Measure after crossing stitches. Raised cables often shorten or narrow the fabric. Check panel width after every two cable repeats rather than relying only on stitch counts.
- Control cuff tension. Ribbed cuffs that are too tight can restrict movement. Test the finished circumference before sewing the cuff to the sleeve.
- Check button attachment. A loose button presents a choking hazard. Sew each button securely and inspect it before every use.
- Keep sleeve shaping symmetrical. Missing one increase creates different sleeve widths. Record the stitch count at every increase row for both sleeves.
- Pin before sewing. Unevenly distributed fabric produces puckered shoulder and collar seams. Pin the center and endpoints first, then distribute the remaining fabric between them.
- Secure every yarn tail. Short or exposed ends can work loose after washing. Weave each tail through several stitches in different directions and trim only after checking its hold.
Care and Washing Instructions
Use the care instructions printed on the yarn label. For a machine-washable cotton-acrylic blend, a gentle wash cycle with mild detergent may be appropriate. Avoid high heat unless the yarn manufacturer explicitly permits it.
Place the cardigan flat to dry and reshape the collar, cable panels, and ribbed edges while damp. Do not pull the cable sections lengthwise, as this can distort their raised structure.
Wash the booties separately in a mesh laundry bag if they have attached decorative details. Inspect the bows and all sewn components after laundering.
Store the set fully dry. Folding is preferable to hanging because the weight of the textured fabric may stretch the shoulders over time.
Common Crochet Baby Cardigan Problems
Why Are the Front Panels Narrower Than the Back?
Raised cable stitches pull neighboring stitches toward the center. This contraction can make a front panel narrower than expected even when the stitch count is correct.
Measure the cable swatch before starting the full panel. Add background stitches where necessary to achieve the required width.
Why Does the Collar Stand Too High?
A collar may stand upright when its ribbed strip is too short for the neckline. Tight sewing tension can produce the same effect.
Remove the collar seam and add ribbing rows if required. Attach the collar without stretching the neckline.
Why Are the Booties Different Sizes?
Uneven yarn tension and inconsistent sole shaping are common causes. A difference of only a few stitches can change the finished toe shape.
Compare the two soles before working the upper sections. Both should have the same stitch count, length, and width.
Why Does the Button Band Curl?
A button band may curl when it is shorter than the cardigan edge or sewn with excessive tension.
Make the band slightly longer if necessary, pin it evenly, and test the alignment before finishing the seam.
Conclusion
This cream cardigan and matching booties set combines textured crochet, raised cable detailing, and contrasting ribbed edges. The most important construction checks are panel width, cable tension, sleeve symmetry, and the fit of the bootie openings. Measure each component before assembly and adjust the gauge where needed.
After completing the crochet baby cardigan and booties pattern, record the final dimensions, yarn consumption, and any modifications for future sizes. Photograph the cardigan flat to show the cable placement, then capture the matching booties separately. Share the finished project on Pinterest or Instagram using #CreamCableBabySet.
Would you keep the taupe collar and cuffs, or make the entire cardigan in cream?









