Introduction
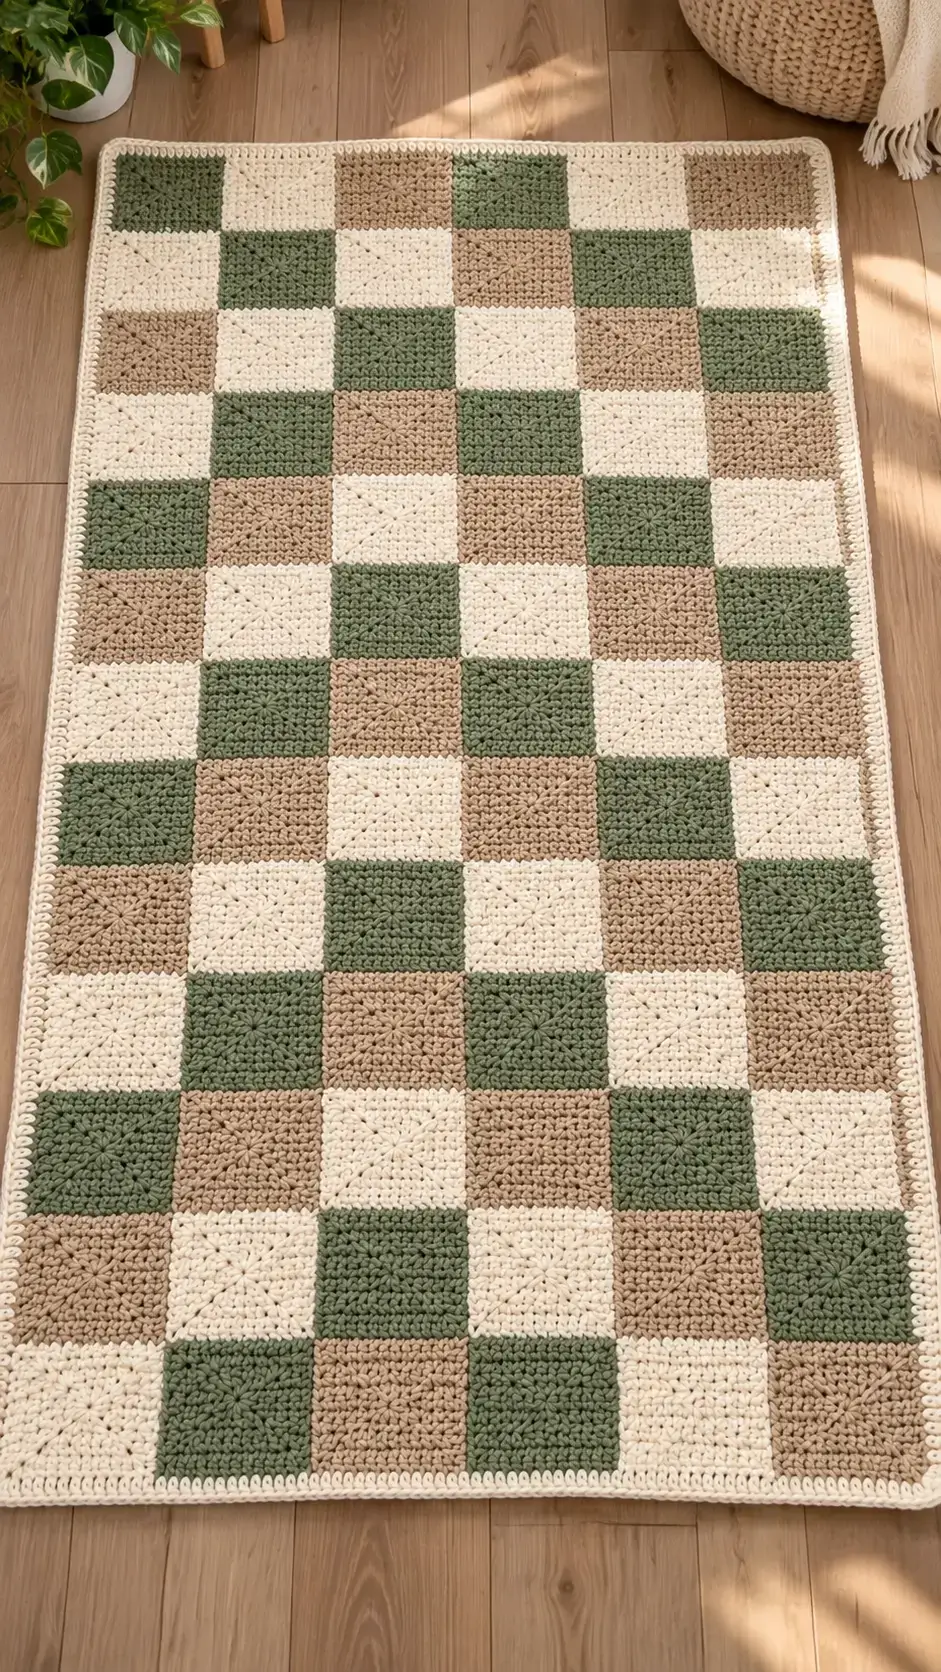
Three alternating sage, cream, and beige squares define this blanket before the border adds a single contrasting frame. This checkerboard crochet blanket pattern uses medium-weight yarn, a 5 mm hook, and modular square construction. Published checkerboard motifs commonly measure about 10 cm, making that a practical gauge target. The project suits intermediate beginners and works well when a blanket must be resized without rewriting the motif.
The Design: What Makes This Checkerboard Blanket Different
The photographed blanket depends on three structural decisions. First, each block is worked separately, which keeps the sage, beige, and cream areas sharply divided rather than carrying colors across a full row. Second, the square develops outward from a central ring, creating visible radial lines that distinguish this granny square blanket pattern from a plain single-crochet checkerboard.
The third decision is the light perimeter border. It visually separates the three-color field from the outside edge while stabilizing dozens of joined motifs.
Square consistency matters more than individual stitch gauge. A common error in a crochet square blanket is accepting motifs that differ by several millimeters and expecting the joining round to correct them. It rarely does. Block every motif to the same dimensions before assembly; the finished grid then remains substantially flatter.
Project Info at a Glance
| Skill Level | Time | Finished Size | Hook | Best For |
|---|---|---|---|---|
| Intermediate beginner | Multi-session project | Adjustable; 10 cm motif reference | 5.0 mm | Throws, stroller blankets, bed runners |
A medium-weight checkerboard motif measuring approximately 10 cm square with a 5 mm hook provides a useful technical reference for this version. Finished blanket dimensions remain adjustable because the design can be reproduced with more or fewer motifs.
Materials and Tools
Yarn
Use medium #4 yarn for the written version. Choose yarns of approximately the same thickness and fiber composition so all three colors produce consistent squares.
- Sage green — medium/worsted #4 — approximately 200–300 g for a small blanket
- Warm beige — medium/worsted #4 — approximately 200–300 g
- Cream — medium/worsted #4 — approximately 300–400 g because this shade is also used for the border
These quantities are planning estimates for this photo-inspired version. Actual yarn consumption depends on square dimensions, blanket size, tension, border width, and yarn construction.
Tools
- 5.0 mm crochet hook
- Tapestry needle
- Locking stitch markers
- Scissors
- Measuring tape
- Blocking mats and rust-resistant pins
Abbreviations
- MR — magic ring
- ch — chain
- sc — single crochet
- hdc — half double crochet
- dc — double crochet
- sl st — slip stitch
- sp — space
- st/sts — stitch/stitches
- RS — right side
- FO — fasten off
Invisible decreases are an amigurumi shaping technique and are not required for this flat motif pattern.
Checkerboard Crochet Blanket Pattern — Step by Step
The source photograph appears to use repeated center-out square motifs. The following motif is an original construction designed to reproduce that overall geometry rather than a transcription of an existing commercial pattern.
Square Motif — Make as Many as Required
Yarn: sage green, warm beige, or cream. Aim for approximately 10 cm per completed square.
R1: Make an MR. Ch 3, 2 dc into ring, ch 2; repeat [3 dc, ch 2] three more times. Join with sl st to the top of the beginning ch-3. You should have four 3-dc groups and four corner spaces.
R2: Sl st into the first corner space. Ch 3, 2 dc, ch 2, 3 dc in the same corner. Work 3 dc, ch 2, 3 dc in each of the remaining three corner spaces. Join with sl st.
R3: Sl st to the first corner. Work ch 3, 2 dc, ch 2, 3 dc in the corner; 3 dc in the next side space. Repeat the corner sequence in each corner, placing one 3-dc group in every side space. Join.
R4: Sl st to the corner. Work ch 3, 2 dc, ch 2, 3 dc in the corner. Work 3 dc in each of the next two side spaces. Repeat around, keeping ch 2 at every corner. Join.
Measure the motif before cutting the yarn. If it measures approximately 10 cm and all four sides are equal, fasten off. If the chosen yarn produces a smaller square, add another granny-style round using the established corner and side sequence.
Do not compensate for an undersized motif by stretching it aggressively during blocking. Adjust the hook or add another controlled round.
Fasten off. Leave a 12–15 cm tail for weaving.
Sage Green Squares
Make the required number using the complete square motif above.
The blanket alternates sage with cream and beige instead of creating uninterrupted runs of one color. Arrange all motifs on a large flat surface before joining them. Check the complete color sequence before sewing.
Warm Beige Squares
Repeat the same motif using warm beige yarn.
Maintain the same hook size, stitch construction, and blocked dimensions. A beige square measuring 10.5 cm beside a sage square measuring 9.5 cm creates a full centimeter of difference at the join and can distort the finished grid.
Cream Squares
Repeat the square motif using cream yarn.
Reserve additional cream yarn for the outer border. The border should remain relatively narrow so it frames the checkerboard instead of competing with the individual blocks.
Checkerboard Layout
Arrange the three colors in a repeating sequence. One practical rotation is:
Row A: Sage — Cream — Beige — Sage — Cream — Beige
Row B: Cream — Sage — Cream — Beige — Sage — Cream
Row C: Beige — Cream — Sage — Cream — Beige — Sage
Continue the sequence while comparing the layout with the reference photograph.
The number of squares can be changed according to the required blanket dimensions. Using approximately 10 cm squares makes the initial calculation simple.
A 6 × 9 grid creates a motif field measuring roughly 60 × 90 cm before accounting for seams and the border. An 8 × 12 grid creates a field near 80 × 120 cm. Add more rows and columns for a larger throw or bed blanket.
Joining the Crochet Squares
Block all motifs before joining them. Every square should have approximately the same width and height.
For a low-profile seam, thread a tapestry needle with matching or cream yarn. Place neighboring motifs together and work through corresponding edge loops. Avoid pulling the joining yarn tighter than the crochet fabric.
Join individual squares into horizontal strips first. Measure each completed strip before proceeding. Once all strips have consistent lengths, connect them while carefully matching every four-square intersection.
A flat crochet join can also be used. Whatever method is selected, use it throughout the entire blanket so the spacing between blocks remains consistent.
Cream Border
Yarn: cream — medium/worsted #4.
Attach cream yarn at any corner of the assembled blanket.
Border R1: Ch 1. Sc evenly along the first side. At the corner work (sc, ch 2, sc). Continue around all four sides using consistent stitch spacing. Join with sl st.
Count the stitches on opposite sides. The top and bottom stitch counts should match. Both long sides should also contain the same number of stitches.
Border R2: Ch 1, sc in every sc to the corner. Work (sc, ch 2, sc) in each ch-2 corner space. Repeat around and join.
Border R3: Repeat Border R2 if a slightly wider and firmer frame is required. Stop after R2 when the border already matches the narrow proportions shown in the photograph.
Fasten off and weave the final tail through several directions on the wrong side.
Assembly
- Block every sage, beige, and cream motif to the same target dimension, preferably approximately 10 × 10 cm.
- Arrange every square on a flat surface and photograph the final arrangement for reference.
- Stack each row separately from left to right so the three-color sequence cannot shift during joining.
- Join adjacent motifs using a mattress seam or another low-profile square join.
- Measure completed horizontal strips and correct unusually tight seams before connecting the rows.
- Join the strips while aligning every four-square intersection.
- Spread the complete panel flat and inspect it for diagonal pulling, puckered joins, or incorrectly positioned colors.
- Attach cream yarn and crochet the first perimeter round with consistent stitch spacing.
- Work the remaining border rounds, using the same corner treatment at all four corners.
- Weave in all remaining tails and block the assembled blanket to its final rectangular dimensions.
The completed piece is a three-color modular checkerboard blanket with a continuous cream perimeter.
7 Technical Tips for a Flatter Checkerboard Blanket
- Mark every corner space. Missing one ch-2 corner can produce a tapered motif on the following round. Four locking markers make the corner positions immediately visible.
- Block to an exact target. If 10 cm is the chosen square dimension, correct a 9.5 cm versus 10.5 cm difference before assembly. A 1 cm discrepancy repeated across several motifs produces visibly uneven rows.
- Control center-ring tension. A loose magic ring can reopen after washing and leave a hole at the center of the block. Weave the starting tail through several stitches in opposing directions after closing the ring.
- Count side groups. An omitted 3-dc group shortens one edge and forces the seam to stretch. Compare all four sides before fastening off each square.
- Do not over-tighten joins. A seam that reduces a nominal 10 cm edge to 9 cm will pucker the completed row. Place each joined pair flat and release the seam if either square curls upward.
- Pin four-square intersections. Misalignment of even 5 mm becomes visible because the checkerboard creates continuous horizontal and vertical reference lines. Match the intersections first, then distribute the remaining seam evenly.
- Check the first border round. Too few edge stitches pull the blanket inward, while too many create ruffling. Place the blanket flat after R1 and correct the stitch distribution before adding another round.
How to Size the Checkerboard Crochet Blanket
Modular construction makes resizing predictable. Start with the finished measurement of one blocked square and multiply it by the required number of columns and rows. Allow additional width and length for joining and the final border.
For example, a 10 cm motif arranged in six columns and nine rows produces a theoretical motif field close to 60 × 90 cm. Eight columns and twelve rows produce approximately 80 × 120 cm before final adjustments.
The exact measurement will change after joining and blocking. Treat these calculations as planning dimensions rather than guaranteed finished measurements.
Decide where the blanket will be used before making the complete batch of squares. Calculate the grid second. Crochet and block one sample motif before purchasing or cutting the entire yarn quantity because fiber choice, hook size, and individual tension change the final dimensions.
Planning the Sage, Cream and Beige Colors
The sage, cream, and beige combination depends on controlled repetition rather than random placement. Cream also performs two functions in this design: it appears inside the checkerboard and forms the perimeter border.
Create a paper grid before assembly. Mark S for sage, C for cream, and B for beige. Cross off each cell after positioning the corresponding motif.
This prevents a misplaced square from being discovered after several surrounding seams have already been completed.
Photograph the complete arrangement before picking up the first row. The image provides a fixed reference if stacks of unjoined squares are accidentally moved during assembly.
Yarn Substitution and Gauge
Medium/worsted #4 yarn with a 5 mm hook is a practical starting combination for this checkerboard crochet blanket pattern. The finished square measurement matters more than matching a specific yarn brand.
Make one complete square before beginning production. Measure it unblocked, block it according to the yarn manufacturer’s care instructions, allow it to dry completely, and measure it again. Use the final blocked measurement for all blanket calculations.
If the square is too small, first check tension and hook size. Adding another complete granny-style round is preferable when a significantly larger motif is required because aggressive blocking can distort the center and corners.
If substituting cotton for acrylic, expect the finished weight and drape to change. When mixing yarn brands, compare thickness, fiber content, yardage per gram, and washing instructions. Yarn carrying the same weight-category label can still vary noticeably in physical diameter.
Conclusion
Measure and block one complete motif before committing yarn to the full grid. That test establishes the actual square dimension, fabric density, and yarn consumption more reliably than estimating from the photograph. Once the sample is correct, calculate the required rows and columns, map the sage, cream, and beige sequence, and make identical motifs in batches. Save this checkerboard crochet blanket pattern to Pinterest with the finished color chart, or share the completed grid on Instagram using #SageCheckerboardBlanket. Before joining, compare every motif against the same measurement template. Which color would you place in the first corner square: sage green, cream, or warm beige?









