Introduction
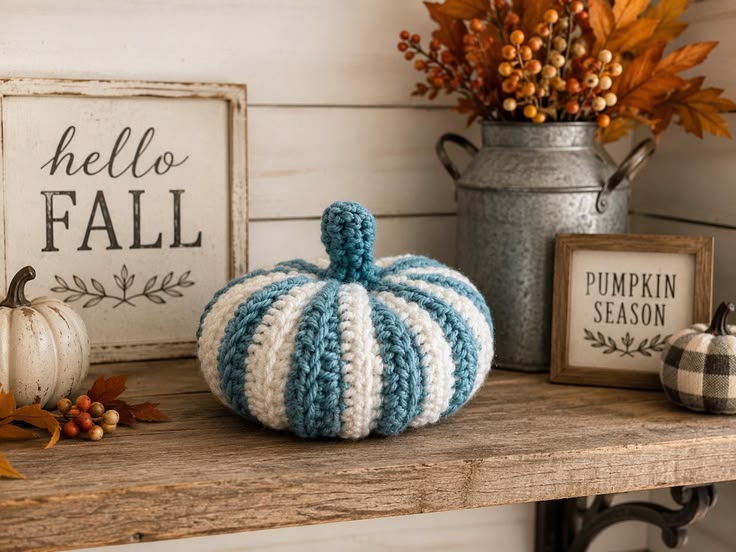
A pumpkin divided into alternating blue and cream ribs needs every stripe to meet at the center without twisting. This striped crochet pumpkin pattern uses worsted-weight yarn, a 4 mm hook and a 36-stitch plateau to create a stuffed pumpkin approximately 13–15 cm wide. Joined color rounds, external shaping and a short teal stem produce the defined farmhouse-style pumpkin shown in the photo.
The Design: What Makes This Striped Pumpkin Different
The strongest feature of this pumpkin is the color placement. Instead of crocheting the entire body in one shade and adding decorative lines afterward, teal-blue and warm-cream sections alternate around the circumference. The color divisions then become guides for the final pumpkin grooves.
A second structural choice is the low, broad profile. The body expands to 36 stitches, remains at that count through the center rounds, then decreases symmetrically. After stuffing, shaping yarn compresses the top and bottom centers and creates the rounded lobes associated with a real pumpkin.
The short stem is deliberately narrow compared with the body. A large stem would compete with the striped surface and pull the proportions upward. One common mistake with a crochet striped pumpkin is allowing the color changes to migrate by one stitch each round. Joined rounds keep the vertical sections better aligned.
Project Info at a Glance
| Skill Level | Time | Finished Size | Hook | Best For |
|---|---|---|---|---|
| Intermediate | 3–5 hours | Approx. 13–15 cm wide × 9–11 cm high | 4.0 mm | Fall shelves, centerpieces, mantel décor |
Materials and Tools
Yarn
- Dusty teal blue — worsted / weight 4 — approximately 30–35 g
- Warm cream — worsted / weight 4 — approximately 25–30 g
- Dark teal — worsted / weight 4 — approximately 5–8 g for the stem
A smooth acrylic, cotton-acrylic blend or firm wool-blend yarn works well. Choose two body colors with similar thickness so the cream sections do not finish wider or narrower than the blue sections.
Tools
- 4.0 mm crochet hook
- Polyester fiberfill
- Long tapestry needle
- Stitch markers
- Scissors
- Measuring tape
- Several removable yarn markers for locating the ribs
Abbreviations
- MR — magic ring
- sc — single crochet
- inc — 2 sc in one stitch
- dec — invisible decrease
- sl st — slip stitch
- ch — chain
- BLO — back loop only
- st/sts — stitch/stitches
For an invisible decrease, insert the hook through the front loops of the next two stitches and complete those loops together as one single crochet.
Pattern — Step by Step
The pumpkin body is worked in joined rounds so the alternating vertical color sections stay aligned. Join each round with a slip stitch, then begin the next round without turning.
Pumpkin Body
Yarn: dusty teal blue and warm cream.
R1: With teal blue, 6 sc in MR. Join. (6)
R2: inc ×6. (12)
R3: (1 sc, inc) ×6. (18)
R4: (2 sc, inc) ×6. (24)
R5: (3 sc, inc) ×6. (30)
R6: (4 sc, inc) ×6. (36)
The body has now reached its 36-stitch plateau.
Establishing the Blue and Cream Stripes
Divide the 36 stitches into twelve groups of three stitches. Alternate blue and cream groups around the body:
3 teal sc, 3 cream sc — repeat six times around. (36)
Carry the unused yarn loosely along the inside of the work rather than cutting it after every three stitches. Do not pull the carried strand tight because it can contract the circumference.
R7: (3 teal sc, 3 cream sc) ×6. (36)
R8: (3 teal sc, 3 cream sc) ×6. (36)
R9: (3 teal sc, 3 cream sc) ×6. (36)
R10: (3 teal sc, 3 cream sc) ×6. (36)
R11: (3 teal sc, 3 cream sc) ×6. (36)
R12: (3 teal sc, 3 cream sc) ×6. (36)
R13: (3 teal sc, 3 cream sc) ×6. (36)
R14: (3 teal sc, 3 cream sc) ×6. (36)
R15: (3 teal sc, 3 cream sc) ×6. (36)
Check the color columns after every second round. Each three-stitch group should remain above the matching group below it.
Upper Pumpkin Shaping
Continue following the established colors while decreasing. Keep each decrease inside its own color section whenever possible.
R16: (4 sc, dec) ×6. (30)
R17: (3 sc, dec) ×6. (24)
R18: (2 sc, dec) ×6. (18)
Begin stuffing now. Add fiberfill in small pieces and distribute it toward the outer edges rather than creating a hard ball in the center.
R19: (1 sc, dec) ×6. (12)
Add the final stuffing.
The pumpkin should feel firm enough to hold its ribs but still compress when pressed between two fingers. Excessive stuffing makes the later shaping grooves shallow.
R20: dec ×6. (6)
Fasten off, leaving approximately 25 cm of yarn. Thread the remaining six front loops and pull the opening closed.
Flattening the Pumpkin
Before creating the individual grooves, use a long strand of matching teal yarn to draw the top and bottom centers toward each other.
Insert a long tapestry needle through the center of the bottom.
Pass it vertically through the stuffing and exit through the center of the top.
Insert the needle beside the exit point and return through the body to the bottom center.
Pull gradually.
The pumpkin should shorten while its diameter expands.
Target a finished body height of approximately 7–9 cm before adding the stem.
Make two or three passes through the center before knotting the shaping strand securely.
Creating the Pumpkin Ribs
The photographed pumpkin has deep vertical divisions. The color boundaries provide natural locations for those grooves.
Cut a strand of teal yarn approximately 150 cm long.
Secure it at the bottom center.
Bring the yarn up around the outside of the pumpkin along the boundary between one teal and one cream stripe.
Insert the needle through the top center and bring it back through the bottom center.
Pull until a clear groove forms.
Move to the next major stripe boundary and repeat.
Create six primary grooves around the pumpkin. These divide the body into six broad lobes containing both blue and cream surface sections.
Work the grooves in alternating order:
- Front groove
- Back groove
- Right groove
- Left groove
- Remaining diagonal groove
- Opposite diagonal groove
This order distributes compression around the stuffed body.
Each groove should sink approximately 1–1.5 cm into the pumpkin at the widest point.
Secure the shaping yarn at the bottom and weave the tail deeply into the stuffing.
Teal Pumpkin Stem
Yarn: dark teal.
The short stem in the photograph is upright with a slightly rounded top rather than a long curved vine.
R1: 6 sc in MR. (6)
R2: inc ×6. (12)
R3: BLO 12 sc. (12)
R4: 12 sc. (12)
R5: (2 sc, dec) ×3. (9)
R6: 9 sc. (9)
R7: (1 sc, dec) ×3. (6)
Add a very small amount of stuffing.
Fasten off, leaving a 20 cm sewing tail.
The finished stem should measure approximately 3–4 cm tall.
Optional Curved Stem
For a less upright stem, crochet one additional six-stitch round and place a small amount of extra stuffing on only one side.
Bend the top gently before attaching it.
A few hidden stitches through the side of the stem can hold the curve in place.
Color-Change Technique
Clean color changes have a large effect on this pumpkin because the entire design depends on visible blue and cream columns.
Work the final yarn-over of the stitch before a color change with the new color. The next stitch then begins completely in the new shade.
Carry the unused color across the inside of the three-stitch section.
Check the float after every color block. It should follow the fabric without hanging loose, but it should not shorten the three-stitch section.
If a cream stripe begins narrowing, pull the cream working loop slightly taller before the first stitch rather than tightening the carried teal yarn.
Stuffing and Shape Control
Stuffing determines whether this project reads as a pumpkin or a sphere.
Fill the lower half first, pressing small pieces of fiberfill toward the outer wall.
Add less stuffing directly through the vertical center because the top-to-bottom shaping strand needs room to compress that area.
Before R19, rotate the pumpkin several times and check for flat spots.
The middle rounds should remain the widest section.
If the body becomes taller than it is wide before shaping, remove approximately 10–15% of the stuffing. The compression strand will then produce a lower pumpkin profile without excessive tension.
Assembly
- Complete all twenty rounds of the striped pumpkin body and close the final six stitches securely.
- Massage the stuffing outward so the widest section sits around R10–R13.
- Pass a long shaping strand vertically through the center and compress the pumpkin to approximately 7–9 cm body height.
- Mark six equally spaced groove positions around the outside before pulling any individual rib tight.
- Work the first groove from the bottom center to the top center and return through the body.
- Add the opposite groove next, then continue alternating around the pumpkin until six balanced lobes form.
- Check that the blue and cream stripes remain visible and that no shaping strand has migrated across the middle of a stripe.
- Stuff the teal stem lightly and position it directly over the closed top center.
- Sew around the stem base twice, catching both the stem stitches and the upper pumpkin fabric.
- Hide all yarn tails inside the pumpkin, reshape each lobe by hand and check the finished pumpkin from every side.
The completed pumpkin should sit without rolling, display clearly alternating blue and cream sections and retain six pronounced rounded lobes.
7 Technical Tips
- Mark every three-stitch color section before R7. A misplaced color change by even one stitch creates a diagonal stripe that becomes more obvious after nine plateau rounds.
- Keep the body at a 36-stitch maximum. Increasing to 42 stitches without adding corresponding height makes this medium pumpkin much wider than the proportions shown in the design.
- Carry each unused yarn color without pulling it tight. If an internal float is shorter than the three stitches it crosses, that stripe will contract and form an unwanted vertical dent.
- Stop stuffing before the body feels rigid. If the surface cannot compress by roughly 1 cm under finger pressure, the external shaping strands will struggle to form deep pumpkin grooves.
- Compress the top and bottom before forming the ribs. Trying to create six lobes on a tall sphere requires much more yarn tension and can pull the closing stitches open.
- Limit the initial groove depth to about 1 cm. Tighten all six ribs gradually before increasing any single groove toward 1.5 cm.
- Sew the stem through at least six upper body stitches. Attaching it only around the closed magic-ring area concentrates tension on the center and can pull the top opening apart.
Changing the Pumpkin Size
The easiest size adjustment is to change yarn weight while keeping the stitch counts unchanged.
DK yarn with a 3–3.5 mm hook produces a smaller decorative pumpkin. Worsted yarn with a 4 mm hook gives the medium size described here. Bulky yarn with a 5–5.5 mm hook creates a larger centerpiece while preserving the same general proportions.
For a genuinely larger stitch-count version, add another increase round after R6:
Large R7: (5 sc, inc) ×6. (42)
Add two or three additional plateau rounds before beginning the decreases. The stripe sequence must also be recalculated so equal color sections divide evenly into 42 stitches.
Changing yarn weight is simpler when exact vertical stripes are the priority.
Finishing the Bottom
The shaping threads converge at the underside, so finishing this area cleanly prevents the pumpkin from rocking.
After tying the final sculpting strand, pass each tail through several centimeters of stuffed fabric before trimming.
Do not stack bulky knots directly beneath the center.
If the pumpkin tilts after shaping, press it against a flat surface and redistribute the bottom stuffing around the central knot.
A flat resting area approximately 3–4 cm across is sufficient for this size.
Conclusion
Complete the striped body before tightening any sculpting strand because the final pumpkin profile depends on balanced compression across all six sections. Target approximately 13–15 cm in width, keep the stem near 3–4 cm tall and align each groove with a color boundary for the strongest visual definition. The next practical step is to crochet through R9 and inspect the first three rounds of vertical stripes before continuing the full body. Save this striped crochet pumpkin pattern to Pinterest and share the finished project on Instagram with #BlueStripeCrochetPumpkin. Would you keep the dusty blue and cream combination or replace the blue sections with rust orange?









