Introduction
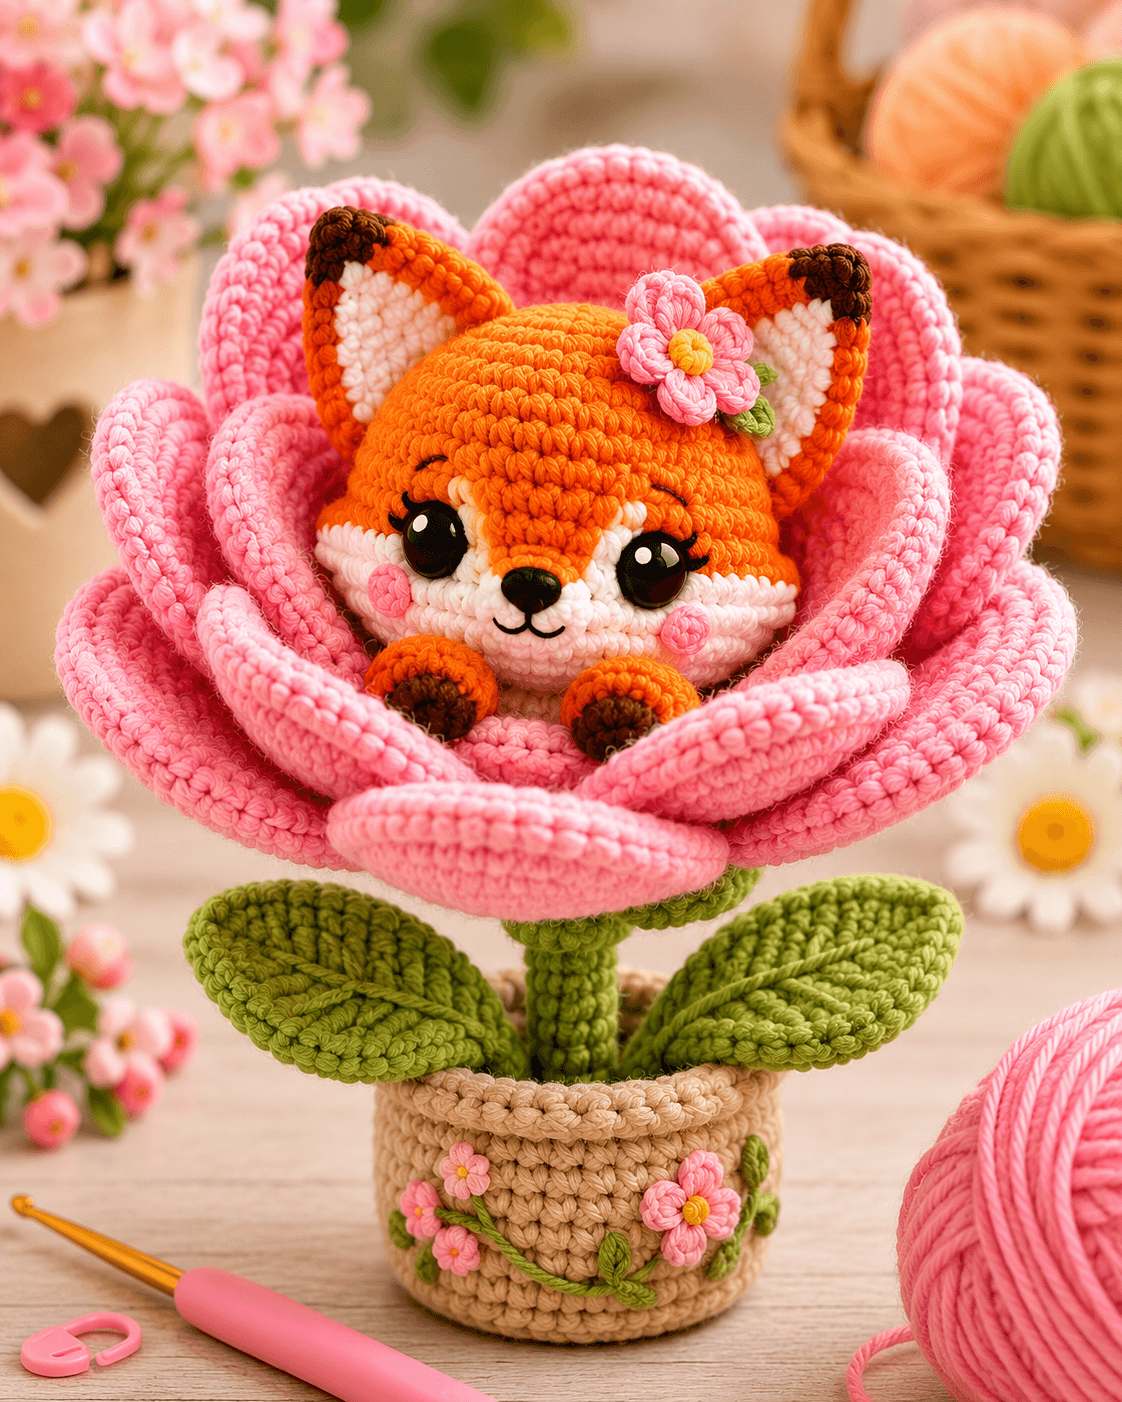
A fox muzzle can disappear completely once ten oversized flower petals close around its cheeks. This fox flower amigurumi crochet pattern uses DK or light-worsted cotton, a 3.5 mm hook and 15 mm safety eyes to build a display piece approximately 28–32 cm tall. The separate fox head, paws, pink flower, stem, leaves and weighted-look crochet pot make it suitable for shelf or desk decoration.
The Design: What Makes This Fox Flower Different
The fox occupies the flower center instead of having a conventional visible body. That changes the construction order. A 36-stitch head provides enough width for the white facial markings and oversized eyes, while only two front paws need to project beneath the muzzle. Ten large pink petals surround the head in overlapping layers and conceal the rear attachment points. Below them, a compact green flower base transfers the weight into a thick stuffed stem. Two broad leaves stabilize the vertical shape visually, and the tan flowerpot gives the project a wider base. This floral fox amigurumi therefore combines toy-making techniques with structural crochet decor. A common failure is attaching the petals before the fox face is finished; once the surrounding petals are sewn down, eye placement and muzzle adjustment become much harder.
Project Information at a Glance
| Skill Level | Time | Finished Size | Hook | Best For |
|---|---|---|---|---|
| Intermediate | 7–10 hours | Approx. 28–32 cm tall | 3.5 mm | Desk decor, nursery shelves and handmade displays |
Published fox amigurumi patterns span a wide scale. One DK fox made with a 3 mm hook measures approximately 9 cm, while another current fox tutorial combines a 3.5 mm hook with 15 mm safety eyes. The larger flower structure in this project accounts for most of its finished height.
Materials and Tools
Yarn
- Bright orange — DK/light-worsted cotton — 45–55 g — fox head, ears and paws
- Warm white — matching yarn — 25–35 g — cheeks, muzzle and inner ears
- Chocolate brown — 8–12 g — ear tips and paws
- Black — small amount — nose, mouth and eyelashes
- Pink — 90–120 g — ten large petals, cheeks and hair flower
- Golden yellow — 5–8 g — decorative flower centers
- Leaf green — 55–70 g — flower base, stem, leaves and pot vine
- Tan/beige — 65–80 g — flowerpot
Tools
- 3.5 mm crochet hook
- 15 mm safety eyes ×2
- Polyester stuffing
- Yarn needle
- Stitch markers
- Scissors
- Long sewing pins
- Optional plastic canvas circle for pot base
Abbreviations
- MR — magic ring
- sc — single crochet
- inc — 2 sc in one stitch
- dec — single crochet decrease
- sl st — slip stitch
- ch — chain
- hdc — half double crochet
- dc — double crochet
- BLO — back loop only
For an invisible decrease, insert the hook through the front loops of the next two stitches, yarn over and complete them together as one sc.
Pattern — Step by Step
Unless stated otherwise, work amigurumi pieces in a continuous spiral. Place a stitch marker in the first stitch of every round.
Fox Head
Yarn: orange.
R1: 6 sc in MR (6)
R2: inc ×6 (12)
R3: (sc, inc) ×6 (18)
R4: (2 sc, inc) ×6 (24)
R5: (3 sc, inc) ×6 (30)
R6: (4 sc, inc) ×6 (36)
R7–R12: sc around (36)
R13: (4 sc, dec) ×6 (30)
R14: (3 sc, dec) ×6 (24)
Insert the 15 mm safety eyes between R9 and R10, approximately 8 stitches apart. Confirm their position after the white cheek pieces are temporarily pinned in place.
R15: (2 sc, dec) ×6 (18)
R16: (sc, dec) ×6 (12)
Stuff firmly, concentrating stuffing around the forehead and sides rather than directly behind the muzzle.
R17: dec ×6 (6)
Fasten off and close the opening.
White Cheek Patches — Make 2
Yarn: white.
R1: 6 sc in MR (6)
R2: inc ×6 (12)
R3: (sc, inc) ×6 (18)
Fasten off with a 25 cm sewing tail.
Flatten each circle slightly into an oval during attachment. Position the upper inside edge near the eye while keeping the lower portion beside the muzzle.
Fox Muzzle
Yarn: white.
R1: 6 sc in MR (6)
R2: inc ×6 (12)
R3: (sc, inc) ×6 (18)
R4: sc around (18)
R5: (sc, dec) ×6 (12)
Stuff lightly.
Fasten off with a 25 cm tail.
Sew centrally between and slightly below the eyes.
Nose
Yarn: black or very dark brown.
R1: 6 sc in MR (6)
R2: sc around (6)
Fasten off and flatten.
Sew to the upper center of the white muzzle. Embroider a short vertical line beneath it and two curved mouth lines.
Pink Cheek Patches — Make 2
Yarn: pink.
R1: 6 sc in MR (6)
R2: inc ×6 (12)
Fasten off.
Position each cheek below the outer corner of an eye.
Fox Ears — Make 2
Start with dark brown.
R1: 6 sc in MR (6)
R2: (sc, inc) ×3 (9)
Change to orange.
R3: (2 sc, inc) ×3 (12)
R4: (sc, inc) ×6 (18)
R5–R6: sc around (18)
Fasten off with a 30 cm tail.
Do not stuff. Flatten each ear into a pointed triangle.
Inner Ears — Make 2
Yarn: white.
Ch 7.
Row 1: sc in second ch, hdc, 2 dc, hdc, sc (6)
Row 2: ch 1, turn, dec, 2 hdc, dec (4)
Row 3: ch 1, turn, dec ×2 (2)
Fasten off.
Sew one inner panel to the front of each orange ear, leaving the dark brown tip visible.
Front Paws — Make 2
Start with dark brown.
R1: 6 sc in MR (6)
R2: inc ×6 (12)
R3: (sc, inc) ×6 (18)
R4: sc around (18)
Change to orange.
R5: (sc, dec) ×6 (12)
R6–R8: sc around (12)
R9: (sc, dec) ×4 (8)
Stuff lightly.
Fasten off with a 25 cm sewing tail.
Large Flower Petals — Make 10
Yarn: pink. Work in continuous rounds.
R1: 6 sc in MR (6)
R2: inc ×6 (12)
R3: (sc, inc) ×6 (18)
R4: (2 sc, inc) ×6 (24)
R5–R8: sc around (24)
R9: (2 sc, dec) ×6 (18)
R10: (sc, dec) ×6 (12)
R11–R14: sc around (12)
Stuff only the wide upper half. Leave the narrow base flat.
Fasten off with a 35 cm tail.
Flower Base
Yarn: green.
R1: 6 sc in MR (6)
R2: inc ×6 (12)
R3: (sc, inc) ×6 (18)
R4: (2 sc, inc) ×6 (24)
R5: (3 sc, inc) ×6 (30)
R6: (4 sc, inc) ×6 (36)
R7–R8: sc around (36)
Fasten off with a long tail.
This base sits beneath the fox and petal assembly.
Flower Stem
Yarn: green.
R1: 6 sc in MR (6)
R2: inc ×6 (12)
R3–R25: sc around (12)
Stuff firmly as you work.
Fasten off with a 30 cm tail.
The stem should remain approximately 12–14 cm long after stuffing.
Large Leaves — Make 2
Yarn: green.
Ch 15.
Working around both sides of the foundation chain:
Round 1: sc, hdc, 3 dc, 5 tr, 3 dc, hdc, 3 sc in final ch; continue along opposite side with hdc, 3 dc, 5 tr, 3 dc, hdc, sc.
Join with sl st.
Round 2: sc around, working 3 sc in the leaf tip.
Fasten off with a 30 cm tail.
Surface-crochet or embroider one raised green line down the center to imitate the strong leaf vein visible in the image.
Flowerpot Base
Yarn: tan/beige.
R1: 6 sc in MR (6)
R2: inc ×6 (12)
R3: (sc, inc) ×6 (18)
R4: (2 sc, inc) ×6 (24)
R5: (3 sc, inc) ×6 (30)
R6: (4 sc, inc) ×6 (36)
R7: (5 sc, inc) ×6 (42)
If using plastic canvas, cut a circle slightly smaller than this base and place it inside.
Flowerpot Walls
R8: BLO sc around (42)
R9–R17: sc around (42)
R18: (5 sc, dec) ×6 (36)
R19–R21: sc around (36)
Stuff the lower pot firmly around the stem attachment area.
Pot Rim
R22: FLO inc around (72)
R23: sc around (72)
Fasten off.
Fold R22–R23 outward slightly to produce the rolled rim shown in the reference.
Small Pot Flowers — Make 4–5
Pink yarn with yellow center.
With yellow:
R1: 5 sc in MR (5)
Change to pink.
In each stitch work:
(sl st, ch 2, 2 hdc, ch 2, sl st)
Repeat five times.
Fasten off.
Pot Vine
Yarn: green.
Ch approximately 35–45.
Sl st back through every chain.
Fasten off.
Arrange the cord in a loose curve around the front of the pot and sew it down every 2–3 cm.
Small Pot Leaves — Make 5–7
Ch 6.
Starting in second ch:
sc, hdc, dc, hdc, sc
Fasten off.
Sew the small leaves along the decorative vine.
Fox Hair Flower
With yellow:
R1: 6 sc in MR (6)
Change to pink.
In each stitch:
(sl st, ch 3, 2 dc, ch 3, sl st)
Repeat for six petals.
Fasten off.
Sew above one eye near the base of the ear. Add one or two miniature green leaves behind it.
Assembly
- Sew both white cheek patches and the muzzle to the completed fox head, then add the nose, embroidered mouth and pink cheek circles.
- Attach both ears to the top of the head approximately 7–8 cm apart, keeping the dark tips angled slightly outward.
- Sew the small pink flower beside one ear and add its miniature green leaf detail.
- Arrange ten large pink petals around the green flower base in two overlapping groups of five, pinning every petal before sewing.
- Seat the fox head in the center of the petals and sew its lower rear surface securely to the green flower base.
- Attach both orange paws at the lower front of the fox face so their brown tips remain visible above the front petals.
- Sew the stuffed green stem to the underside of the flower base and reinforce the attachment with several passes through the final stem round.
- Attach one large leaf to each side of the stem approximately 4–6 cm above the pot rim.
- Insert the lower stem into the pot, surround it with stuffing and stitch it to the pot base before closing the upper opening around it.
- Sew the green vine, miniature leaves and pink flowers across the front of the pot, then reshape all ten large petals into an even circular frame.
The finished piece should stand with the fox centered inside the flower and the two green leaves balancing the weight visually above the pot.
7 Technical Tips
- Head distortion: Overstuffing directly behind the muzzle pushes the white face pieces forward. Keep the stuffing firm at the sides and forehead while leaving approximately 1 cm less pressure behind the muzzle.
- Eye-spacing failure: A difference of even two stitches changes the facial expression. Test both 15 mm eyes with the white cheek patches pinned before locking the washers.
- Petal collapse: Stuffing the entire 14-round petal makes its base too bulky to overlap. Stuff only the broad upper half and leave the final 4–5 rounds flat.
- Uneven flower circle: A petal base displaced by more than about 1 cm creates a visible gap. Pin all ten petals before sewing the first one permanently.
- Stem bending: Loose stuffing inside the 12-stitch stem allows the flower head to lean. Add fiberfill every 3–4 rounds and compress it before continuing.
- Leaf rotation: A single attachment point lets a large leaf spin around the stem. Sew each leaf across an attachment area approximately 2–3 cm long.
- Pot tipping: A lightweight base can become unstable under the flower head. Add a plastic-canvas base and pack the lowest 3–4 cm of the pot more firmly than its upper section.
Shaping the Fox Face
The white face area is essential because an orange muzzle alone would disappear against the head. Two flat circles create the pale cheek sweep, while the separate muzzle projects slightly farther forward.
Place the eye openings before sewing those circles permanently. Current fox references use eye sizes from 6 mm to 15 mm depending on scale, and a recent larger fox tutorial specifically uses 15 mm eyes with a 3.5 mm hook.
The dark nose should overlap the upper edge of the white muzzle rather than floating at its center. Keep the embroidered mouth short so it remains readable between the surrounding flower petals.
Building the Ten-Petal Flower
The flower is a structural component, not only decoration. Each petal has a stuffed rounded end and a flat narrow base, allowing ten pieces to overlap without forming a thick ring behind the fox.
Arrange five rear petals first. Place the second five between those attachment points so the outer circumference has no large gaps.
Do not sew the petal tips together. Independent petals retain the layered appearance shown in the image and can be reshaped after storage.
Supporting the Flower on the Stem
A large flower head produces more leverage than a standard amigurumi body. The green base distributes this load across the stem attachment instead of asking a few petal stitches to support everything.
Stuff the stem more firmly than the fox paws. It should resist compression when held horizontally.
If the cotton yarn is very soft, a removable craft dowel can be placed inside the stuffed stem for a display-only item. Do not use a rigid internal support in an item intended as a soft toy.
Constructing the Pot
The pot widens to 42 stitches before the wall begins. Working the first wall round through the back loops creates the sharp lower corner visible at the base.
The upper section narrows to 36 stitches, then the front-loop increase creates a rolled rim. This prevents the pot from looking like a plain cylinder.
Attach the stem to the base before completely filling the pot. Trying to sew through a fully stuffed pot makes it difficult to reach the central anchor point.
Adding the Decorative Vine
The miniature pink flowers repeat the color of the oversized petals without adding another major structural element. A simple surface cord works better than embroidering directly into the pot because it creates the raised green line visible in the photograph.
Position the largest mini flower toward one side rather than centering every detail symmetrically. The reference uses a loose garden-vine arrangement.
Sew each flower at its yellow center and one outer petal only. This allows the remaining petals to stand slightly away from the pot surface.
Choosing Yarn, Hook and Eye Size
Published fox patterns use a broad range of materials. A DK Ravelry fox uses a 3 mm hook and 10 mm eyes, while a current step-by-step fox uses a 3.5 mm hook and 15 mm eyes. Another free pattern uses a 2.5 mm hook with 6 mm eyes.
The 3.5 mm hook and 15 mm eye specification here suits the larger head proportions visible inside the flower. If you switch to plush yarn, increase the hook and eye size together rather than changing only one component.
Estimating Yarn Quantity
A published 9 cm DK fox requires less than 15 g of orange and under 5 g each of black and white. This project requires substantially more because the fox head is larger and the ten pink petals, stem and pot are separate structural components.
Make one large petal first and weigh it. Multiply by ten, then add at least 10 percent for sewing tails and gauge variation.
Orange remains a comparatively modest allocation because the visible fox consists primarily of the head, ears and paws rather than a complete body and tail.
Finishing Checks
Set the finished pot on a flat table and view the project from directly in front. The fox eyes should appear level, and the large flower should form a roughly circular outline around the head.
Check the stem next. It should rise vertically from the center of the pot without leaning toward the heavier leaf.
Inspect all ten petal bases from behind and add extra stitches wherever a gap allows the green flower base to show through.
Finally, compare both leaf angles and reshape the miniature pot flowers so their centers remain visible.
Conclusion
Complete the fox head and one test petal before cutting yarn for the full flower. Record the head width, petal length and stem height so the fox flower amigurumi crochet pattern can be reproduced without changing its proportions. Pin all ten petals around the finished face before making permanent joins, then check the pot balance on a flat surface. Photograph one close-up of the fox and one full-height view, save the project to Pinterest and share it on Instagram with #FoxFlowerAmigurumi. The next practical step is to crochet the 36-stitch head and test the 15 mm eye placement. Would you keep the flower bright pink or change the petals to peach?
Sources
- 53stitches / Ravelry — DK fox, 3 mm hook, 10 mm safety eyes, approximately 9 cm finished height and published yarn quantities.
- ShowMeStepByStep / ComplicatedKnots — current 2026 fox tutorial using a 3.5 mm hook, cotton/amigurumi yarn and 15 mm safety eyes.
- Amyliva — free fox construction using a 2.5 mm hook and 6 mm safety eyes.
- Amigurumi All Free Patterns — Pau the Fox, February 2024, using a 2.75–3 mm hook and 7 mm eyes.
- Amigurumi All Free Patterns — September 2024 free fox pattern using cotton yarn.
- Ravelry / Amy Stromquist — worsted sleeping fox pattern using a 3.75 mm hook and optional 9 mm eyes.









