Introduction
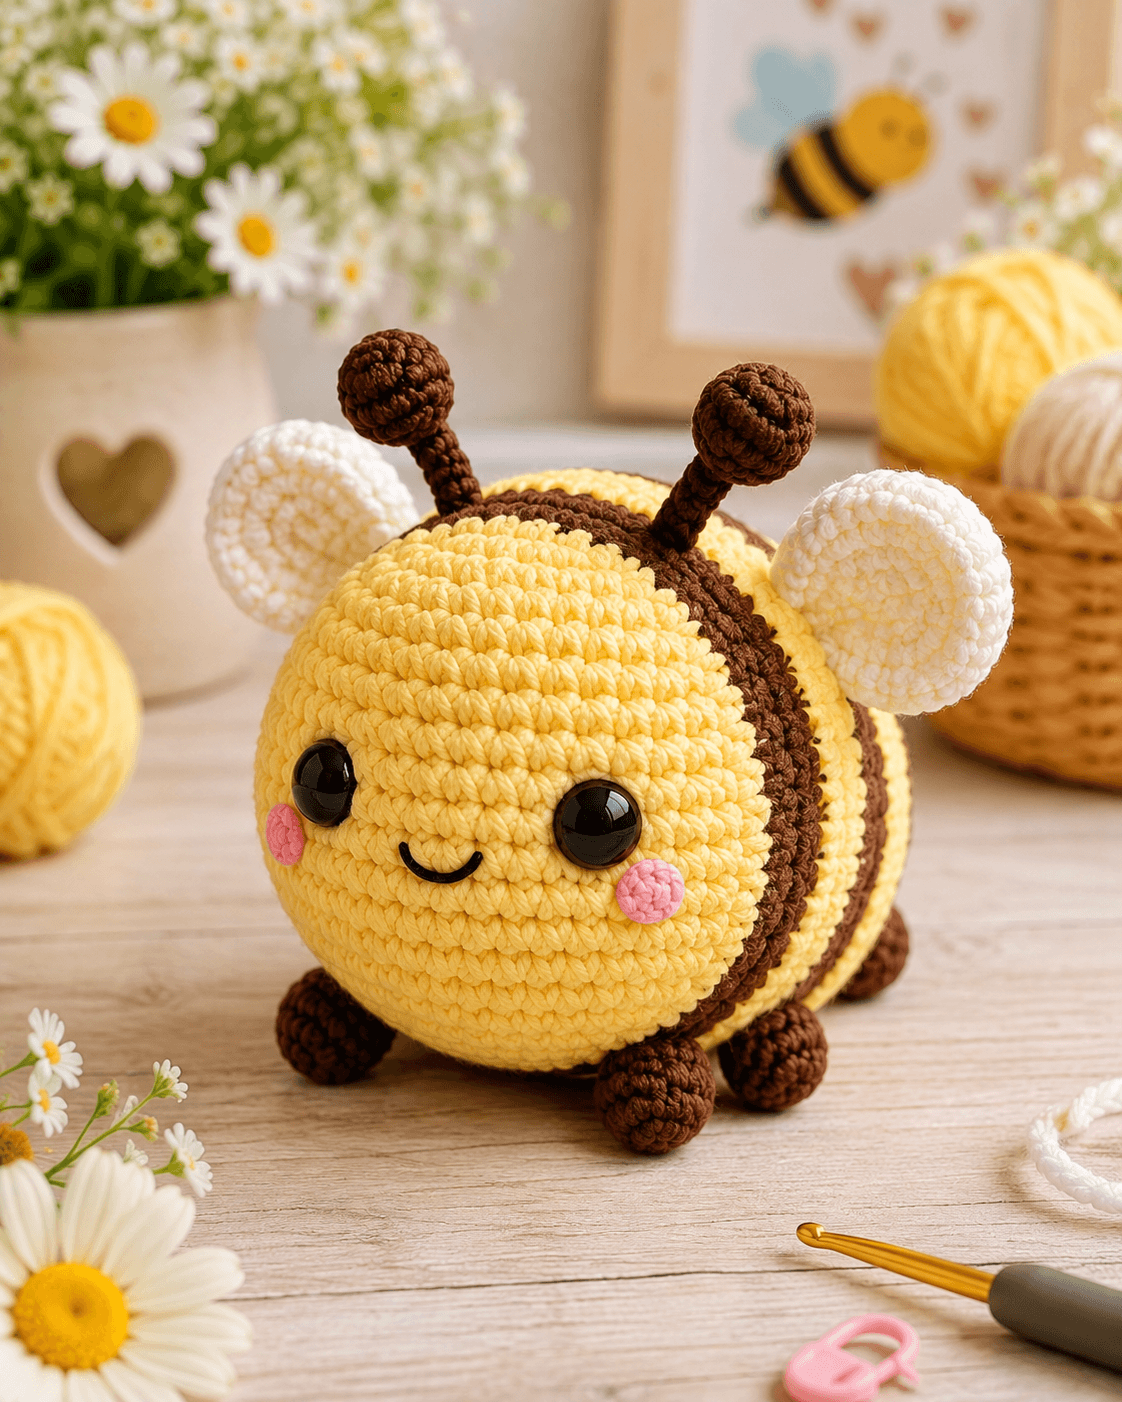
A bee’s stripes have to turn around a stuffed oval without stepping upward at the color-change seam. This bee amigurumi crochet pattern uses worsted or light-worsted yarn, a 3 mm hook and 16 mm safety eyes to produce a bee approximately 20–24 cm long. Separate head and body pieces control the proportions, while brown antennae, white wings and four low-set feet reproduce the photographed silhouette.
The Design: What Makes This Bee Different
The head is almost as wide as the abdomen, which gives the bee a front-heavy profile instead of the usual pill-shaped plush construction. Both sections reach a 42-stitch plateau, but the abdomen stays at full circumference for longer so the brown stripes have enough vertical space. White wings are lightly stuffed and flattened, creating the thick oval shapes visible behind the head. The bumblebee amigurumi pattern also substitutes chocolate brown for conventional black, softening the contrast while retaining clearly separated body bands. Rounded antenna tips repeat the shape of the feet and balance the large glossy eyes. One common bee-making mistake is changing stripe colors at different stitch positions. That produces a visible staircase down the side of the abdomen rather than one controlled color-change line.
Project Information at a Glance
| Skill Level | Time | Finished Size | Hook | Best For |
|---|---|---|---|---|
| Intermediate | 5–7 hours | Approx. 20–24 cm long | 3.0 mm | Display toys, gifts and nursery decor for ages appropriate to the finishing method |
The finished dimensions depend on yarn thickness and tension. This version is planned around the scale of current 20–25 cm cotton bee patterns, then adjusted to the broader head and rounded body visible in the reference photograph.
Materials and Tools
Yarn
- Golden yellow — worsted/light-worsted cotton or cotton blend — approximately 80 g — head and body
- Chocolate brown — matching yarn — approximately 30 g — body stripes, antennae and feet
- White — matching yarn — approximately 20 g — wings
- Blush pink — matching yarn — approximately 5 g — cheek patches
- Black embroidery thread — small amount — mouth
Tools
- 3.0 mm crochet hook
- 16 mm black safety eyes ×2
- Polyester fiberfill
- Large-eye yarn needle
- Stitch markers
- Sharp scissors
- Long doll needle for facial embroidery
For a toy intended for a child under three, replace safety eyes with securely embroidered eyes. Safety-eye backs are small rigid components and are not suitable for every age group.
Abbreviations
- MR — magic ring
- sc — single crochet
- inc — 2 sc in one stitch
- dec — single-crochet decrease
- sl st — slip stitch
- ch — chain
- BLO — back loop only
- FO — fasten off
For an invisible decrease, insert the hook through the front loops of the next two stitches, yarn over, pull through both front loops, then complete one single crochet.
Pattern — Step by Step
Work all stuffed pieces in a continuous spiral unless a section says otherwise. Place a marker in the first stitch of every round.
Head
Yarn: golden yellow — 42-stitch large amigurumi sphere.
R1: 6 sc in MR (6)
R2: inc ×6 (12)
R3: (sc, inc) ×6 (18)
R4: (2 sc, inc) ×6 (24)
R5: (3 sc, inc) ×6 (30)
R6: (4 sc, inc) ×6 (36)
R7: (5 sc, inc) ×6 (42)
R8: sc around (42)
R9: sc around (42)
R10: sc around (42)
R11: sc around (42)
R12: sc around (42)
R13: sc around (42)
R14: sc around (42)
Insert the 16 mm safety eyes between R11 and R12. Leave approximately 8–9 visible stitches between the eye posts. Check placement from directly in front before attaching the backs.
R15: (5 sc, dec) ×6 (36)
R16: (4 sc, dec) ×6 (30)
R17: (3 sc, dec) ×6 (24)
Stuff firmly, concentrating fiberfill around the outer edges rather than pushing one dense lump into the center.
R18: (2 sc, dec) ×6 (18)
R19: (sc, dec) ×6 (12)
R20: dec ×6 (6)
Fasten off. Close the final six stitches and hide the tail.
Body
Start with golden yellow. Change colors only on the final pull-through of the stitch before a new stripe.
R1: 6 sc in MR (6)
R2: inc ×6 (12)
R3: (sc, inc) ×6 (18)
R4: (2 sc, inc) ×6 (24)
R5: (3 sc, inc) ×6 (30)
R6: (4 sc, inc) ×6 (36)
R7: (5 sc, inc) ×6 (42)
R8: sc around in yellow (42)
R9: sc around in yellow (42)
R10: sc around in yellow (42)
Change to chocolate brown.
R11: sc around (42)
R12: sc around (42)
Change to yellow.
R13: sc around (42)
R14: sc around (42)
R15: sc around (42)
Change to brown.
R16: sc around (42)
R17: sc around (42)
Change to yellow.
R18: sc around (42)
R19: sc around (42)
R20: sc around (42)
Change to brown.
R21: sc around (42)
R22: sc around (42)
Change back to yellow for the rear section.
R23: sc around (42)
R24: sc around (42)
R25: (5 sc, dec) ×6 (36)
R26: sc around (36)
R27: (4 sc, dec) ×6 (30)
R28: sc around (30)
Begin firm stuffing. Keep the front end broad because it will support the oversized head.
R29: (3 sc, dec) ×6 (24)
R30: (2 sc, dec) ×6 (18)
R31: (sc, dec) ×6 (12)
R32: dec ×6 (6)
Fasten off. Close the six stitches and hide the tail.
Front Legs / Feet — Make 2
Yarn: chocolate brown.
R1: 6 sc in MR (6)
R2: inc ×6 (12)
R3: sc around (12)
R4: (sc, dec) ×4 (8)
R5: sc around (8)
R6: sc around (8)
Stuff the rounded foot lightly.
Flatten the opening and work 4 sc through both layers (4).
Fasten off. Leave a 20 cm sewing tail.
Back Legs / Feet — Make 2
Repeat the front-leg pattern.
The supplied stylized bee shows four prominent rounded feet, so this pattern reproduces the visible four-foot construction rather than adding a separate hidden middle pair.
Wings — Make 2
Yarn: white.
R1: 6 sc in MR (6)
R2: inc ×6 (12)
R3: (sc, inc) ×6 (18)
R4: (2 sc, inc) ×6 (24)
R5: sc around (24)
R6: sc around (24)
R7: (2 sc, dec) ×6 (18)
R8: (sc, dec) ×6 (12)
Add only a thin layer of stuffing. The wing should remain soft enough to flatten into an oval.
Flatten the opening and work 6 sc through both layers.
Fasten off. Leave a 30 cm tail for sewing.
Antennae — Make 2
Yarn: chocolate brown.
R1: 6 sc in MR (6)
R2: sc around (6)
R3: sc around (6)
R4: sc around (6)
R5: sc around (6)
R6: sc around (6)
R7: sc around (6)
R8: inc ×6 (12)
R9: sc around (12)
R10: sc around (12)
R11: dec ×6 (6)
Stuff the rounded tip only. Leave the narrow stem unstuffed so it can curve slightly.
Fasten off with a 25 cm tail.
Cheek Patches — Make 2
Yarn: blush pink.
R1: 6 sc in MR (6)
R2: inc ×6 (12)
Join with sl st.
Fasten off with a 15 cm sewing tail.
Do not stuff.
Mouth
Black embroidery thread.
Mark a point approximately one round below the midpoint between the eyes.
Embroider a shallow curved smile approximately 3–3.5 cm wide. Anchor the center of the curve one stitch lower than both ends so the mouth does not become a straight horizontal line.
Assembly
- Place the completed head against the yellow front of the body and pin it at four equally spaced points before sewing.
- Sew the head to the body around a circular attachment area approximately 6–7 cm wide, adding small amounts of stuffing behind the join if a hollow forms.
- Attach both pink cheek circles about one round below the eyes, keeping their inner edges approximately 1–1.5 cm outside the embroidered mouth.
- Embroider the curved black smile between the cheeks and check that its midpoint stays on the vertical center line of the face.
- Pin the two front brown feet beneath the front half of the abdomen, approximately 5–6 cm apart.
- Attach the two back feet near the rear third of the abdomen and keep all four feet in contact with a flat tabletop.
- Sew one white wing to each upper side of the body behind the head, angling the broad end outward and slightly upward.
- Position the antennae on the upper head approximately 3–4 cm apart and sew through the full base circumference of each stem.
- Rotate the bee on a flat surface and correct any wing or foot that causes the body to lean noticeably to one side.
- Weave all tails through several internal stitches, trim excess yarn and reshape the head, abdomen, wings and antenna tips by hand.
The finished bee has a separate spherical head, three brown abdomen bands, two raised white wings, four visible brown feet and two rounded antenna tips.
7 Technical Tips
- Stripe staircase: Changing colors one stitch late in consecutive rounds creates a diagonal brown seam. Start every stripe at the same marked stitch and make the color swap on the final pull-through of the preceding stitch.
- Head flattening: A 42-stitch sphere develops a flat face if the center is overpacked. Add fiberfill in small pieces around the inner circumference and stop when the stitches remain closed without stretching.
- Eye drift: A one-round difference in eye height is very obvious with 16 mm eyes. Place both posts between R11 and R12 before installing either backing.
- Wing rotation: Wings sewn through only two or three stitches can twist downward. Catch approximately 5–6 cm of the flattened wing base against the body.
- Foot instability: If one foot sits more than about 5 mm higher than another, the bee rocks on a tabletop. Pin all four feet before sewing the first one permanently.
- Antenna collapse: Stuffing the narrow six-stitch stem makes it bulky and difficult to curve. Put fiberfill only in the 12-stitch rounded tip.
- Visible decreases: Standard decreases can form gaps across the yellow head. Use front-loop invisible decreases from R15 onward and keep stuffing at least one round away from the active stitches.
Controlling the Round Bee Head
The head uses the largest standard six-stitch plateau in this pattern: 42 stitches. Seven increase rounds create enough diameter for the oversized eye spacing shown in the photograph.
Do not reduce the plateau to 36 stitches unless a noticeably smaller head is wanted. A 36-stitch head paired with the 42-stitch abdomen changes the design from a large-faced character to a more anatomically narrow bee.
Seven plain rounds between the final increase and first decrease create the broad central zone. That extra height matters because the safety eyes need room to sit above the cheeks without crowding the upper curve.
Building Clean Brown Stripes
The abdomen contains three narrow chocolate-brown bands separated by wider yellow sections. Keeping the brown bands at two rounds and the yellow bands at three rounds preserves the visual rhythm visible in the image.
Carry the unused yarn loosely inside the body if the same yarn will be needed again within two or three rounds. Do not pull the carried strand tightly across the interior because that can reduce the circumference of the stripe.
Place every color change along the underside or rear side of the bee. The front and upper body then remain visually uninterrupted.
Choosing Yarn, Hook and Finished Scale
Comparable 20–25 cm cotton bees use approximately 80 g of yellow, 30 g of a dark accent and 20 g of white. The 3 mm hook specified here produces a dense surface with smooth worsted or light-worsted cotton-blend yarn.
The bee amigurumi crochet pattern can be resized through yarn thickness rather than changing stitch counts. A thinner sport cotton with a 2–2.5 mm hook produces a substantially smaller bee, while plush yarn creates a larger body from the same mathematical structure.
Make a small six-round sphere test if changing yarn categories. Fiberfill should remain hidden when the sample is compressed between two fingers.
Placing the 16 mm Safety Eyes
Large glossy eyes account for much of the face proportion in the supplied photograph. Sixteen-millimeter eyes occupy enough surface area on a 42-stitch head to reproduce that look without touching the pink cheek circles.
Insert both posts before attaching either plastic washer. Temporary placement makes it possible to adjust the spacing by one stitch.
The eyes should appear level when the head is viewed from its natural resting angle, not only when the crochet opening points directly toward you.
Making the Thick White Wings
The photographed wings are not thin lace shapes. Their edges have noticeable thickness, so each wing is constructed as a closed oval rather than a flat single-layer circle.
Light stuffing adds depth, but excessive fiberfill turns the wing into a ball. Flatten the piece after R8 and check that its broad face remains roughly oval.
Sew the narrow closed end against the body. The widest portion should remain free so the wing projects outward instead of disappearing against the brown stripe.
Shaping the Antennae
The antennae use six-stitch tubes followed by small 12-stitch spheres. This creates the club-shaped ends visible in the image without wire.
Position the stems closer to the body side of the head than to the forehead. Antennae placed too far forward can interfere visually with the eyes.
Before fastening them permanently, tilt both tips outward by roughly the same angle. Their rounded ends should reach comparable heights when viewed from the front.
Planning Yarn Quantity
A comparable 20–25 cm cotton bee uses approximately 80 g of yellow, 30 g of its dark color and 20 g of white. Those quantities provide a practical purchasing baseline for this photo-matched version.
The yellow share is largest because it covers the head and most of the abdomen. Brown yarn is concentrated in six relatively small pieces plus three stripe bands, while white is limited to the two wings.
If using a different worsted yarn, weigh the completed head first. That part represents a substantial percentage of the yellow consumption and gives a useful early warning if the selected yarn is heavier than expected.
Competition and Design Position
Current crochet-bee marketplaces contain many chunky, no-sew and pill-shaped patterns. The separate head used here creates a different silhouette. Its brown rather than black stripes also move the palette closer to honey and cocoa tones.
Another distinction is the wing scale. The white ovals are almost as tall as the visible side of the head, while many compact bee patterns use small flat wings.
Those differences give this bee amigurumi crochet pattern a clearer visual identity without adding advanced stitch types. The difficulty comes from shaping, placement and consistent color changes rather than decorative stitch complexity.
Finishing Checks
Set the completed bee on a flat table and inspect the feet first. All four should share the load rather than leaving one leg suspended.
Look at the face from approximately one meter away. The eye line should remain horizontal, both cheeks should sit at comparable heights and the mouth center should align with the midpoint between the eyes.
Check the brown stripes from both sides. Each band should remain parallel to the next without a visible upward step.
Finish with the wings and antennae. Their left-right angles do not need to be mechanically identical, but a difference greater than roughly 1 cm at the tips will become visually dominant.
Conclusion
Measure the completed head and abdomen before recording the final project notes, because those dimensions provide the fastest reference for reproducing this bee amigurumi crochet pattern with another yarn. The next practical step is to crochet the head through R14, install the 16 mm eyes and confirm the scale before making the striped body. Photograph the finished bee from the front and side, save the project to Pinterest and share it on Instagram with #HoneyStripeBee. Keep one detail consistent in the next version: will the three abdomen stripes stay chocolate brown, or change to traditional black?
Sources
- Ravelry — Bee Amigurumi by Anastasia Sakhno: sport cotton blend, 2.5 mm hook and 6 mm safety eyes.
- Always Free Amigurumi — 2024 bee pattern using YarnArt Jeans, a 2 mm hook and 10 mm safety eyes.
- LoveCrafts / Bellota_Arte — 20–25 cm bee using approximately 80 g yellow, 30 g dark yarn and 20 g white with a 3 mm hook.
- Amigurumi Corner — current larger bee pattern using 16 mm safety eyes and a 36-stitch head plateau.
- Storyland Amis — approximately 7.5 cm small bee size reference.
- Ravelry — Trang Minh Bee Amigurumi, approximately 15 cm with fingering cotton and a 2 mm hook.
- Etsy — current crochet-bee marketplace and current 24 cm bee-pattern size reference.
- Ravelry — Grace and Yarn Amigurumi Bee using Aran yarn and a 3.5 mm hook.









