Introduction
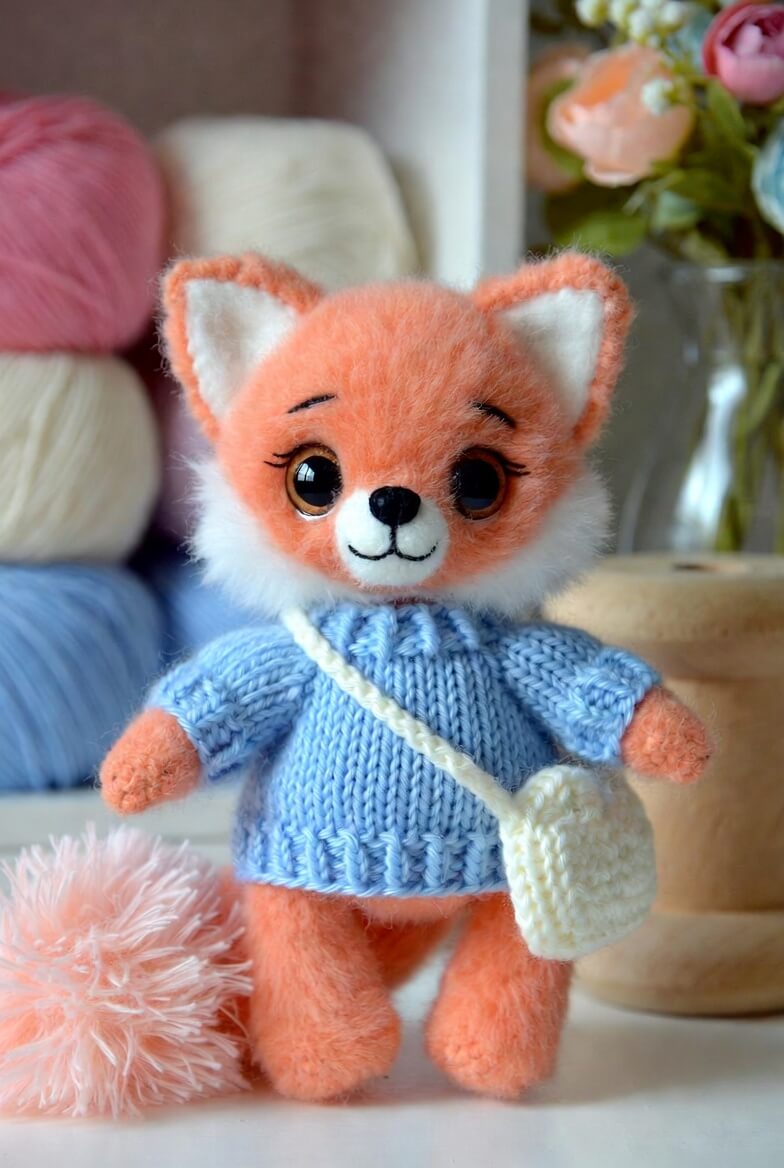
A fox’s white cheek ruff must widen below the ears without covering the narrow orange forehead. This fox amigurumi crochet pattern with sweater uses worsted yarn, a 3.5 mm hook and fitted clothing to create a standing figure approximately 21–23 cm tall. The intermediate project includes triangular ears, a white-tipped tail and a removable crossbody bag. Broad feet keep the finished fox upright without wire.
The Design: What Makes This Fox Different
The head reaches a 42-stitch plateau so the large eyes, white muzzle and layered cheek ruff remain distinct. Triangular ears are worked flat and attached near the crown, leaving a narrow orange section between their inner edges. Separate white cheek panels widen the lower face and reproduce the characteristic fox outline without complicated in-round color changes. The standing body is narrower than the head, while long legs give the blue sweater a clear lower edge. This dressed fox crochet pattern also includes a cream crossbody bag placed above one hip. Its strap crosses the sweater without pulling the neck sideways. A common error in a standing fox amigurumi is attaching the legs directly beneath the body center. That narrow placement reduces stability and leaves no visual separation between the feet.
Project Info at a Glance
| Skill Level | Time | Finished Size | Hook | Best For |
|---|---|---|---|---|
| Intermediate | 11–14 hours | Approximately 21–23 cm | 3.5 mm | Woodland displays, dressed-animal sets and market stock |
Materials and Tools
Yarn
- Coral orange — worsted or aran — approximately 85 g — used for the head, ears, body, arms, legs and tail
- White — worsted or aran — approximately 30 g — used for the muzzle, cheeks, inner ears, chest and tail tip
- Pale blue — worsted yarn — approximately 50 g — used for the sweater and sleeves
- Cream — worsted yarn — approximately 25 g — used for the bag and strap
- Black — embroidery yarn — approximately 2 g — used for the mouth, eyebrows and eyelashes
Tools
- 3.5 mm crochet hook
- 15 mm safety eyes
- 13–14 mm safety nose
- Polyester stuffing, approximately 65–80 g
- Yarn needle
- Locking stitch markers
- Dressmaking pins
- Scissors
- Pet slicker brush for the optional brushed finish
Abbreviations
- MR — magic ring
- sc — single crochet
- inc — two single crochets in one stitch
- dec — invisible decrease over two stitches
- sl st — slip stitch
- ch — chain
- hdc — half double crochet
- dc — double crochet
- BLO — back loop only
- FLO — front loop only
Work an invisible decrease through the front loops of the next two stitches before completing one single crochet through both loops.
Pattern — Step by Step
Work stuffed pieces in continuous spirals unless joined rounds or rows are stated. Mark the first completed stitch of every round.
Head
Yarn: coral orange — standard six-stitch amigurumi shaping.
R1: 6 sc in MR (6)
R2: inc ×6 (12)
R3: (sc, inc) ×6 (18)
R4: (2 sc, inc) ×6 (24)
R5: (3 sc, inc) ×6 (30)
R6: (4 sc, inc) ×6 (36)
R7: (5 sc, inc) ×6 (42)
R8–R15: sc around (42)
R16: (5 sc, dec) ×6 (36)
R17: sc around (36)
R18: (4 sc, dec) ×6 (30)
R19: sc around (30)
R20: (3 sc, dec) ×6 (24)
R21: (2 sc, dec) ×6 (18)
R22: (sc, dec) ×6 (12)
R23: dec ×6 (6)
R24: close through the front loops (6)
Insert the eyes between R12 and R13 with eight visible stitches between the posts. Fit both washers before R20. Stuff firmly after R18.
Fasten off. Leave a 30 cm tail.
Body
Yarn: coral orange — standard six-stitch shaping.
R1: 6 sc in MR (6)
R2: inc ×6 (12)
R3: (sc, inc) ×6 (18)
R4: (2 sc, inc) ×6 (24)
R5: (3 sc, inc) ×6 (30)
R6: (4 sc, inc) ×6 (36)
R7–R14: sc around (36)
R15: (4 sc, dec) ×6 (30)
R16–R18: sc around (30)
R19: (3 sc, dec) ×6 (24)
R20–R21: sc around (24)
R22: (2 sc, dec) ×6 (18)
R23: sc around (18)
Fill the lower body firmly. Keep the final 2 cm level and moderately stuffed.
Fasten off. Leave a 35 cm tail.
Arms (Make 2)
Yarn: coral orange.
R1: 6 sc in MR (6)
R2: inc ×6 (12)
R3–R5: sc around (12)
R6: (2 sc, dec) ×3 (9)
R7–R12: sc around (9)
R13: (sc, dec) ×3 (6)
Stuff through R6 only. Leave the upper section flexible for the sweater sleeves.
Flatten and work 3 sc through both layers. Leave a 25 cm tail.
Legs (Make 2)
Yarn: coral orange — standing-foot construction.
R1: 6 sc in MR (6)
R2: inc ×6 (12)
R3: (sc, inc) ×6 (18)
R4–R6: sc around (18)
R7: (sc, dec) ×6 (12)
R8–R14: sc around (12)
R15: dec ×6 (6)
Stuff the feet firmly through R7. Use moderate filling in the remaining rounds.
Fasten off. Leave a 30 cm tail.
Outer Ears (Make 2)
Yarn: coral orange — worked in rows.
Row 1: ch 2, 2 sc in second ch from hook (2)
Row 2: ch 1, turn, inc ×2 (4)
Row 3: ch 1, turn, inc, 2 sc, inc (6)
Row 4: ch 1, turn, inc, 4 sc, inc (8)
Row 5: ch 1, turn, inc, 6 sc, inc (10)
Row 6: ch 1, turn, inc, 8 sc, inc (12)
Row 7: ch 1, turn, sc across (12)
Fasten off. Leave a 25 cm tail.
Inner Ears (Make 2)
Yarn: white — worked in rows.
Row 1: ch 2, 2 sc in second ch from hook (2)
Row 2: ch 1, turn, inc ×2 (4)
Row 3: ch 1, turn, inc, 2 sc, inc (6)
Row 4: ch 1, turn, inc, 4 sc, inc (8)
Row 5: ch 1, turn, sc across (8)
Sew each white triangle to an orange ear, leaving a 4 mm orange border.
Fasten off. Leave a 20 cm tail.
Muzzle
Yarn: white — shallow oval.
R1: 6 sc in MR (6)
R2: inc ×6 (12)
R3: (sc, inc) ×6 (18)
R4: (2 sc, inc) ×6 (24)
R5: sc around (24)
R6: (2 sc, dec) ×6 (18)
Add a small amount of filling. Fit the safety nose through the upper center before sewing.
Fasten off. Leave a 30 cm tail.
White Cheek Ruffs (Make 2)
Yarn: white — scalloped circles.
R1: 6 sc in MR (6)
R2: inc ×6 (12)
R3: (sc, inc) ×6 (18)
R4: repeat (sl st, 3 dc in next stitch) ×9 (36 worked stitches)
Place three scallops along each outer cheek and tuck the inner edge beneath the muzzle.
Fasten off. Leave a 22 cm tail.
White Chest Patch
Yarn: white — flat oval.
R1: 6 sc in MR (6)
R2: inc ×6 (12)
R3: (sc, inc) ×6 (18)
R4: (2 sc, inc) ×6 (24)
Flatten into a vertical oval. Attach before dressing the body.
Fasten off. Leave a 25 cm tail.
White-Tipped Tail
Yarn: white and coral orange — tapered tube.
R1: with white, 6 sc in MR (6)
R2: inc ×6 (12)
R3: (sc, inc) ×6 (18)
R4–R7: sc around (18)
R8: change to coral orange, sc around (18)
R9–R15: sc around (18)
R16: (4 sc, dec) ×3 (15)
R17–R20: sc around (15)
R21: (3 sc, dec) ×3 (12)
R22–R23: sc around (12)
R24: (2 sc, dec) ×3 (9)
Stuff the broad end firmly and the attachment half lightly. Curve the tail upward while filling.
Fasten off. Leave a 35 cm tail.
Blue Sweater Body
Yarn: pale blue — joined rounds.
R1: ch 37, join without twisting; ch 2, 36 hdc around, join (36)
R2–R5: ch 2, hdc around, join (36)
R6: (4 hdc, hdc dec) ×6, join (30)
R7–R10: hdc around, join (30)
R11: 5 hdc, ch 6, skip 5, 10 hdc, ch 6, skip 5, 5 hdc (32 including chains)
R12: hdc in every stitch and chain (32)
R13: (6 hdc, hdc dec) ×4 (28)
R14–R16: hdc around (28)
R17: BLO sc around (28)
R18: sc around (28)
Test the sweater on the body after R10. Keep both armholes directly opposite each other.
Fasten off. Weave in the tails.
Sweater Sleeves (Make 2)
Yarn: pale blue.
R1: join at an armhole, work 12 hdc evenly around, join (12)
R2–R5: hdc around, join (12)
R6: BLO sc around, join (12)
The orange paw should extend approximately 2 cm beyond the cuff.
Fasten off. Weave in the tails.
Crossbody Bag Panels (Make 2)
Yarn: cream — worked in rows.
Row 1: ch 11, sc in second ch from hook and across (10)
Row 2–Row 10: ch 1, turn, sc across (10)
Row 11: ch 1, turn, dec, 6 sc, dec (8)
Row 12: ch 1, turn, sc across (8)
Fasten off the first panel. Leave a 30 cm tail on the second.
Bag Gusset
Ch 4. Work 3 sc across for 30 rows. Pin the strip around the sides and lower edge of one panel, then sew the second panel to the remaining edge. Add a small amount of stuffing before closing.
Bag Strap
Ch 61. Beginning in the second chain, sl st in every chain across (60). The finished strap should measure approximately 38–40 cm.
Assembly
- Sew the head centrally to the body’s 18-stitch opening, adding a final layer of stuffing before closing the seam.
- Attach the cheek ruffs between head R11 and R18, keeping a narrow orange section visible beneath each eye.
- Center the muzzle over the inner cheek edges, then embroider one vertical mouth line and two 8 mm curves.
- Pin the ears between head R4 and R8 with approximately eight crown stitches between their inner corners.
- Sew the white chest patch across the upper front body before pulling on the sweater.
- Dress the body and align the sleeve openings, then attach the arms through the sweater at body R18.
- Sew the legs across body R3 to R9, testing both feet on a flat surface before completing the second seam.
- Attach the tail at the center back between body R7 and R13, curving its white tip toward one side.
- Place the bag strap over one shoulder and position the bag above the opposite hip. Tack the strap to the sweater at the shoulder.
- Add three eyelashes outside each eye, brush the orange and white surfaces lightly and bury every remaining tail through at least 5 cm of stuffing.
The completed fox should stand on both feet without support from its tail, sweater or bag.
7 Technical Tips
- Off-center muzzle: A shift of two stitches changes the width of both cheek ruffs. Mark the vertical center from the midpoint between the eyes to head R18 before pinning.
- Weak neck: Compression greater than 6 mm lets the large head lean over the sweater. Add small pieces of stuffing around the neck perimeter before completing the seam.
- Visible decrease holes: Standard decreases may expose filling through brushed yarn. Work through front loops only and change to a 3.25 mm hook when a gap exceeds 2 mm.
- Late eye installation: Fifteen-millimetre washers are difficult to fit after the head opening drops below 24 stitches. Attach both eyes before head R20.
- Overbrushed fabric: More than six passes in one area can weaken the stitch surface. Brush lightly in the direction of the fur and stop when the loops remain identifiable.
- Uneven feet: A 4 mm height difference makes the fox lean. Pin both legs, stand the body on a hard surface and compare their magic-ring centers before sewing.
- Twisted bag strap: A half-turn makes the strap lift away from the sweater. Lay the strap flat across the chest and tack it at two points before attaching the bag.
Conclusion
Check the ear and cheek positions before brushing the finished fox. The white ruffs should widen below the eyes, while the inner-ear triangles need an even orange border on all three sides. Crochet one leg next and record its stuffed height from the magic ring to the final round; use that measurement when shaping the second leg. Save this fox amigurumi crochet pattern with sweater to a Pinterest woodland-doll board, then share the finished figure on Instagram using #SweaterFoxPattern. Include the yarn weight, hook size and final standing height in the caption. Did you position the cream bag over the fox’s left hip or reverse the strap direction?









