Introduction
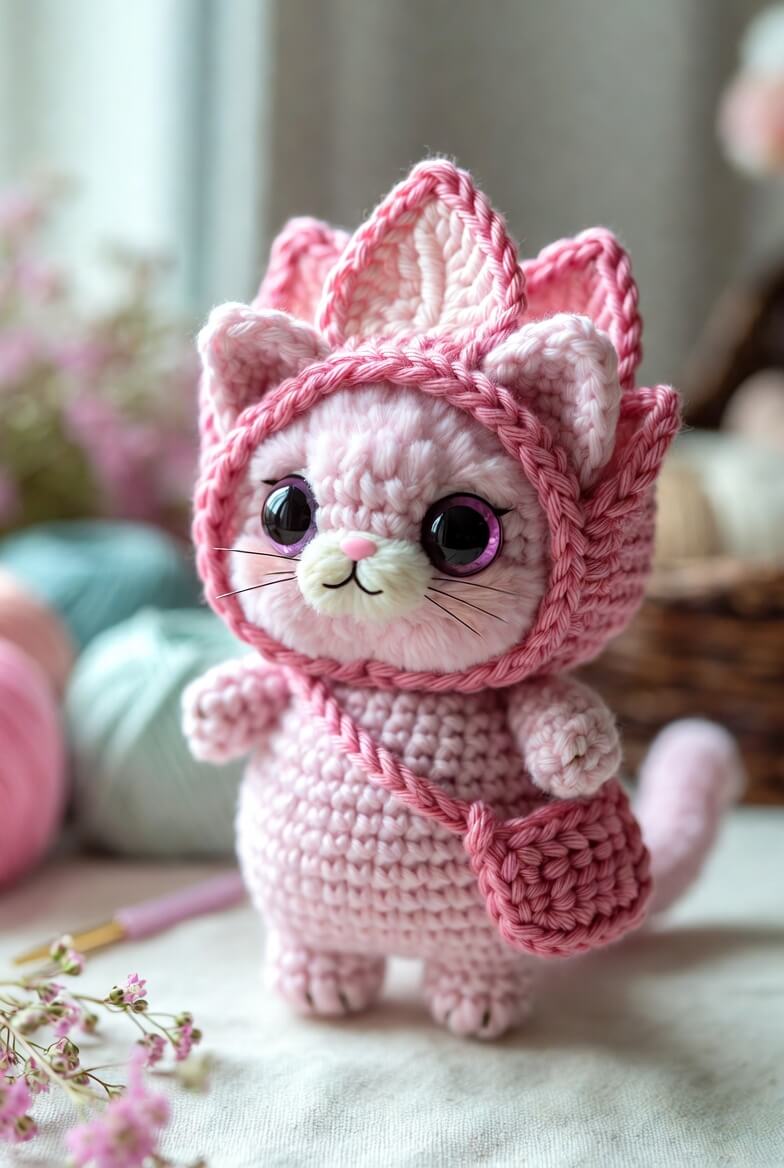
A cat’s ears must pass through a flower hood without collapsing its petal ring. This flower hood cat amigurumi pattern solves that structure with a 36-stitch head, seven individually shaped petals and reinforced ear openings. You will use DK yarn, a 3.5 mm hook and 18 mm eyes to make an approximately 18 cm kitten. The intermediate project works well as a display figure because its broad feet and compact body stand without internal wire.
The Design: What Makes Petal the Cat Different
Petal uses a separate head and body so the neck seam can support the weight of the flower hood. A one-piece form would place too much movement beneath the large head. Her hood begins with a fitted facial band, followed by seven pointed panels that overlap around the crown. That arrangement keeps the petals upright while leaving two controlled openings for the ears. The body reaches a 36-stitch plateau, matching the head’s maximum count and creating the square, compact proportions visible in the reference. Broad back legs move the center of gravity toward the base. A frequent error in a crochet flower cat pattern is attaching the hood before finishing the face; this blocks access to the eye washers and embroidery. Complete the facial work first. The same order also improves alignment in this hooded cat crochet pattern.
Project Info at a Glance
| Skill Level | Time | Finished Size | Hook | Best For |
|---|---|---|---|---|
| Intermediate | 8–11 hours | Approximately 18 cm | 3.5 mm | Display, photography and gifting |
The size and hook pairing follow comparable 18 cm DK cat specifications published at Etsy. Finished measurements will change with yarn thickness, hook size and individual tension.
Materials and Tools
Yarn
- Pale blush pink — DK/light-worsted — approximately 60 g — Scheepjes Stone Washed, YarnArt Jeans or a similar cotton-acrylic yarn.
- Rose pink — DK/light-worsted — approximately 27 g — use the same yarn line for the hood, edging, strap and bag.
- Cream — DK/light-worsted — approximately 5 g — required for the muzzle.
- Soft pink — DK or embroidery yarn — less than 1 g — required for the nose.
- Black embroidery thread — a small amount — required for the mouth, eyelashes and optional whiskers.
The 60 g main-color and 27 g accent-color amounts are based on the published material quantities for a comparable 17 cm cat at DIY Fluffies.
Tools
- 3.5 mm crochet hook
- Two 18 mm safety eyes, preferably lavender glitter eyes with black pupils
- Polyester stuffing, approximately 35–45 g
- Yarn needle with a blunt tip
- Locking stitch markers
- Straight pins
- Scissors
- Optional nylon whisker filament; omit it when the figure may be handled by a young child
Plastic safety eyes are not considered suitable for children under three. Embroidered eyes are the safer substitute for a nursery toy.
Abbreviations
- MR — magic ring
- sc — single crochet
- inc — two single crochet in one stitch
- dec — single crochet two stitches together
- sl st — slip stitch
- ch — chain
- BLO — back loop only
- FLO — front loop only
- hdc — half double crochet
For an invisible decrease, insert the hook through the front loops of the next two stitches, yarn over and complete one single crochet through both loops.
Pattern — Step by Step
Work all stuffed components in a continuous spiral unless a section states otherwise. Mark the first stitch of every round and move the marker upward after each completed round.
Head
Yarn: pale blush pink — original shaping based on standard six-stitch amigurumi expansion.
R1: 6 sc in MR (6)
R2: inc ×6 (12)
R3: (sc, inc) ×6 (18)
R4: (2 sc, inc) ×6 (24)
R5: (3 sc, inc) ×6 (30)
R6: (4 sc, inc) ×6 (36)
R7–R12: sc around (36)
R13: (4 sc, dec) ×6 (30)
R14: (3 sc, dec) ×6 (24)
Install the 18 mm eyes between R9 and R10, leaving six visible stitches between their inner edges. Add washers before further decreasing. Begin stuffing, pushing small pieces toward the upper sides rather than placing one dense ball in the center.
R15: (2 sc, dec) ×6 (18)
R16: (sc, dec) ×6 (12)
R17: dec ×6 (6)
R18: dec ×3 (3)
Fasten off. Leave a 20 cm tail and close the final opening.
Body
Yarn: pale blush pink — original shaping based on standard amigurumi math.
R1: 6 sc in MR (6)
R2: inc ×6 (12)
R3: (sc, inc) ×6 (18)
R4: (2 sc, inc) ×6 (24)
R5: (3 sc, inc) ×6 (30)
R6: (4 sc, inc) ×6 (36)
R7–R12: sc around (36)
R13: (4 sc, dec) ×6 (30)
R14–R16: sc around (30)
R17: (3 sc, dec) ×6 (24)
R18: (2 sc, dec) ×6 (18)
Stuff the lower third firmly so the body resists compression. Keep the shoulder area slightly softer for a clean head seam.
R19: (sc, dec) ×6 (12)
R20: dec ×6 (6)
Fasten off. Leave a 25 cm tail for attaching the head.
Arms (Make 2)
Yarn: pale blush pink — original limb construction.
R1: 6 sc in MR (6)
R2: inc ×6 (12)
R3–R4: sc around (12)
R5: (sc, dec) ×4 (8)
R6–R9: sc around (8)
R10: dec ×4 (4)
Stuff only the rounded paw section. Leave the upper arm flat so it lies close to the body.
Fasten off. Leave a 20 cm tail on each arm.
Back Legs (Make 2)
Yarn: pale blush pink — original standing-foot construction.
R1: 6 sc in MR (6)
R2: inc ×6 (12)
R3: (sc, inc) ×6 (18)
R4: BLO sc around (18)
R5–R6: sc around (18)
R7: (sc, dec) ×6 (12)
R8–R10: sc around (12)
R11: dec ×6 (6)
Fill the foot firmly and the ankle moderately. Flatten the top edge before sewing.
Fasten off. Leave a 25 cm tail on each leg.
Outer Ears (Make 2)
Yarn: pale blush pink — the increasing triangle forms the cat-ear silhouette.
R1: 6 sc in MR (6)
R2: (2 sc, inc) ×2 (8)
R3: (3 sc, inc) ×2 (10)
R4: (4 sc, inc) ×2 (12)
R5: (5 sc, inc) ×2 (14)
R6: sc around (14)
Fasten off. Leave a 20 cm tail and flatten each ear without stuffing.
Inner Ears (Make 2)
Yarn: rose pink — worked flat in rows.
Row 1: ch 7, sc in second ch from hook and across (6)
Row 2: ch 1, turn, dec, 2 sc, dec (4)
Row 3: ch 1, turn, dec ×2 (2)
Row 4: ch 1, turn, dec (1)
Fasten off. Leave a 15 cm tail. Sew one inner triangle to the front of each outer ear, keeping a one-stitch pale-pink border visible.
Muzzle
Yarn: cream — original oval muzzle construction.
R1: ch 5; starting in second ch, 3 sc, 3 sc in final ch, work along the opposite side with 2 sc, inc (10)
R2: inc, 2 sc, inc ×3, 2 sc, inc ×2 (16)
R3: sc around (16)
Add a thin layer of stuffing beneath the center before completing the seam.
Fasten off. Leave a 20 cm tail.
Cheek Patches (Make 2)
Yarn: pale blush pink or a slightly lighter pink — flat circles.
R1: 6 sc in MR (6)
R2: inc ×6 (12)
Join with a sl st. Fasten off and leave a 15 cm tail. These circles should remain flat and unstuffed.
Tail
Yarn: pale blush pink — flexible narrow spiral.
R1: 6 sc in MR (6)
R2: inc ×6 (12)
R3–R5: sc around (12)
R6: (sc, dec) ×4 (8)
R7–R18: sc around (8)
R19: dec ×4 (4)
Stuff the first six rounds firmly, then add only a thin line of stuffing through the remaining length. Bend the tail upward before attachment.
Fasten off. Leave a 25 cm tail.
Hood Face Band
Yarn: rose pink — measure the chain against the completed head before joining.
Foundation: ch 50, taking care not to twist; join with sl st (50)
R1: ch 1, sc around, join with sl st (50)
R2: ch 1, sc around, join with sl st (50)
R3: ch 1, BLO sc around, join with sl st (50)
R4: ch 1, sc around, join with sl st (50)
The ring should frame the face without covering the outer edges of the eyes. Add or remove chains in pairs when your gauge differs.
Fasten off. Leave a 25 cm tail.
Hood Petals (Make 7)
Yarn: pale blush pink with rose edging — each petal is worked flat.
Row 1: ch 11, sc in second ch from hook and across (10)
Row 2: ch 1, turn, sc across (10)
Row 3: ch 1, turn, dec, 6 sc, dec (8)
Row 4: ch 1, turn, sc across (8)
Row 5: ch 1, turn, dec, 4 sc, dec (6)
Row 6: ch 1, turn, sc across (6)
Row 7: ch 1, turn, dec, 2 sc, dec (4)
Row 8: ch 1, turn, dec ×2 (2)
Row 9: ch 1, turn, dec (1)
Fasten off pale pink. Join rose yarn at one lower corner, work sc evenly up the side, place 3 sc in the tip, then sc down the opposite side. Fasten off and leave a 20 cm sewing tail.
Seven petals create the layered crown shown in the photograph. Position two petals behind the ears, two beside the ears, two beside the lower face and one at the top center. Slight overlaps prevent visible gaps.
Crossbody Bag
Yarn: rose pink — make two flat circles.
R1: 6 sc in MR (6)
R2: inc ×6 (12)
R3: (sc, inc) ×6 (18)
R4: (2 sc, inc) ×6 (24)
Fasten off the first circle. Do not cut the yarn after completing the second circle. Hold both circles together and sc through both layers around 18 stitches. Add a small amount of stuffing, then sc through the remaining six stitch pairs. Join with a sl st.
Fasten off. Leave a 20 cm tail for attaching the strap.
Bag Strap
Yarn: rose pink — the strap length is fitted during assembly.
Row 1: ch 47, hdc in second ch from hook and across (46)
Row 2: ch 1, turn, sl st loosely across (46)
Fasten off. Leave a 20 cm tail at each end. The finished strap should pass from one shoulder to the opposite hip without pulling the body out of shape.
Assembly
- Pin the head to the body with the facial center aligned above the midpoint between the legs. Sew around the neck twice with small whipstitches.
- Position the muzzle below the eyes, covering approximately R10–R13 of the head. Add its final stuffing before closing the seam.
- Embroider a small triangular nose at the top center of the muzzle. Add one vertical stitch and two curved mouth lines beneath it.
- Sew the cheek patches beside the lower outer edges of the muzzle. Keep both circles on the same round.
- Attach the outer ears between R3 and R7 of the head. Angle the tips slightly outward and stitch both the front and back edges to limit movement.
- Pin the back legs beneath the lower body with approximately six stitches between them. Test the standing position before sewing each leg around its full upper edge.
- Attach the arms at the shoulder line, approximately R14–R16 of the body. Angle the arm on the bag side slightly forward.
- Sew the tail to the lower back across R7–R10. Add two hidden anchoring stitches higher on the body to hold the upward curve.
- Place the hood band around the face, then sew the seven petals to its outer edge with small overlaps. Pass the ears between the upper petals and tack the hood behind each ear.
- Lay the strap diagonally across the torso and sew its ends to the bag. Tack the strap at one shoulder and the bag at the opposite hip.
The completed figure should stand on both back feet with the tail clear of the supporting surface.
7 Technical Tips
- Stitch-marker drift: A missing marker can shift facial placement by three or more stitches over six rounds. Recount each 36-stitch head round before moving to the next one.
- Uneven stuffing: One dense clump behind an eye can tilt the safety-eye post. Add stuffing in pieces no larger than 2 cm and distribute them around both washers.
- Visible decrease bars: Standard decreases create horizontal ridges across the lower head. Work every head and body decrease through the front loops only.
- Late eye placement: Installing washers after R14 leaves an opening of only 24 stitches and restricts hand access. Fit both eyes immediately after completing R14.
- Loose hood tension: A face band more than 1 cm larger than the head circumference will slide over the eyes. Test the foundation chain before joining and alter it in two-chain increments.
- Asymmetric pinning: A 5 mm difference between leg positions can make the kitten lean. Measure from the body’s round marker to each inner leg edge before sewing.
- Escaping yarn tails: A tail woven through fewer than four directional changes may pull free when the hood is adjusted. Pass each tail through at least 3 cm of fabric, reverse direction and bury it again.
Conclusion
Check the finished kitten from the front, side and back before trimming the final yarn tails. The hood’s center petal should align with the nose, both ear tips should remain visible, and the bag should rest above the lower edge of the body. Your next step is to record the final height, eye spacing and hood-chain count so a second version can be reproduced at the same scale. Pin the finished flower hood cat amigurumi pattern to your crochet board and share a front-view photograph on Instagram with #PetalFlowerHoodCat. Which petal arrangement worked better around your kitten’s ears: equal spacing or a deeper overlap behind the crown?









