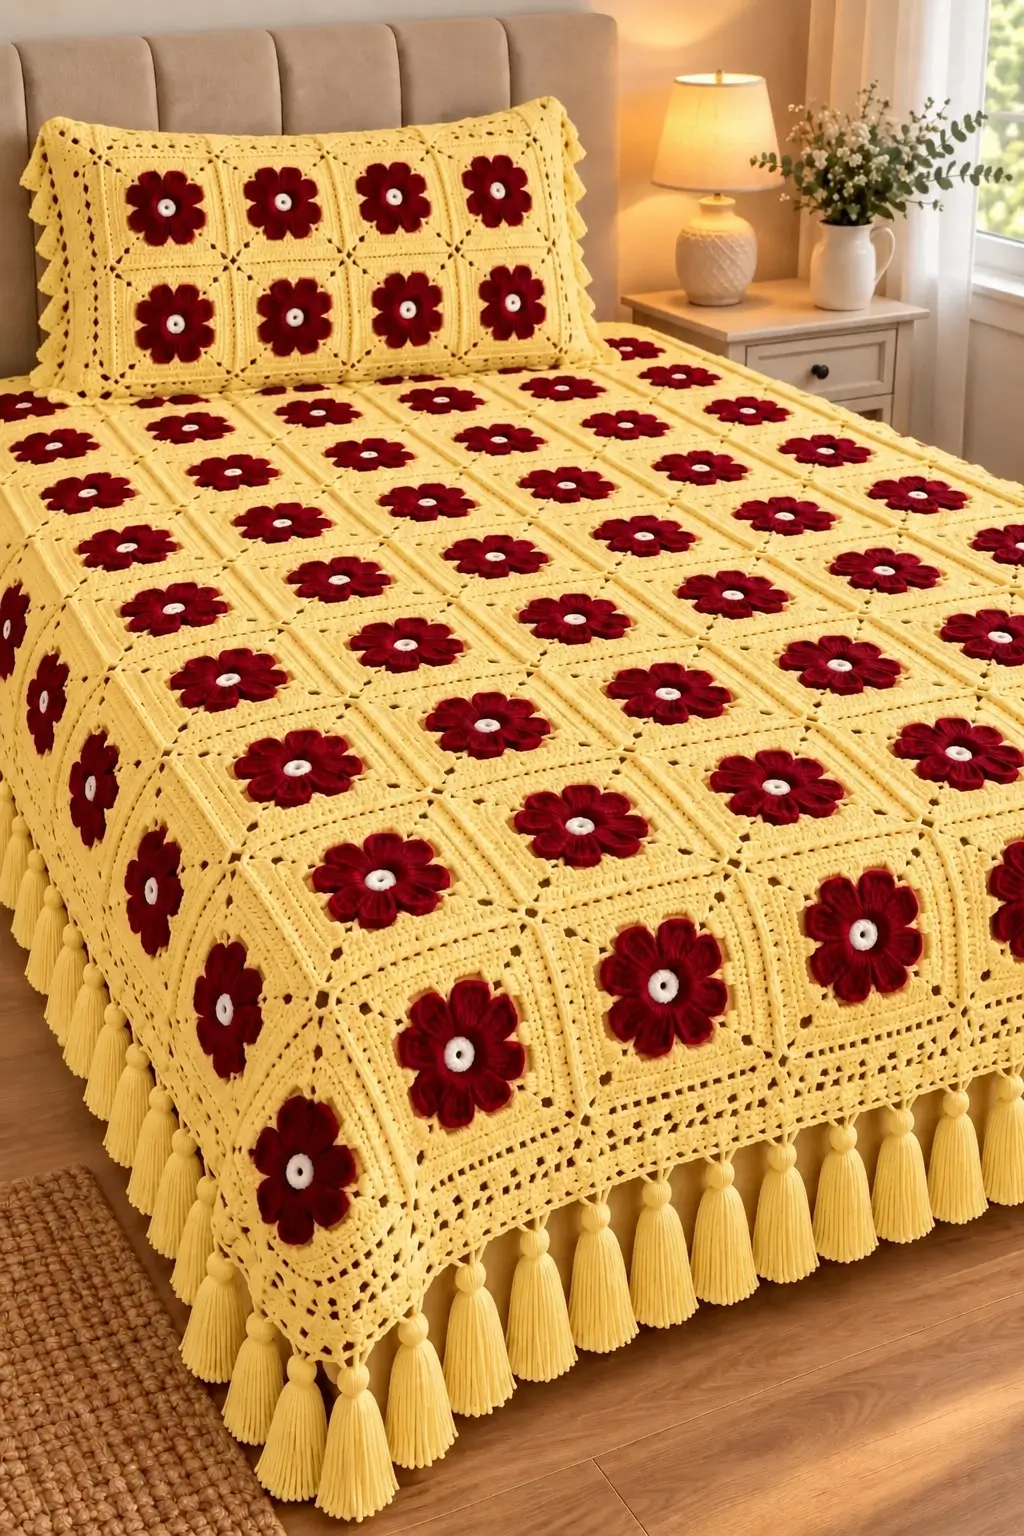
Eight burgundy petals have to rise cleanly from every yellow square without collapsing into the openwork frame. This flower granny square blanket uses dimensional flowers, contrasting white centers, modular squares and a tassel border to reproduce that structure. Plan on DK yarn, a 4.5 mm hook and intermediate crochet skills. Because every motif is separate, damaged or stained squares can also be repaired individually.
The Design: What Makes This Flower Blanket Different
Three structural choices define the design. First, the burgundy flower is raised above the yellow ground instead of being worked as flat color changes. That separation keeps all eight petals visible after joining. Second, the yellow frame changes from a circular center into a square through four deliberately enlarged corners, producing the geometric grid seen across the bed.
The third decision concerns proportion. The flower occupies roughly half the visible width of each motif rather than filling the entire block. That leaves enough yellow space for the raised flower granny square to read as a flower inside a frame.
A frequent mistake in a 3D flower crochet square is adding increasingly tall stitches without controlling the petal bases. The petals then twist or overlap. Narrow bases and broader outer edges give this version a clearer radial arrangement.
Project Info at a Glance
| Skill Level | Time | Finished Size | Hook | Best For |
|---|---|---|---|---|
| Intermediate | Modular; depends on bed size and motif count | Size to mattress; 106 × 136 cm is a published DK reference size | 4.5 mm | Throws, bedspreads and pillow shams |
The 106 × 136 cm measurement and 4.5 mm/DK pairing come from a published flower-square blanket rather than measurements inferred from the photograph.
Materials and Tools
Yarn
For a photo-inspired version, use a smooth DK #3 yarn throughout. DK yarn paired with a 4.5 mm hook provides enough definition for the raised petals while keeping the square flexible.
- Butter yellow — DK #3 — begin with approximately 800 g for a throw and purchase more for a bedspread.
- Deep burgundy — DK #3 — quantity depends on the number and fullness of the flowers.
- White — DK #3 — a small quantity for the circular flower centers.
- Butter yellow fringe yarn — use the same yarn as the background to keep the border visually continuous.
Do not treat 800 g as a guaranteed bedspread requirement. A bed-sized version can require substantially more yarn depending on motif dimensions, border depth and tassel density.
Tools
- 4.5 mm crochet hook
- Yarn needle
- Sharp scissors
- Locking stitch markers
- Tape measure
- Blocking mats
- Rust-resistant blocking pins
- Kitchen scale for calculating yarn per motif
- Cardboard tassel template, approximately 15–18 cm long
Abbreviations
- MR — magic ring
- ch — chain
- sc — single crochet
- hdc — half double crochet
- dc — double crochet
- tr — treble crochet
- sl st — slip stitch
- st/sts — stitch/stitches
- sp — space
- rep — repeat
- yo — yarn over
An invisible decrease belongs to three-dimensional amigurumi shaping and is not required for this flat modular blanket.
Flower Granny Square Blanket Pattern
The following motif is an original construction developed from the visible features of the reference blanket. Make one complete sample square before calculating the number required for your bedspread.
White Flower Center
Make one for every granny square. Use white DK yarn.
R1: Make an MR, ch 1 and work 8 sc into the ring. Join with sl st to the first sc. (8)
Pull the magic ring firmly closed.
R2: Ch 1, sc in each st around. Join with sl st. (8)
Fasten off, leaving approximately a 12 cm tail.
The white disc should remain compact. It forms the contrasting center inside each burgundy flower.
Burgundy Raised Flower
Make one for every square. Use deep burgundy DK yarn.
Join the burgundy yarn to any stitch of the white center.
R1: Ch 1. Work 2 sc in each white-center stitch around. Join with sl st. (16)
Each petal uses two foundation stitches.
Petal 1: Ch 3. Work 2 tr in the same stitch, 3 tr in the next stitch, ch 3, then sl st into the same second stitch.
Repeat the petal sequence around the remaining seven pairs of stitches. You should have 8 raised petals.
For a rounder petal, keep the five treble stitches relaxed while holding the beginning and ending chains slightly firmer. This creates a broader outer edge and a narrower attachment point.
Fasten off and leave approximately a 15 cm tail.
Arrange all eight petals evenly before starting the yellow foundation. No petal should remain permanently folded underneath its neighbor.
Yellow Foundation Around the Flower
Use butter yellow DK yarn.
The yellow foundation sits behind the burgundy petals so the dimensional flower remains prominent.
Join the yellow yarn to the back of the burgundy foundation round between two petals.
R1: Ch 3, work 2 dc into the same attachment area, ch 1. Work 3 dc behind the next petal, ch 1. Repeat around. Join with sl st to the top of the beginning ch 3. You should have 8 groups of 3 dc.
R2: Sl st to the first ch-1 sp. Ch 3, 2 dc in the same sp, ch 1. Work 3 dc in each remaining ch-1 sp, placing ch 1 between groups. Join. You should again have 8 groups.
The result is an approximately octagonal foundation positioned behind the flower.
Squaring the Flower Motif
Continue with butter yellow yarn.
Four defined corners now convert the flower foundation into a square.
R3: Sl st to the next ch-1 sp. Ch 3, 2 dc, ch 2, 3 dc in the same space to form the first corner. Ch 1, then work 3 dc in the next sp, ch 1.
In the following space, work (3 dc, ch 2, 3 dc) to create the second corner.
Continue this sequence around the motif, placing one ordinary 3-dc group between each pair of corners. Join with sl st. You should have four clearly defined corners.
Place the motif on a flat surface. The four corners should sit at approximately 90-degree intervals.
Openwork Square Frame
Continue with butter yellow yarn.
R4: Sl st into the corner ch-2 sp. Ch 3, 2 dc, ch 2, 3 dc in the same corner. Ch 2, work 3 dc in each side space and place ch 2 between groups. In each corner work (3 dc, ch 2, 3 dc). Join.
R5: Repeat R4, working one 3-dc group in every ch-2 side space and (3 dc, ch 2, 3 dc) in each corner.
R6: Ch 1, sc in each dc and work 2 sc in each side chain space. In every corner ch-2 sp work (2 sc, ch 2, 2 sc). Join with sl st.
Fasten off and leave approximately a 20 cm tail.
Measure the square without stretching it. Block every subsequent motif to exactly the same dimensions.
Joining the Granny Squares
Use butter yellow DK yarn.
Lay the blocked squares in the intended grid with every raised flower facing upward. The design works best with an aligned grid rather than an offset arrangement.
Hold two motifs with their wrong sides together.
Join yellow yarn through the corresponding corner spaces.
Joining Row: Ch 1 and sc through the corresponding edge stitches of both squares. At the next corner, sc through both corner spaces.
Fasten off.
Join individual motifs into complete horizontal strips first. Connect those strips with longer vertical seams afterward. This approach makes it easier to keep a large blanket square.
For a flatter join, hold the right sides together during joining so the small seam ridge remains on the back.
Main Blanket Border
Use butter yellow DK yarn.
After all motifs are connected, work around the complete rectangle.
Border R1: Join yarn at any outer corner. Ch 1 and sc evenly around the entire blanket, placing 3 sc in each blanket corner. Join.
Border R2: Ch 3 and dc in every stitch around. Work 5 dc in each corner stitch. Join.
Border R3: Ch 1 and sc around, placing 3 sc in the central corner stitch. Join.
Border R4: Ch 4, skip 2 sts, sc in the next st. Repeat around. Adjust by one stitch close to a corner when necessary so the arches remain evenly distributed.
Border R5: Work 5 dc into a ch-4 arch, then sc into the next arch. Alternate these instructions around the blanket to create a shallow shell edge.
Fasten off.
The reference design has a relatively deep openwork area along its outer edge. Add extra mesh rounds before the final shell round if you want a broader border.
Yellow Tassels
Make enough tassels to maintain consistent spacing around the desired edges.
Cut a firm cardboard template approximately 15–18 cm long.
Wrap the yellow yarn around the template 25–35 times. Cut a separate 30 cm strand and knot it firmly around one end of the wrapped bundle.
Cut through the strands at the opposite end of the template.
Fold the strands downward around the top tie. Wrap another piece of yarn tightly around the tassel approximately 2 cm below the top.
Knot securely and bury the ends inside the tassel. Trim the lower edge so all strands finish at one consistent length.
Attach each tassel through sturdy border stitches rather than delicate chain arches. Dense tassels place substantially more weight on the border than ordinary fringe.
Matching Flower Granny Square Pillow
Make enough complete flower squares to cover the front of the pillow. The reference photograph appears to use two rows of four motifs across the visible pillow face, although perspective prevents an exact measurement.
Join the squares using the same method as the blanket.
For the back, crochet two overlapping rectangular panels to create an envelope closure. A second granny-square panel can also be used when the pillow will be decorative on both sides.
Work a matching yellow border around the pillow. Long tassels are best omitted from areas that will receive regular pressure.
Assembly
- Crochet one complete flower granny square before producing a full batch.
- Block the sample and record its exact finished width and height.
- Divide your target blanket dimensions by the blocked motif measurement to determine the grid.
- Make the required number of white centers, burgundy flowers and yellow square frames.
- Block every finished motif to the same recorded dimensions.
- Arrange the squares with every raised flower facing upward.
- Join individual squares into horizontal strips.
- Connect the completed strips to form the rectangular blanket.
- Work the yellow outer border, then make and attach evenly spaced tassels.
- Weave yarn tails through several stitch directions on the wrong side and trim the ends only after they are secure.
The finished blanket consists of a regular grid of raised burgundy flowers framed with yellow crochet and finished with a coordinated tassel border.
7 Technical Tips for a Cleaner Flower Blanket
- Prevent corner-marker drift. Put a locking marker into each corner before beginning the squaring round. Missing one corner space can turn an otherwise square motif into a visible trapezoid.
- Control petal overlap. Keep each burgundy petal attached to its assigned two foundation stitches. A wider base pushes adjacent petals together and reduces the yellow space surrounding the flower.
- Watch the white center. Pull the magic ring closed until the central opening is nearly invisible, but stop if the eight stitches begin buckling upward. Excess tension produces a puckered center.
- Correct blocking differences before joining. Do not connect a 14 cm motif directly beside a 15 cm motif and expect the seam to compensate. Block every square to one recorded measurement first.
- Check seam contraction. If the joining row is more than approximately 5% shorter than the relaxed square edge, the finished blanket can ripple between seams. Move up a hook size for joining when necessary.
- Reinforce tassel attachment points. Attach a 15–18 cm tassel through substantial border stitches rather than one loose chain. Dense fringe can distort weak chain arches over time.
- Hide dark yarn tails carefully. Weave burgundy tails back through burgundy stitches instead of carrying them behind the yellow openwork. Dark strands can remain visible through a pale background.
How to Size the Blanket for Your Bed
Do not choose the number of granny squares from a generic bed-size chart before making a sample motif. Your actual crochet gauge determines the finished dimensions.
Suppose one blocked flower granny square measures 15 cm. Eight motifs across create approximately 120 cm before joining allowances and the outer border. Ten motifs produce approximately 150 cm before those additions.
Measure the actual mattress width, mattress length and desired side drop. Add twice the desired drop to the mattress width. Add the required foot drop to the mattress length when the blanket will stop near the pillows.
Divide the resulting target dimensions by the blocked width and height of your sample square. Round to a whole number of motifs, then calculate the final dimensions again before starting the complete batch.
A published DK flower granny square blanket measures approximately 106 × 136 cm, while larger flower-square constructions can reach approximately 130 × 185 cm. These dimensions should be treated as comparison points rather than universal sizing rules.
How to Calculate the Yarn Quantity
Large granny square blankets require a significant amount of background yarn because the same color appears in every motif, the joining seams, the border and the tassels.
Make one complete square first. Block it and weigh it on a kitchen scale. If necessary, weigh the flower components separately to estimate the quantity needed for each color.
For example, if one finished motif consumes 22 g of yarn and the planned blanket contains 80 motifs, the motifs alone require approximately 1,760 g of yarn.
Joining yarn, the outer border, tassels and a reserve for matching dye lots must then be added to that calculation.
For the burgundy yarn, make several complete flowers and calculate their average weight. Multiply that figure by the total number of motifs. Use the same process for the white centers.
This sample-based calculation is more reliable than applying the yarn quantity from another blanket to a different bed size.
Choosing Colors for the Flower Granny Square Blanket
The reference design depends on strong contrast. Burgundy is substantially darker than the yellow background, while the small white center provides the lightest point in each motif. This contrast makes the flower shape readable even when the blanket is viewed from a distance.
You can change the palette without changing the structural pattern. Dark navy flowers can be combined with a pale cream background and gold centers. Forest green flowers can sit against ivory with pale pink centers.
Three colors of similar brightness produce a different result. Even though the petals remain physically raised, their outlines become less distinct against the surrounding square.
For a result close to the photographed design, select one pale background color, one substantially darker flower color and one small high-contrast center color.
Finishing and Blocking
Check every seam before working the final border. Large blankets amplify small joining errors, particularly where four motif corners meet.
Lay the blanket flat and inspect the outer perimeter. If one side contracts, identify the tight joining section before adding additional border rounds. A decorative border cannot reliably correct severe tension differences in the underlying grid.
Block according to the fiber manufacturer’s care instructions. Acrylic, wool and cotton react differently to moisture, heat and stretching, so the yarn label should determine the blocking method.
Arrange the raised burgundy petals while the blanket is being blocked. Keep all eight petals visible and position their tips at approximately equal intervals around the white center.
Attach the tassels after the main blocking stage. Trim them only after the blanket is hanging naturally so the lower ends can be aligned accurately.
Conclusion
Finish one sample square before purchasing yarn for the entire bedspread. Block it, measure it and weigh it; those three numbers determine the motif grid and provide a stronger yarn estimate than dimensions copied from another project. Once the grid is fixed, batch the white centers, burgundy flowers and yellow frames separately to maintain consistent tension. Photograph one completed motif beside a ruler for your project records. Save the finished flower granny square blanket to Pinterest and share your completed grid on Instagram with #BurgundyFlowerGrannyBlanket. Would you keep the white flower centers shown in this design or replace them with yellow centers for a two-color version?









