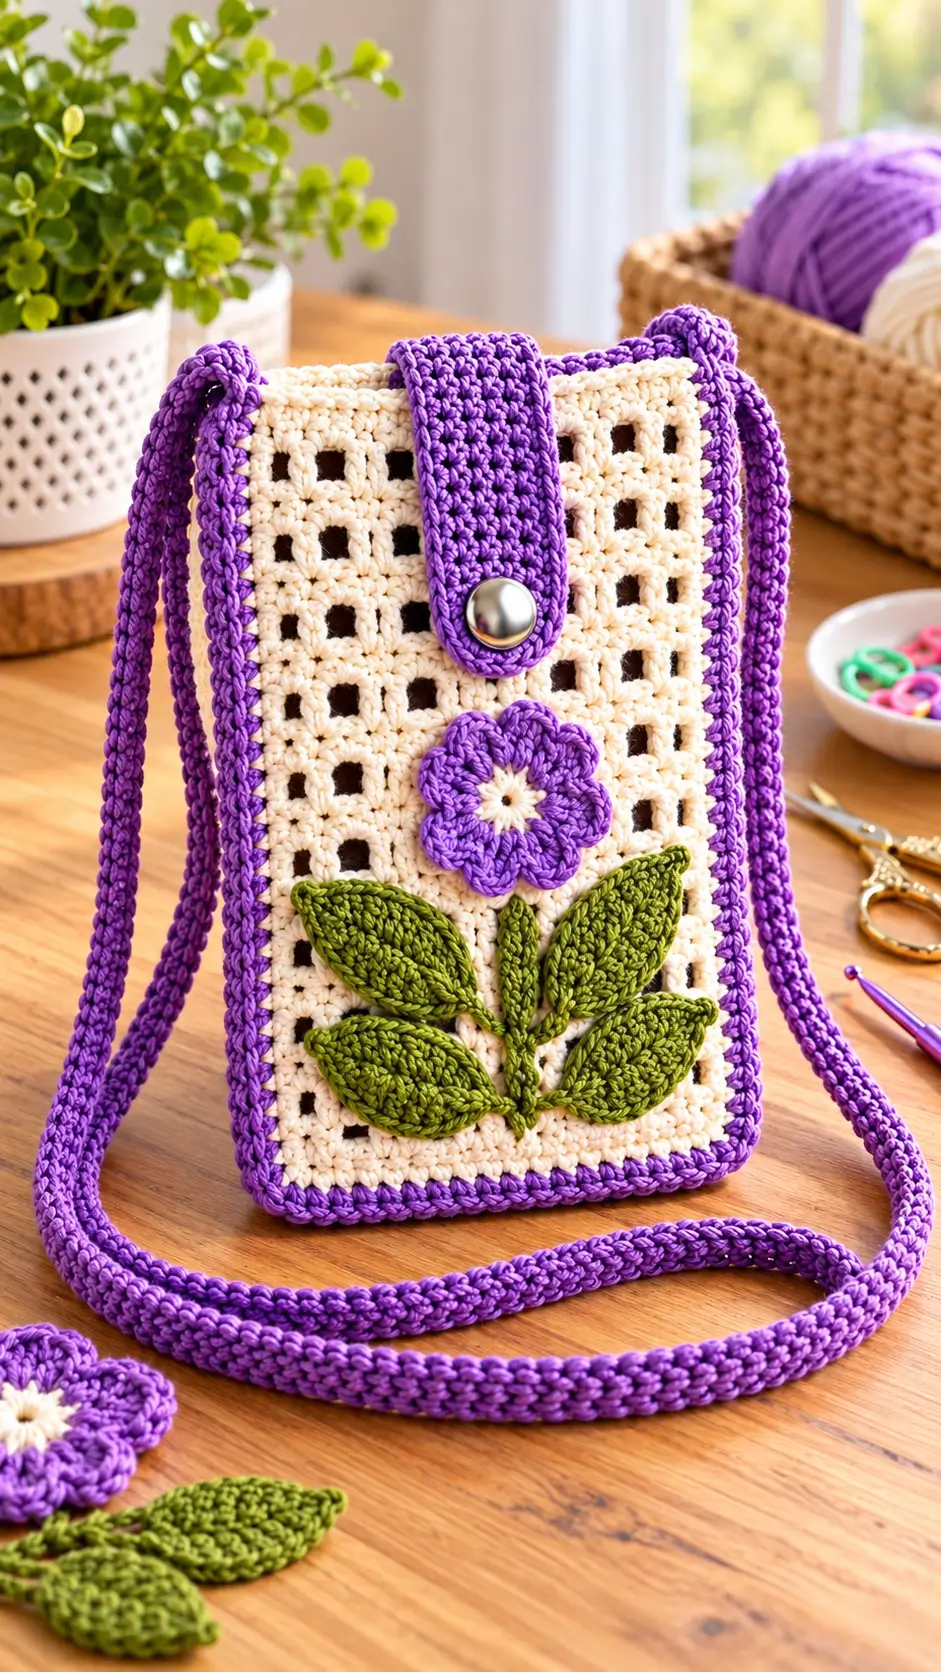
Five purple petals sitting above four olive leaves turn this otherwise geometric pouch into a distinctly floral bag. This crochet crossbody bag pattern uses worsted cotton, a 3.5 mm hook and a compact body measuring about 16 × 18 cm. It is an intermediate project built from rectangular openwork panels, edging and appliqués. The narrow format gives a phone and small essentials a dedicated hands-free carrier.
The Design: What Makes This Floral Bag Different
The body needs three different structural behaviors. Its cream lattice provides the open squares visible in the design, while the purple perimeter adds a denser edge that resists distortion. A broad center tab places the closure load over several stitches instead of pulling one lattice space out of shape.
The flower and leaves are surface components rather than colorwork. That decision keeps the floral crochet bag pattern readable and lets you position the motif after the bag has been assembled. Raised leaves also cover part of the openwork without changing the dimensions of the main panel.
A common mistake in a crochet flower purse is attaching the strap directly to open mesh. Repeated loading can enlarge those spaces. Sew the strap into the reinforced purple side edging instead.
Project Info at a Glance
| Skill Level | Time | Finished Size | Hook | Best For |
|---|---|---|---|---|
| Intermediate | 5–8 hours | Approx. 16 × 18 cm | 3.5 mm | Phone, cards and small essentials |
Final dimensions depend on yarn, gauge and blocking. Make a gauge sample before starting if an exact finished size is required.
Materials and Tools
Yarn
- Natural cream: worsted cotton, approximately 70 g
- Purple: worsted cotton, approximately 45 g
- Olive green: worsted cotton, approximately 20 g
- Cream scrap: less than 2 g for the flower center
A tightly spun cotton works particularly well because it gives the open squares, leaves and flower petals clear stitch definition.
Tools
- 3.5 mm crochet hook
- 18–22 mm sew-on magnetic snap or decorative button
- Yarn needle
- Scissors
- Locking stitch markers
- Pins
- Measuring tape
- Optional lining fabric and sewing thread
No stuffing or safety eyes are required for this project.
Abbreviations
- ch — chain
- sc — single crochet
- hdc — half double crochet
- dc — double crochet
- tr — treble crochet
- sl st — slip stitch
- st/sts — stitch/stitches
- sp — space
- ch-sp — chain space
- RS — right side
- WS — wrong side
Invisible decrease is not used because this bag is constructed from flat panels rather than shaped amigurumi rounds.
Crochet Crossbody Bag Pattern — Step by Step
This construction creates a compact rectangular crossbody bag with a cream openwork body, purple border and strap, flower appliqué and raised green leaves.
Front Panel
Yarn: natural cream.
Foundation: Ch 41.
Row 1: Sc in second ch from hook and each ch across. (40)
Row 2: Ch 1, turn. Sc across. (40)
Row 3: Ch 3, turn; dc in next st, *ch 2, skip 2 sts, dc in next 2 sts*; repeat across, adjusting the final repeat so both outer edges retain 2 solid dc.
Row 4: Ch 3, turn; dc in next dc, *ch 2, skip ch-2 sp, dc in next 2 dc* across.
Rows 5–18: Repeat Row 4.
Check the panel after Row 10. The square openings should remain rectangular and the two side edges should remain vertical.
Row 19: Ch 1, turn. Work sc evenly across the top, placing 2 sc into each ch-2 space and 1 sc into each dc. (40)
Row 20: Ch 1, turn. Sc across. (40)
Fasten off.
If your yarn produces a panel wider than approximately 16 cm, adjust the foundation in complete lattice repeats. Keep both vertical edges solid because the purple border and shoulder strap place stress on these areas.
Back Panel
Yarn: natural cream.
Repeat the Front Panel from the foundation chain through Row 20.
Place the two panels together before fastening off completely and check that their width and height match.
Fasten off.
Purple Panel Border
Yarn: purple.
Place the front and back panels with the wrong sides together.
Join purple yarn at the upper-left corner.
Sc down the first side through both layers, distributing the stitches evenly along the row ends.
Work 3 sc in the first bottom corner.
Sc across the bottom through both layers.
Work 3 sc in the second bottom corner.
Continue with sc up the opposite side through both layers.
Do not close the top of the bag.
Work a second round of sc around the joined sides and bottom to create the thicker purple frame visible around the cream body.
At each lower corner, work 3 sc into the center corner stitch.
Fasten off and weave the yarn tail through at least 4 cm of the dense border.
Top Edging
Yarn: purple.
Join purple yarn at one upper corner.
Round 1: Sc evenly around the front top edge, side junction, back top edge and opposite side junction.
Round 2: Sc in each st around.
Fasten off.
This dense upper band provides a stronger foundation for the closure and shoulder strap than the open cream lattice.
Closure Tab
Yarn: purple.
Foundation: Ch 10.
Row 1: Sc in second ch from hook and across. (9)
Rows 2–16: Ch 1, turn, sc across. (9)
Row 17: Ch 1, turn and sc across.
Continue around the short end, distributing 3 sc around the rounded end. Work evenly along the opposite long side.
Continue edging around the entire tab once. Add increases around the lower corners as required so the rounded end lies flat instead of curling inward.
Fasten off, leaving approximately 25 cm of yarn for sewing.
Position the straight end at the center of the back panel. Sew it securely through the dense purple top border rather than through an individual openwork bar.
Position an 18–22 mm magnetic snap or decorative button near the rounded end. Check its alignment against the front panel before permanently attaching both components.
Shoulder Strap
Yarn: purple.
Ch 181, or continue chaining until the foundation reaches your preferred crossbody length.
Row 1: Sc in second ch from hook and every ch across. (180)
Row 2: Ch 1, turn. Sc across. (180)
Row 3: Ch 1, turn. Sc across. (180)
Do not fasten off yet.
Ch 1 and work sc evenly around the entire strap perimeter. Add 3 sc around each end corner where required to prevent the strap from cupping.
Fasten off, leaving approximately 30 cm of yarn at each attachment end.
Pin each strap end against at least 3 cm of the reinforced purple side border. Sew around the attachment zone, then sew diagonally through the same area to distribute the load.
Five-Petal Crochet Flower
Yarn: cream and purple.
Using cream yarn, ch 4 and join with sl st to form a small ring.
Round 1: Work 10 sc into the ring. Join with sl st. (10)
Change to purple.
Round 2: *Sl st in next st, ch 2, 3 dc in next st, ch 2, sl st in next st.* Repeat around to create five petal sections.
Round 3: Work around each petal using sc, hdc, 3 dc, hdc, sc, distributing the stitches around the petal edge.
Repeat around all five petals.
Fasten off, leaving approximately 25 cm of yarn for sewing.
Shape the five petals before attaching the flower. Position it in the upper-middle section of the front panel while leaving enough space above it for the purple closure tab.
Large Crochet Leaves — Make 4
Yarn: olive green.
Ch 12.
Working down the first side of the foundation chain:
Sl st in second ch, sc in next ch, hdc in next 2 ch, dc in next 3 ch, hdc in next 2 ch, sc in next ch, then work 3 sc in the final ch.
Rotate the work and crochet along the unused loops on the opposite side of the foundation chain.
Work sc, hdc in next 2, dc in next 3, hdc in next 2, sc, sl st.
Join at the leaf tip.
For a stronger center vein, surface sl st along the original foundation chain from the base toward the leaf tip.
Fasten off, leaving a 20 cm sewing tail.
Repeat until you have four large leaves.
Small Center Leaf
Yarn: olive green.
Ch 8.
Sl st in second ch, sc in next ch, hdc in next, dc in next 2, hdc in next, then work 3 sc in the final ch.
Rotate the piece.
Work along the opposite side with hdc, dc in next 2, hdc, sc and sl st.
Fasten off, leaving approximately 15 cm for sewing.
Crochet Stem
Yarn: olive green.
Ch 22.
Starting in the second ch from the hook, work one tight sl st into every chain. (21)
Fasten off, leaving approximately 20 cm at the end for attachment.
Position the stem vertically beneath the flower. Hide its upper end beneath the lowest flower petal and finish the lower end above the purple bottom border.
Optional Fabric Lining
Cut two fabric rectangles approximately 1 cm larger than the internal dimensions of the finished crochet bag on every side.
Press the seam allowances toward the wrong side.
Sew the two lining pieces together along both sides and the bottom while leaving the top open.
Insert the lining into the crochet bag with the wrong side of the fabric facing the crochet interior.
Hand-sew the upper edge to the dense purple top border. Keep the sewing stitches away from the visible exterior surface.
A lining is particularly useful for this openwork design because keys, jewelry and other small objects can otherwise project through the square openings.
Assembly
- Block the cream front and back panels to matching dimensions before joining them.
- Place the panels wrong sides together and join both sides and the bottom with the purple border.
- Work the second reinforcing border and top edging before adding the decorative components.
- Center the purple closure tab on the back and sew it through the dense top border.
- Fit the snap or button after folding the closure tab over the bag and checking its final position.
- Pin the purple flower to the upper-middle area and sew around its center and selected petal bases.
- Position the olive stem below the flower and attach it with small matching stitches.
- Arrange four large leaves around the stem, then position the smaller center leaf.
- Sew each shoulder-strap end across a reinforced section measuring at least 3 cm and test the seams under a light load.
- Add the optional lining, weave all yarn tails into dense stitches and trim the ends only after checking every seam.
The finished crochet crossbody bag should have a flat rectangular body, an open top controlled by the center closure tab, a balanced floral motif and reinforced strap attachment points.
7 Technical Tips for a Better Crochet Crossbody Bag
- Control lattice drift. Place a stitch marker in the first and last solid stitch of every mesh row. Adding or losing one repeat can make the finished panel visibly trapezoidal.
- Watch for a ruffled border. Distribute the purple side-border stitches according to measurement rather than automatically placing one stitch into every row end. Too many stitches cause the edge to wave.
- Test strap stretch before attachment. Hang the completed strap with approximately 500 g of temporary weight before fixing the second end. Cotton stitches can lengthen after loading.
- Keep the closure away from the edge. Position the snap at least 15 mm from the rounded end of the tab. Placing it closer concentrates repeated pulling force into fewer stitches.
- Prevent flower petals from folding. Pin all five petal tips before sewing the appliqué. Attaching only the flower center allows the petals to move forward and cover part of the cream center.
- Separate the leaf bases. Leave approximately 5–10 mm between opposing leaf bases instead of stacking every leaf directly on the stem. Excessive overlap produces a thick raised section in the center of the bag.
- Secure load-bearing yarn tails. Weave strap and closure tails through at least 4 cm of dense crochet, reverse direction and weave through again. A short single pass can work loose under repeated loading.
Finishing the Floral Crochet Crossbody Bag
Measure the finished cream panels before attaching the purple border because that measurement determines whether the strap and closure remain proportional to the pouch. After assembly, load the bag with the items it will normally carry and inspect both strap seams before trimming the final yarn tails.
Make a gauge sample in the selected cotton first if you want to reproduce the approximate 16 cm panel width. Changes in cotton thickness or hook size can noticeably alter both the lattice openings and finished dimensions.
Save this crochet crossbody bag pattern to Pinterest or share the completed bag on Instagram with #FloralCrossbodyBag.
Which detail would you change on this floral bag: the four olive leaves, the purple flower, or the cream openwork background?









