Introduction
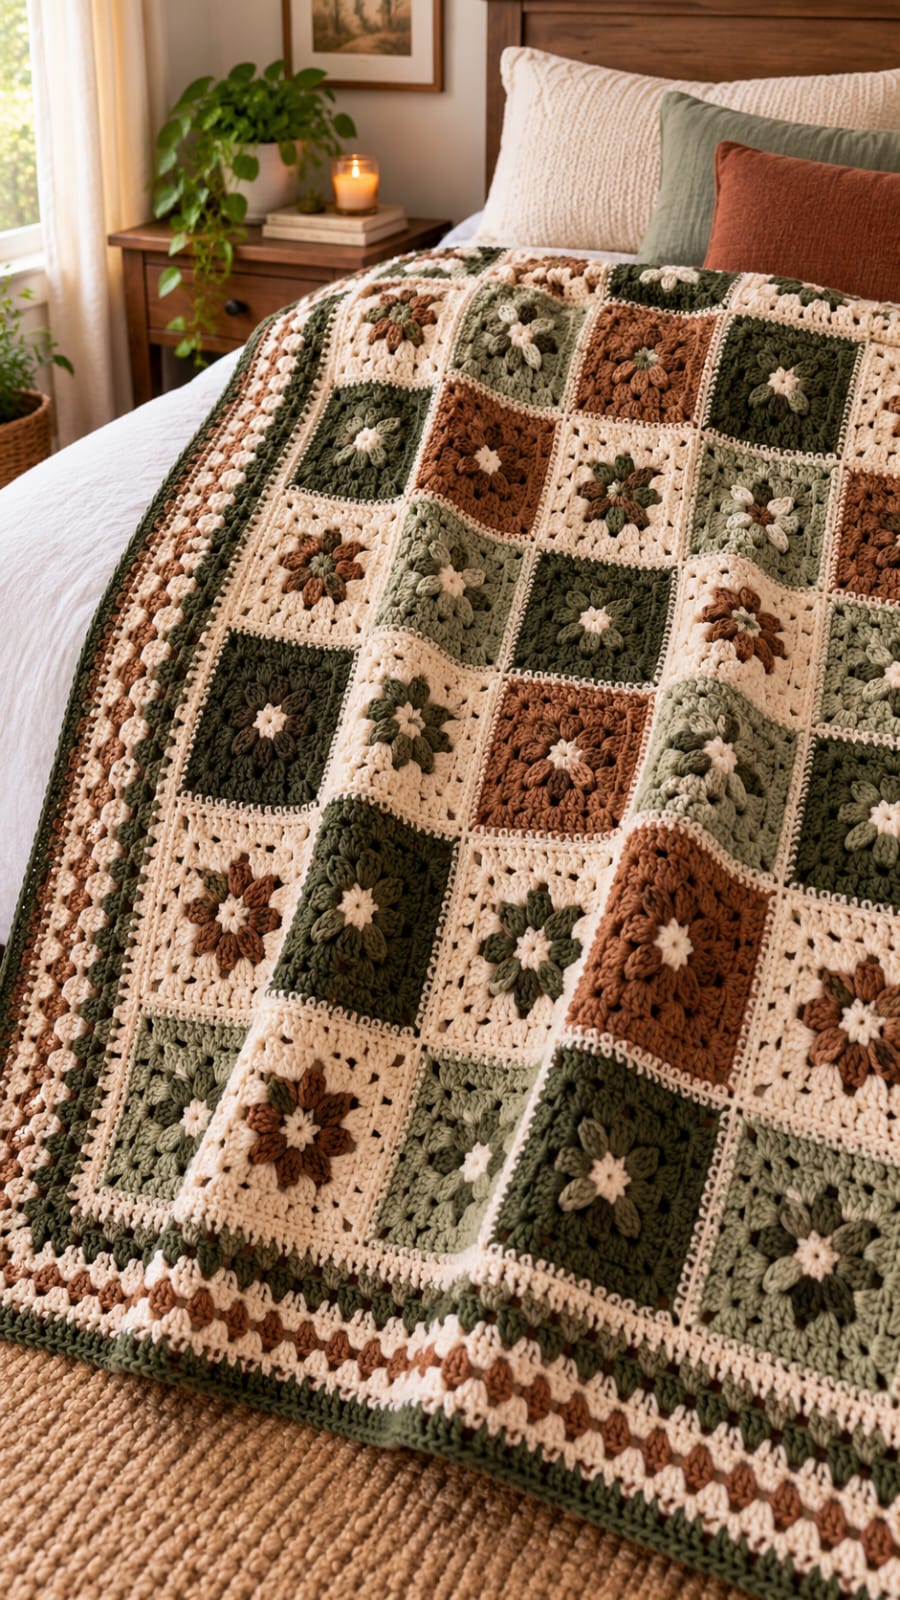
Eight raised petals have to remain distinct even when the square beneath them changes from cream to sage, olive, or brown. This flower granny square blanket pattern uses worsted-weight yarn, dimensional floral centers, cream joining seams, and a wide earth-tone border. The intermediate design targets approximately 120 × 150 cm and works particularly well as a bed throw because individual damaged motifs can be repaired separately.
The Design: What Makes This Flower Granny Square Blanket Different
The flower is constructed before the surrounding square, allowing its petals to sit above the background instead of being absorbed into ordinary granny clusters. Eight elongated petals create enough volume to remain visible on dark olive, medium sage, brown, and cream motifs.
A consistent cream joining color is the second structural decision. It separates neighboring earth tones and creates a light grid across the completed blanket. The wide border then repeats all four main colors, connecting the irregular square arrangement to a controlled outer frame.
One common mistake with a raised flower granny square is changing hook size between colors. Even a few millimeters of size difference accumulate across a row of motifs. Every floral granny square blanket motif should therefore be blocked to the same measurement before joining begins.
Project Info at a Glance
| Skill Level | Time | Finished Size | Hook | Best For |
|---|---|---|---|---|
| Intermediate | 30–40 hours | Approx. 120 × 150 cm | 5.0 mm | Bed throw, sofa blanket, guest room |
The finished dimensions are a photo-inspired target rather than measurements taken from the pictured blanket. Published flower granny square blankets include examples around 91 × 91 cm and 122 × 108 cm, confirming that motif count can be changed substantially without altering the basic square construction.
Materials and Tools
Yarn
- Warm cream — worsted #4 / Aran — approximately 900–1,050 g for motifs, joins, flower centers, and border.
- Dark olive green — worsted #4 / Aran — approximately 450–550 g.
- Medium sage green — worsted #4 / Aran — approximately 450–550 g.
- Medium warm brown — worsted #4 / Aran — approximately 400–500 g.
These quantities are allowances for the larger photo-inspired throw rather than yarn amounts reported for the pictured object. Published worsted flower blankets can require 1,700–1,800 yards even at approximately 91 cm square, while a documented DK throw uses 800 g for its background alone.
Tools
- 5.0 mm crochet hook
- Tapestry needle
- Scissors
- Locking stitch markers
- Measuring tape
- Blocking mats
- Rust-resistant pins
Abbreviations
- MR — magic ring
- ch — chain
- sc — single crochet
- hdc — half double crochet
- dc — double crochet
- tr — treble crochet
- sl st — slip stitch
- sp — space
- st/sts — stitch/stitches
- RS — right side
- WS — wrong side
- FO — fasten off
An invisible decrease is not required because the blanket is assembled from flat motifs rather than shaped amigurumi pieces.
Gauge and Finished Motif Size
Make one complete test square before producing the blanket quantity. With worsted-weight yarn and a 5.0 mm hook, target approximately 14–15 cm square after blocking.
Published flower-square designs vary substantially in scale. One worsted pattern produces a 30.5 cm square with a 6 mm hook, demonstrating why the motif must be measured rather than sized from yarn weight alone.
For this blanket, the smaller 14–15 cm target allows enough individual motifs to reproduce the patchwork effect visible in the photograph.
All finished squares should be within approximately 3 mm of the reference square before joining.
Pattern — Step by Step
This is an original photo-inspired motif construction rather than a transcription of a published blanket pattern. Make background squares in cream, sage, dark olive, and brown while varying the petal color according to the layout.
Raised Eight-Petal Flower Center
Yarn: choose cream, sage, olive, or brown according to the motif plan. Use a 5.0 mm hook.
R1: 8 sc in MR. Join with sl st. (8)
R2: Ch 1. Work 2 sc in each st around. Join. (16)
The sixteen stitches provide two base stitches for each of the eight raised petals.
Raised Petals
R3: *Sl st in next st, ch 6. Beginning in second ch from hook work sc, hdc, 2 dc, hdc. Sl st into next base st.* Repeat eight times.
You should have 8 separate petals.
Fasten off if the square background will use another color.
Spread all eight petals outward before beginning the squaring rounds. They should sit above the background rather than being trapped underneath later stitches.
Foundation Behind the Flower
Join the selected background color behind one petal.
R4: *Ch 4, sl st into the space behind the next petal.* Repeat eight times. Join.
This creates eight chain spaces behind the flower.
Squaring Round
R5: Sl st into first ch-4 sp.
In first space work:
(3 dc, ch 2, 3 dc).
In next space work 3 dc.
Repeat this sequence around so four alternating spaces become corners and four become side groups.
Join with sl st.
You should now have four defined corners.
Square Expansion Round
R6: Sl st into first corner space.
Work (3 dc, ch 2, 3 dc) into the corner.
Ch 1.
Work 3 dc in each side space, placing ch 1 between groups.
At every corner work (3 dc, ch 2, 3 dc).
Repeat around and join.
Final Motif Round
R7: Ch 1. Sc in each dc and each ch-1 sp around.
At each corner ch-2 space work (sc, ch 2, sc).
Join with sl st.
Fasten off with a 25 cm tail.
Block the completed motif to approximately 14–15 cm square.
Cream Background Flower Square
Use warm cream for R4–R7.
For the flower, use brown, dark olive, or sage petals with a small cream center.
Cream motifs provide the lightest areas in the blanket. Distribute them rather than grouping several together.
Dark Olive Flower Square
Use dark olive for R4–R7.
Work the flower in sage or brown, retaining a cream center.
Because the background is dark, keep the raised petals one value lighter or warmer so their shape remains readable.
Sage Flower Square
Use medium sage for R4–R7.
Choose dark olive, brown, or cream for the petals.
Several sage motifs in the photograph use relatively low-contrast flowers. Keep the cream center consistent so the motif still has a visible focal point.
Brown Flower Square
Use warm medium brown for R4–R7.
Dark olive petals create the strongest earth-tone combination. Cream petals produce a lighter alternative.
Do not change the number of rounds when switching colors. All four square types need identical edge construction for clean joining.
Optional Small Cream Flower Center
For a more pronounced pale center, make a separate small flower.
R1: 6 sc in MR. Join. (6)
R2: In each stitch work (sl st, ch 2, hdc, ch 1, sl st).
Repeat six times.
Fasten off with a 20 cm tail.
Sew the small cream flower over the center of the eight-petal motif.
Attach only through its center so the six tiny petals remain raised.
Suggested Motif Quantity
For a throw near the photographed proportions, make approximately 8 motifs across × 10 motifs long, giving 80 squares before the border.
| Square Type | Suggested Quantity |
|---|---|
| Cream background | 22 |
| Dark olive background | 20 |
| Sage background | 20 |
| Brown background | 18 |
| Total | 80 |
The distribution does not need to form a checkerboard. The photograph uses a more irregular patchwork arrangement, but identical colors are generally separated by at least one contrasting square.
Blocking the Granny Squares
Block the motifs before joining.
Select one square with clean corners and use it as the dimensional reference.
Pin that motif to approximately 14–15 cm square. Place pins in all four corners first, then add pins along each side.
Do not stretch the raised petals flat.
Block every remaining motif to the same dimensions.
Stack dry squares in groups of ten and compare their edges. Correct noticeably oversized motifs before assembly.
Planning the Blanket Layout
Lay all 80 blocked squares on a large clean surface.
Arrange them in eight columns and ten rows.
Start by distributing the dark olive motifs. Add the brown squares next, then fill the remaining spaces with sage and cream.
Rotate individual flowers when necessary so neighboring petal arrangements do not all point in the same visual direction.
Stand several feet away from the layout before joining. Large patches of one color are easier to identify at a distance.
Photograph the final arrangement.
Cream Flat Slip-Stitch Join
Yarn: warm cream.
The light joining lines are an important feature of this blanket because they separate four similarly muted background colors.
Place two squares side by side with right sides facing upward.
Insert the hook through the corresponding inner loops of both corner stitches.
Join cream yarn.
Work a loose slip stitch through the corresponding inner loops of each pair of edge stitches.
Continue to the next corner.
Do not pull the seam tightly.
Join all motifs into horizontal rows first. Then connect the completed rows vertically.
Alternative Single Crochet Join
For a more pronounced cream lattice, place two squares with wrong sides together.
Join cream through both corresponding edge stitches.
Work one sc through each pair of stitches across the seam.
This produces a raised cream ridge on the right side.
Use the same joining method throughout the blanket. Do not alternate between slip-stitch and single-crochet seams because their widths differ.
Preparing the Outer Edge
After all 80 motifs are joined, spread the blanket flat.
Inspect every square intersection.
Join cream at any outer corner.
Border R1: Ch 1 and sc evenly around the entire blanket.
Work 3 sc in each outer corner.
At motif junctions, avoid adding unnecessary stitches. Excess stitches at every seam can create a rippled border.
Join with sl st.
Dark Olive Border
Change to dark olive.
Border R2: Ch 2, hdc in each st around.
Work 3 hdc in the middle corner stitch.
Join.
Border R3: Ch 1, sc in each st around, working 3 sc at each corner.
Join and fasten off.
Cream Granny Border
Join cream at a corner.
Border R4: Ch 3, 2 dc in same corner, ch 2, 3 dc in same corner.
*Skip 2 sts, 3 dc in next st.* Repeat along each side.
At each corner work (3 dc, ch 2, 3 dc).
If the repeat does not reach a corner evenly, alter one skip near the corner rather than adding an extra cluster.
Join with sl st.
Brown Accent Border
Join brown.
Border R5: Ch 1, sc in each dc and ch space around.
Work 3 sc in each corner.
Join.
Border R6: Ch 3. Work dc in every stitch around with 3 dc in each corner.
Join and fasten off.
Cream and Brown Cluster Border
Join cream.
Border R7: Ch 1, sc around. Work 3 sc at each corner.
Join.
Change to brown.
Border R8: *Skip 2 sts, work 3 dc in next st, ch 1.* Repeat along the sides.
At each corner work (3 dc, ch 2, 3 dc).
Join.
Change to cream.
Border R9: Work 3 dc into each ch-1 space around.
At the corners work (3 dc, ch 2, 3 dc).
Join and fasten off.
Final Dark Olive Edge
Join dark olive.
Border R10: Ch 1, sc evenly around.
Work 3 sc in each corner.
Border R11: Ch 1, sc in each st around.
At each corner work (sc, ch 1, sc).
Join and fasten off with a 20 cm tail.
Assembly
- Make one complete test motif and block it to approximately 14–15 cm before producing the full blanket quantity.
- Crochet 80 flower squares using the planned combination of cream, dark olive, sage, and brown backgrounds.
- Block every motif to the same dimensions while leaving the eight raised petals free from the blocking pins.
- Arrange the squares in eight columns and ten rows, then photograph the approved color placement.
- Join the motifs into horizontal rows with cream yarn, matching every corner and edge stitch.
- Connect the completed rows vertically and inspect all four-square intersections for gaps or excessive tension.
- Work the cream leveling round around the complete motif field before adding any decorative border.
- Add the olive, cream, brown, and cluster border rounds while checking that every side remains flat.
- Weave each yarn tail through at least 4–5 cm of matching-color fabric and reverse direction once before trimming.
- Block the completed blanket to approximately 120 × 150 cm, square all four corners, and allow it to dry flat.
The completed blanket should show separate raised flower centers, four clearly distinguishable earth-tone backgrounds, a continuous cream joining lattice, and a flat multicolor border.
7 Technical Tips
- Different square sizes: A 4 mm discrepancy repeated across eight motifs can shift a row by more than 3 cm. Block every square to one reference measurement before beginning the joins.
- Flattened petals: Sewing or blocking directly through the petal tips removes the raised flower profile. Pin the square background only and leave all eight petal tips unrestrained.
- Puckered cream seams: Tight slip stitches shorten the joined edge. Keep each joining loop approximately the same height as an ordinary loose slip stitch and stop if the square edges begin lifting.
- Open four-square intersections: Misaligned corners leave visible holes where four motifs meet. Place a locking marker through all four corner spaces before joining the second seam direction.
- Ruffled border: Adding extra stitches at every motif seam accumulates quickly around an 80-square blanket. Work the first border round evenly and omit redundant stitches where joined corners already create bulk.
- Color clumping: Three adjacent dark olive or brown squares create a heavy visual block. Photograph the complete 8 × 10 layout before joining and separate large same-color groups.
- Loose flower centers: Raised petals place repeated stress on the center ring during washing. Leave a starting tail of at least 12 cm, weave it through the center stitches, reverse direction, then trim.
Choosing Yarn for Raised Flower Squares
Worsted yarn with a 5.0 mm hook is a documented combination for flower granny square blankets. It gives the petals enough thickness to stand above the square without making an 80-motif throw excessively dense.
A smooth acrylic or acrylic-wool blend gives clear petal definition and manageable weight. Cotton produces crisp flowers but becomes substantially heavier at bed-throw dimensions.
Use the same yarn line for all four main colors when possible. A nominally worsted sage from one manufacturer may behave differently from a brown labeled worsted by another manufacturer.
Matching fiber composition also reduces differential shrinkage after washing.
Controlling the Earth-Tone Palette
Dark olive is the deepest value in the photographed palette. Use it throughout the motif field and again at the outside edge so the border visually contains the lighter squares.
Medium sage supplies the softer green. Brown adds warmth without introducing a high-contrast color, while cream creates the strongest value difference.
The cream yarn therefore has two jobs. It forms some motif backgrounds, but more importantly it separates the darker squares through the joining lattice.
Keep cream flower centers distributed across all four backgrounds. Repeating that small pale detail makes differently colored motifs look like members of the same design family.
Making the Blanket Smaller
A six-by-eight layout requires 48 squares and works well for a lap blanket. At a blocked motif size of 14.5 cm, the unbordered motif field measures roughly 87 × 116 cm before seam and border effects.
Retain all four background colors even when reducing the motif count. Cutting one color completely changes the patchwork balance.
The border can also be shortened. Work the cream leveling round, one olive round, one cream granny round, and a final olive edge for a more compact finish.
Making a Larger Bed Blanket
Increase the motif field to 10 × 12 squares for 120 motifs.
Make the extra motifs before beginning assembly rather than trying to extend a completed bordered blanket.
Lay the full 120-square arrangement out before joining. With more motifs, accidental diagonal bands of one color become easier to create.
Keep the border width proportional to the blanket. The full 11-round border works more naturally on a large bed throw than on a small baby blanket.
Alternative Flower Colors
The construction does not depend on green and brown. A muted floral version can use dusty rose, sage, cream, and mushroom.
For stronger contrast, combine charcoal backgrounds with rust, mustard, and cream flowers. A cooler version can use denim, eucalyptus, oatmeal, and taupe.
When changing the palette, maintain a light joining color. The joining lattice is one of the most visible structural features of the blanket.
Also retain a small repeated center color across most motifs. That tiny constant helps visually connect squares with different petal and background combinations.
Repairing an Individual Granny Square
Modular blankets have a practical advantage: localized damage does not always require rebuilding a large section of fabric.
If a petal becomes loose, reinforce it from the back of its original square without opening the joining seams.
For more serious motif damage, carefully remove the cream joining stitches around that square. Crochet a replacement to the same blocked dimensions, position it in the opening, and recreate the original seams.
Save small quantities of all four yarn colors after completing the blanket. Matching yarn makes later repairs substantially less visible.
Care and Blocking
Follow the care instructions supplied with the selected yarn. Large modular blankets become heavy when wet, particularly when cotton or dense wool blends are used.
After washing, support the complete blanket rather than lifting it from one corner.
Reshape the cream lattice first. Next align the motif columns and rows, then square the outer border.
Do not press the raised flowers flat while drying. Arrange the petals with your fingers so all eight remain visible.
Dry according to the yarn manufacturer’s instructions before folding or placing the blanket on a bed.
Finishing the Flower Granny Square Blanket
Inspect the blanket from the foot of the bed before trimming the final tails. The cream joins should form continuous lines, the olive, sage, brown, and cream motifs should remain distributed across the field, and all raised flowers should retain distinct petals. Check the outer border for rippling before completing the final blocking.
This flower granny square blanket pattern depends on consistency more than complicated shaping: identical motif dimensions, controlled petal height, matched corners, and a joining tension that remains constant across every row. Make and block one reference square first, then use its measurement throughout the project.
Share the finished blanket on Pinterest or Instagram with #EarthToneFlowerGrannyBlanket. For this exact palette, would you keep all four backgrounds or replace the brown squares with a darker forest green?









