Introduction
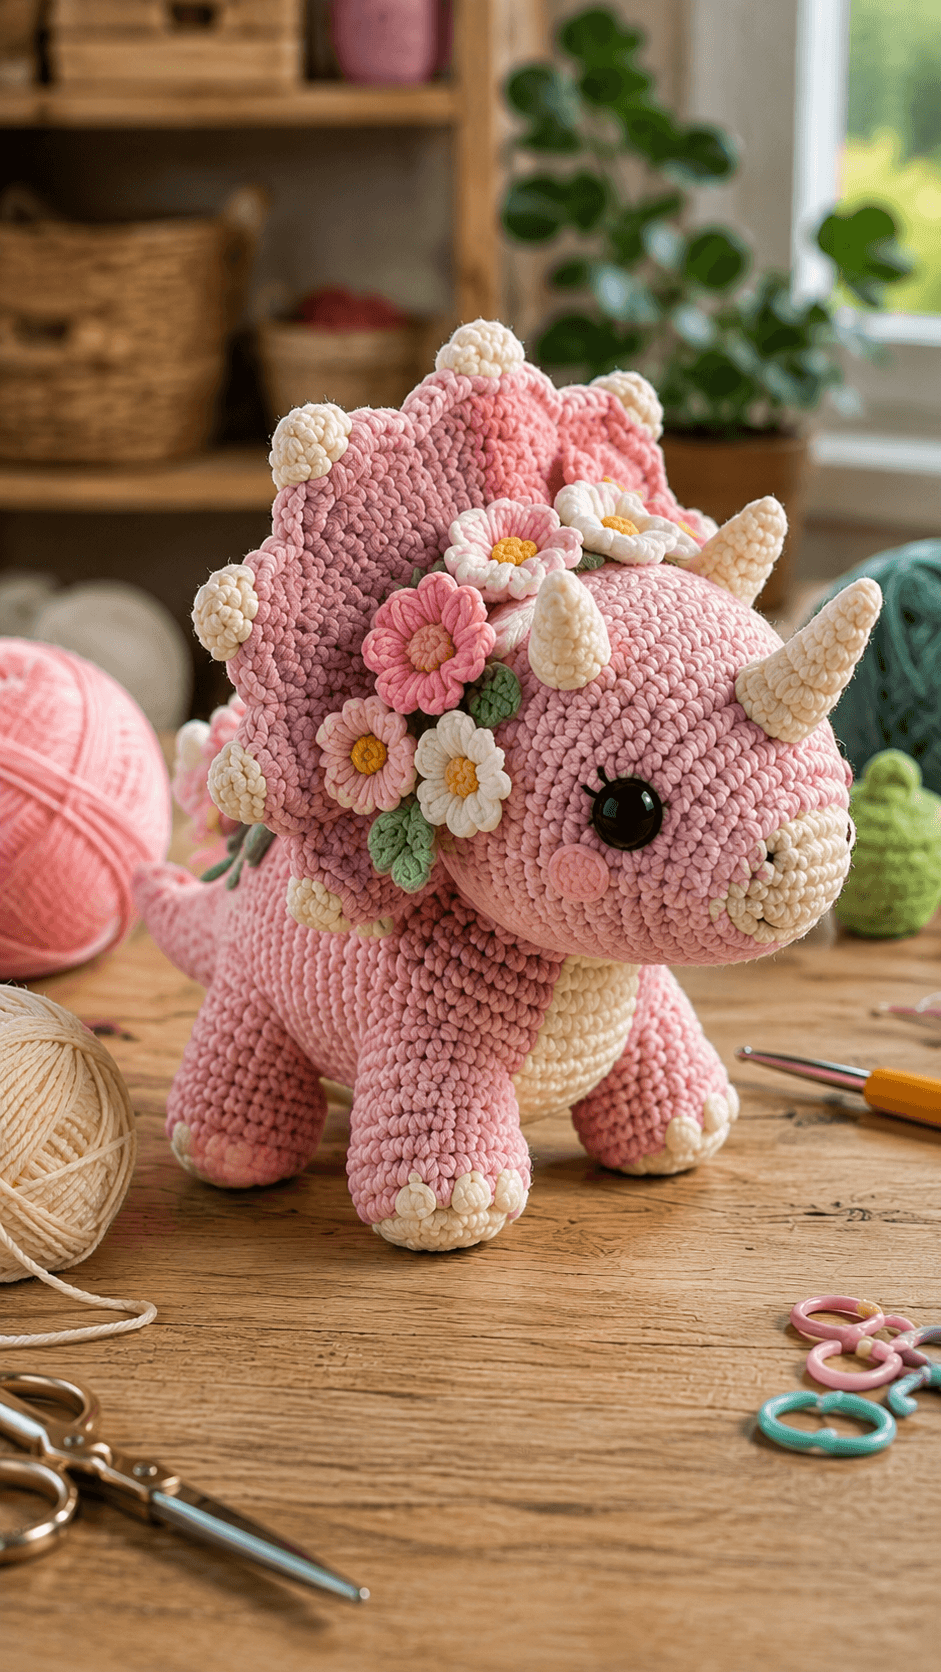
A triceratops can carry five flowers across its frill only if the horn line remains visible in front of them. This floral triceratops amigurumi crochet pattern uses chunky chenille yarn, a 5 mm hook and 12–14 mm eyes to make a plush about 40–45 cm long. A dusty-pink body, cream belly, three horns, scalloped frill, four legs and layered flowers create the intermediate construction shown in the reference.
The Design: What Makes This Triceratops Different
The head is broad and low so the two brow horns, nose horn and large eyes have enough horizontal space without crowding the muzzle. Behind it, the oversized frill extends beyond both sides of the skull and carries small cream nodules around the edge, which gives the silhouette a strong scalloped outline. The body stays long and nearly horizontal, supported by four thick legs and balanced by a tapered tail. A cream belly patch breaks up the pink underside, while white toe tips repeat the horn color. The floral cluster is added last. Five flowers cross the frill and upper head, but their centers remain behind the horn line so the dinosaur still reads immediately as a triceratops. One common mistake is attaching the flowers before the frill is sewn firmly; the added weight can make the entire head lean backward.
Project Info at a Glance
| Skill Level | Time | Finished Size | Hook | Best For |
|---|---|---|---|---|
| Intermediate | 12–15 hours | Approx. 40–45 cm long × 28–32 cm tall | 5.0 mm | Display plushies, dinosaur collections and nursery decor |
Materials and Tools
Yarn
- Dusty pink — chunky chenille / plush yarn — approximately 300–350 g — head, body, frill, legs and tail.
- Warm cream — matching chunky chenille — approximately 90–120 g — horns, belly and toe tips.
- Soft pink — chunky or smooth worsted — approximately 10–15 g — flower.
- Pale blush — chunky or smooth worsted — approximately 10–15 g — flower.
- White — chunky or smooth worsted — approximately 15–20 g — flowers.
- Golden yellow — scrap yarn — flower centers.
- Sage green — worsted or chunky yarn — approximately 20–30 g — leaves.
- Black — smooth yarn — eyebrow or eyelash embroidery if used.
Keep the pink and cream chenille close to the same thickness. A thinner horn yarn can produce cleaner points, but the base circumference still needs enough width to anchor securely into plush fabric.
Tools
- 5.0 mm crochet hook
- 12–14 mm safety eyes — 2
- Polyester fiberfill — approximately 400–500 g
- Long tapestry needle
- Standard yarn needle
- Locking stitch markers
- Dressmaking pins
- Scissors
- Measuring tape
For a toy intended for a child under three, replace plastic eyes with embroidered eyes and check every horn, flower and frill attachment for loose components.
Abbreviations
- MR — magic ring
- sc — single crochet
- inc — two single crochets in one stitch
- dec — invisible decrease
- sl st — slip stitch
- ch — chain
- hdc — half double crochet
- dc — double crochet
- tr — treble crochet
- BLO — back loop only
An invisible decrease is worked through the front loops of the next two stitches before one single crochet is completed through both loops.
Pattern — Step by Step
Work all amigurumi parts in continuous spirals unless noted. Move the stitch marker after every completed round.
Head
Yarn: dusty pink — reconstruction based on standard amigurumi math.
R1: 6 sc in MR (6)
R2: inc ×6 (12)
R3: (sc, inc) ×6 (18)
R4: (2 sc, inc) ×6 (24)
R5: (3 sc, inc) ×6 (30)
R6: (4 sc, inc) ×6 (36)
R7: sc around (36)
R8: sc around (36)
R9: sc around (36)
R10: sc around (36)
R11: sc around (36)
R12: sc around (36)
R13: sc around (36)
R14: (4 sc, dec) ×6 (30)
R15: sc around (30)
R16: (3 sc, dec) ×6 (24)
R17: sc around (24)
R18: (2 sc, dec) ×6 (18)
R19: sc around (18)
R20: (sc, dec) ×6 (12)
R21: dec ×6 (6)
Insert the eyes between R10 and R11, approximately 9–10 stitches apart. Begin stuffing after R14. Keep the front third moderately firm and the back of the head firmer because it will carry the frill.
Fasten off. Leave a 50 cm sewing tail.
Muzzle
Yarn: dusty pink.
R1: 6 sc in MR (6)
R2: inc ×6 (12)
R3: (sc, inc) ×6 (18)
R4: (2 sc, inc) ×6 (24)
R5: sc around (24)
R6: sc around (24)
R7: (2 sc, dec) ×6 (18)
Stuff lightly.
Flatten the open edge slightly and leave a 40 cm tail.
Target approximately 8–9 cm wide and 5–6 cm deep. The muzzle should project without becoming cylindrical.
Cheek Patches — Make 2
Yarn: pale pink.
R1: 6 sc in MR (6)
R2: inc ×6 (12)
Fasten off. Leave a 15 cm sewing tail.
Flatten each circle.
Body
Yarn: dusty pink.
R1: 6 sc in MR (6)
R2: inc ×6 (12)
R3: (sc, inc) ×6 (18)
R4: (2 sc, inc) ×6 (24)
R5: (3 sc, inc) ×6 (30)
R6: (4 sc, inc) ×6 (36)
R7: (5 sc, inc) ×6 (42)
R8: sc around (42)
R9: sc around (42)
R10: sc around (42)
R11: sc around (42)
R12: sc around (42)
R13: sc around (42)
R14: sc around (42)
R15: sc around (42)
R16: sc around (42)
R17: sc around (42)
R18: sc around (42)
R19: sc around (42)
R20: sc around (42)
R21: (5 sc, dec) ×6 (36)
R22: sc around (36)
R23: (4 sc, dec) ×6 (30)
R24: sc around (30)
R25: (3 sc, dec) ×6 (24)
R26: sc around (24)
R27: (2 sc, dec) ×6 (18)
R28: (sc, dec) ×6 (12)
R29: dec ×6 (6)
Begin stuffing after R21. Keep the body long rather than spherical by packing more firmly toward the front and rear ends.
Fasten off and close.
Cream Belly Patch
Yarn: warm cream.
Ch 19.
Starting in second ch from hook:
sc in next 17 ch, 3 sc in final ch.
Continue along the opposite side of the chain.
Sc in next 16 ch, inc in final ch.
For the next two rounds, work sc around while placing three evenly spaced increases at both curved ends.
Fasten off with a 45 cm tail.
Target approximately 13–15 cm long × 5–6 cm wide.
Front Legs — Make 2
Yarn: dusty pink.
R1: 6 sc in MR (6)
R2: inc ×6 (12)
R3: (sc, inc) ×6 (18)
R4: sc around (18)
R5: sc around (18)
R6: sc around (18)
R7: sc around (18)
R8: sc around (18)
R9: (sc, dec) ×6 (12)
R10: sc around (12)
R11: sc around (12)
Stuff firmly through the foot and lower leg. Keep the top 2–3 cm softer for sewing.
Fasten off with a 35 cm tail.
Back Legs — Make 2
Yarn: dusty pink.
R1: 6 sc in MR (6)
R2: inc ×6 (12)
R3: (sc, inc) ×6 (18)
R4: (2 sc, inc) ×6 (24)
R5: sc around (24)
R6: sc around (24)
R7: sc around (24)
R8: (2 sc, dec) ×6 (18)
R9: sc around (18)
R10: (sc, dec) ×6 (12)
R11: sc around (12)
The larger 24-stitch foot gives the rear legs enough mass to balance the broad frill.
Stuff firmly at the lower half. Fasten off with a 40 cm sewing tail.
Cream Toes
Yarn: warm cream.
After the legs are attached, embroider three short raised toe stitches across the front of every foot.
Each toe should measure approximately 8–10 mm.
For a stronger sculpted look, make each toe with two passes of cream yarn.
Tail
Yarn: dusty pink.
R1: 6 sc in MR (6)
R2: sc around (6)
R3: inc ×6 (12)
R4: sc around (12)
R5: sc around (12)
R6: (sc, inc) ×6 (18)
R7: sc around (18)
R8: sc around (18)
R9: sc around (18)
R10: (2 sc, inc) ×6 (24)
R11: sc around (24)
R12: sc around (24)
R13: sc around (24)
Stuff the wide base firmly and reduce the stuffing gradually toward the 6-stitch tip so the tail can curve.
Fasten off with a 50 cm tail.
Frill
Yarn: dusty pink.
R1: 6 sc in MR (6)
R2: inc ×6 (12)
R3: (sc, inc) ×6 (18)
R4: (2 sc, inc) ×6 (24)
R5: (3 sc, inc) ×6 (30)
R6: (4 sc, inc) ×6 (36)
R7: (5 sc, inc) ×6 (42)
Do not stuff.
Fold the circle slightly so it cups backward rather than forward.
Work one final sc round without increases.
Fasten off with a 70 cm sewing tail.
Target approximately 18–20 cm across. The frill should extend beyond both sides of the head by roughly 3–4 cm.
Cream Frill Nodules — Make 7
Yarn: warm cream.
R1: 6 sc in MR (6)
R2: inc ×6 (12)
R3: sc around (12)
R4: dec ×6 (6)
Stuff very lightly.
Fasten off with a 20 cm tail.
Target approximately 2–2.5 cm diameter.
Brow Horns — Make 2
Yarn: warm cream.
R1: 6 sc in MR (6)
R2: sc around (6)
R3: sc around (6)
R4: (2 sc, inc) ×2 (8)
R5: sc around (8)
R6: (3 sc, inc) ×2 (10)
R7: sc around (10)
R8: (4 sc, inc) ×2 (12)
Stuff only R5–R8. Leave the tip mostly empty so it can taper naturally.
Fasten off with a 30 cm tail.
Nose Horn
Yarn: warm cream.
R1: 6 sc in MR (6)
R2: sc around (6)
R3: sc around (6)
R4: (2 sc, inc) ×2 (8)
R5: sc around (8)
R6: (3 sc, inc) ×2 (10)
Stuff lightly.
Fasten off with a 25 cm tail.
White Daisy — Make 2
Yarn: white and golden yellow.
With yellow:
R1: 6 sc in MR (6)
R2: inc ×6 (12)
Change to white.
*Ch 4, hdc in second ch, dc in next ch, hdc in next ch, sl st into next base stitch.*
Repeat around for six petals.
Fasten off with a 25 cm sewing tail.
Large Pink Flower
Yarn: soft pink.
R1: 6 sc in MR (6)
R2: inc ×6 (12)
For petals:
*Ch 5, hdc in second ch, 2 dc, hdc, sl st in next base stitch.*
Repeat six times.
Add a small blush or yellow center.
Fasten off with a long tail.
Blush Flower
Yarn: pale blush.
R1: 6 sc in MR (6)
R2: inc ×6 (12)
Work six rounded petals using:
*Ch 4, hdc, dc, hdc, sl st in next base stitch.*
Fasten off.
Small Pink Flower
Yarn: soft pink.
R1: 6 sc in MR (6)
Work five small petals:
*Ch 3, hdc in second ch, sc in next ch, sl st in next base stitch.*
Fasten off with a sewing tail.
Green Leaves — Make 3
Yarn: sage green.
Ch 8.
Starting in second chain:
sl st, sc, hdc, dc, hdc, sc, sl st.
Work 3 sc into the final chain.
Repeat the stitch sequence down the opposite side.
Fasten off with a 20 cm tail.
For variety, make one leaf with ch 10 and one with ch 6.
Assembly
- Sew the muzzle to the lower front of the head and keep its center aligned between the safety eyes.
- Attach the frill firmly to the back of the head, catching at least 4–5 cm of contact across the center so it cannot pivot backward.
- Sew the two brow horns above the eyes and the shorter nose horn at the top center of the muzzle before any flowers are added.
- Attach the head to the body with the lower edge sitting slightly forward of the front legs so the frill does not press directly against the back.
- Sew the cream belly patch beneath the body, then attach both front legs and both larger rear legs while all four feet are resting on a flat surface.
- Attach the tail to the rear center and angle it gently upward, keeping the base broad enough to counterbalance the head and frill.
- Sew seven cream nodules around the frill edge, spacing them approximately 2–3 cm apart and leaving the lower center edge clear.
- Pin the five flowers across the upper-left and central frill area, leaving both brow horns and the nose horn fully visible from the front.
- Add three sage leaves between the flowers, sewing mainly through their lower 10–15 mm so the tips remain raised.
- Attach the pink cheeks and cream toes last, then weave all structural tails through at least 4–5 cm of matching chenille before trimming.
The finished triceratops should stand on four feet with a broad upright frill, three visible cream horns, a balanced flower cluster and a tail that offsets the weight of the head.
7 Technical Tips
- Frill falling backward: A large 18–20 cm frill sewn only along its center point creates a hinge. Use at least 4–5 cm of attachment across the back of the head and add two concealed side anchors.
- Flowers hiding the horns: Any flower extending more than approximately 10 mm into the brow-horn line can weaken the triceratops silhouette. Pin all three horns first and keep the flower cluster behind their bases.
- Front legs lifting off the table: A heavy head can rotate the body forward. Position the front legs directly beneath the shoulder area and confirm all four feet contact the surface before sewing them permanently.
- Horn tips looking blunt: Firm stuffing through every round rounds the narrow tip. Leave the first 2–3 rounds almost empty and pack only the wider horn base.
- Frill nodules looking uneven: A spacing error of more than about 10 mm becomes obvious around the edge. Mark seven attachment points before sewing the first cream piece.
- Chenille seams opening: Pulling sewing yarn too tightly can strip the plush fibers and weaken the attachment. Catch full stitch posts and make two passes across heavily loaded areas such as the frill and leg bases.
- Tail failing to balance the body: A lightly stuffed wide tail base gives little counterweight. Pack the 18–24 stitch section firmly and keep the narrow tip flexible so the body remains level.
Conclusion
Check the three horn positions before pinning any flower because the floral arrangement should decorate the frill rather than replace its dinosaur structure. The next practical step is to attach the head, frill and legs, set the triceratops on a flat surface and correct the balance before adding embellishments. Keep the largest pink flower toward the upper frill and the smaller white and blush flowers closer to the face. Share the finished floral triceratops amigurumi crochet pattern project on Pinterest with a full three-quarter view, then post a close view of the flowered frill on Instagram using #FloralTriceratopsCrochet. For this triceratops specifically, would you keep the cream frill nodules or replace them with tiny green leaves?









