Introduction
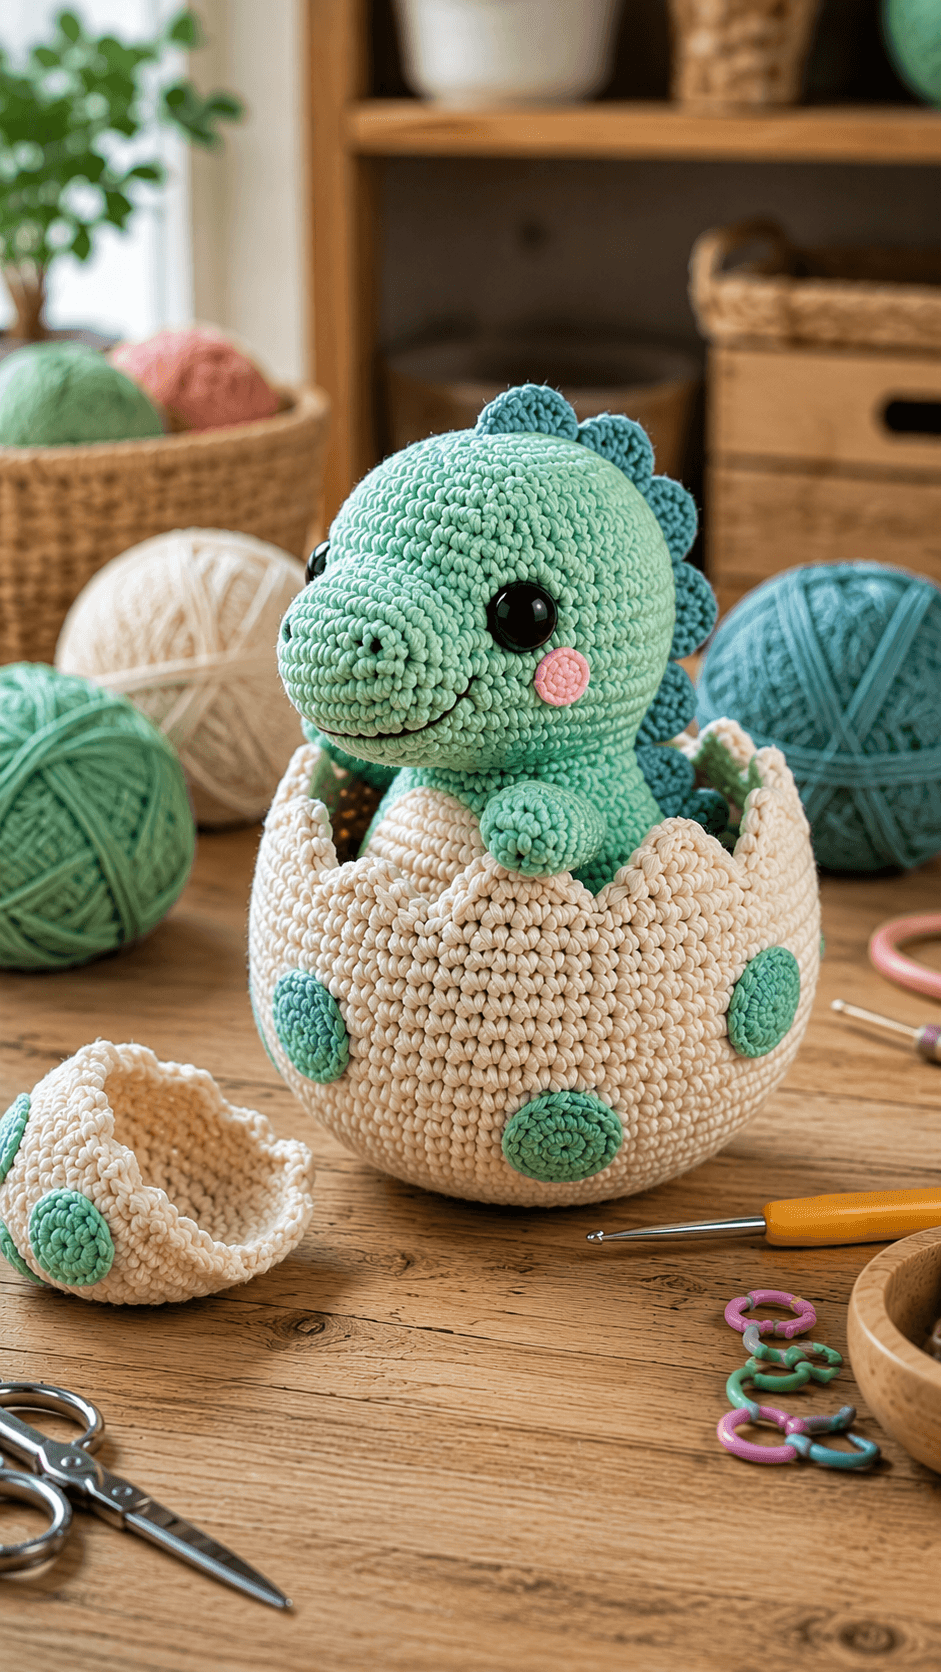
A stegosaurus cannot look newly hatched if its dorsal plates disappear behind the eggshell rim. This baby stegosaurus egg amigurumi crochet pattern uses chunky chenille yarn, a 5 mm hook and 12 mm eyes to make an approximately 28–32 cm display. A mint hatchling, seven teal plates, cream belly, pink cheeks and a spotted broken shell create the intermediate construction shown in the reference.
The Design: What Makes This Hatching Stegosaurus Different
The dinosaur is proportioned around the egg rather than designed as a complete free-standing plush. Its head is intentionally oversized, the torso remains compact and the lower body disappears inside the shell, so the viewer reads the piece as a hatchling immediately. Seven rounded teal plates begin behind the crown and descend toward the hidden tail instead of forming sharp triangular spikes. The eggshell is structural: a deep cream bowl supports the dinosaur while a jagged upper edge frames both arms. Mint appliqué spots connect the shell visually to the dinosaur body, and one separate broken shell fragment reinforces the hatching scene. This stegosaurus in egg crochet design depends on balance. A frequent mistake is stuffing the head heavily while leaving the egg base soft; that raises the center of gravity and makes the finished display lean forward.
Project Info at a Glance
| Skill Level | Time | Finished Size | Hook | Best For |
|---|---|---|---|---|
| Intermediate | 9–12 hours | Approx. 28–32 cm high | 5.0 mm | Dinosaur displays, nursery decor and collectible plush scenes |
Materials and Tools
Yarn
- Mint green — chunky chenille / plush yarn — approximately 150–180 g — head, body, arms and tail.
- Warm cream — matching chunky chenille — approximately 160–200 g — main eggshell, detached shell piece and belly.
- Teal blue — matching chenille — approximately 25–35 g — seven dorsal plates.
- Soft pink — scrap chenille or smooth worsted yarn — approximately 5–8 g — cheek patches.
- Black — smooth yarn — embroidered smile.
Use the same cream yarn for both shell pieces. Even a small thickness difference changes the stiffness of the jagged rim and makes the detached fragment look unrelated to the main egg.
Tools
- 5.0 mm crochet hook
- 12 mm safety eyes — 2
- Polyester fiberfill — approximately 220–280 g
- Long tapestry needle
- Standard yarn needle
- Locking stitch markers
- Dressmaking pins
- Scissors
- Measuring tape
For a toy intended for a child who may remove small components, replace plastic safety eyes with securely embroidered eyes.
Abbreviations
- MR — magic ring
- sc — single crochet
- inc — two single crochets in one stitch
- dec — invisible decrease
- sl st — slip stitch
- ch — chain
- hdc — half double crochet
- dc — double crochet
- BLO — back loop only
An invisible decrease is worked through the front loops of the next two stitches before completing one single crochet through both loops.
Pattern — Step by Step
Work all stuffed dinosaur parts in a continuous spiral unless another method is stated. Move the stitch marker after each round.
Head
Yarn: mint green — reconstruction using standard six-stitch amigurumi shaping.
R1: 6 sc in MR (6)
R2: inc ×6 (12)
R3: (sc, inc) ×6 (18)
R4: (2 sc, inc) ×6 (24)
R5: (3 sc, inc) ×6 (30)
R6: (4 sc, inc) ×6 (36)
R7: sc around (36)
R8: sc around (36)
R9: sc around (36)
R10: sc around (36)
R11: sc around (36)
R12: sc around (36)
R13: (4 sc, dec) ×6 (30)
R14: sc around (30)
R15: (3 sc, dec) ×6 (24)
R16: sc around (24)
R17: (2 sc, dec) ×6 (18)
R18: sc around (18)
R19: (sc, dec) ×6 (12)
R20: dec ×6 (6)
Insert the 12 mm eyes between R9 and R10, approximately 8 stitches apart. Begin stuffing after R13 and keep the lower front slightly softer for muzzle shaping.
Fasten off. Leave a 45 cm sewing tail.
Muzzle
Yarn: mint green.
R1: 6 sc in MR (6)
R2: inc ×6 (12)
R3: (sc, inc) ×6 (18)
R4: (2 sc, inc) ×6 (24)
R5: sc around (24)
R6: (2 sc, dec) ×6 (18)
Stuff lightly.
Fasten off with a 35 cm tail.
Flatten the attachment edge slightly. Target approximately 7–8 cm width and 4–5 cm projection.
Nostrils
Yarn: dark green, black or matching mint.
Embroider two small nostrils near the upper front of the muzzle.
Each nostril should be approximately 5–6 mm wide.
Keep approximately 18–22 mm between their centers.
Cheek Patches — Make 2
Yarn: soft pink.
R1: 6 sc in MR (6)
R2: inc ×6 (12)
Fasten off and leave a 15 cm tail.
If chunky yarn produces a cheek wider than 18–20 mm, use R1 only.
Smile
Yarn: black smooth yarn.
Embroider a shallow curved smile approximately 3.5–4 cm long beneath the muzzle.
Anchor the ends level with one another.
Use two or three long stitches rather than many small stitches so the line remains visible against plush yarn.
Body
Yarn: mint green.
R1: 6 sc in MR (6)
R2: inc ×6 (12)
R3: (sc, inc) ×6 (18)
R4: (2 sc, inc) ×6 (24)
R5: (3 sc, inc) ×6 (30)
R6: (4 sc, inc) ×6 (36)
R7: sc around (36)
R8: sc around (36)
R9: sc around (36)
R10: sc around (36)
R11: sc around (36)
R12: sc around (36)
R13: sc around (36)
R14: sc around (36)
R15: (4 sc, dec) ×6 (30)
R16: sc around (30)
R17: (3 sc, dec) ×6 (24)
R18: sc around (24)
R19: (2 sc, dec) ×6 (18)
R20: sc around (18)
R21: (sc, dec) ×6 (12)
R22: sc around (12)
R23: dec ×6 (6)
R24: sl st around (6)
Stuff firmly through the upper half. Keep the lowest 3–4 cm moderately soft because that section will be concealed inside the eggshell.
Fasten off.
Cream Belly Patch
Yarn: warm cream.
Ch 13.
Starting in the second chain:
sc in next 11 ch, 3 sc in final ch.
Continue along the opposite side.
Sc in next 10 ch, inc in final ch.
Work one additional round of sc, placing three evenly spaced increases at each curved end.
Fasten off with a 30 cm tail.
Target approximately 8–10 cm long × 4–5 cm wide.
Front Arms — Make 2
Yarn: mint green.
R1: 6 sc in MR (6)
R2: inc ×6 (12)
R3: sc around (12)
R4: sc around (12)
R5: sc around (12)
R6: sc around (12)
R7: (sc, dec) ×4 (8)
R8: sc around (8)
Stuff the rounded end lightly.
Leave the upper third unstuffed.
Flatten the opening and fasten off with a 25 cm tail.
Hidden Rear Legs — Make 2
Yarn: mint green.
R1: 6 sc in MR (6)
R2: inc ×6 (12)
R3: sc around (12)
R4: sc around (12)
R5: (sc, dec) ×4 (8)
R6: sc around (8)
Stuff lightly.
Fasten off with a sewing tail.
These legs sit inside the shell and mainly stabilize the body rather than remain fully visible.
Tail
Yarn: mint green.
R1: 6 sc in MR (6)
R2: sc around (6)
R3: (sc, inc) ×3 (9)
R4: sc around (9)
R5: (2 sc, inc) ×3 (12)
R6: sc around (12)
R7: sc around (12)
R8: (3 sc, inc) ×3 (15)
R9: sc around (15)
Stuff lightly, with less filling toward the tip.
Fasten off with a 30 cm tail.
Dorsal Plate 1 — Largest
Yarn: teal blue.
Ch 9.
Starting in second chain:
sl st, sc, hdc, 2 dc, hdc, sc, sl st.
Work 3 sc into the final chain.
Repeat the stitch sequence down the opposite side.
Work one sc edging round.
Fasten off with a 25 cm tail.
Target approximately 6–7 cm high.
Dorsal Plate 2
Repeat Plate 1.
Keep the second plate within approximately 5 mm of the first in height.
Dorsal Plate 3
Ch 8 and repeat the double-sided plate structure with one fewer center dc.
Target approximately 5.5–6 cm high.
Dorsal Plate 4
Repeat Plate 3.
This plate should mark the transition from the upper back toward the hidden lower body.
Dorsal Plate 5
Ch 7.
Work sl st, sc, hdc, dc, hdc, sc around both sides of the chain.
Add one sc edging round.
Target approximately 4.5–5 cm high.
Dorsal Plate 6
Repeat Plate 5, but omit the final edging round if the piece appears too large.
Target approximately 4 cm high.
Dorsal Plate 7 — Smallest
Ch 5.
Starting in second chain:
sl st, sc, hdc, sc.
Work 3 sc at the tip and repeat along the opposite side.
Fasten off.
Target approximately 3–3.5 cm high.
Main Eggshell Base
Yarn: warm cream.
R1: 6 sc in MR (6)
R2: inc ×6 (12)
R3: (sc, inc) ×6 (18)
R4: (2 sc, inc) ×6 (24)
R5: (3 sc, inc) ×6 (30)
R6: (4 sc, inc) ×6 (36)
R7: (5 sc, inc) ×6 (42)
R8: BLO sc around (42)
R9: sc around (42)
R10: sc around (42)
R11: sc around (42)
R12: sc around (42)
R13: sc around (42)
R14: sc around (42)
R15: sc around (42)
R16: sc around (42)
R17: sc around (42)
Do not stuff. The shell should form a firm open bowl approximately 20–22 cm across.
Jagged Egg Rim
Continue in cream.
Divide the 42 stitches into seven 6-stitch sections.
Across each section work one triangular shell point:
Row 1: 6 sc, turn (6)
Row 2: ch 1, dec, 2 sc, dec, turn (4)
Row 3: ch 1, dec ×2, turn (2)
Row 4: ch 1, dec (1)
Fasten off that point and rejoin at the next 6-stitch section.
Repeat until seven points surround the rim.
Vary two points by one row so the shell does not look mechanically symmetrical.
Mint Egg Spots — Make 5
Yarn: mint green.
R1: 6 sc in MR (6)
R2: inc ×6 (12)
Fasten off with a sewing tail.
For two larger spots:
R3: (sc, inc) ×6 (18)
Flatten each spot completely.
Detached Broken Shell Piece
Yarn: warm cream.
R1: 6 sc in MR (6)
R2: inc ×6 (12)
R3: (sc, inc) ×6 (18)
R4: (2 sc, inc) ×6 (24)
R5: BLO sc around (24)
R6: sc around (24)
R7: sc around (24)
Stop working complete rounds.
Across the upper edge, form four uneven points using 6-stitch triangular sections:
Row 1: 6 sc (6)
Row 2: dec, 2 sc, dec (4)
Row 3: dec ×2 (2)
Row 4: dec (1)
Fasten off.
Press the piece into a shallow cup rather than flattening it.
Mint Spot for Detached Shell
R1: 6 sc in MR (6)
R2: inc ×6 (12)
Fasten off and sew to the outside of the detached shell.
Assembly
- Sew the muzzle to the lower front of the head, then attach both pink cheeks at matching height beside the smile.
- Attach the head to the upper body with a broad 4–5 cm contact area so the oversized head cannot pivot forward.
- Sew the cream belly patch down the front of the torso before placing the dinosaur inside the shell.
- Attach both front arms approximately 2–3 cm below the head and angle them forward so the paws remain visible above the broken rim.
- Sew both rear legs and the tail to the lower body; these parts can remain partly hidden because their main function is to stabilize the hatchling inside the egg.
- Pin all seven teal dorsal plates in a straight line from the back of the head toward the tail, decreasing them gradually from approximately 6–7 cm to 3 cm.
- Sew the plates through their lower 10–15 mm, leaving the upper portions free so they stand behind the head rather than lying flat.
- Sew five mint spots to the outside of the main cream shell, keeping every spot at least 15 mm below the jagged edge.
- Seat the dinosaur inside the main shell and attach the lower torso at four concealed points around the interior, then place the front arms over two separate rim valleys.
- Set the detached shell fragment beside the main egg, reshape all seven jagged points and weave every structural yarn tail through at least 4 cm of matching fabric.
The completed display should show a mint baby stegosaurus rising from a stable spotted cream egg, with both arms visible, seven teal plates aligned behind the head and one detached shell fragment beside the base.
7 Technical Tips
- Egg rim collapsing outward: Loose tension across the final 42-stitch rounds leaves the seven shell points unsupported. Use a hook approximately 0.5 mm smaller for R14–R17 if the rim bends more than about 10 mm away from vertical.
- Dinosaur tipping forward: An oversized chenille head places most weight beyond the egg center. Attach the lower body at four internal points and keep the back of the shell directly beneath the head-body join.
- Dorsal plates forming a crooked line: A 5–10 mm sideways error becomes obvious behind the smooth round head. Draw an imaginary center line from crown to tail and pin every plate base before sewing any one permanently.
- Jagged rim looking too regular: Seven identical points can resemble a crown instead of broken shell. Shorten two points by one row and shift one attachment valley by approximately one stitch.
- Front paws disappearing: Arms positioned more than about 3 cm below the head can fall completely inside the bowl. Pin each arm over a separate rim valley before fixing the torso to the shell.
- Mint egg spots puckering: Tight sewing around a 12- or 18-stitch circle pulls the cream wall inward. Attach the spots with relaxed whip stitches placed only through the outer shell loops.
- Detached shell fragment lying flat: Heavy blocking removes the broken-cup profile. Keep the BLO transition at R5 intact and curve the fragment so its center rises approximately 20–25 mm from the table.
Conclusion
Check the dinosaur’s head position against the jagged rim before sewing the body into the egg because the shell should frame the hatchling rather than hide it. Next, pin the seven teal plates, set both paws above separate shell valleys and test the complete display on a level surface. Add the mint spots only after the shell remains stable under the dinosaur’s weight. Share the finished baby stegosaurus egg amigurumi crochet pattern project on Pinterest with a front three-quarter photograph, then post a side view of the plates and broken rim on Instagram using #HatchingMintStegosaurus. For this hatchling specifically, would you keep the cream egg with mint spots or switch the spots to teal?









