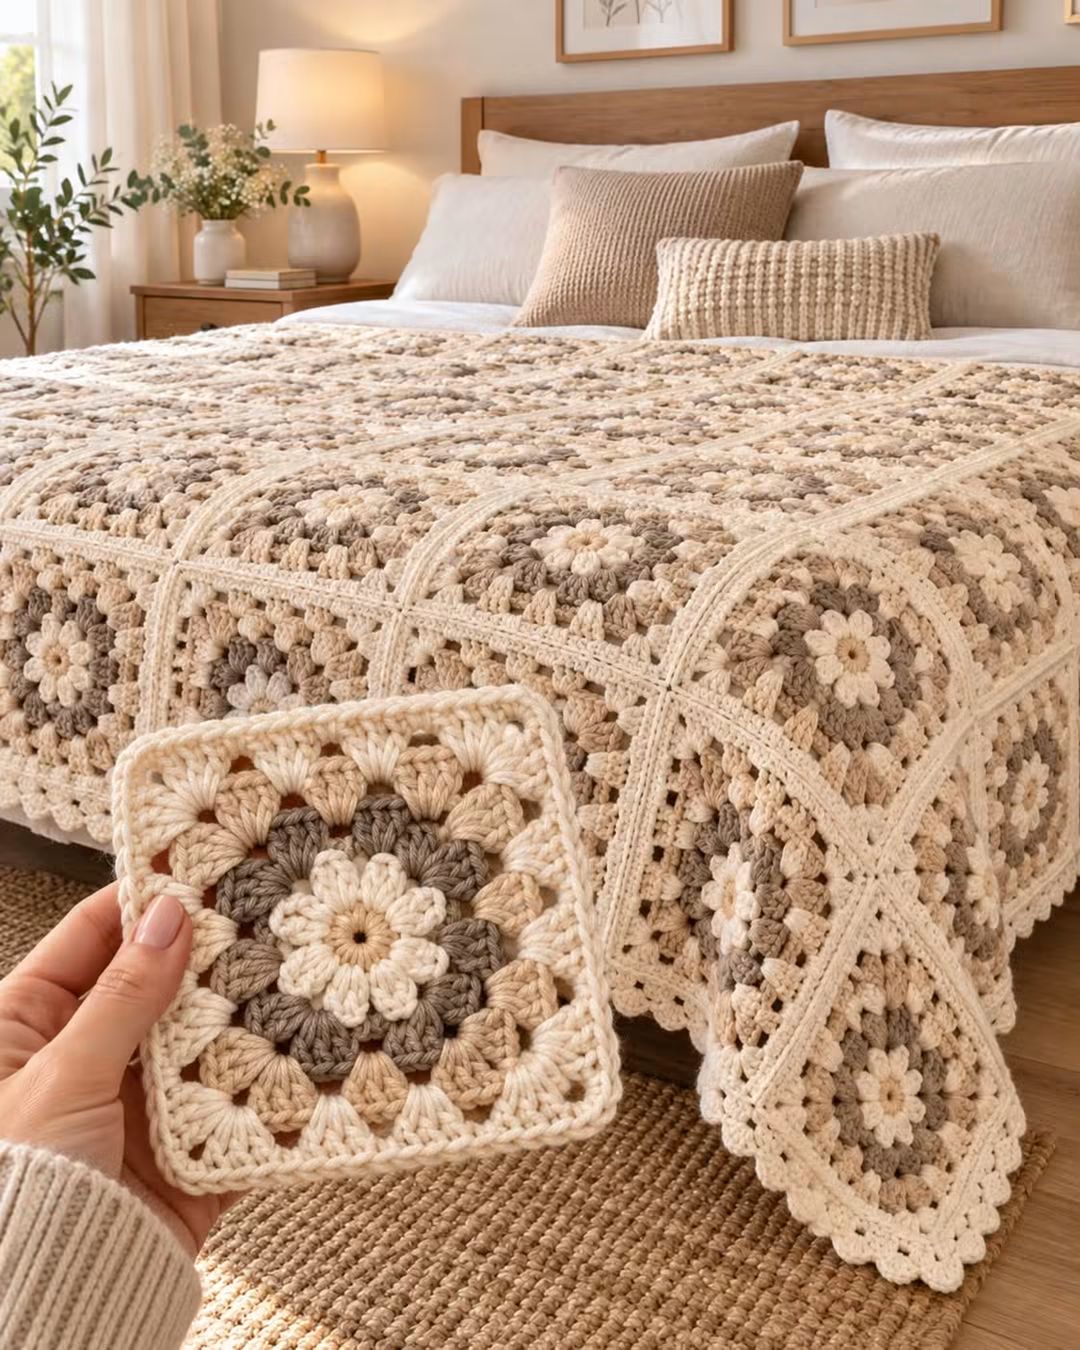
A raised ivory flower occupies the center of every square before taupe petals and cream corners turn the motif into a geometric grid. This floral granny square blanket crochet pattern uses worsted-weight yarn, a 5 mm crochet hook, and individually worked squares joined into a large neutral blanket. The modular construction makes the finished dimensions adjustable while preserving the cream, beige, and taupe arrangement shown in the reference design.
The Design: What Makes This Floral Granny Square Blanket Different
The blanket depends on three layers of structure. A dimensional ivory flower establishes the center of each motif. Taupe clusters form a darker ring around that flower, while beige and cream stitches expand the circular motif into a square.
The second defining feature is the joining system. Instead of allowing neighboring granny squares to blend together, a narrow cream seam outlines every motif. The resulting grid remains visible across the entire blanket.
Finally, a restrained neutral palette keeps the three-dimensional flowers prominent without introducing strong color contrast. For this flower granny square blanket, consistency between individual squares matters more than complicated stitches. A common construction error is joining motifs before blocking them to equal dimensions. Even a 5 mm difference between squares can distort a large grid.
Project Info at a Glance
| Skill Level | Square Size | Hook | Yarn | Construction |
|---|---|---|---|---|
| Intermediate | Approx. 13 cm | 5 mm | Worsted #4 | Individual joined motifs |
The finished blanket size is determined by the number of squares. Make and block one complete test square before calculating the final dimensions.
Materials and Tools
Yarn
Use worsted-weight #4 yarn in three coordinating neutral shades. A consistent yarn line is preferable because differences in yarn diameter can change the finished dimensions of individual squares.
- Ivory or warm white — worsted #4 — flower centers, outer rounds, joins, and border
- Taupe or mushroom beige — worsted #4 — inner flower/background sections
- Light beige or oatmeal — worsted #4 — secondary clusters and transition sections
For reference, published daisy granny-square blankets using worsted yarn and a 5 mm hook commonly produce squares around 5 inches or 13 cm across. Make the first motif before purchasing the entire yarn quantity if you plan to substitute another fiber.
Tools
- 5 mm crochet hook
- Tapestry needle
- Scissors
- Locking stitch markers
- Tape measure
- Blocking mats
- Rust-resistant blocking pins
Abbreviations
- MR — magic ring
- ch — chain
- sc — single crochet
- hdc — half double crochet
- dc — double crochet
- tr — treble crochet
- sl st — slip stitch
- st/sts — stitch/stitches
- sp — space
- dc3tog — three double crochets worked together
- FO — fasten off
Finished Size and Blanket Planning
Target approximately 13 × 13 cm per blocked square when using worsted-weight yarn and a 5 mm hook.
A published worsted-weight daisy granny square also measures approximately 5 inches square with a 5 mm hook, making this a practical baseline for planning a modular blanket.
Use the following calculation before beginning a large blanket:
Finished width = blocked square width × number of squares across + border allowance.
Finished length = blocked square height × number of squares down + border allowance.
For example, a 10 × 12 arrangement of 13 cm motifs creates a central panel approximately 130 × 156 cm before the final border.
For a larger bed blanket, increase the number of motifs rather than making individual squares substantially larger. This preserves the flower-to-grid proportions visible in the reference image.
Floral Granny Square Pattern
This is a photo-inspired reconstruction based on the visible flower motifs, neutral palette, square proportions, joins, and border. A finished photograph cannot establish an original designer’s exact stitch sequence.
Round 1 — Flower Center
Yarn: Ivory
Make a magic ring.
Round 1: Ch 2, work 11 dc into MR. Join with sl st to first dc. (12 sts)
Pull the magic ring closed firmly.
Fasten off if changing color for the surrounding flower structure.
Round 2 — Raised Flower Petals
Yarn: Ivory
Join ivory in any stitch from Round 1.
Round 2: Ch 2. Work a dc3tog cluster in the same stitch, ch 2. Repeat one dc3tog cluster followed by ch 2 in each stitch around.
Join with sl st to the first cluster.
(12 petals and 12 ch-2 spaces)
Fasten off.
The clusters should project slightly above the surrounding fabric. Do not pull the chain spaces excessively tight because the next round is worked into these openings.
Round 3 — Taupe Flower Ring
Yarn: Taupe
Join taupe in any ch-2 space.
Round 3: Ch 3, work 2 dc in the same space. Ch 1.
Work 3 dc in the next ch-2 space, ch 1.
Repeat around, placing one 3-dc group into every ch-2 space.
Join with sl st to the top of the beginning ch-3.
(12 groups of 3 dc)
Fasten off.
Round 4 — Squaring the Flower
Yarn: Light beige
Join light beige in any ch-1 space.
First corner: Ch 3, 2 dc, ch 2, 3 dc in the same space.
Side: Ch 1, work 3 dc in the next space, ch 1, then 3 dc in the following space, ch 1.
Next corner: Work 3 dc, ch 2, 3 dc in the next space.
Repeat the side and corner sequence around until four corners have been formed.
Join with sl st.
The motif should now read as a square rather than a circle. Each corner contains a ch-2 space that establishes the four final corner positions.
Round 5 — Cream Expansion Round
Yarn: Cream or ivory
Join cream in any corner ch-2 space.
Corner: Ch 3, 2 dc, ch 2, 3 dc in the same corner space.
Side: Ch 1. Work 3 dc into each available ch-1 space across the side, placing ch 1 between groups.
At the next corner, work 3 dc, ch 2, 3 dc.
Continue around all four sides.
Join with sl st to the top of the beginning ch-3.
Round 6 — Solid Joining Edge
Yarn: Cream
Ch 1.
Work 1 hdc in every dc and 1 hdc in each ch-1 space across the first side.
In each corner ch-2 space, work:
2 hdc, ch 2, 2 hdc.
Continue around all four sides and join with sl st to the first hdc.
Fasten off, leaving a tail long enough to weave securely into the back of the square.
This solid outer round creates a stable edge for blocking and joining.
Making the Blanket Squares
Make the required number of floral granny squares using the same hook, yarn line, and tension.
For a blanket approximately 130 × 156 cm before edging, make 120 squares and arrange them in a 10 × 12 grid.
For a smaller throw, use an 8 × 10 arrangement. For a larger bed covering, add complete rows and columns while maintaining the rectangular proportions.
Do not join a square immediately after crocheting it. Complete a batch, block the motifs to the same dimensions, and then arrange them.
Blocking the Granny Squares
Measure the first completed motif. Use that square to establish the target dimensions for the rest of the project.
- Place the square on a blocking mat.
- Pin the four corners first.
- Measure from corner to corner in both directions.
- Adjust until both diagonals are equal.
- Pin the center of each side if the edge curves inward.
- Check that the square measures approximately 13 × 13 cm.
- Dampen or steam according to the yarn manufacturer’s instructions.
- Allow the square to dry completely.
- Repeat with every motif using the same measurements.
- Stack the finished squares by size before joining.
Squares intended for the same blanket should differ by no more than a few millimeters after blocking.
Arranging the Floral Granny Squares
Lay every blocked square on a clean floor, bed, or large table before joining.
Rotate individual motifs until the flower centers and corners appear consistent. Even though the color palette is neutral, slight differences in yarn tension can make one orientation look more balanced than another.
For the reference-style blanket, keep the same cream, taupe, and beige sequence across every motif. Repetition creates the continuous floral grid visible across the bed.
Photograph the final arrangement before picking up the squares. The image provides a placement reference while joining rows.
Joining the Granny Squares
Cream Flat Join
Yarn: Cream
Place two blocked squares beside each other with their right sides facing upward.
Join cream at the first corner.
Insert the hook through the corresponding edge stitch of both squares and work a slip stitch.
Continue through matching stitches across the entire side.
Keep every joining stitch relaxed. A tight seam shortens the joined edge and causes the blanket to buckle.
Fasten off at the opposite corner.
Continue joining individual squares into horizontal rows.
After all horizontal rows are assembled, join those rows vertically using the same method.
At four-square intersections, check that all corners meet at one point before continuing. Misaligned intersections become increasingly visible as the blanket grows.
Alternative Mattress-Stitch Join
If you prefer a flatter seam, join the motifs with a tapestry needle and cream yarn.
Place two squares side by side. Pass the needle beneath corresponding edge loops, alternating between the left and right motifs.
Pull the yarn periodically until the edges meet without overlapping.
Do not pull hard enough to gather the fabric.
This method reduces the visible ridge between squares while retaining the cream grid.
Blanket Border
After all squares are joined, work around the entire blanket in cream.
Border Round 1
Join cream at any outer corner.
Round 1: Ch 1 and work sc evenly around the complete perimeter.
Work 3 sc into each blanket corner.
At the joins between squares, keep the stitches close together without adding unnecessary increases.
Join with sl st.
Border Round 2
Ch 2.
Work hdc in each stitch around.
At every corner, work 2 hdc, ch 2, 2 hdc into the corner stitch or space.
Join with sl st.
Border Round 3
Ch 3.
Work dc evenly around.
At each corner, work 2 dc, ch 2, 2 dc.
Join with sl st.
Decorative Scalloped Border
The reference blanket has a softly decorative outer edge. Add the following final round if you want a similar finish.
Final Round: Sl st in first stitch, skip 2 sts, work 5 dc in next st, skip 2 sts, sl st in next st.
Repeat around the perimeter.
Adjust the spacing near each corner so one shell is centered at the corner. Do not force the normal repeat if the stitch count does not divide evenly.
Fasten off and weave in the final yarn tail.
How to Keep the Flower Centers Raised
The central flowers provide much of the texture in this blanket. Their petals should remain visible after joining and blocking.
Do not press the flower clusters flat during blocking. Pin the square around its perimeter while allowing the central flower to retain its natural height.
If using steam, keep the heat source above the crochet fabric rather than pressing directly onto the raised petals. Follow the yarn manufacturer’s temperature restrictions, particularly with acrylic fibers.
How Much Yarn to Prepare
Exact yarn consumption depends on the finished blanket dimensions, yarn brand, square size, joining technique, and border width.
A published 5-inch worsted-weight daisy granny square uses approximately 25–35 yards of yarn per motif. Larger blanket patterns using the same general yarn category can require well over 1,500 yards in total.
The most reliable method is to crochet one complete square, weave in the ends, and weigh it on a digital scale.
Multiply the weight of one finished square by the total number of motifs. Then add yarn for seams and the outer border.
Buy additional cream because it appears in the flower, outer square rounds, joining seams, and blanket border. Taupe and beige are concentrated primarily within the individual motifs.
7 Technical Tips for a Better Floral Granny Square Blanket
- Measure every tenth square. A 5 mm size difference looks minor in one motif but can become several centimeters across a long blanket row. Compare new squares against a blocked reference square throughout the project.
- Keep all corner spaces identical. Switching between ch-1, ch-2, and ch-3 corners changes the dimensions of otherwise matching motifs. Use the same ch-2 corner construction on every square.
- Do not flatten the flower clusters. Heavy blocking can remove the dimensional effect visible in the center of the motifs. Pin the perimeter rather than placing pins through the raised petals.
- Mark the first stitch of the solid edge. Accidentally adding one stitch per round creates a square that gradually becomes larger than the rest. Count each side before fastening off.
- Check every four-square intersection. A corner displaced by even one stitch creates a broken grid line that remains visible across the finished blanket. Align all four corner spaces before completing the seam.
- Keep joining tension looser than motif tension. Tight slip-stitch seams shorten the edges and cause the blanket to bunch between joins. Place the joined section flat after every completed row to identify contraction early.
- Reserve enough cream yarn for finishing. The reference design uses cream across the outer rounds, seams, and perimeter. Running out during joining can create visible dye-lot differences across the blanket grid.
Color Placement
The photographed blanket relies on a narrow neutral palette rather than multiple contrasting shades. Use warm ivory for the raised flowers and structural outlines, mushroom taupe around the central flower, and light oatmeal beige through the transition sections.
Avoid using pure optical white if you want the softer neutral appearance shown in the reference design. Warm cream keeps the contrast between the flower and taupe background visible without creating a stark black-and-white effect.
For a slightly darker version, increase the taupe content while keeping the final round and joining yarn cream. The grid should remain lighter than the center sections so individual squares stay visually separated.
Finishing the Blanket
- Inspect every square intersection for loose yarn ends.
- Weave each tail through several stitches in opposing directions.
- Check the blanket width at the top, middle, and bottom.
- Measure both long edges and compare their lengths.
- Correct any obvious border rippling before the final decorative round.
- Complete the scalloped edging.
- Weave in all remaining border tails.
- Wash the blanket according to the yarn label.
- Lay it flat and reshape the outer corners while damp.
- Allow it to dry completely before folding or placing it on a bed.
The completed blanket should form a regular grid of raised neutral flowers surrounded by cream joining lines and a coordinated decorative border.
Conclusion
Make one complete motif before committing yarn to this floral granny square blanket crochet pattern, then block and measure it to establish the dimensions for every remaining square. Record the yarn weight of that sample as well; it provides a better material estimate than relying on a generic blanket quantity. Complete the motifs in batches, block them to matching dimensions, and arrange the entire grid before joining. Add the cream perimeter only after all intersections lie flat. Save the finished blanket to Pinterest and share a close-up of the raised flower centers on Instagram with #NeutralFloralGrannyBlanket. For this design, would you keep the taupe flower ring or replace it with a warmer caramel beige?









