Introduction
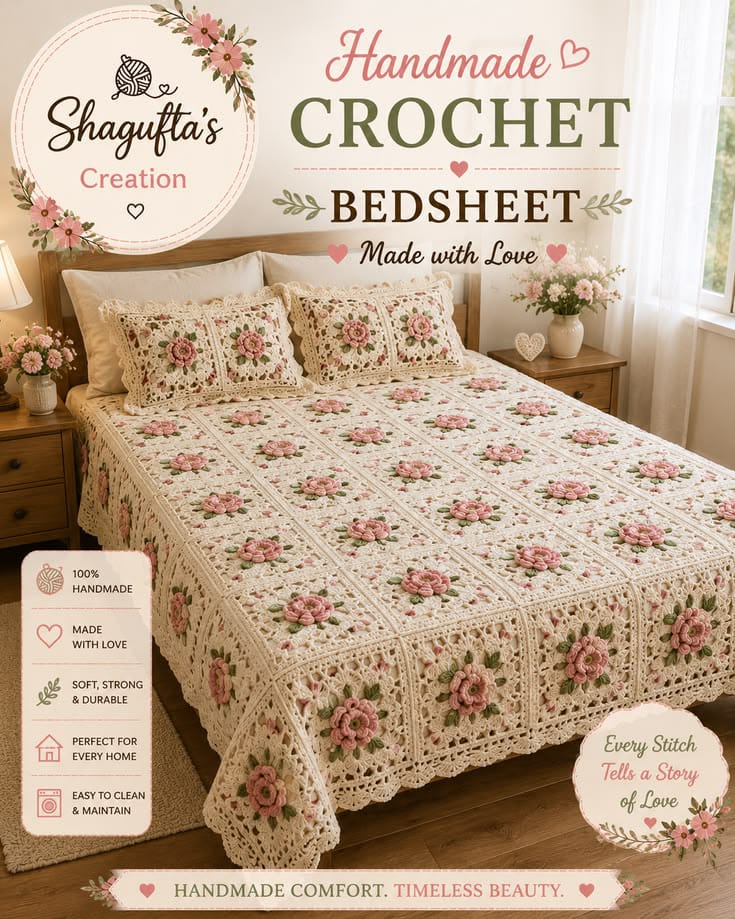
A bedspread containing more than two hundred raised roses can drift out of square before the border is even started. This floral crochet bedspread pattern controls that problem with 12–13 cm blocked motifs, a flat cream joining grid and measured flower placement. Size 10 cotton with a 2 mm hook produces an approximately 155 × 230 cm double-bed cover with dimensional pink flowers and an open lace edge.
The Design: What Makes This Floral Bedspread Different
Each block performs three jobs. A dimensional pink flower establishes the center, olive stitches form four small leaf accents, and cream lace converts the circular floral section into a square that can be joined without large gaps.
The reference does not scatter flowers randomly. Every primary square carries a rose, so the finished crochet flower bedspread develops a regular garden-grid structure across the mattress. Cream occupies most of the total surface, keeping the raised pink elements visually separate.
The lower border is deeper than a standard granny-square edging. Open mesh and scalloped shells extend the crochet lace bedspread beyond the joined motif grid and create the overhanging section visible around the bed.
A frequent construction error is joining unblocked motifs. A difference of only 4–5 mm per square can accumulate across twelve columns and shift the finished width by several centimeters.
Project Info at a Glance
| Skill Level | Time | Finished Size | Hook | Best For |
|---|---|---|---|---|
| Intermediate | 55–80 hours | Approx. 155 × 230 cm | 2 mm | Double bed, decorative bed cover |
Materials and Tools
Thread
Use size 10 mercerized cotton crochet thread or another fine cotton that produces the required motif size.
- Warm cream / ivory — approximately 1,300–1,450 g
- Dusty pink — approximately 180–220 g
- Blush pink — approximately 100–140 g
- Olive green — approximately 100–130 g
- Soft yellow — approximately 30–50 g
Tools
- 2 mm steel crochet hook
- Tapestry needle
- Fine scissors
- Rust-proof blocking pins
- Large blocking surface
- Flexible measuring tape
- Stitch markers
- Optional digital scale for checking motif yarn use
Abbreviations
- MR — magic ring
- ch — chain
- sl st — slip stitch
- sc — single crochet
- hdc — half double crochet
- dc — double crochet
- tr — treble crochet
- sp — space
- ch-sp — chain space
- st/sts — stitch/stitches
- rnd — round
- RS — right side
Invisible decreases are not required because the flower squares are worked outward in rounds and remain flat after the raised petal section.
Finished Size and Motif Count
The sample uses a 12-column × 17-row layout.
That equals:
12 × 17 = 204 floral squares.
Block every square to approximately 12.5 cm.
Before edging:
12 × 12.5 cm = 150 cm width
17 × 12.5 cm = 212.5 cm length
Joining and the border bring the finished project to approximately 155 × 225–230 cm.
If your squares block closer to 13 cm, measure a complete row before making all 204 motifs. A 0.5 cm difference repeated twelve times adds 6 cm to the width.
Pattern — Step by Step
Raised Rose Granny Square — Make 204
Each finished motif uses yellow, two pink shades, olive and cream.
Work with the RS facing.
Round 1 — Flower Center
With soft yellow, make a MR.
Ch 1.
Work:
8 sc in MR. (8)
Join with sl st to first sc.
Fasten off yellow.
Round 2 — Inner Pink Petals
Join blush pink in any stitch.
In each stitch around work:
sl st, ch 2, 2 dc, ch 2, sl st
You will create 8 small petals.
Fasten off.
The petals should remain raised rather than being blocked flat.
Round 3 — Back Loops for Outer Petals
Join dusty pink behind the flower.
Work one anchoring sl st between two Round 2 petals.
Ch 4, sl st between next petals.
Repeat around.
You should have 8 ch-4 loops positioned behind the first petal layer.
Round 4 — Outer Pink Petals
Into each ch-4 loop work:
sc, hdc, 3 dc, hdc, sc
Repeat for all eight loops.
Join.
Fasten off pink.
The flower should now have two visible petal levels.
Round 5 — Leaves
Join olive green behind the outer petals.
Work:
ch 5, sl st into next rear anchoring point
around until eight loops are formed.
Into alternating loops, make a leaf:
sc, hdc, 2 dc, tr, 2 dc, hdc, sc
In the other four loops, work:
3 sc
This creates four principal leaves positioned roughly north, east, south and west.
Fasten off green.
Round 6 — Cream Foundation
Join cream in one of the short green sections between leaves.
Ch 3.
Work a combination of dc and ch spaces around the flower to create four corner points.
At each corner position work:
2 dc, ch 2, 2 dc
Between corners, work:
ch 2, 3 dc, ch 2
as space allows around the floral center.
The objective is a flat four-sided foundation rather than a tight ring.
Join with sl st.
Round 7 — Squaring Round
Sl st into the next corner ch-2 space.
Ch 3.
In the same corner work:
2 dc, ch 2, 3 dc
Along each side:
ch 2, 3 dc in next ch-sp
Repeat to the next corner.
At every corner work:
3 dc, ch 2, 3 dc
Continue around.
Join.
Round 8 — Lace Expansion
Sl st into corner.
Work:
3 dc, ch 2, 3 dc in corner.
Ch 2.
In each side space work:
3 dc, ch 2
Continue across each side.
Repeat the full corner group at all four corners.
Join.
Round 9 — Final Cream Round
Ch 1.
Sc in each dc.
Work 2 sc in every ch-2 side space.
At each corner work:
sc, ch 2, sc
into the corner space.
Join.
Fasten off with approximately 20 cm tail.
Block the finished motif to 12–13 cm square.
Blocking 204 Squares
Do not wait until every motif is complete.
Block in batches of 12 or 24 squares.
Pin each square to an identical template.
Measure from corner to corner and side to side.
Maximum recommended difference between finished motifs:
3 mm.
Larger discrepancies become visible when twelve motifs are joined across one row.
Allow the cotton to dry before removing pins.
Keep completed squares stacked by row group so counting remains manageable.
Joining the Squares
Arrange the motifs into 17 rows of 12 squares.
Orient the flowers in the same direction unless intentional variation is wanted.
For a flat join, use cream yarn and a mattress-style seam.
Place two squares RS up.
Align corresponding stitches.
With cream thread and a tapestry needle, catch the inner loops from one square, then the corresponding inner loops from the second.
Continue across.
Do not pull the seam tight after every stitch.
Tightening excessively shortens the join and creates a ridge.
Join all 12 squares into one row.
Make 17 rows.
Then join the rows horizontally.
Checking the Joined Panel
After every fourth completed row, lay the project flat.
Measure the width at:
- top
- center
- bottom
Keep differences below approximately 2 cm.
If one row is shorter, inspect its joining tension before continuing.
Do not attempt to correct a narrow row later by stretching the final border.
Foundation Border
Join cream at one corner of the assembled spread.
Border Round 1
Ch 1.
Sc evenly around.
Where two squares meet, place one additional sc if the join creates a shallow gap.
At each outer corner work:
sc, ch 2, sc
Join.
Border Round 2
Ch 3.
Dc in each stitch around.
At each corner ch-2 space work:
2 dc, ch 2, 2 dc
Join.
Open Mesh Border
Border Round 3
Ch 4.
Skip 1 st, dc in next st, ch 1.
Repeat around.
At each corner work:
dc, ch 2, dc
into the corner space.
Border Round 4
Repeat the mesh structure.
Keep one dc above each previous dc and ch 1 between posts.
Border Round 5
Repeat once more.
Three mesh rounds provide enough openness to distinguish the edging from the square grid.
Floral Shell Border
Border Round 6
In each second mesh space work:
5 dc
In the next mesh space:
sc
Repeat:
5 dc in next space, sc in next space
around.
At corners, work a larger shell:
7 dc
to turn without pulling the edge inward.
Final Scallop Round
Border Round 7
Across each 5-dc shell work:
sc, hdc, dc, tr, dc, hdc, sc
Work one sl st into the sc between shells.
Across each 7-dc corner shell distribute:
sc, hdc, dc, 3 tr, dc, hdc, sc
Fasten off.
The finished edging should add approximately 6–9 cm to each outside dimension depending on blocking.
Optional Deeper Bed Skirt Border
The reference hangs substantially below the mattress.
For a deeper drop, repeat the open mesh section for another 4–6 rounds before making the shell border.
Every additional mesh round increases both yarn use and border weight.
Test the spread on the actual bed after three mesh rounds.
Matching Pillow Sham — Make 2
The reference also includes matching floral pillows.
For one decorative sham front, make:
3 × 4 floral squares = 12 motifs.
Join them into a rectangle.
Add two rounds of cream sc around the outside.
For the back, use fabric or crochet two overlapping cream panels.
If crocheting the back:
Ch to match the finished sham width.
Work dc rows until the panel reaches approximately 60% of the sham height.
Make two identical pieces.
Overlap them at the center to form an envelope opening.
Sew around the outside perimeter.
Add a shell border to the front edge if desired.
Assembly
- Crochet one complete rose square and block it before calculating the full motif count.
- Make the remaining squares in batches, keeping the finished blocked dimension within approximately 3 mm of the sample.
- Arrange 204 motifs into 17 rows of 12 and photograph the layout before joining.
- Join individual squares into rows using cream thread and consistent seam tension.
- Connect the seventeen completed rows and measure the panel after every fourth join.
- Work the cream foundation border around all four sides, correcting only minor spacing differences at the joins.
- Add the open mesh rounds and check all four corners for flatness before beginning shells.
- Crochet the shell and scallop rounds without pulling the lower edge tighter than the motif grid.
- Weave flower, joining and edging tails through at least 3–4 cm of matching stitches.
- Wet-block the completed bedspread to its final dimensions and allow the cotton to dry completely while supported flat.
The completed spread consists of 204 raised floral squares joined into a rectangular cream grid with a deep lace perimeter.
7 Technical Tips
- Motif-size drift: A difference of 5 mm per square becomes 6 cm across twelve columns. Block each motif to the same 12–13 cm template before joining.
- Rose flattening: Pinning directly through dimensional petals during blocking can crush the flower center. Pin only the cream outer square and four corners, leaving the pink petals uncompressed.
- Crooked joins: Pulling mattress stitches too tightly shortens the seam and causes adjacent squares to cup. Stop after every four motifs and lay the joined strip flat before continuing.
- Color inconsistency: Running out of one pink dye lot halfway through 204 roses can create visible blocks of color. Allocate the full 180–220 g dusty-pink quantity before starting the flower batch.
- Border ruffling: Too many stitches along the assembled outside edge produce waves that become larger through later rounds. Compare each border side against the flat motif grid after every round.
- Heavy wet cotton: A full bedspread gains substantial weight during washing. Support the wet fabric across both arms or in a laundry basket rather than lifting it by one corner.
- Petal snagging: Long loose flower loops can catch during laundering. Keep each Round 4 outer petal anchored inside its ch-4 loop and weave the pink tail through several rear flower stitches.
Why Motif Size Matters
A bedspread is less forgiving than a small granny-square blanket.
One square being 4 mm wider is barely visible.
Twelve of those squares arranged across a bed can add nearly 5 cm.
Seventeen slightly oversized motifs along the length add even more.
Choose one blocked size before batch production.
Do not mix square patterns simply because their unblocked measurements appear similar.
Their final blocked dimensions and edge stitch counts need to match before joining.
Planning the Pink Flowers
The reference keeps the flower palette narrow.
Dusty rose forms the strongest petal color.
Blush softens the inner petals.
Yellow appears only in the small center.
Green is limited to four leaf sections.
That color distribution keeps cream dominant even though every square contains a flower.
For a close photo-inspired balance, reserve approximately:
75–80% of total visible yarn area for cream
10–12% for pinks
6–8% for green
less than 2% for yellow
The percentages are visual targets rather than precise mass calculations.
How Much Yarn Does a Bedspread Need?
Large motif spreads consume far more thread than a throw.
Your rose density, motif size and border depth affect the total substantially.
The most reliable method is to complete and weigh four finished squares.
Calculate the average grams per square.
Multiply by 204.
Then add approximately 15–20% for joining and the border.
Adjusting the Bedspread Width
For a narrower bed:
10 columns × 17 rows
at 12.5 cm per square gives approximately 125 × 212.5 cm before edging.
For the main double-bed version:
12 × 17 squares
gives approximately 150 × 212.5 cm.
For a wider cover:
14 × 17 squares
gives approximately 175 × 212.5 cm before the border.
Always add the expected border width to both sides before selecting the motif layout.
A 7 cm border adds approximately 14 cm to the total width.
Adjusting the Length
The same calculation applies vertically.
Fifteen 12.5 cm squares produce:
187.5 cm
before edging.
Seventeen produce:
212.5 cm.
Nineteen produce:
237.5 cm.
A bedspread intended to cover the pillows can use more rows than one designed to stop below them.
Measure the mattress and required drop before making all the squares.
Flat Join Versus Join-As-You-Go
Both methods can work.
A flat sewn mattress join gives more control after every square has been blocked.
It also makes damaged motifs easier to replace later.
Continuous join-as-you-go reduces the total number of joining ends and can connect an entire grid with one working strand.
For a 204-square bedspread, the reduced number of tails is significant.
The trade-off is planning.
Every square must already be blocked and arranged in final order before continuous joining begins.
Caring for Raised Rose Motifs
Mercerized cotton generally responds well to careful wet blocking, but dimensional flowers need different treatment from flat lace.
Do not iron directly over the roses.
Heat and pressure can permanently flatten the petals.
After washing, spread the bedspread flat.
Shape the cream squares first.
Then lift each flower petal with your fingers.
Allow the spread to dry before folding.
When storing it, fold along motif joins rather than repeatedly creasing the center of raised flowers.
Conclusion
Make and block one complete square before committing to the other 203 motifs. That first 12–13 cm measurement determines the bedspread width, length, join plan and final border depth. Keep the dimensional roses unpinned during blocking, join the cream edges with consistent tension, then add the lace border only after the entire grid lies flat. For a double-bed version, the 12 × 17 layout provides a practical starting point near 155 × 230 cm after edging. Save this floral crochet bedspread pattern to Pinterest and share the completed rose grid on Instagram with #PinkRoseBedspread. Would you keep every flower dusty pink, or alternate blush and darker rose motifs by row?









