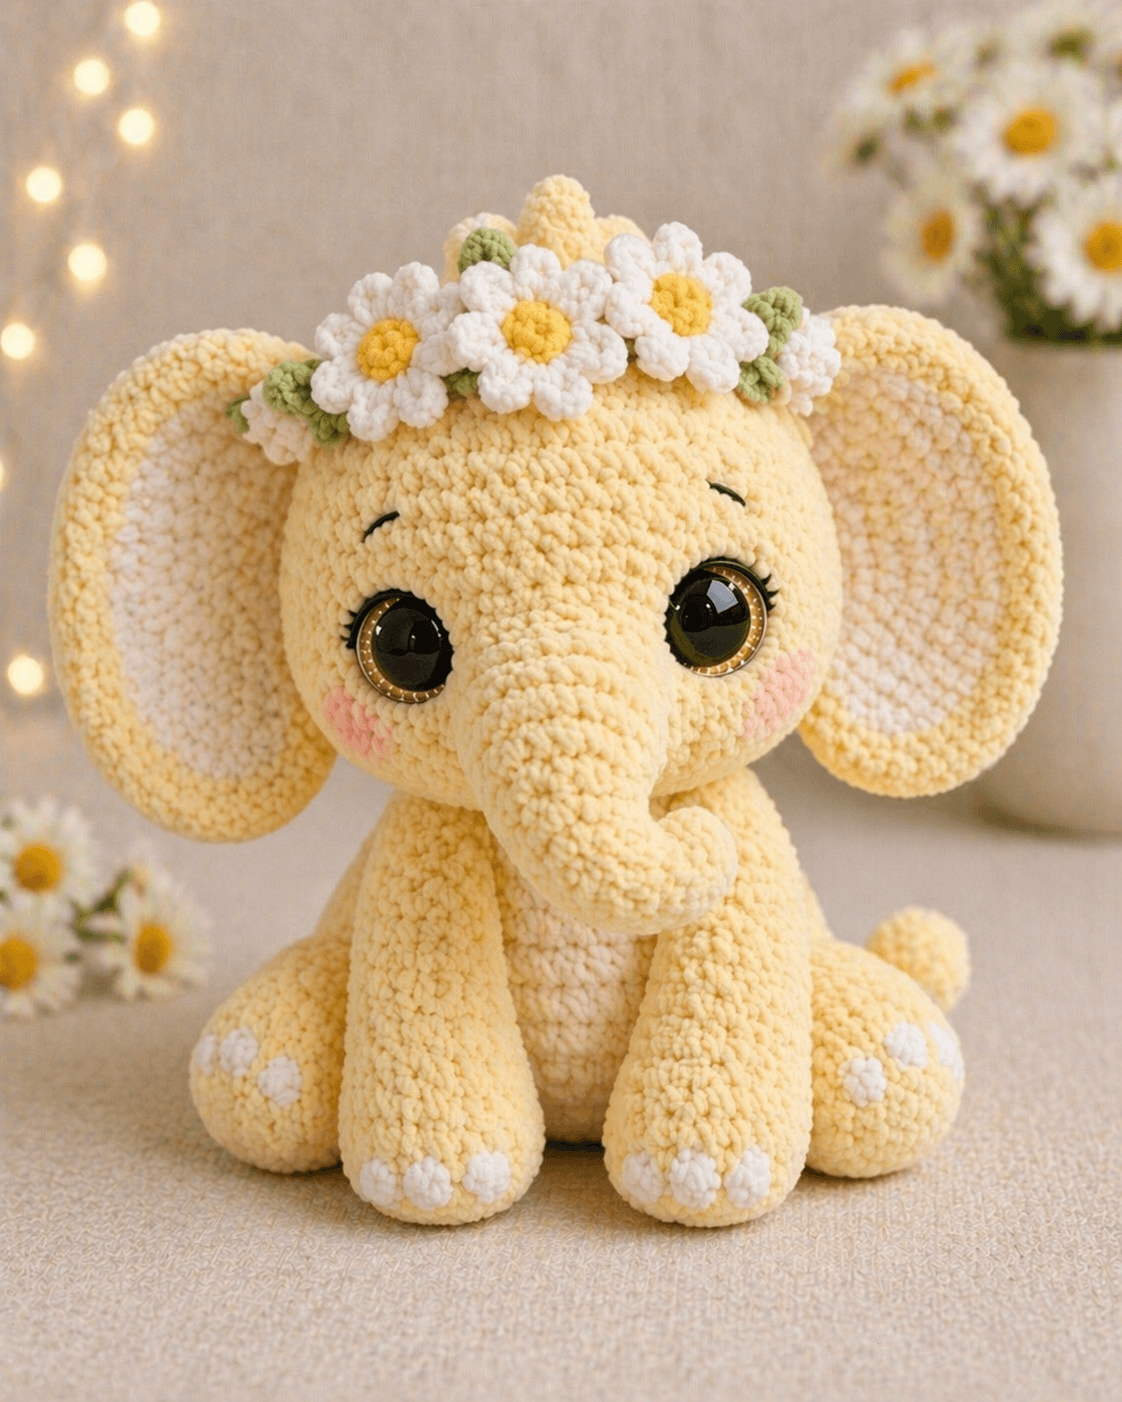
An elephant stops reading as an elephant the moment the trunk joins too close to the eyes. This elephant amigurumi crochet pattern uses plush chenille yarn, a 5.0 mm hook, and large eyes to build a seated toy around 22 cm tall for an intermediate maker. You get broad ears, a stable sitting base, and a flower crown that photographs cleanly. The finished piece works well for nursery decor, safari themes, or a gift build.
The Design: What Makes This Elephant Different
This plush elephant amigurumi depends on proportion more than surface detail. First, the head is drafted larger than the body, because the trunk, eyes, and ears carry most of the read from the front view. Second, the trunk stays separate instead of being pulled directly from the head, which gives tighter control over curl, seam height, and face depth. Third, the ears are layered, not flat, so the inner panel supports the forward fold that makes a baby elephant amigurumi pattern look young instead of heavy. The common mistake is leg placement. Back legs sewn too far behind the body push the toy off balance, and ears placed too low flatten the silhouette from the front. Published elephant tutorials also tend to skip blush circles and crown spacing as structural choices.
Project Info at a Glance
| Skill Level | Time | Finished Size | Hook | Best For |
|---|---|---|---|---|
| Intermediate | 6–8 hours | 22 cm | 5.0 mm | Nursery gift, shelf display, safari set |
Benchmark plush elephant specs in current listings cluster around chenille or velvet yarn, large eyes, and a finished size in the mid-teens to low-twenties in centimeters.
Materials and Tools
Yarn
- Butter yellow — super bulky chenille — 100–120 g — Himalaya Dolphin Baby or Hobbii Honey Bunny
- White — super bulky chenille — 25 g — matching chenille line
- Soft pink — light scrap yarn — 5 g — Ricorumi or YarnArt Jeans
- Golden yellow — light scrap yarn — 5 g — Ricorumi or YarnArt Jeans
- Sage green — light scrap yarn — 5 g — Ricorumi or YarnArt Jeans
Tools
- Hook 5.0 mm
- Safety eyes 16 mm or large gloss eyes with washers
- Stuffing
- Yarn needle
- Stitch markers
- Scissors
- Pins
- Black embroidery thread for brows and lashes
Published plush elephant patterns commonly pair 100 g main skeins with chenille yarn and a 5.0 mm hook, while contrast details range from small scraps to roughly 25 g.
Abbreviations
MR / sc / inc / dec / sl st / ch / BLO / hdc / dc
Use invisible decrease on every closing round; plush yarn hides the front-loop join better than a regular single-crochet-two-together.
Pattern — Step by Step
Continuous spiral unless noted. The rounds below are a fresh draft built to match the photographed elephant, scaled from common plush-elephant benchmarks and standard amigurumi math.
Head (Make 1)
Yarn: butter yellow — Standard amigurumi math adapted to the photographed sample.
R1: 6 sc in MR (6)
R2: inc x6 (12)
R3: (1 sc, inc) x6 (18)
R4: (2 sc, inc) x6 (24)
R5: (3 sc, inc) x6 (30)
R6: (4 sc, inc) x6 (36)
R7: (5 sc, inc) x6 (42)
R8: sc around (42)
R9: sc around (42)
R10: sc around (42)
R11: sc around (42)
R12: sc around (42)
R13: sc around (42)
Place eyes between R10 and R11, spaced 11 stitches apart. Stuff firmly.
R14: (5 sc, dec) x6 (36)
R15: (4 sc, dec) x6 (30)
R16: (3 sc, dec) x6 (24)
R17: (2 sc, dec) x6 (18)
R18: (1 sc, dec) x6 (12)
R19: dec x6 (6)
Fasten off. Leave 20 cm tail.
Body (Make 1)
Yarn: butter yellow — Standard amigurumi math adapted to the photographed sample.
R1: 6 sc in MR (6)
R2: inc x6 (12)
R3: (1 sc, inc) x6 (18)
R4: (2 sc, inc) x6 (24)
R5: (3 sc, inc) x6 (30)
R6: (4 sc, inc) x6 (36)
R7: sc around (36)
R8: sc around (36)
R9: sc around (36)
R10: sc around (36)
R11: (4 sc, dec) x6 (30)
R12: sc around (30)
R13: sc around (30)
R14: (3 sc, dec) x6 (24)
R15: sc around (24)
R16: (2 sc, dec) x6 (18)
R17: sc around (18)
R18: (1 sc, dec) x6 (12)
Stuff the base firmly and keep the neck area lighter.
Fasten off. Leave 30 cm tail.
Trunk (Make 1)
Yarn: butter yellow — Standard amigurumi math adapted to the photographed sample.
R1: 6 sc in MR (6)
R2: sc around (6)
R3: sc around (6)
R4: sc around (6)
R5: inc x6 (12)
R6: sc around (12)
R7: sc around (12)
R8: sc around (12)
R9: inc x6 (18)
R10: sc around (18)
R11: sc around (18)
R12: sc around (18)
R13: sc around (18)
R14: sc around (18)
R15: sc around (18)
R16: BLO sc around (18)
R17: sc around (18)
Stuff only the lower half. Keep the top rounds soft so the tip can curl.
Fasten off. Leave 35 cm tail.
Outer Ears (Make 2)
Yarn: butter yellow — Standard amigurumi oval math.
Ch 10.
R1: starting in 2nd ch from hook, 8 sc, 3 sc in last ch, 7 sc on opposite side, inc in final st (20)
R2: inc, 7 sc, inc x3, 7 sc, inc x2 (26)
R3: 1 sc, inc, 7 sc, (1 sc, inc) x3, 7 sc, (1 sc, inc) x2 (32)
R4: 2 sc, inc, 7 sc, (2 sc, inc) x3, 7 sc, (2 sc, inc) x2 (38)
R5: 3 sc, inc, 7 sc, (3 sc, inc) x3, 7 sc, (3 sc, inc) x2 (44)
R6: sc around (44)
Fasten off. Leave 25 cm tail.
Inner Ears (Make 2)
Yarn: white — Standard amigurumi oval math.
Ch 8.
R1: starting in 2nd ch from hook, 6 sc, 3 sc in last ch, 5 sc on opposite side, inc in final st (16)
R2: inc, 5 sc, inc x3, 5 sc, inc x2 (22)
R3: 1 sc, inc, 5 sc, (1 sc, inc) x3, 5 sc, (1 sc, inc) x2 (28)
R4: 2 sc, inc, 5 sc, (2 sc, inc) x3, 5 sc, (2 sc, inc) x2 (34)
R5: sc around (34)
Fasten off. Leave 20 cm tail.
Front Legs (Make 2)
Yarn: butter yellow — Standard amigurumi math adapted to the photographed sample.
R1: 6 sc in MR (6)
R2: inc x6 (12)
R3: (1 sc, inc) x6 (18)
R4: sc around (18)
R5: sc around (18)
R6: sc around (18)
R7: (1 sc, dec) x6 (12)
R8: sc around (12)
R9: sc around (12)
R10: sc around (12)
R11: sc around (12)
R12: sc around (12)
R13: sc around (12)
R14: sc around (12)
R15: sc around (12)
R16: sc around (12)
Stuff lower two-thirds only.
Fasten off. Leave 25 cm tail.
Back Legs (Make 2)
Yarn: butter yellow — Standard amigurumi math adapted to the photographed sample.
R1: 6 sc in MR (6)
R2: inc x6 (12)
R3: (1 sc, inc) x6 (18)
R4: sc around (18)
R5: sc around (18)
R6: sc around (18)
R7: (1 sc, dec) x6 (12)
R8: sc around (12)
R9: sc around (12)
R10: sc around (12)
Stuff firmly for a stable seat.
Fasten off. Leave 25 cm tail.
Belly Patch (Make 1)
Yarn: white — Standard amigurumi oval math.
Ch 6.
R1: starting in 2nd ch from hook, 4 sc, 3 sc in last ch, 3 sc on opposite side, inc in final st (12)
R2: inc, 3 sc, inc x3, 3 sc, inc x2 (18)
R3: 1 sc, inc, 3 sc, (1 sc, inc) x3, 3 sc, (1 sc, inc) x2 (24)
Fasten off. Leave 20 cm tail.
Cheek Patches (Make 2)
Yarn: soft pink — Standard amigurumi flat circle.
R1: 6 sc in MR (6)
R2: inc x6 (12)
Fasten off. Leave 12 cm tail.
Toe Spots (Make 12)
Yarn: white — Standard amigurumi flat circle.
R1: 6 sc in MR (6)
Fasten off. Leave 8 cm tail.
Tail Puff (Make 1)
Yarn: butter yellow — Standard amigurumi math adapted to the photographed sample.
R1: 6 sc in MR (6)
R2: inc x6 (12)
R3: sc around (12)
R4: dec x6 (6)
Stuff very lightly.
Fasten off. Leave 15 cm tail.
Daisy Flowers (Make 5)
Yarn: yellow center, white petals — Accessory drafted for the photographed sample.
R1: 6 sc in MR (6)
R2: inc x6 (12)
R3: sl st in next st, ch 3, 2 dc in same st, ch 3, sl st in same st, sl st in next st x6
Fasten off. Leave 15 cm tail.
Leaves (Make 6)
Yarn: sage green — Accessory drafted for the photographed sample.
Ch 6.
Row 1: sl st in 2nd ch from hook, sc, hdc, sc, sl st (5 worked stitches)
Fasten off. Leave 10 cm tail.
Assembly
- Pin the head to the body and sew around the neck opening with the body tail.
- Sew the belly patch to the center front of the body, with the lower edge sitting about two rounds above the base.
- Sew the trunk to the center face, starting below the eye line and curving the tip slightly inward.
- Attach the cheek patches one round below the eyes, then embroider the brows one round above the eyes and add short outer lashes.
- Sew the front legs to the front body directly under the head, spaced about 6 stitches apart.
- Sew the back legs low on the sides and angle them slightly forward so the toy sits on its leg fronts.
- Layer each inner ear inside an outer ear, pinch the top edge, and sew the ears high on the head with a soft forward fold.
- Sew three toe spots to each foot end and close any remaining openings.
- Attach the tail puff at the back base, then sew the leaves and daisies across the forehead from ear to ear.
- Check the toy from front and side view, compress or add stuffing where needed, and bury every yarn tail inside the body.
With plush yarn and the benchmark materials above, the seated toy lands close to the 20–22 cm range used in comparable elephant builds.
7 Technical Tips
- Stitch marker drift: A head marker that slips even one stitch will pull the trunk seam off center by the time you reach the eye rounds. Reset the marker at the end of every increase round through R7.
- Stuffing firmness: Overfilled trunks point outward instead of curling down and in. Fill only the lower half and leave the top 3–4 rounds soft.
- Invisible decrease: Standard decreases leave visible gaps in chenille on the closing rounds. Use front-loop invisible decreases from R14 onward on the head and from R11 onward on the body.
- Eye placement timing: Plush eye washers become harder to lock once the head starts closing. Install the eyes between R10 and R11 before the first decrease round.
- Velvet tension: Loose tension creates windows at the 36-to-42 stitch expansion where stuffing can flash through. Drop one hook size if the head plateau looks open from the front.
- Pinning ears: Elephant ears can twist backward while sewing and narrow the face. Use three pins per ear: top point, lower lobe, and center fold.
- Tail weaving: Short finishing tails pull loose after handling, especially on crown pieces and toe spots. Leave at least 10–15 cm on accessories and run the tail through two stuffing zones before trimming.
Conclusion
This build moves fastest when you batch the mirrored parts first: both ears, both front legs, both back legs, then the full crown set. Next, join head and body before fixing the flowers, because crown spacing depends on the final ear angle and face width. For sharing, post one straight-on photo and one side profile to Pinterest and Instagram, then keep the project title identical on both platforms so later revisions stay easy to compare. Use #DaisyElephantPattern. This elephant amigurumi crochet pattern is also a clean test piece for trunk height, eye spacing, and seated balance. Did you place your crown low across the forehead, or higher between the ears for a taller profile?









