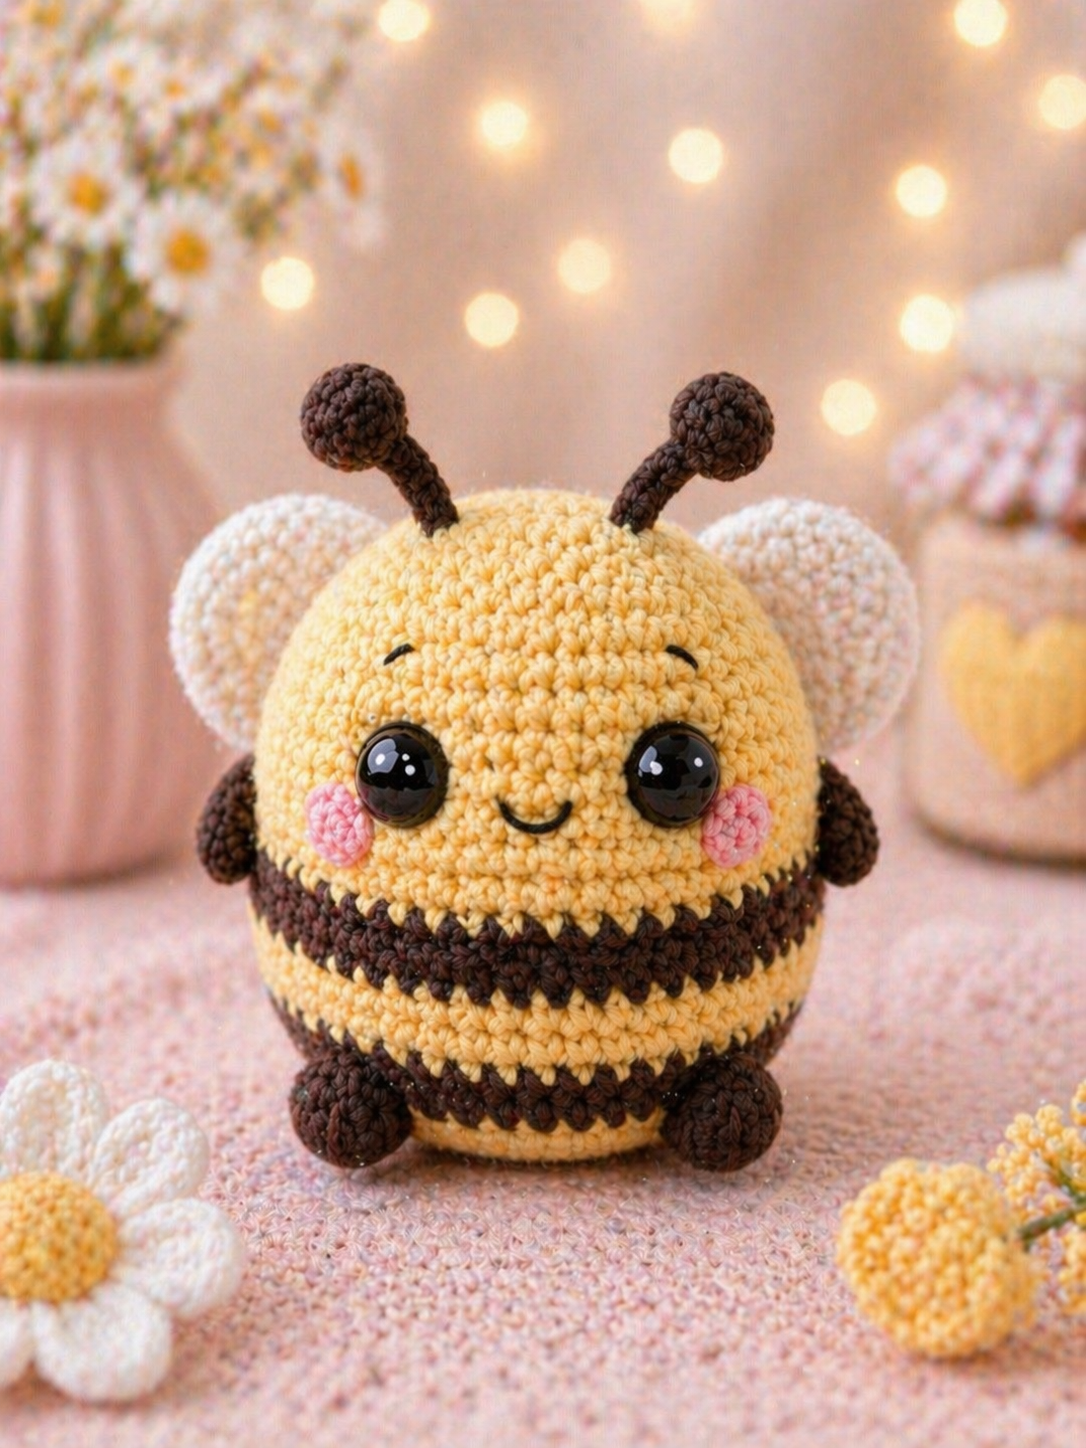
A bee with wings sewn too low stops reading as a bee and starts reading as a striped bear. This bee amigurumi crochet pattern uses DK cotton, a 3 mm hook, and 10 mm safety eyes to build a rounded 15 cm bumblebee at easy-intermediate level. You will make separate wings, cheek circles, and antennae; once assembled, the toy works well as shelf decor, market stock, or a nursery prop.
The Design: What Makes This Bee Different
The photo points to three structural decisions. First, the head must read wider than the body, even though both parts stay rounded; that keeps the face dominant and stops the toy from looking like a striped ball. Second, the wings need to sit high and slightly behind the head-body join, because low wings flatten the silhouette. Third, the antennae need rounded tips rather than plain chains, which gives the finished toy a cleaner kawaii bee amigurumi profile. One common mistake in a bumble bee crochet pattern is starting the top stripe too close to the chin. That shortens the yellow face area and makes the cheeks feel crowded. Another weak point is oversizing the crochet bee wings, which can pull the toy backward instead of letting it sit upright.
Project Info at a Glance
| Skill Level | Time | Finished Size | Hook | Best For |
|---|---|---|---|---|
| Easy-Intermediate | About 2 hrs | 15 cm | 3.0 mm | Shelf decor, spring gift, market table |
Materials and Tools
Yarn
- Warm yellow — DK cotton — 20 g — milk cotton or smooth cotton blend
- Dark brown — DK cotton — 25 g — same yarn line as main color
- White — DK cotton — 10 g — same yarn line as main color
- Pink — DK cotton — 5 g or less — same yarn line as main color
- Black embroidery thread — small amount — for brows and smile
Tools
- Hook 3.0 mm
- 10 mm safety eyes
- Polyester stuffing
- Tapestry needle
- Stitch markers
- Pins
- Small scissors
Abbreviations
MR / sc / inc / dec / sl st / ch / BLO / FO
Work each invisible decrease through the front loops only; a standard decrease leaves a visible ridge, and yellow cotton shows that ridge fast.
Pattern — Step by Step
Continuous spiral unless noted.
The stitch recipe below is a custom photo-led adaptation built with standard amigurumi increase math. Material sizing stays inside the published bee range of DK to worsted yarn, 3.0–3.5 mm hooks, and 10–12 mm eyes for small-to-medium cotton builds.
Head (Make 1)
Yarn: warm yellow
R1: 6 sc in MR (6)
R2: inc x6 (12)
R3: (sc, inc) x6 (18)
R4: (2 sc, inc) x6 (24)
R5: (3 sc, inc) x6 (30)
R6: (4 sc, inc) x6 (36)
R7: sc around (36)
R8: sc around (36)
R9: sc around (36)
R10: sc around (36)
R11: sc around (36)
Place the 10 mm eyes between R8 and R9, 7 stitches apart. Keep them slightly low on the face so the forehead stays tall.
R12: (4 sc, dec) x6 (30)
R13: (3 sc, dec) x6 (24)
R14: (2 sc, dec) x6 (18)
Stuff firmly. Add extra filling behind the eyes so the cheeks stay rounded.
R15: (sc, dec) x6 (12)
R16: dec x6 (6)
Fasten off. Leave 25 cm tail.
Body (Make 1)
Yarn: warm yellow and dark brown
R1: 6 sc in MR with yellow (6)
R2: inc x6 (12)
R3: (sc, inc) x6 (18)
R4: (2 sc, inc) x6 (24)
R5: (3 sc, inc) x6 (30)
R6: sc around in yellow (30)
R7: sc around in dark brown (30)
R8: sc around in dark brown (30)
R9: sc around in yellow (30)
R10: sc around in dark brown (30)
R11: sc around in dark brown (30)
R12: sc around in yellow (30)
R13: (3 sc, dec) x6 in yellow (24)
R14: (2 sc, dec) x6 (18)
Stuff more firmly than the head. The base should compress only slightly when pressed.
R15: (sc, dec) x6 (12)
R16: dec x6 (6)
Fasten off. Leave 30 cm tail.
Arms (Make 2)
Yarn: dark brown
R1: 6 sc in MR (6)
R2: sc around (6)
R3: sc around (6)
R4: sc around (6)
Do not stuff. Light shaping with fingers is enough.
Fasten off. Leave 18 cm tail.
Feet (Make 2)
Yarn: dark brown
R1: 6 sc in MR (6)
R2: inc x6 (12)
R3: sc around (12)
Add a small pinch of stuffing. Overfilling makes the feet tilt outward.
R4: dec x6 (6)
Fasten off. Leave 20 cm tail.
Wings (Make 2)
Yarn: white
R1: 6 sc in MR (6)
R2: inc x6 (12)
R3: (sc, inc) x6 (18)
R4: sc around (18)
R5: (sc, dec) x6 (12)
Do not stuff. Flatten the piece before sewing so the wing keeps a soft oval.
Fasten off. Leave 25 cm tail.
Antennae (Make 2)
Yarn: dark brown
R1: 6 sc in MR (6)
R2: inc x6 (12)
R3: sc around (12)
R4: dec x6 (6)
R5: sc around (6)
R6: sc around (6)
R7: sc around (6)
R8: sc around (6)
Stuff only the rounded tip. Leave the stem unstuffed so it can angle forward slightly.
Fasten off. Leave 22 cm tail.
Cheek Patches (Make 2)
Yarn: pink
R1: 6 sc in MR (6)
R2: inc x6 (12)
These stay flat. Steam is not needed; finger-pressing is enough.
Fasten off. Leave 15 cm tail.
Face Embroidery
Yarn: black embroidery thread
Embroider the smile centered one round below the eyes, about 3 stitches wide.
Add each brow as a 2-stitch curve set 1 round above the eyes and angled slightly outward.
Do not embroider the smile too high; a high mouth crowds the cheek circles.
Assembly
- Stuff the head firmly and close the final opening. Round the forehead with your fingers before weaving in the tail.
- Stuff the body more firmly than the head and close it. Press the top of the body lightly so it forms a shallow sewing surface.
- Mark the face first. Check eye spacing, cheek position, and smile height before attaching any side pieces.
- Attach the cheek patches directly below the outer edge of each eye. Keep one stitch of yellow visible between eye and cheek.
- Sew the head to the body with the face centered above the top stripe. The yellow area of the body should stay visible under the chin.
- Attach the arms to the side seams of the body, slightly above the first dark stripe. Aim for symmetry from the front, not from the side.
- Sew the feet to the lower front of the body on the last yellow section. They should touch the table at the same angle.
- Pin the wings high on the back with their inner edges nearly touching. Sew them so the body join stays hidden from the front view.
- Attach the antennae on the head between the upper center line and the side curve. Angle them forward slightly before knotting off on the inside.
- Embroider the brows and smile, then weave every tail through at least 4 internal stitches. The finished bee should sit upright without added support.
7 Technical Tips
- Marker drift on stripes: Move the stitch marker up after every color change, not before it. If you leave it in the old position, the brown rings will climb diagonally across the body by round 10.
- Head stuffing firmness: Stop when the head springs back after a light thumb press and does not crease around the eyes. A soft head makes the 10 mm eyes tilt inward.
- Invisible decrease control: Work dec stitches with even pull on both front loops. A loose dec leaves six visible dents around the yellow crown and breaks the smooth face line.
- Eye placement timing: Insert safety eyes before the head drops below 24 stitches. Waiting until 18 stitches makes the washer hard to seat and can stretch the eye holes.
- Wing pinning height: Place the wings with their top edge aligned close to the head-body seam. Drop them lower than that and the toy loses the bee silhouette from the front.
- Foot angle: Sew the feet so their center points sit level with each other. A difference of even 3–4 mm will make the toy rock on a flat surface.
- Tail weaving: Run each tail through at least 4 internal posts, reverse once, then trim. Single-pass weaving slips loose fastest on smooth cotton DK yarn.
Conclusion
This version keeps the face dominant, the stripes low, and the wings high, which is why the silhouette reads clearly as a bee from the first glance. The next step is simple: make the head and body first, then dry-pin the wings and feet before any final sewing. Save the finished toy to Pinterest with a front and side view, then post the same pair on Instagram so the wing height and stripe placement are visible. For this bee amigurumi crochet pattern, use the project hashtag #RoundBeePattern. Did you place your wings touching at the center back, or did you leave a one-stitch gap?









