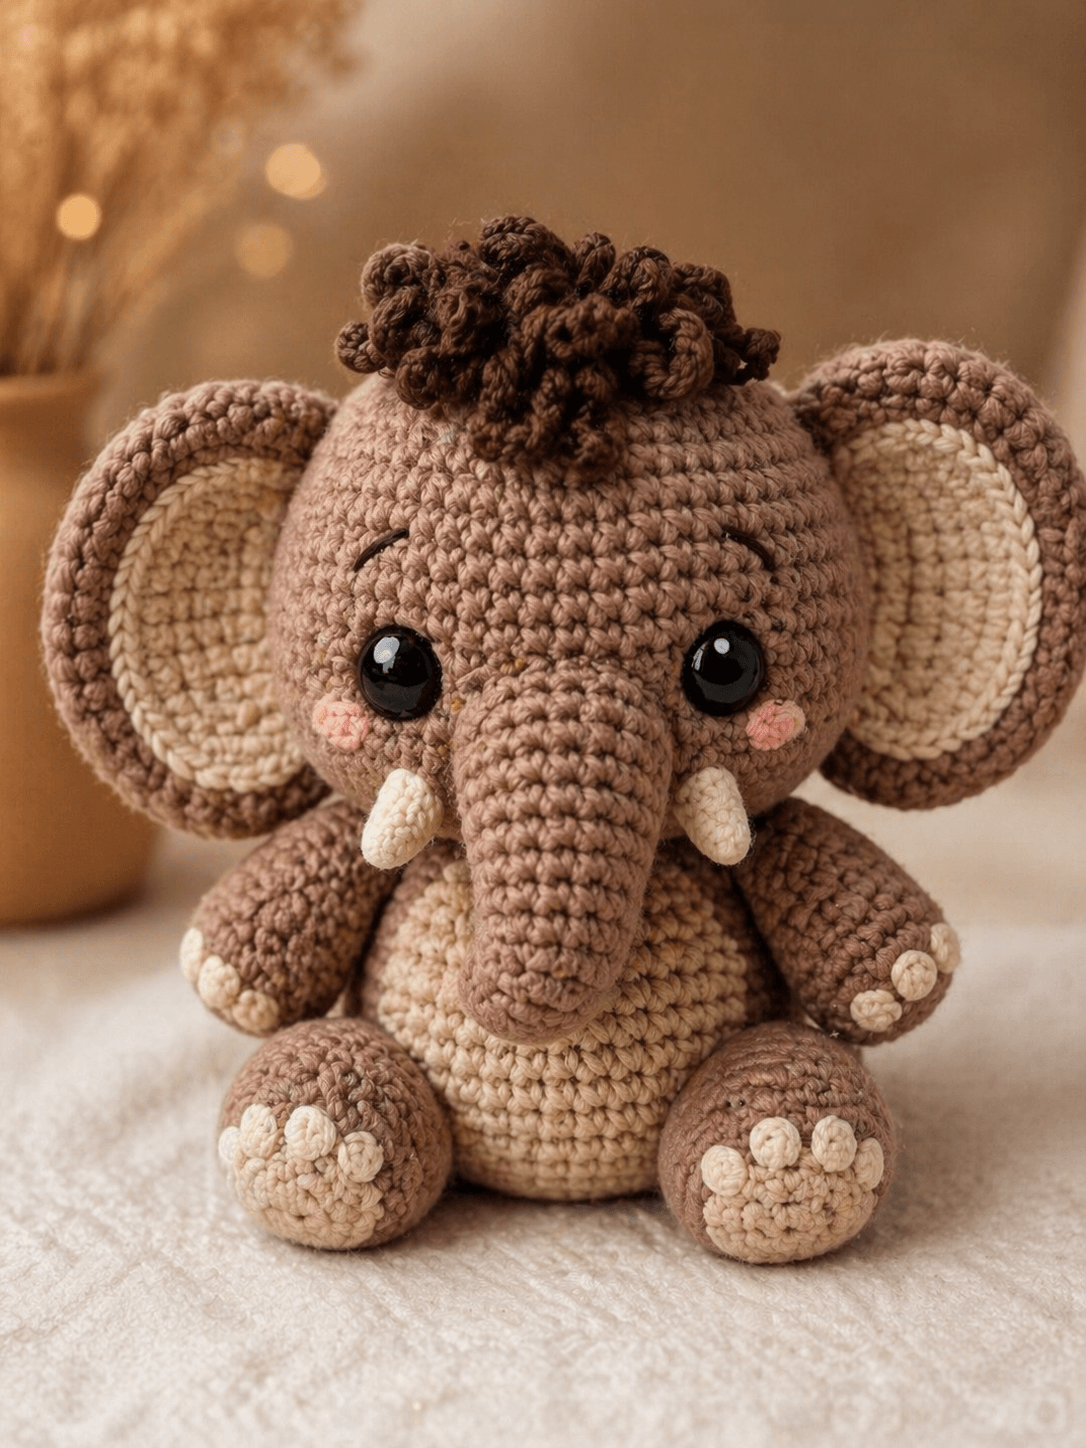
An elephant calf’s trunk has to hang from the face without dragging the head forward. This elephant amigurumi crochet pattern builds a taupe sitting calf, 20–23 cm tall, with cream inner ears, tusks, toe pads, a belly patch, and a dark curly forelock. Use DK or tight worsted yarn, a 3.5 mm hook, 12 mm eyes, and intermediate shaping. The back legs act as props for shelf styling.
The Design: What Makes This Baby Elephant Different
Three structural choices control this baby elephant amigurumi. First, the head uses a 42-stitch plateau so the trunk has enough face area without crowding the eyes. Second, each ear is built as a cream inner circle capped by a taupe outer layer; that extra rim copies the photo and keeps the ear edge from curling inward. Third, the body stays compact, then the back legs sit forward to counter the trunk and oversized ears.
Many elephant crochet toy patterns miss that balance point, so the animal tips back or needs support. The common mistake is sewing the ears too low. In a crochet elephant pattern, low ears make the head look like a bear with a trunk rather than an elephant calf with large lateral ears.
Project Info at a Glance
| Skill Level | Time | Finished Size | Hook | Best For |
|---|---|---|---|---|
| Intermediate | 5–7 hours | 20–23 cm seated | 3.5 mm | Shelf toy, nursery display, safari set |
Materials and Tools
Yarn
- Taupe brown — DK or tight worsted — 100 g — Paintbox Cotton DK, Stylecraft Special DK, or similar
- Cream — same weight — 25 g — inner ears, belly patch, tusks, toe pads
- Dark brown — same weight — 8–10 g — curly forelock and brows
- Soft pink — same weight — 3 g — cheek patches
Tools
- Hook 3.5 mm
- 12 mm black safety eyes
- Polyester stuffing
- Yarn needle
- Stitch markers
- Pins
- Scissors
- Black or dark brown embroidery thread
For toys intended for children under 3, embroider the eyes instead of using plastic safety eyes.
Abbreviations
- MR = magic ring
- sc = single crochet
- inc = 2 sc in same stitch
- dec = invisible decrease
- sl st = slip stitch
- ch = chain
- BLO = back loop only
- FO = fasten off
Invisible decrease uses the front loops of the next two stitches only, then finishes as one single crochet to reduce visible gaps.
Pattern — Step by Step
Continuous spiral unless noted. Use a stitch marker at the first stitch of every round.
Head
Yarn: taupe brown
R1: 6 sc in MR (6)
R2: inc ×6 (12)
R3: (sc, inc) ×6 (18)
R4: (2 sc, inc) ×6 (24)
R5: (3 sc, inc) ×6 (30)
R6: (4 sc, inc) ×6 (36)
R7: (5 sc, inc) ×6 (42)
R8–R13: sc around (42)
R14: (5 sc, dec) ×6 (36)
R15: (4 sc, dec) ×6 (30)
R16: (3 sc, dec) ×6 (24)
R17: (2 sc, dec) ×6 (18)
R18: (sc, dec) ×6 (12)
R19: dec ×6 (6)
Insert eyes between R10 and R11, 10 stitches apart. Check that the trunk will sit centered below them before locking the backs. Stuff firmly, especially at the lower face where the trunk will be sewn.
Fasten off. Leave 25 cm tail.
Body
Yarn: taupe brown
R1: 6 sc in MR (6)
R2: inc ×6 (12)
R3: (sc, inc) ×6 (18)
R4: (2 sc, inc) ×6 (24)
R5: (3 sc, inc) ×6 (30)
R6: (4 sc, inc) ×6 (36)
R7: (5 sc, inc) ×6 (42)
R8–R11: sc around (42)
R12: (5 sc, dec) ×6 (36)
R13–R14: sc around (36)
R15: (4 sc, dec) ×6 (30)
R16–R17: sc around (30)
R18: (3 sc, dec) ×6 (24)
R19: sc around (24)
R20: (2 sc, dec) ×6 (18)
R21: (sc, dec) ×6 (12)
R22: dec ×6 (6)
Stuff the base firmly and the neck area extra firm so the head does not rock.
Fasten off. Leave 35 cm tail for sewing head to body.
Belly Patch
Yarn: cream
R1: 6 sc in MR (6)
R2: inc ×6 (12)
R3: (sc, inc) ×6 (18)
R4: (2 sc, inc) ×6 (24)
R5: (3 sc, inc) ×6 (30)
R6: (4 sc, inc) ×6 (36)
sl st to next stitch (36)
Block lightly with pins if the patch cups.
Fasten off. Leave 40 cm tail.
Arms / Front Legs
Yarn: cream for paw, taupe brown for arm
Make 2.
R1: with cream, 6 sc in MR (6)
R2: inc ×6 (12)
R3: (sc, inc) ×6 (18)
R4: BLO with taupe, sc around (18)
R5–R8: sc around (18)
R9: (sc, dec) ×6 (12)
R10–R13: sc around (12)
Stuff the paw firmly. Leave the top half only lightly filled so the arms sit close to the body.
Fasten off. Flatten top and leave 25 cm tail.
Back Legs
Yarn: cream for foot front, taupe brown for leg
Make 2.
R1: with cream, 6 sc in MR (6)
R2: inc ×6 (12)
R3: (sc, inc) ×6 (18)
R4: (2 sc, inc) ×6 (24)
R5: BLO with taupe, sc around (24)
R6–R8: sc around (24)
R9: (2 sc, dec) ×6 (18)
R10: (sc, dec) ×6 (12)
R11–R12: sc around (12)
Stuff the foot firmly and keep the top flatter for sewing.
Fasten off. Flatten top and leave 30 cm tail.
Large Layered Ears
Yarn: cream inner circle, taupe brown outer circle
Make 2.
Inner ear, cream:
R1: 6 sc in MR (6)
R2: inc ×6 (12)
R3: (sc, inc) ×6 (18)
R4: (2 sc, inc) ×6 (24)
R5: (3 sc, inc) ×6 (30)
R6: (4 sc, inc) ×6 (36)
Fasten off. Weave in tail.
Outer ear, taupe:
R1: 6 sc in MR (6)
R2: inc ×6 (12)
R3: (sc, inc) ×6 (18)
R4: (2 sc, inc) ×6 (24)
R5: (3 sc, inc) ×6 (30)
R6: (4 sc, inc) ×6 (36)
Hold cream circle against taupe circle, wrong sides together. Continue through both layers.
R7: (5 sc, inc) ×6 (42)
sl st to next stitch (42)
Pinch 1.5 cm at the top edge and stitch the fold before attaching to the head.
Fasten off. Leave 45 cm tail.
Trunk
Yarn: taupe brown
R1: 6 sc in MR (6)
R2–R4: sc around (6)
R5: inc ×6 (12)
R6–R10: sc around (12)
R11: (sc, inc) ×6 (18)
R12–R14: sc around (18)
Stuff tip lightly, middle moderately, and base firmly. Curve the tip downward with two small anchor stitches if needed.
Fasten off. Leave 40 cm tail.
Tusks
Yarn: cream
Make 2.
R1: 6 sc in MR (6)
R2–R4: sc around (6)
Do not overstuff. Pinch the tip with the yarn tail to make a blunt cone.
Fasten off. Leave 25 cm tail.
Cheek Patches
Yarn: soft pink
Make 2.
R1: 6 sc in MR (6)
R2: inc ×6 (12)
sl st to next stitch (12)
Keep these flat and do not stuff.
Fasten off. Leave 20 cm tail.
Toe Pads
Yarn: cream
Make 14: 3 for each front paw and 4 for each back foot.
R1: 6 sc in MR (6)
sl st to first sc (6)
Pull the ring tight so each pad forms a raised dot.
Fasten off. Leave 12 cm tail on each pad.
Curly Forelock
Yarn: dark brown
Make 10 curls.
Row 1: ch 9 (9)
Row 2: 2 sc in 2nd ch from hook and in each ch across (16)
The curl twists naturally when worked at two stitches per chain. Make 6 longer curls and 4 shorter curls by using ch 7 for the shorter pieces.
Fasten off. Leave 18 cm tail on each curl.
Eyebrows
Yarn: dark brown embroidery strand
Make 2.
Cut two 20 cm strands. Embroider each brow as one slanted stitch, 2 rounds above each eye and 3 stitches wide.
Fasten off by burying the tail through the head.
Tail
Yarn: taupe brown with dark brown fringe
Row 1: ch 7 (7)
Row 2: sc in 2nd ch from hook, sc across (6)
Add three 6 cm dark brown strands to the tail end as fringe.
Fasten off. Leave 20 cm tail.
Assembly
- Pin the head centered on the body with the eye line facing forward and the lower head touching the firm neck area.
- Sew the head to the body using the body tail, passing through one head stitch and one body stitch on every seam stitch.
- Pin the trunk below the eyes with the base spanning R11–R14 of the head, then sew around the full 18-stitch base.
- Attach the tusks on both sides of the trunk base, angled slightly outward and placed one round below the eyes.
- Sew the cheek patches beside the trunk, directly under the eyes, keeping both patches level.
- Attach the ears with their top folds aligned near R5–R6 of the head and their lower edges behind the cheek line.
- Sew the arms two rounds below the head, slightly forward of the side seam so they frame the belly patch.
- Sew the back legs to the lower front of the body, spaced 6 stitches apart, then test that the toy sits without tipping.
- Stitch the cream belly patch to the front of the body and sew the toe pads onto the paws and feet.
- Attach the curly forelock to the crown, embroider the brows, add the tail to the back, and bury all ends through stuffed sections.
The taupe baby elephant is complete when it sits independently on a flat surface.
7 Technical Tips
- Stitch marker drift: Spiral drift can move the trunk off center by one stitch every 3–4 rounds. Move the marker at the first stitch of every round and count before each decrease.
- Neck wobble: A soft neck makes the 42-stitch head drop forward under the trunk weight. Pack the body neck until it resists a 5 mm thumb press.
- Visible decrease gaps: Loose decreases show stuffing on the head’s lower curve. Work every dec as an invisible decrease through front loops only, then pull the working yarn tight before the next sc.
- Eye placement timing: Late eye placement forces the trunk too low. Insert 12 mm eyes between R10 and R11 before closing the head, with 10 stitches between posts.
- Worsted tension spread: Loose worsted yarn can push the finished size past 23 cm. Drop from a 3.5 mm hook to 3.25 mm if stuffing shows between stitches.
- Ear pinning error: Ears sewn flat against the head make the elephant look narrow from the front. Pinch the top 1.5 cm of each ear and pin both ears for symmetry before sewing.
- Tail weaving failure: Short tails can pull out when a child handles the toy. Leave at least 20 cm on the tail and weave it through three different body paths before trimming.
Conclusion
This taupe calf works because the largest shapes do the holding: broad ears, a 42-stitch head, a compact 42-stitch body, and front-weighted legs. Keep the trunk stuffed lightly at the tip and firmly at the base, then check the sitting angle before sewing the back legs. The next concrete step is to crochet one ear first and compare its diameter against the head before making the second. Save this elephant amigurumi crochet pattern to Pinterest, post the finished calf on Instagram, and tag it with #TaupeBabyElephant. Which feature should be adjusted first for your version: the darker curly forelock or the length of the trunk?









