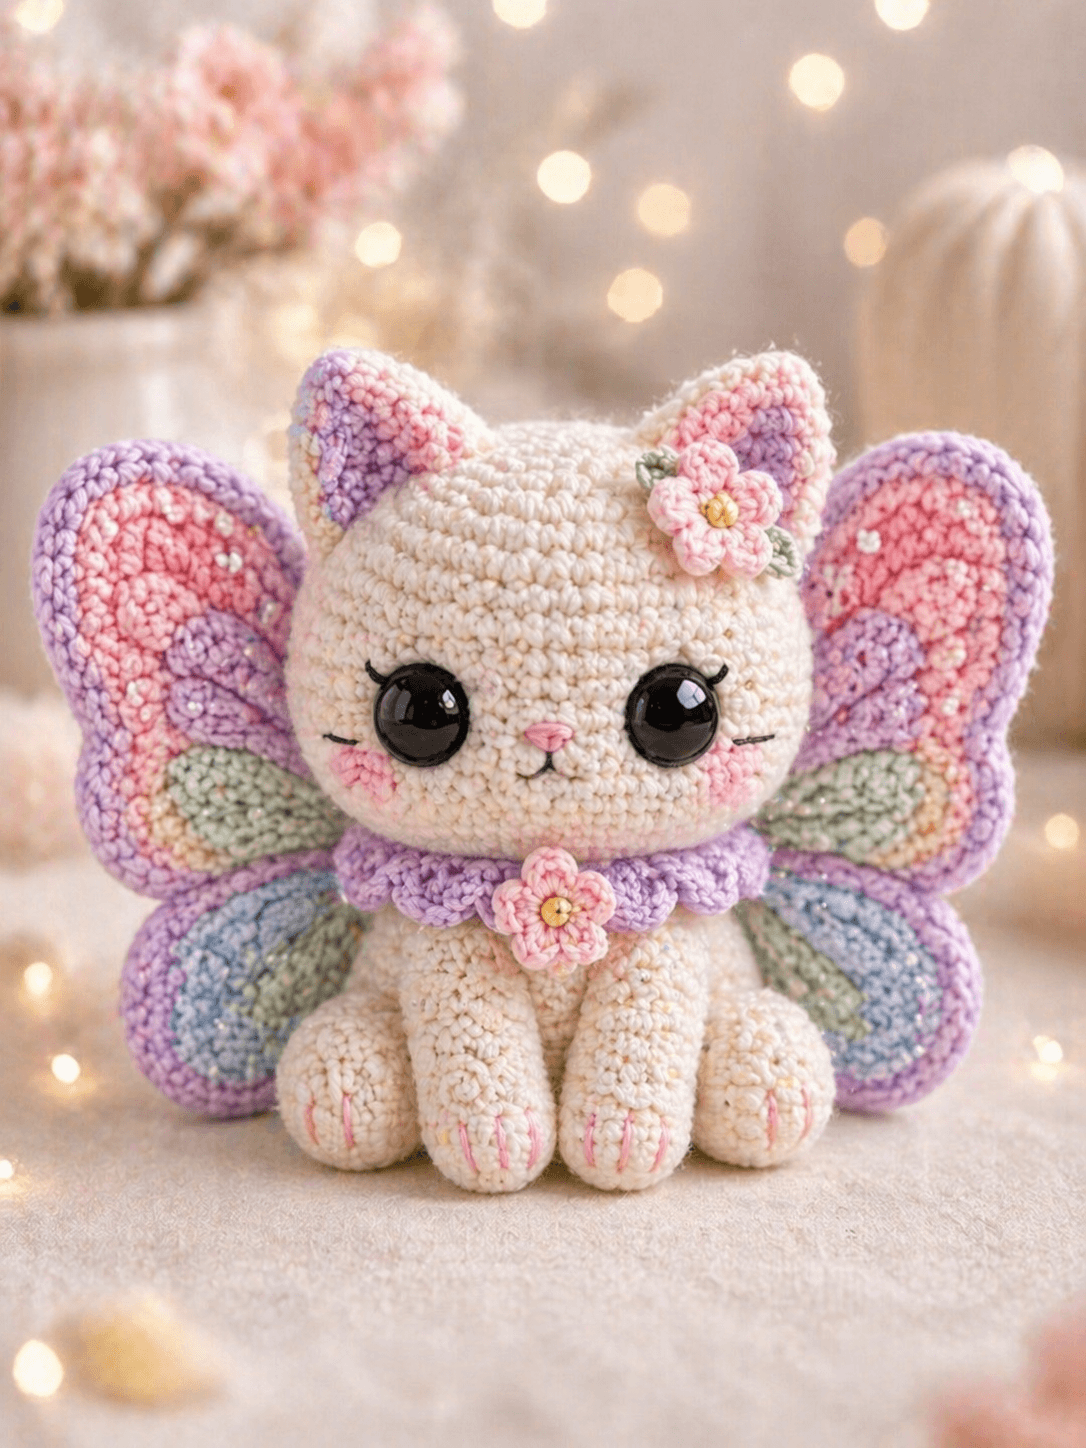
A cat with butterfly wings cannot sit like a plain kitten; the wing weight must be planned before the ears. This butterfly cat amigurumi pattern makes a 19 cm cream fairy kitty with worsted yarn, pastel accents, 18 mm eyes, and a 3.5 mm hook. The skill level is advanced beginner to intermediate. Make it as a display piece where the wide wings stay balanced behind the body.
The Design: What Makes This Fairy Cat Different
The head is larger than the body because the photo depends on a round kitten face, oversized eyes, and short front paws. A 42-stitch head plateau gives enough surface for 18 mm eyes, embroidered lashes, cheeks, and a small nose without crowding. The body also reaches 42 stitches, then tapers faster so the toy sits low instead of leaning forward.
The butterfly wings are separate stuffed lobes, not flat appliqués. That choice adds thickness at the back and keeps the pastel panels visible from the front. A common mistake with a crochet cat with wings is placing the wing center too high; the toy tips backward. Pin the wing seam at the shoulder line, then check the sitting angle before sewing. The pastel cat amigurumi styling comes from small color fields: inner ears, cheeks, collar, flower centers, and soft wing veins.
Project Info at a Glance
| Skill Level | Time | Finished Size | Hook | Best For |
|---|---|---|---|---|
| Advanced beginner–intermediate | 7–9 hours | 19 cm sitting height | 3.5 mm | Display toy, nursery shelf, spring market table |
The 19 cm target matches a published butterfly-cat listing, while the hook and yarn choices match common worsted/aran cat amigurumi ranges.
Materials and Tools
Yarn
- Cream — worsted/aran #4 — 60 g — Paintbox Simply Aran, YarnArt Jeans Plus, or similar smooth acrylic/cotton blend
- Pastel variegated — worsted/aran #4 — 20 g — for wing panels
- Lavender — worsted/aran #4 — 8 g — for collar and wing edging
- Pink — worsted/aran #4 — 6 g — for cheeks, inner ears, flowers, paw lines
- Mint green — worsted/aran #4 — 3 g — for leaves and wing shading
- Yellow — worsted/aran #4 — 2 g — for flower centers
- Black embroidery thread — under 1 g — for mouth, lashes, and whiskers
Tools
- Hook 3.5 mm
- 18 mm black safety eyes
- Polyester stuffing
- Yarn needle
- Long pins
- Stitch markers
- Embroidery needle
- Scissors
Safety eyes are not suitable for children under age 3; embroidered eyes are the safer build for toys meant for that age group.
Abbreviations
MR = magic ring
sc = single crochet
inc = 2 sc in same stitch
dec = invisible decrease
sl st = slip stitch
ch = chain
BLO = back loop only
FLO = front loop only
st = stitch
R = round
Invisible decrease catches the front loops of the next two stitches before the final yarn-over, reducing bulk on face and body closing rounds.
Pattern — Step by Step
Continuous spiral unless noted. The pattern below is original, drafted from the photo and calibrated to public size, hook, yarn, and standard 6-stitch amigurumi math references.
Head
Yarn: cream
R1: 6 sc in MR (6)
R2: inc ×6 (12)
R3: (sc, inc) ×6 (18)
R4: (2 sc, inc) ×6 (24)
R5: (3 sc, inc) ×6 (30)
R6: (4 sc, inc) ×6 (36)
R7: (5 sc, inc) ×6 (42)
R8–R14: sc around (42)
R15: (5 sc, dec) ×6 (36)
R16: sc around (36)
R17: (4 sc, dec) ×6 (30)
R18: (3 sc, dec) ×6 (24)
Place eyes between R10 and R11, 9 stitches apart. Embroider lashes before stuffing blocks needle access.
R19: (2 sc, dec) ×6 (18)
R20: (sc, dec) ×6 (12)
R21: dec ×6 (6)
Stuff firmly. Add more stuffing to the cheek sides than to the crown.
Fasten off. Leave 20 cm tail and close the hole.
Body
Yarn: cream
R1: 6 sc in MR (6)
R2: inc ×6 (12)
R3: (sc, inc) ×6 (18)
R4: (2 sc, inc) ×6 (24)
R5: (3 sc, inc) ×6 (30)
R6: (4 sc, inc) ×6 (36)
R7: (5 sc, inc) ×6 (42)
R8–R10: sc around (42)
R11: (5 sc, dec) ×6 (36)
R12–R13: sc around (36)
R14: (4 sc, dec) ×6 (30)
R15: sc around (30)
R16: (3 sc, dec) ×6 (24)
R17: sc around (24)
R18: (2 sc, dec) ×6 (18)
R19: (sc, dec) ×6 (12)
R20: dec ×6 (6)
Stuff the lower body firmly and keep the neck area flat enough for the head seam.
Fasten off. Leave 30 cm tail.
Front Legs
Make 2. Yarn: cream
R1: 6 sc in MR (6)
R2: inc ×6 (12)
R3: (sc, inc) ×6 (18)
R4–R6: sc around (18)
R7: (sc, dec) ×6 (12)
R8–R13: sc around (12)
Stuff only the paw and lower half. Embroider three pink claw lines across R3–R5.
Fasten off. Leave 20 cm tail.
Back Legs
Make 2. Yarn: cream
R1: 6 sc in MR (6)
R2: inc ×6 (12)
R3: (sc, inc) ×6 (18)
R4: (2 sc, inc) ×6 (24)
R5–R7: sc around (24)
R8: (2 sc, dec) ×6 (18)
R9–R10: sc around (18)
R11: (sc, dec) ×6 (12)
Stuff firmly. Flatten the last round so the legs sit wide at the body base.
Fasten off. Leave 25 cm tail.
Ears
Make 2. Yarn: cream outer ear; pink-lavender inner panel
Outer ear:
R1: 6 sc in MR (6)
R2: sc around (6)
R3: inc ×6 (12)
R4: sc around (12)
R5: (sc, inc) ×6 (18)
R6–R7: sc around (18)
Do not stuff. Flatten into a triangle with the increase line centered at the back.
Fasten off. Leave 25 cm tail.
Inner ear flat circle, make 2:
R1: 6 sc in MR (6)
R2: inc ×6 (12)
Flatten into an oval and sew inside each ear before the ears go on the head.
Fasten off. Leave 15 cm tail.
Upper Wing Lobes
Make 2. Yarn: pastel variegated with lavender edging
R1: 6 sc in MR (6)
R2: inc ×6 (12)
R3: (sc, inc) ×6 (18)
R4: (2 sc, inc) ×6 (24)
R5: (3 sc, inc) ×6 (30)
R6–R7: sc around (30)
R8: (3 sc, dec) ×6 (24)
R9: sc around (24)
R10: (2 sc, dec) ×6 (18)
Stuff lightly. Add lavender surface stitches from center base to outer tip.
Fasten off. Leave 35 cm tail.
Lower Wing Lobes
Make 2. Yarn: pastel variegated with mint and blue sections
R1: 6 sc in MR (6)
R2: inc ×6 (12)
R3: (sc, inc) ×6 (18)
R4: (2 sc, inc) ×6 (24)
R5: sc around (24)
R6: (2 sc, dec) ×6 (18)
R7: sc around (18)
R8: (sc, dec) ×6 (12)
Stuff lightly, less than the upper lobes. Sew each lower lobe to the underside of an upper lobe.
Fasten off. Leave 35 cm tail.
Wing Center Seam
Make 1. Yarn: lavender
R1: 6 sc in MR (6)
R2–R14: sc around (6)
Do not overstuff. This narrow tube hides the join between the left and right wings.
Fasten off. Leave 30 cm tail.
Cheek Patches
Make 2. Yarn: pale pink
R1: 6 sc in MR (6)
R2: inc ×6 (12)
Pull the final tail to make a flat circle. Do not stuff.
Fasten off. Leave 15 cm tail.
Micro Muzzle and Nose
Make 1. Yarn: cream with pink embroidery
R1: 6 sc in MR (6)
R2: inc ×6 (12)
R3: sc around (12)
Flatten the piece and sew it below the eyes. Embroider a small pink triangle nose and a short black mouth line.
Fasten off. Leave 20 cm tail.
Ruffled Collar
Make 1. Yarn: lavender
Foundation: ch 43 (42)
Row 1: sc in second ch from hook and across (42)
Row 2: ch 1, turn, inc in each st across (84)
Row 3: ch 1, turn, (sl st, hdc, sl st) across first 42 sts; leave remaining sts to ripple naturally (42 scallops worked)
Wrap around the neck after the head is attached. The opening belongs at the back.
Fasten off. Leave 25 cm tail.
Five-Petal Flowers
Make 2. Yarn: pink petals, yellow center, mint leaves
Center:
R1: 6 sc in MR (6)
sl st to first sc.
Petals:
In each stitch around: (ch 2, 2 hdc in same st, ch 2, sl st in same st) ×6 (6 petals)
Leaves, make 2 per flower:
Ch 5, sc in second ch from hook, hdc, dc, hdc (4)
Sew one flower to the right ear and one to the front collar. Add a yellow center knot through the magic ring.
Fasten off. Leave 20 cm tail.
Assembly
- Pin the head to the body with the face tilted slightly downward.
- Sew the head to the body twice around the neck seam.
- Sew the micro muzzle under the eyes and embroider nose, mouth, lashes, and whiskers.
- Sew cheek patches two rounds below the eyes.
- Attach ears between R4 and R8 of the head, spaced 8 stitches apart.
- Sew front legs to the body front, starting one round below the neck seam.
- Sew back legs low and wide so the cat sits without support.
- Join each upper wing lobe to one lower wing lobe, then sew both sides to the wing center seam.
- Pin the full wing unit to the back at shoulder height and sew through the body, not just the surface stitches.
- Add the ruffled collar and flowers, then weave all tails inside the body.
The finished butterfly cat sits upright with the wings visible from the front.
7 Technical Tips
- Stitch marker drift: A spiral seam can move 1–2 stitches left by the time the head reaches R14. Reposition the eye line by counting from the front center, not from the marker.
- Stuffing firmness: Underfilled wings collapse at the outer edge. Fill each upper lobe until it springs back, then leave the last two rounds softer for sewing.
- Invisible decrease gaps: Visible holes appear on cream yarn when the hook catches both loops during decrease rounds. Work front-loop-only decreases on R17–R21 of the head and R16–R20 of the body.
- Eye placement timing: Safety eyes must be locked before R19 of the head. Place them between R10 and R11, 9 stitches apart, then test the muzzle width before attaching washers.
- Velvet tension mismatch: Chenille or velvet yarn will enlarge this design by 25–40 percent with the same stitch counts. Move to a 5.0 mm hook only if the yarn label calls for bulky yarn and the fabric shows no stuffing gaps.
- Pinning the wings: Wing panels sewn 1 cm too low drag against the back legs. Pin the center seam from the head-body join to the body midpoint before stitching.
- Tail weaving: Short tails can pop out around the collar because the neck seam is handled often. Leave 25–35 cm tails on head, collar, wings, and flowers, then bury each tail through two stuffed parts.
Conclusion
This build works because the head, body, and wings are planned as one structure instead of three separate decorations. The 42-stitch plateau gives the face enough width, while the tapered body and low back legs offset the wing weight. For the next sample, crochet the head and body first, pin the wings in place, then adjust collar length after assembly. Save this butterfly cat amigurumi pattern to Pinterest, post your finished fairy kitty on Instagram, and tag it with #ButterflyCatAmigurumi. Which wing section will you make most visible from the front: lavender upper lobes, mint lower lobes, or pink vein stitching?









