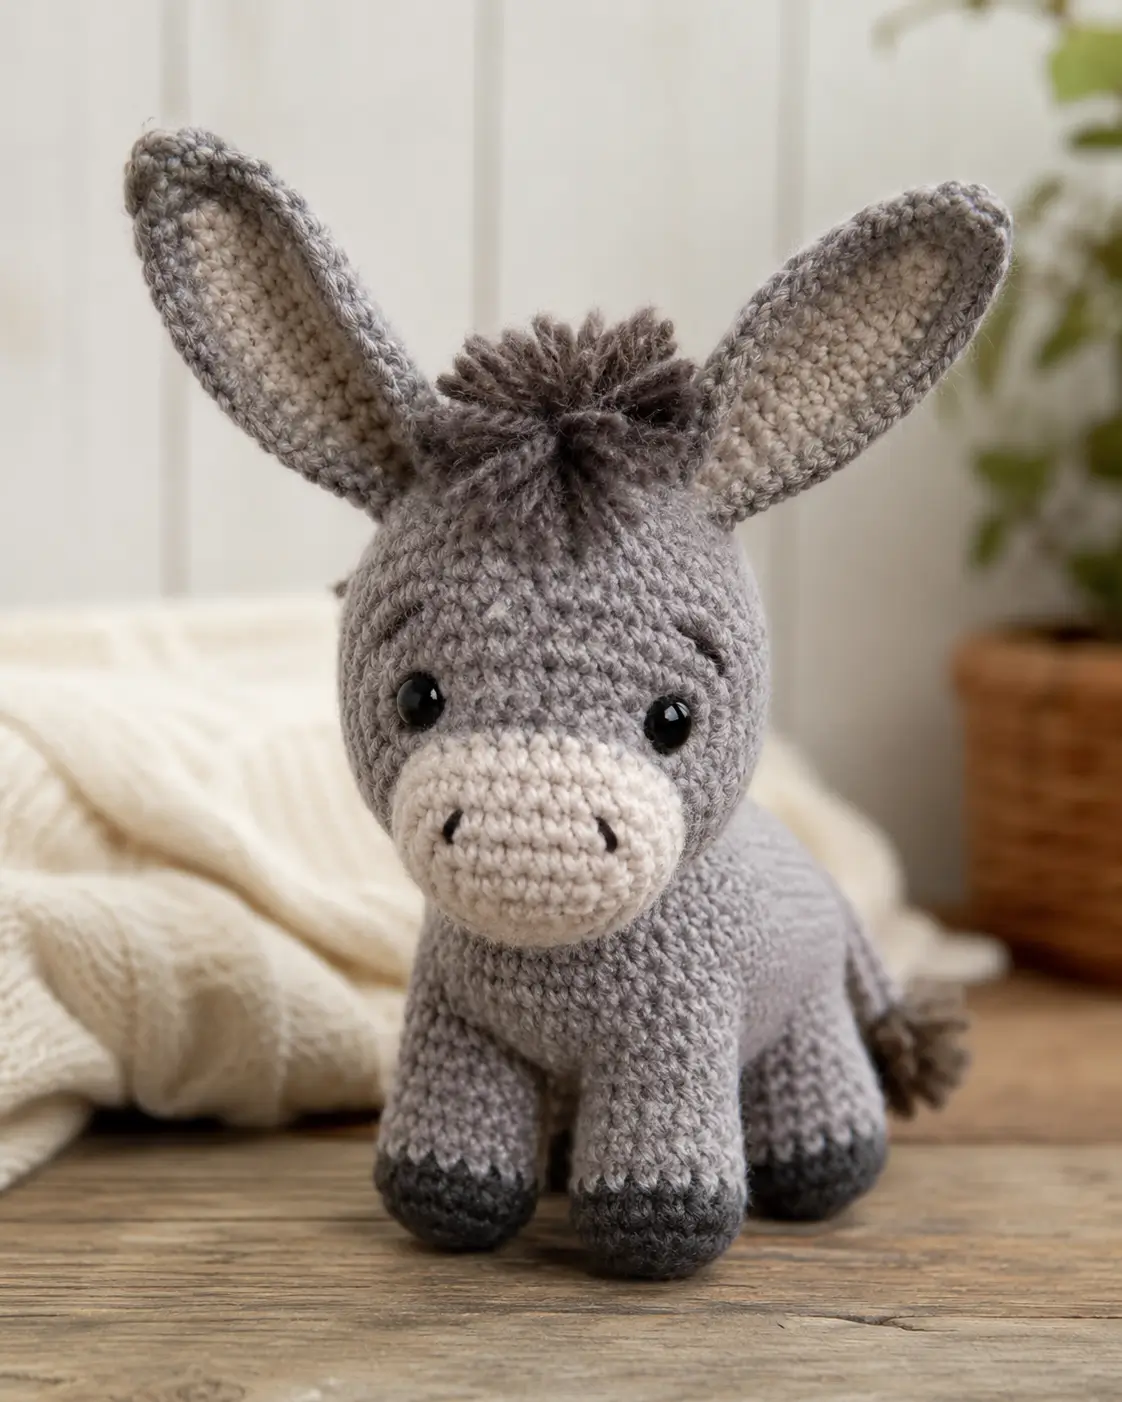
Donkeys read wrong the instant the ears shorten and the muzzle flattens. This donkey amigurumi crochet pattern keeps both proportions intact in worsted yarn with a 3.5 mm hook, lands in the small-plush range, and uses basic shaping plus one color change at the hooves. You can make it as nursery décor, a farm set piece, or a low-bulk market sample.
The Design: What Makes Donkey Different
A donkey is not just a gray horse with longer ears. The structure shifts in three places. First, the muzzle projects farther forward and sits lower, which is why this version uses a separate oval snout instead of flat face embroidery. Second, the ears need height more than width; published donkey patterns repeatedly keep the ear tall and fold the base rather than making a wide leaf shape. Third, the legs read sturdier than horse legs, a point 5 Little Monsters explicitly called out when thickening the donkey’s nose and legs in its mini version.
One recurring maker error is placing the hoof color break too high. That stretches the leg visually and pushes the toy back toward horse proportions. In a good donkey crochet pattern, the hoof stays compact, the muzzle stays broad, and the ear line remains upright. That balance is what separates a generic farm plush from a recognizable donkey amigurumi pattern.
Project Info at a Glance
| Skill Level | Time | Finished Size | Hook | Best For |
|---|---|---|---|---|
| Beginner to easy intermediate | 4–6 hours on current small donkey listings | 8–9 in tall | 3.5 mm | Farm sets, nursery shelf plush, market stock |
Materials and Tools
Yarn
- Light gray — worsted — about 70 g — any smooth acrylic or cotton-acrylic blend in a neutral gray
- Cream — worsted — about 15 g — for muzzle, inner ears, and cheek patches
- Charcoal or black — worsted — about 10 g — for hooves, mane, tail tuft, brows, and nostrils
Current donkey patterns in this size band most often use medium or worsted yarn, while larger public patterns confirm gray plus pale muzzle and dark contrast details as the standard palette.
Tools
- Hook 3.5 mm
- Safety eyes 9 mm
- Polyester stuffing
- Yarn needle
- Stitch markers
- Black embroidery thread or black yarn split thin
A 3.5 mm hook with worsted yarn is established in current donkey listings, and 9 mm eyes sit in the same small-plush range.
Abbreviations
MR / sc / inc / dec / sl st / ch / BLO / FO = fasten off.
Use invisible decrease for all closing rounds. It keeps the forehead, shoulder, and hip seams smoother than a standard two-stitch decrease.
Pattern — Step by Step
Continuous spiral unless noted.
Head (Make 1)
Yarn: light gray — Source: Standard amigurumi math, medium 36-st plateau
R1: 6 sc in MR (6)
R2: inc x6 (12)
R3: [sc, inc] x6 (18)
R4: [2 sc, inc] x6 (24)
R5: [3 sc, inc] x6 (30)
R6: [4 sc, inc] x6 (36)
R7: sc around (36)
R8: sc around (36)
R9: sc around (36)
R10: sc around (36)
R11: sc around (36)
R12: sc around (36)
R13: sc around (36)
R14: sc around (36)
Insert 9 mm eyes between R11 and R12, 8 sts apart. Add brows after assembly.
R15: [4 sc, dec] x6 (30)
R16: sc around (30)
R17: [3 sc, dec] x6 (24)
R18: sc around (24)
R19: [2 sc, dec] x6 (18)
Stuff firmly through the forehead and lower cheeks.
R20: [sc, dec] x6 (12)
R21: dec x6 (6)
FO. Leave a 25 cm tail.
Body (Make 1)
Yarn: light gray — Source: Standard amigurumi math, medium 36-st plateau
R1: 6 sc in MR (6)
R2: inc x6 (12)
R3: [sc, inc] x6 (18)
R4: [2 sc, inc] x6 (24)
R5: [3 sc, inc] x6 (30)
R6: [4 sc, inc] x6 (36)
R7: sc around (36)
R8: sc around (36)
R9: sc around (36)
R10: sc around (36)
R11: sc around (36)
R12: [4 sc, dec] x6 (30)
R13: sc around (30)
R14: [3 sc, dec] x6 (24)
R15: sc around (24)
R16: [2 sc, dec] x6 (18)
Stuff the chest and hindquarters densely. Keep the back flat, not round.
R17: [sc, dec] x6 (12)
R18: dec x6 (6)
FO. Leave a 30 cm tail.
Front Legs (Make 2)
Yarn: charcoal, then light gray — Source: Standard amigurumi math
R1: 6 sc in MR in charcoal (6)
R2: inc x6 (12)
R3: BLO sc around (12)
R4: sc around (12)
Change to light gray.
R5: sc around (12)
R6: sc around (12)
R7: sc around (12)
R8: sc around (12)
R9: [4 sc, dec] x2 (10)
R10: sc around (10)
R11: sc around (10)
Lightly stuff hoof and lower leg only.
Flatten top edge.
R12: sc through both sides across (5)
FO. Leave a 20 cm tail.
Back Legs (Make 2)
Yarn: charcoal, then light gray — Source: Standard amigurumi math
R1: 6 sc in MR in charcoal (6)
R2: inc x6 (12)
R3: BLO sc around (12)
R4: sc around (12)
Change to light gray.
R5: sc around (12)
R6: sc around (12)
R7: sc around (12)
R8: sc around (12)
R9: [4 sc, dec] x2 (10)
R10: sc around (10)
R11: sc around (10)
Lightly stuff hoof and lower leg only.
Flatten top edge.
R12: sc through both sides across (5)
FO. Leave a 20 cm tail.
Ears (Make 2)
Yarn: light gray
R1: 6 sc in MR (6)
R2: inc x6 (12)
R3: [sc, inc] x6 (18)
R4: [2 sc, inc] x6 (24)
R5: sc around (24)
R6: sc around (24)
R7: sc around (24)
R8: [2 sc, dec] x6 (18)
R9: sc around (18)
R10: sc around (18)
R11: [sc, dec] x6 (12)
R12: sc around (12)
Do not stuff. Flatten. FO. Leave a 20 cm tail.
Pinch the base before sewing to create the upright donkey ear angle.
Inner Ears (Make 2)
Yarn: cream
R1: 6 sc in MR (6)
R2: inc x6 (12)
R3: [sc, inc] x6 (18)
R4: sc around (18)
R5: sc around (18)
R6: [sc, dec] x6 (12)
FO. Leave a 15 cm tail.
Sew one insert to each outer ear, centered and slightly below the tip.
Muzzle / Snout (Make 1)
Yarn: cream — Source: photo-based original oval shaping
Ch 6.
R1: inc in 2nd ch from hook, 3 sc, 4 sc in last ch; working on opposite side, 3 sc, inc x2 (14)
R2: inc x2, 3 sc, inc x4, 3 sc, inc x2 (22)
R3: sc around (22)
R4: sc around (22)
R5: sc around (22)
FO. Leave a 30 cm tail.
Stuff lightly before closing the last third of the seam. Embroider nostrils 6 sts apart.
Cheek Patches (Make 2)
Yarn: cream — Source: flat circle math
R1: 6 sc in MR (6)
R2: inc x6 (12)
R3: sc around (12)
FO. Leave a 12 cm tail.
Optional on the photographed look. Use only if you want a softer face transition under the eyes.
Mane Tuft / Forelock (Make 1)
Yarn: charcoal
Cut 10 to 12 strands, each 10 cm long. Fold in half, loop them through the crown stitches between the ears, and knot. Trim to a rounded tuft.
FO remaining ends inside the head.
Tail (Make 1)
Yarn: light gray plus charcoal tuft
R1: 6 sc in MR (6)
R2: sc around (6)
R3: sc around (6)
R4: sc around (6)
FO. Leave a 20 cm tail.
Add 4 to 6 charcoal strands to the tip and trim short.
Assembly
- Sew the muzzle centered on the lower half of the head, spanning roughly R10 to R16.
- Add nostrils first, then attach the safety eyes if not already installed.
- Embroider the brows one round above the eyes, angled slightly downward toward the muzzle.
- Sew the ears between R4 and R8 of the crown, 8 stitches apart, with the bases pinched inward.
- Attach the forelock directly between the ears.
- Sew the head to the front third of the body with a slight forward tilt.
- Attach the front legs to the shoulder line, aligned vertically under the neck.
- Attach the back legs at the rear third of the body, level with the front leg base.
- Sew the tail centered at the back, one round above the body base.
- Add the cheek patches only if you want more cream on the face; skip them for a closer photo match.
The completed donkey stands on four compact legs with the body slightly pitched forward.
7 Technical Tips
- Mark the first stitch of every round. Losing the round start on a 36-stitch head shifts the eye line and makes the muzzle sit off-center by one or two stitches.
- Do not overstuff the muzzle. Too much fill pushes it upward and turns the face into a blunt horse nose instead of a donkey’s broader, lower snout.
- Keep invisible decreases on the same vertical lanes. Random dec placement leaves bumps across the forehead and shoulder seams.
- Install the eyes before the head drops below 24 stitches. Past that point, washers become harder to seat and the eye angle usually ends up uneven.
- Stop stuffing the legs above the ankle line. A fully packed leg resists sewing and kicks outward instead of hanging straight under the body.
- Pin the ears with a base tuck. Without that pinch, the ear spreads flat and loses the narrow upright silhouette visible in donkey-focused patterns.
- Weave every tail end back through at least 4 cm of stuffing path. Short weaves pull loose fastest at the neck, tail, and muzzle seam.
Conclusion
A convincing donkey amigurumi crochet pattern depends on proportion, not decoration. The long ears, low oval muzzle, short hoof bands, and compact body do most of the recognition work. Build the head first, test the eye line before closing, and pin every limb before sewing so the stance stays square. Then photograph the finished donkey from the front and the side, share it on Pinterest and Instagram, and tag it with #DonkeyAmigurumiPattern. One question matters on this character more than most: did your ears stay upright after stuffing, or did they start to splay outward?









