Introduction
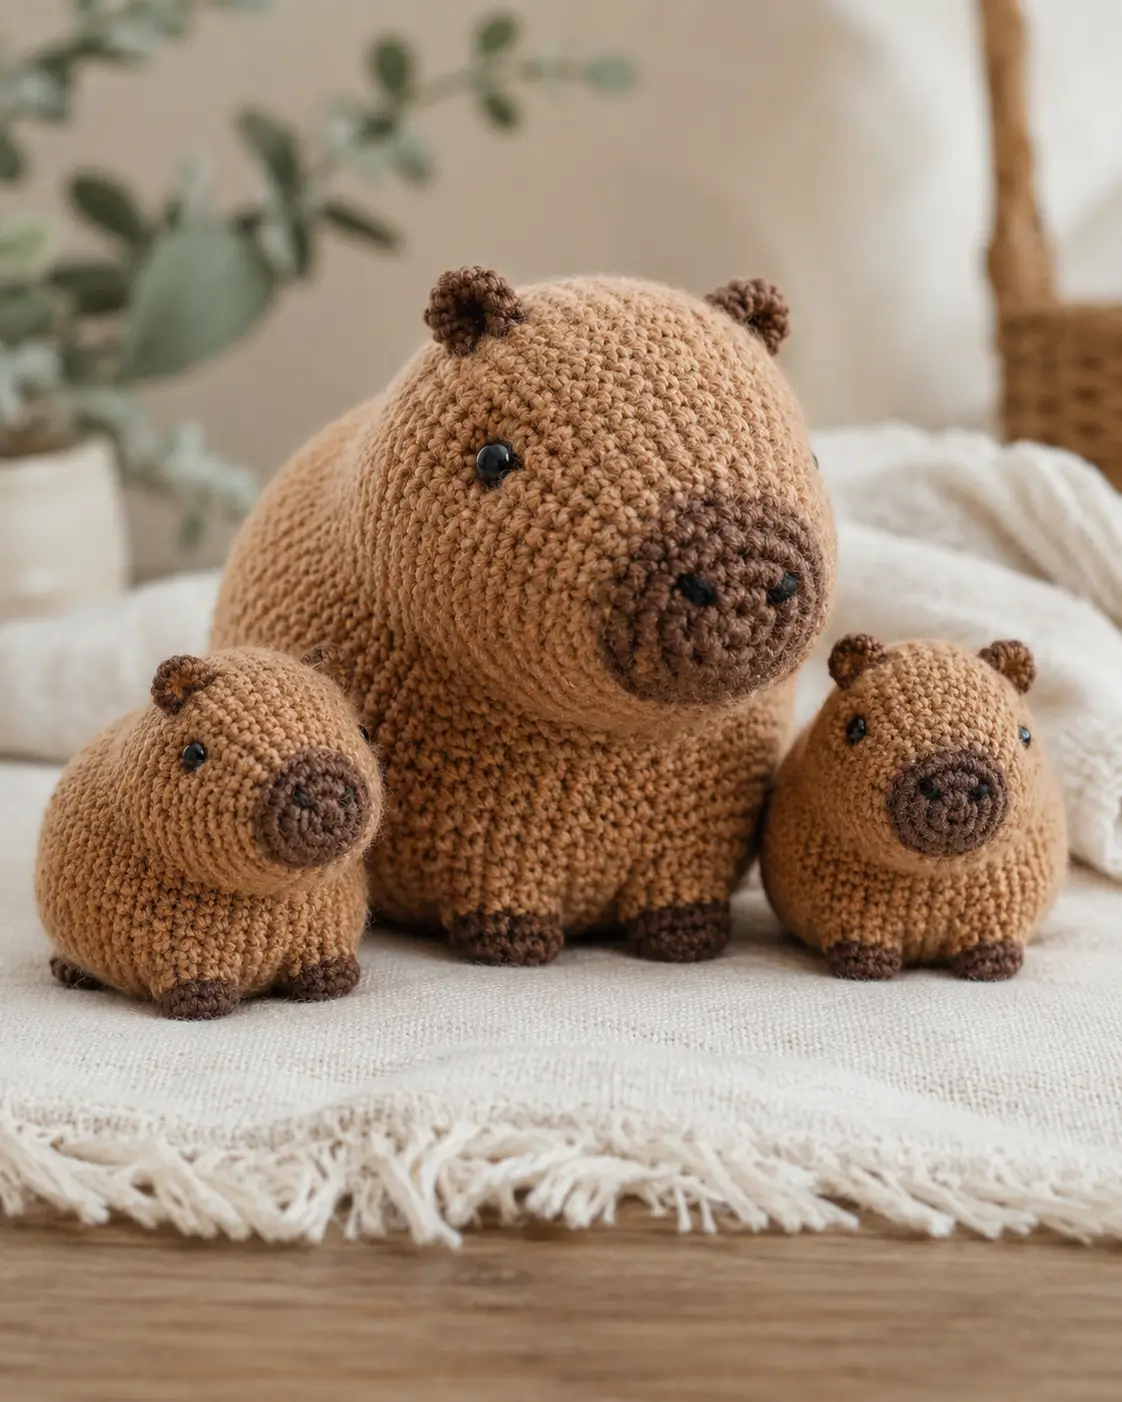
A capybara stops looking like a capybara the moment the snout climbs too high on the face. This capybara amigurumi crochet pattern keeps the muzzle low, the body barrel-shaped, and the ears deliberately undersized. Use worsted yarn, a 2.75 mm to 3.5 mm hook range, and simple continuous rounds for a compact shelf plush that sits cleanly and photographs well.
The Design: What Makes Capybara Different
The structure is blunt, not teddy-bear round. That matters first. A capybara head needs a forward muzzle disc attached below center, because the species reads from profile before it reads from eye placement. Many published patterns also keep the ears very small and rounded, which prevents the silhouette from drifting toward bear or guinea pig.
The second choice is body proportion. This version uses a medium 36-stitch plateau for both head and body drafting, then relies on assembly placement to create the heavy-front posture visible in the photo. Comparable free patterns that rank well either use a one-piece body/head or an oversized plush body, but both still keep the legs short and the top line smooth.
The common mistake is predictable: makers center the snout and widen the ears. The result reads generic woodland plush. In a crochet capybara amigurumi, the muzzle must sit low and broad. In a capybara crochet pattern, leg placement also decides whether the toy actually sits instead of tipping forward.
Project Info at a Glance
| Skill Level | Time | Finished Size | Hook | Best For |
|---|---|---|---|---|
| Easy to intermediate | 4–6 hours | 15.5 cm target reference; custom sample may vary | 2.75 mm reference / 3.0–3.5 mm acceptable for similar yarn | Shelf plush, market prep, animal set |
Reference specs for the verified model: 15.5 cm tall, 17.5 cm long, worsted/aran yarn, 2.75 mm hook, 12 mm eyes.
Materials and Tools
Yarn
- Light caramel brown — worsted/aran — about 62 g — style match: matte cotton or cotton-blend in a warm tan tone
- Dark brown — worsted/aran — about 22 g — for snout, ears, paws, and embroidered nose area
- Black — small amount — embroidery for nostrils and optional mouth
Tools
- Hook 2.75 mm for the verified reference size; 3.0–3.5 mm also works when matching a slightly softer worsted yarn
- 12 mm safety eyes for the verified reference size; size down if making the smaller photo scale
- Polyester stuffing
- Tapestry needle
- Stitch markers
- Scissors
Abbreviations
MR / sc / inc / dec / sl st / ch / BLO
Use invisible decrease whenever shaping curves toward closure; it keeps the head and body surface cleaner than a standard decrease.
Pattern — Step by Step
Continuous spiral unless noted.
Head (Make 1)
Yarn: light caramel brown
R1: 6 sc in MR (6)
R2: inc x6 (12)
R3: (sc, inc) x6 (18)
R4: (2 sc, inc) x6 (24)
R5: (3 sc, inc) x6 (30)
R6: (4 sc, inc) x6 (36)
R7: sc around (36)
R8: sc around (36)
R9: sc around (36)
R10: sc around (36)
R11: sc around (36)
R12: (4 sc, dec) x6 (30)
R13: sc around (30)
R14: (3 sc, dec) x6 (24)
Insert safety eyes between R10 and R11, about 8 sts apart. Keep them slightly behind the snout line rather than centered on the face.
R15: (2 sc, dec) x6 (18)
Begin firm stuffing at the forehead and crown, lighter stuffing near the lower face.
R16: (sc, dec) x6 (12)
R17: dec x6 (6)
Fasten off. Leave a 20 cm tail for closing and shaping.
Body (Make 1)
Yarn: light caramel brown
R1: 6 sc in MR (6)
R2: inc x6 (12)
R3: (sc, inc) x6 (18)
R4: (2 sc, inc) x6 (24)
R5: (3 sc, inc) x6 (30)
R6: (4 sc, inc) x6 (36)
R7: sc around (36)
R8: sc around (36)
R9: sc around (36)
R10: sc around (36)
R11: sc around (36)
R12: (4 sc, dec) x6 (30)
R13: sc around (30)
R14: (3 sc, dec) x6 (24)
Stuff the lower body firmly. Press slightly at the top front to create a flatter neck seat for the head.
R15: (2 sc, dec) x6 (18)
R16: (sc, dec) x6 (12)
R17: dec x6 (6)
Fasten off. Leave a 20 cm tail.
Front Legs (Make 2)
Yarn: dark brown then light caramel brown
R1: 6 sc in MR (6)
R2: (sc, inc) x3 (9)
Change to light caramel brown.
R3: sc around (9)
R4: sc around (9)
Stuff only the foot half. Keep the top soft for easier sewing.
Fasten off. Leave a 15 cm tail.
Back Legs (Make 2)
Yarn: dark brown then light caramel brown
R1: 6 sc in MR (6)
R2: inc x6 (12)
Change to light caramel brown.
R3: sc around (12)
R4: sc around (12)
Stuff the front half of each leg more than the back. That gives the capybara a planted stance instead of a rolled side profile.
Fasten off. Leave a 15 cm tail.
Ears (Make 2)
Yarn: dark brown
R1: 6 sc in MR (6)
R2: (3 sc, inc) x2 (8)
Do not stuff. Flatten lightly.
Fasten off. Leave a 12 cm tail.
Snout (Make 1)
Yarn: dark brown
R1: 6 sc in MR (6)
R2: inc x6 (12)
R3: (sc, inc) x6 (18)
R4: sc around (18)
Lightly stuff only if you want more projection. Embroider two nostrils and a short vertical split before sewing.
Fasten off. Leave a 20 cm tail.
Cheek Patches (Make 2)
Yarn: light caramel brown
R1: 6 sc in MR (6)
R2: inc x6 (12)
R3: sc around (12)
Do not stuff. These are optional support pads that can sit under the lower snout edges to soften the face transition.
Fasten off. Leave a 12 cm tail.
Tail Nub (Make 1)
Yarn: light caramel brown
R1: 6 sc in MR (6)
R2: sc around (6)
Do not stuff. This remains subtle and partly hidden from the front.
Fasten off. Leave a 10 cm tail.
Assembly
- Sew the head to the body with the head angled slightly forward, not vertical.
- Pin the snout low on the head so its top edge sits roughly between R9 and R11.
- Sew the cheek patches first if using them, one on each side under the snout edge.
- Attach the snout over the cheek area and add a pinch of stuffing only at the center if more projection is needed.
- Place the eyes so they sit slightly behind the widest part of the snout, not above it.
- Sew the back legs to the lower sides of the body, wide enough to form a sitting base.
- Sew the front legs slightly forward of center, aligned so the toy does not pitch nose-down.
- Attach the ears near the crown but slightly back from the forehead curve.
- Stitch the tail nub to the rear lower body, keeping it small and flat to the form.
- Weave all tails inward, compress the stuffing at the neck if needed, and level the base by hand.
The finished toy should sit on four points with the snout projecting farther forward than the toes.
7 Technical Tips
- Mark every first round after a color change. The failure mode here is a creeping jog at the paw line that makes one foot look taller than the other.
- Do not overstuff the lower face. Too much fill under the snout lifts the muzzle and turns the profile into a bear shape.
- Use invisible decreases on every closing round. Standard decreases leave small ridges that show most clearly on matte cotton yarn.
- Install eyes before the head closes past 24 stitches. Once the opening drops to 18, washers become harder to place symmetrically.
- Pin the back legs at least 14–18 mm apart on a medium sample. Narrower spacing makes the toy rock backward instead of sitting flat.
- Keep ear width tiny. An 8-st ear is enough here; larger ears shift the silhouette away from capybara and toward cub or hamster.
- Weave tails through at least three direction changes. A single straight weave can loosen at the snout seam where handling pressure is highest.
Conclusion
A correct capybara outline depends on restraint. Small ears. Low snout. Short limbs. This capybara amigurumi crochet pattern stays inside that logic, which is why the finished piece reads clearly even before the facial details are added. The next step is practical: make one sample in matte worsted cotton, record the eye spacing and leg placement, then scale the same draft up or down with hook changes. Post the result to Pinterest and Instagram with side-profile photos, because that angle shows the shaping best. Use #CapybaraAmigurumiPattern. Did your snout sit low enough to read capybara before the nostrils were embroidered?









