Introduction
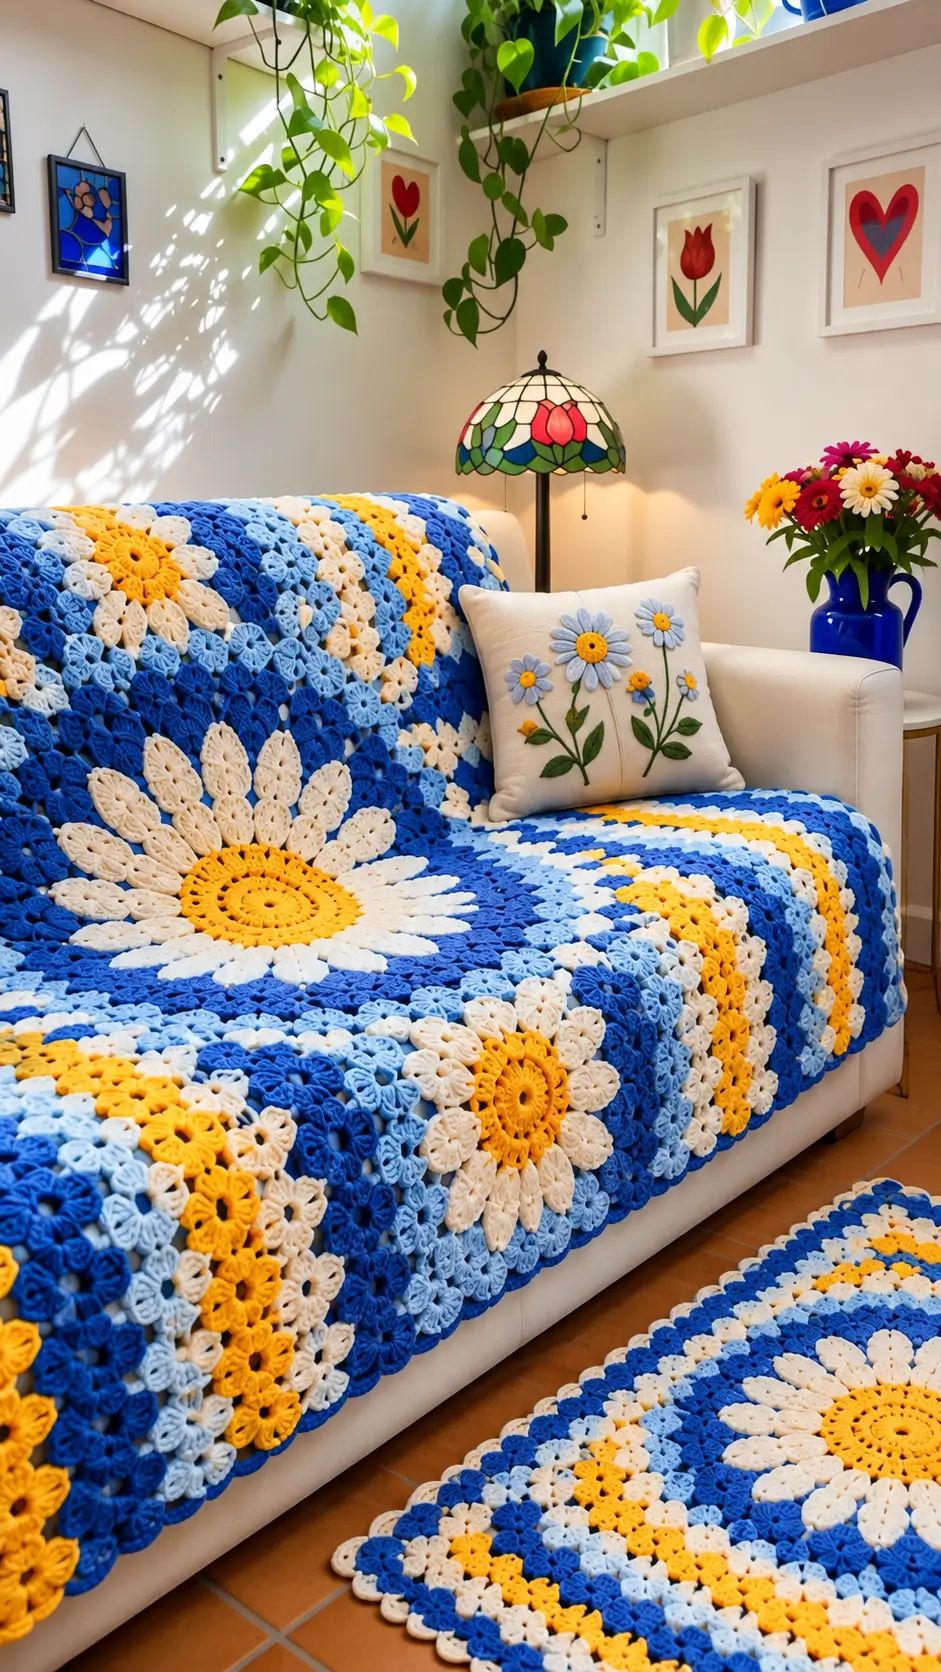
A daisy needs a circular yellow disk and clearly separated white rays before a square can form around it. This daisy granny square blanket translates that geometry into blue, white and yellow crochet blocks using worsted yarn and a 5 mm hook. The reference size is approximately 81 × 99 cm, with intermediate-level color changes and joining. Modular construction also lets you replace a damaged square without rebuilding the entire throw.
The Design: What Makes This Daisy Blanket Different
The design relies on scale contrast rather than repeating one identical flower across the entire surface. Large white daisies act as focal blocks while smaller yellow-and-white motifs break up the blue field. Three background values—royal blue, light blue and cream—prevent the crochet daisy blanket from reading as a rigid checkerboard.
Petal relief matters too. Clustered stitches lift the white sections away from the square background. The flower granny square blanket then needs firm joining because heavily textured motifs can pull differently from ordinary granny blocks.
A frequent construction error is treating every floral round as if its stitch count must expand uniformly. It does not. Petal rounds establish repeat units; the following round converts those units into four corners.
Project Info at a Glance
| Skill Level | Time | Finished Size | Hook | Best For |
|---|---|---|---|---|
| Intermediate | Multi-session blanket project | Approx. 81 × 99 cm reference size | 5.0 mm | Sofa throw / lap blanket |
The finished dimensions are a practical reference size. The exact size of the photographed blanket cannot be measured from the image alone.
Materials and Tools
Yarn
Use worsted or medium-weight yarn throughout so the motifs block to consistent dimensions.
- Royal blue — worsted/medium — main background color; allow the largest quantity.
- Light blue — worsted/medium — secondary blocks and color transitions.
- White or cream — worsted/medium — daisy petals and light floral motifs.
- Golden yellow — worsted/medium — flower centers and accent blocks.
For a blanket around the reference size, yarn requirements depend heavily on the number of oversized focal blocks and the final border. A useful planning reference is approximately 710 g for the dominant color, 426 g for the main petal color and 284 g for the center/accent color. Because this version divides the background between royal blue and light blue, redistribute the main-color quantity accordingly.
Tools
- 5.0 mm crochet hook
- Tapestry needle
- Scissors
- Stitch markers
- Blocking mats
- Rust-resistant blocking pins
- Measuring tape or ruler
Abbreviations
- MR — magic ring
- sc — single crochet
- hdc — half double crochet
- dc — double crochet
- tr — treble crochet
- cl — cluster
- sl st — slip stitch
- ch — chain
- sp — space
- st/sts — stitch/stitches
- rep — repeat
An invisible decrease is an amigurumi shaping technique and is not required for these flat blanket motifs.
Pattern — Step by Step
This is an original, image-inspired motif construction. Granny-square mathematics does not use the six-single-crochet increase system associated with amigurumi. Instead, chain spaces and four defined corners control the expansion of each square.
Standard 12-Petal Daisy Square
Yarn: golden yellow, white, then royal blue or light blue.
Round 1 — Yellow: Make an MR. Ch 3 and work 11 dc into the ring. Join with a sl st to the top of the beginning ch-3. (12 dc)
Fasten off yellow and secure the center.
Round 2 — White: Join white in any stitch. Ch 2 and make a 3-dc cluster in the same stitch, then ch 2. Work one 4-dc cluster followed by ch 2 in each of the remaining 11 stitches. Join. (12 petals, 12 ch-2 spaces)
Fasten off white.
Round 3 — Blue: Join blue in any ch-2 space. Ch 3 and work 2 dc into the same space. Work 3 dc into each of the next two ch-2 spaces.
In the next ch-2 space work (3 dc, ch 2, 3 dc) to establish a corner.
Continue around the flower, distributing four corner groups evenly around the 12 petals. Join with a sl st.
Round 4: Sl st to the nearest corner space. Ch 3, 2 dc, ch 2 and 3 dc in the same corner. Ch 1. Work 3 dc into each intervening space with ch 1 between groups.
At every corner work (3 dc, ch 2, 3 dc). Join with a sl st and fasten off.
Block every standard square to the same measurement before joining.
Large Focal Daisy Block
The oversized white daisies create the strongest visual feature of this blanket. Instead of stretching a small motif, expand the daisy square until it occupies the same modular space as several standard squares.
Work the yellow center and white petal rounds using the standard daisy instructions.
Complete the first blue square-forming round, then continue:
Round 4: In each corner work (3 dc, ch 2, 3 dc). Work 3-dc groups into the available side spaces, maintaining even spacing.
Round 5: Repeat the established granny-square expansion. Each side naturally gains additional groups as the square grows.
Round 6: Repeat the established pattern while keeping all four corners aligned.
Round 7: Repeat only if additional width is required.
Block and measure the motif. If the focal block will replace a 2 × 2 section of standard squares, its finished dimensions must equal two standard squares plus the joining allowance in each direction.
Do not use round count alone to determine the final dimensions. Individual tension, hook material and yarn construction can alter the blocked measurement.
Yellow Accent Flower Square
Yarn: golden yellow, cream and blue.
Round 1: Work the 12-dc center in golden yellow.
Round 2: Work the petal clusters in cream for a conventional daisy, or use golden yellow to create one of the stronger yellow floral accents visible in the design.
Round 3: Change to royal blue or light blue and establish four corners.
Round 4: Continue the blue granny-square expansion until the motif matches the standard square measurement.
Use yellow-dominant squares less frequently than the white daisies. This keeps yellow as an accent rather than allowing it to compete with the primary white floral pattern.
Cream Accent Square
Begin with golden yellow for the center.
Work the petal round in cream or white.
Use light blue for the first square-forming background round, then change to royal blue for the final round.
Make color changes only after completing a round. This produces a defined boundary around the flower and prevents partial color changes from disturbing the four-corner structure.
Leave sufficient yarn at each change to weave the tail through stitches of the same color. Avoid carrying dark blue yarn behind open cream sections because it may remain visible through the granny spaces.
Plain Blue Granny Filler Square
Filler squares can control spacing between large floral motifs and prevent the surface from becoming visually crowded.
Round 1: With royal blue, ch 4 and join to form a ring. Ch 3, 2 dc, ch 2. Work (3 dc, ch 2) three more times into the ring. Join.
Round 2: Sl st to a corner. Work (3 dc, ch 2, 3 dc) in every corner. Work the required 3-dc groups into the side spaces.
Round 3: Repeat the established granny-square construction, maintaining four ch-2 corners.
Continue until the blocked dimensions match the standard floral squares exactly.
Scalloped Border
The rounded outer edge is an important part of the photographed design. Work a stabilizing round before adding the decorative shells.
Foundation round: Join royal blue or another selected border color. Work sc evenly around the entire blanket. Keep the fabric flat and distribute stitches consistently along joined square edges.
At each blanket corner, add sufficient stitches to turn the corner without pulling the fabric inward.
Scallop round: Repeat skip 1 st, 5 dc in next st, skip 1 st, sl st in next st around the perimeter.
Check the first 30–40 cm before completing the border. A rippling edge indicates excessive shells or stitches. An inward-curving border indicates insufficient spacing or excessive tension.
Layout and Color Planning
The strongest way to reproduce this design is to treat the blanket as a modular mosaic rather than a grid of identical motifs.
Place the largest white daisy blocks first. Distribute them across the blanket so no two oversized flowers create an unintended heavy cluster.
Fill the remaining spaces with standard daisy squares, yellow accent flowers, light-blue blocks and royal-blue filler motifs.
Royal blue should remain the dominant background. Light blue acts as a transition color, while cream separates the petals from the saturated blues. Golden yellow works as the smallest high-contrast color area.
Lay every completed and blocked motif on a flat surface before joining. Photograph the arrangement, then convert it into a numbered grid. Mark each square by color and motif type.
This extra planning step matters when the design contains several similar blue blocks. Once squares are stacked beside the work area, their intended positions are easy to confuse.
Joining the Squares
A flat join suits this blanket because the flowers already provide substantial surface texture. A heavily raised seam can compete with the petals and divide the larger visual composition into obvious individual blocks.
Start by matching the corners of two squares. Pin both corners, then pin the midpoint of the adjoining edges.
Add another pin between the midpoint and each corner if the squares are large. This distributes small dimensional differences along the entire seam rather than forcing excess fabric toward one end.
You can sew the squares with a tapestry needle for a relatively flat finish or crochet them together using slip stitches. Use the same joining method throughout the project.
Constructing rows first makes a large blanket easier to handle. Join all motifs in each horizontal row, check the color sequence against the layout photograph, then join the completed rows together.
Assembly
- Block all standard daisy squares to one common measurement and allow them to dry completely.
- Block each large focal daisy so its dimensions match the modular space allocated to it.
- Arrange the large white daisies first, using the photograph as the color-placement reference.
- Insert yellow accent flowers between focal areas without creating an uninterrupted yellow row.
- Add light-blue motifs to divide large areas of royal blue.
- Fill remaining spaces with standard blue-background daisy or granny squares.
- Pin every adjoining edge at both corners and its midpoint before joining.
- Join motifs into rows, then join the completed rows to construct the full blanket.
- Work one stabilizing perimeter round before adding the scalloped decorative border.
- Weave yarn tails through matching-color stitches, trim the secured ends and perform a final light blocking.
The completed fabric should lie flat with aligned joins, square corners and a scalloped outer edge that does not flare.
7 Technical Tips
- Control square-size drift. Measure every fifth completed motif with the same ruler. A difference of only 3 mm per square can accumulate into several centimeters across a wide blanket.
- Secure the center hole. Tighten the magic ring before weaving its tail through the back of the yellow center stitches. A poorly secured center can gradually open during washing and repeated handling.
- Count every petal. Confirm all 12 petal units before beginning the square-forming background. One missing or duplicated petal shifts the corner positions and distorts the square.
- Watch joining tension. Do not pull the joining yarn more tightly than the outer edges of the motifs. Excess tension creates raised seams and can shorten an entire row.
- Leave adequate color-change tails. Keep approximately 12–15 cm of yarn for weaving after each color change. Short ends have less surface area inside the stitches and are more likely to work loose.
- Check border ruffling early. Lay the work flat after completing the first 30–40 cm of the border. Waves indicate excessive stitches or shells, so correct the spacing before working around the full blanket.
- Measure focal blocks against joined squares. Compare each oversized daisy with the exact modular area it will replace. A 2 × 2 focal block must match two joined standard squares in both directions, including the joining allowance.
Conclusion
Finish the final border only after checking that every joined block lies flat, because correcting square alignment becomes harder once the perimeter is fixed. For this blue-and-yellow version, the next concrete step is to crochet one 12-petal sample, block it and record its finished width before calculating the required motif count. Save the daisy granny square blanket layout to Pinterest or share the finished color arrangement on Instagram with #BlueDaisyGrannyBlanket. Before buying the full yarn quantity, decide one structural detail: will the oversized white daisies occupy four-square modules like the photographed throw, or will every flower use the same square size?









