Introduction
A maple leaf fails visually when its five lobes become five identical points. This crochet maple leaf pattern uses DK yarn, a 3.0 mm hook, graduated stitch heights and a narrow stem to produce a leaf approximately 10 × 10 cm. The intermediate construction works well for autumn garlands, table decorations, wreaths and appliqués. Make several in orange, mustard, burgundy, cream and forest green for a mixed fall arrangement.
The Design: What Makes This Maple Leaf Different
The central lobe must dominate the silhouette. It extends farther than the two upper side lobes, while the two lower lobes remain shorter and wider. That hierarchy is what separates a recognizable maple leaf from a five-point crochet star.
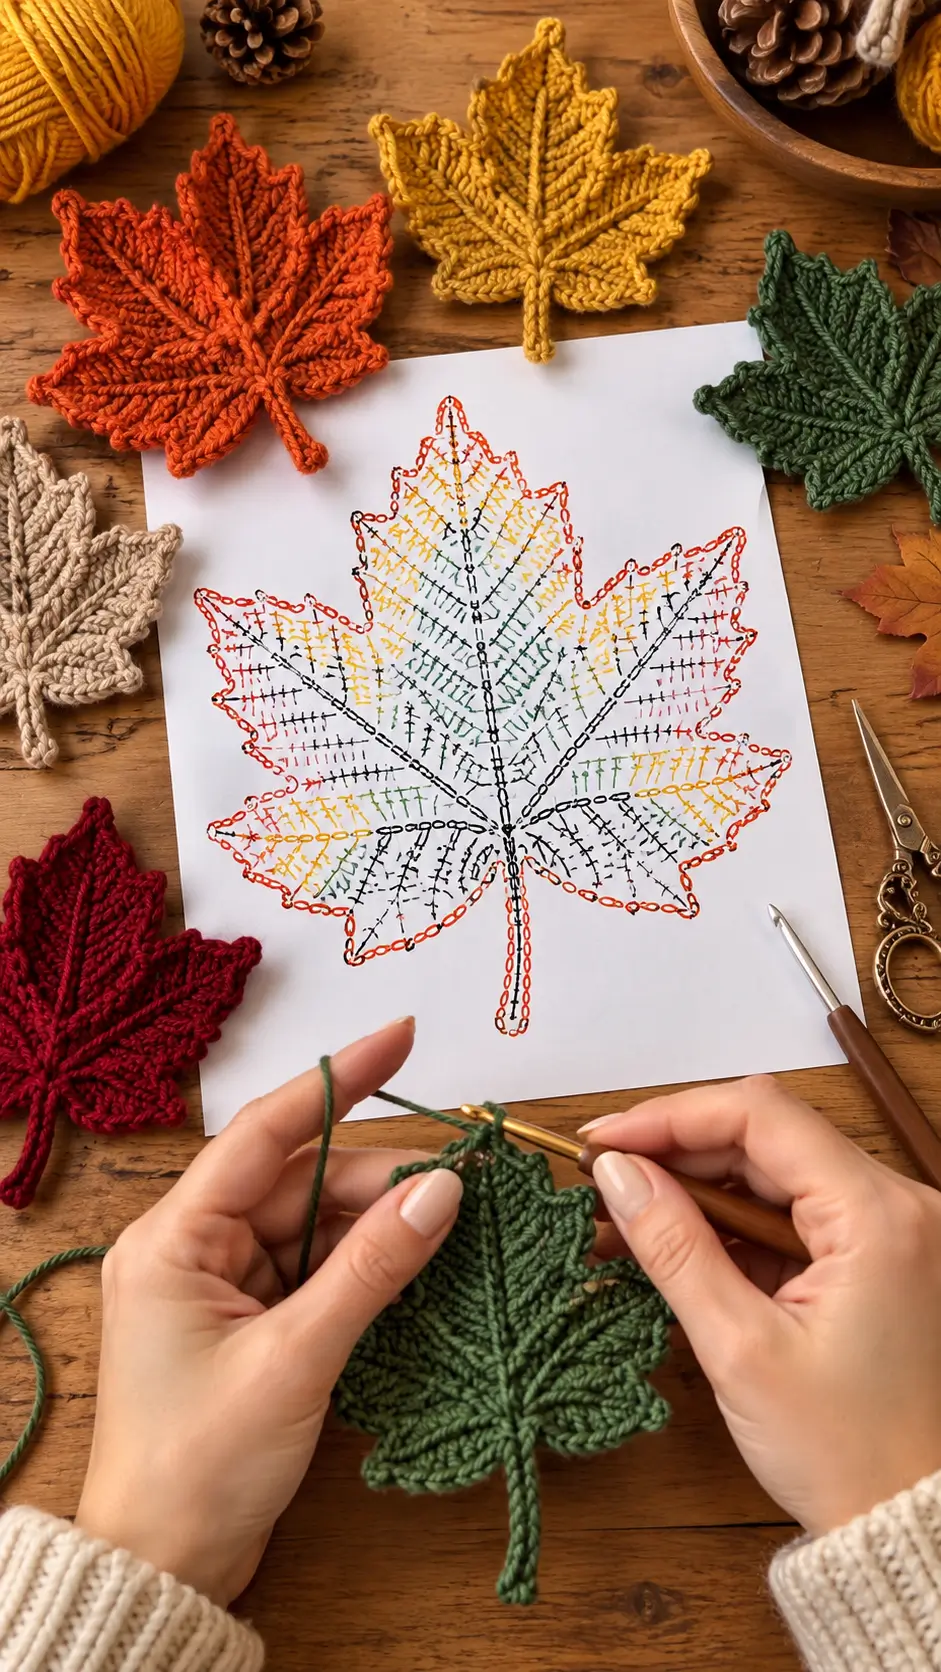
The second structural decision is the vein system. A raised center line runs directly into the stem, while smaller lines visually divide the side lobes. These details reproduce the strongly ribbed appearance shown in the reference image. Finally, pointed tips are formed by changing stitch height and adding compact picots rather than increasing every section equally. A common mistake in a maple leaf crochet pattern is making every lobe the same length. The result becomes too symmetrical and loses the characteristic maple outline.
Project Info at a Glance
| Skill Level | Time | Finished Size | Hook | Best For |
|---|---|---|---|---|
| Intermediate | 30–60 minutes | Approx. 10 × 10 cm | 3.0 mm | Garlands, wreaths, table décor, appliqués |
A published DK cotton maple leaf worked with a 3.0 mm hook measures approximately 10 × 10 cm. Yarn thickness, tension and blocking can change the final dimensions.
Materials and Tools
Yarn
- Forest green — DK / Light #3 — approximately 20 metres
- Burnt orange — DK / Light #3 — approximately 20 metres for an alternate leaf
- Mustard gold — DK / Light #3 — approximately 20 metres for an alternate leaf
- Burgundy red — DK / Light #3 — approximately 20 metres for an alternate leaf
- Cream — DK / Light #3 — approximately 20 metres for an alternate leaf
Tools
- 3.0 mm crochet hook
- Yarn needle
- Scissors
- Stitch markers
- Blocking mat
- Rust-resistant blocking pins
- Measuring tape
Abbreviations
- MR — magic ring
- ch — chain
- sl st — slip stitch
- sc — single crochet
- hdc — half double crochet
- dc — double crochet
- tr — treble crochet
- inc — two stitches worked into the same stitch
- BLO — back loop only
- FO — fasten off
A picot in this pattern means ch 3, then sl st into the first chain to create a compact pointed tip.
Pattern — Step by Step
The leaf is worked from a circular center before the five individual lobes are shaped. Keep the foundation flat and count each stitch before beginning the points.
Maple Leaf Center — Make 1
Yarn: forest green, burnt orange, mustard, burgundy or cream.
R1: 6 sc in MR (6)
R2: 2 hdc in each stitch around (12)
R3: 2 dc in each stitch around (24)
Join R3 with a sl st to the first dc.
Do not tighten the center excessively. The 24-stitch foundation needs to remain flat because the five lobes will be distributed around its outside edge.
First Lower Lobe
Skip 1 stitch.
Work 7 dc into the next stitch.
Skip 1 stitch and sl st into the following stitch.
The seven-double-crochet group forms the foundation for the first lower lobe. It will be shaped during the finishing round.
First Upper Side Lobe
Skip 1 stitch.
Work 7 dc into the next stitch.
Skip 1 stitch and sl st into the following stitch.
Keep this section loose enough that the tall stitches can spread during blocking.
Central Lobe
Skip 1 stitch.
Work 7 dc into the next stitch.
Skip 1 stitch and sl st into the following stitch.
This lobe will receive the tallest finishing stitches. Mark its center stitch now so it remains identifiable after all five foundations have been completed.
Second Upper Side Lobe
Skip 1 stitch.
Work 7 dc into the next stitch.
Skip 1 stitch and sl st into the following stitch.
Second Lower Lobe
Skip 1 stitch.
Work 7 dc into the next stitch.
Skip 1 stitch and sl st into the following stitch.
The leaf now has five rounded foundations. The next stage converts those rounded sections into pointed maple lobes.
Shape the First Lower Lobe
Work across the seven-dc foundation as follows:
Stitch 1: sc
Stitch 2: hdc
Stitch 3: dc
Stitch 4: tr, ch 3, sl st into first ch to make picot, tr
Stitch 5: dc
Stitch 6: hdc
Stitch 7: sc
Sl st into the valley between lobes.
Shape the First Upper Side Lobe
Stitch 1: sc
Stitch 2: hdc
Stitch 3: dc
Stitch 4: 2 tr, ch 3, sl st into first ch, 2 tr
Stitch 5: dc
Stitch 6: hdc
Stitch 7: sc
Sl st firmly into the next valley.
Shape the Central Lobe
The center point must extend farther than the four surrounding points.
Stitch 1: sc
Stitch 2: hdc
Stitch 3: dc
Stitch 4: tr, ch 2, tr, ch 3, sl st into first ch, tr, ch 2, tr
Stitch 5: dc
Stitch 6: hdc
Stitch 7: sc
Sl st into the next valley.
The central picot should sit on the same visual axis as the stem. Correct this relationship during blocking if the point leans to either side.
Shape the Second Upper Side Lobe
Stitch 1: sc
Stitch 2: hdc
Stitch 3: dc
Stitch 4: 2 tr, ch 3, sl st into first ch, 2 tr
Stitch 5: dc
Stitch 6: hdc
Stitch 7: sc
Sl st into the valley.
Shape the Second Lower Lobe
Stitch 1: sc
Stitch 2: hdc
Stitch 3: dc
Stitch 4: tr, ch 3, sl st into first ch to make picot, tr
Stitch 5: dc
Stitch 6: hdc
Stitch 7: sc
Sl st into the base of the leaf.
Stem — Make 1
Continue with the same yarn without fastening off.
Ch 12.
Starting in the second chain from the hook, work 1 sl st in each chain back toward the leaf (11).
Sl st into the leaf base.
For a thicker stem like the one visible in the reference image, work back along the stem once more:
Ch 1, turn. Work 1 sc into each of the 11 stem stitches.
Fasten off and leave a 15 cm tail.
Raised Central Vein
Use the same color yarn.
Insert the hook at the base of the stem and bring up a loop.
Surface sl st in a straight line from the stem base through the center of the leaf toward the central lobe.
Keep every surface stitch loose enough that the leaf remains flat.
Stop approximately 5 mm before the central picot.
Fasten off and pull both ends to the wrong side.
First Side Vein
Join yarn approximately one-third of the way up the central vein.
Surface sl st diagonally toward the tip of the first lower lobe.
Stop 5–8 mm before the lobe tip.
Fasten off.
Second Side Vein
Join yarn slightly higher on the central vein.
Surface sl st toward the first upper side lobe.
Keep the line centered within the lobe.
Fasten off before reaching the picot.
Third Side Vein
Repeat the same process on the opposite upper side lobe.
Match the starting height to the second side vein so the two upper branches remain visually balanced.
Fourth Side Vein
Join yarn on the lower portion of the central vein.
Surface sl st toward the remaining lower lobe.
Fasten off 5–8 mm before its point.
Blocking the Maple Leaf
Blocking is a structural stage for this motif rather than an optional cosmetic step. The five points naturally curl and contract because several tall stitches are concentrated into small foundation areas.
Place the finished leaf on a blocking mat. Pin the central lobe first, followed by the end of the stem. These two points establish the main vertical axis.
Next, pull the two upper side lobes outward at matching angles. Pin the lower lobes last. They should sit lower and spread more horizontally than the upper pair.
Measure from the center ring to both upper side tips. The difference should remain below approximately 5 mm if a symmetrical finished motif is wanted.
For acrylic yarn, use the fiber-safe blocking method recommended for that yarn. Cotton can generally be damp-blocked and allowed to dry completely while pinned.
Color Variations
The supplied image demonstrates why this motif works well as a seasonal set. The same structure appears in forest green, burnt orange, mustard, cream and deep burgundy without requiring any stitch changes.
Use forest green for an early-season leaf. Mustard and orange produce a conventional autumn palette, while burgundy gives the motif greater contrast in garlands or wreath arrangements. Cream works as a neutral separator when several saturated colors are placed together.
Avoid changing colors halfway through an individual lobe unless a deliberately variegated effect is required. The raised vein structure is easier to read when the body of each fall crochet leaf remains one continuous color.
How to Make a Maple Leaf Garland
Make 7, 9 or 11 leaves for a balanced garland. Odd numbers allow one leaf to occupy the center position.
Block every leaf before joining them. Trying to correct the points after the motifs are attached makes consistent spacing more difficult.
For a nine-leaf arrangement, alternate burnt orange, mustard, forest green, cream and burgundy. Repeat the colors toward the opposite end rather than arranging identical colors beside one another.
Ch a cord approximately 120–150 cm long. Attach each leaf by its stem with a removable knot or several slip stitches. Leave roughly 8–12 cm between motifs so the five-point outlines remain visible.
How to Make the Leaf Larger
Changing yarn weight is the simplest method. A published bulky-yarn maple leaf uses a 5.5 mm hook, while DK examples can be worked around 3 mm. The heavier combination creates a larger motif without requiring the entire lobe structure to be recalculated.
For a smaller appliqué, use fingering-weight yarn with approximately a 2.2 mm hook. A published example made with that combination measures approximately 7 × 7 cm.
Keep the hook small enough to produce defined stitches. Loose fabric weakens the edges of the points and makes the surface-crochet veins less distinct.
7 Technical Tips for Cleaner Maple Leaves
- Five identical lobes: Keep the central point longer than the upper side lobes and keep both lower lobes shorter. Equal lobe lengths create a star-like outline rather than a maple leaf.
- Curling edges: Block all five points after finishing. A difference of more than approximately 5 mm between corresponding side lobes becomes visible when several leaves are displayed together.
- Loose center: Tighten the magic ring before weaving in its tail. An open center becomes more noticeable after the surface vein stitches pull attention toward it.
- Blunt points: Tighten each three-chain picot independently instead of pulling the surrounding treble stitches tighter. Excess tension on the tall stitches makes the entire lobe contract.
- Crooked stem: Align the stem with the central lobe before blocking. Even a 5–10 degree sideways shift is noticeable because the raised central vein visually connects these two features.
- Puckered veins: Surface slip stitches must remain slightly looser than the stitches underneath them. Tight surface crochet shortens the fabric and causes the leaf to cup upward.
- Unstable tips: Pass the finishing tail through at least three stitches on the wrong side before cutting. Picot points and stems receive more handling than the center of an appliqué.
Using the Finished Crochet Maple Leaves
Individual leaves can be sewn to bags, blankets and seasonal cushions. For garments, attach the motif through the center and major lobe junctions rather than sewing continuously around every edge. This leaves some dimensional movement at the points.
For table decorations, leave the leaves unattached and make several colors. A 10 cm motif is large enough to remain visible beneath small decorative objects without occupying the space of a full coaster.
The leaves can also be attached to an autumn wreath. Position the stems toward the center of the wreath and overlap only the lower lobes. Keeping the central and upper points exposed preserves the recognizable maple silhouette.
Conclusion
Check the finished motif against three measurements before weaving in the final tails: the central lobe should be the longest point, corresponding side lobes should remain within roughly 5 mm of one another, and the stem should align with the raised central vein. Block the first leaf completely before producing a full color set; that sample establishes the dimensions for every later motif. Save this crochet maple leaf pattern to Pinterest or share your finished autumn set on Instagram with #CrochetMapleLeaf. For the collection shown here, would you arrange the mustard leaf at the center or use the dark green leaf as the focal color?









