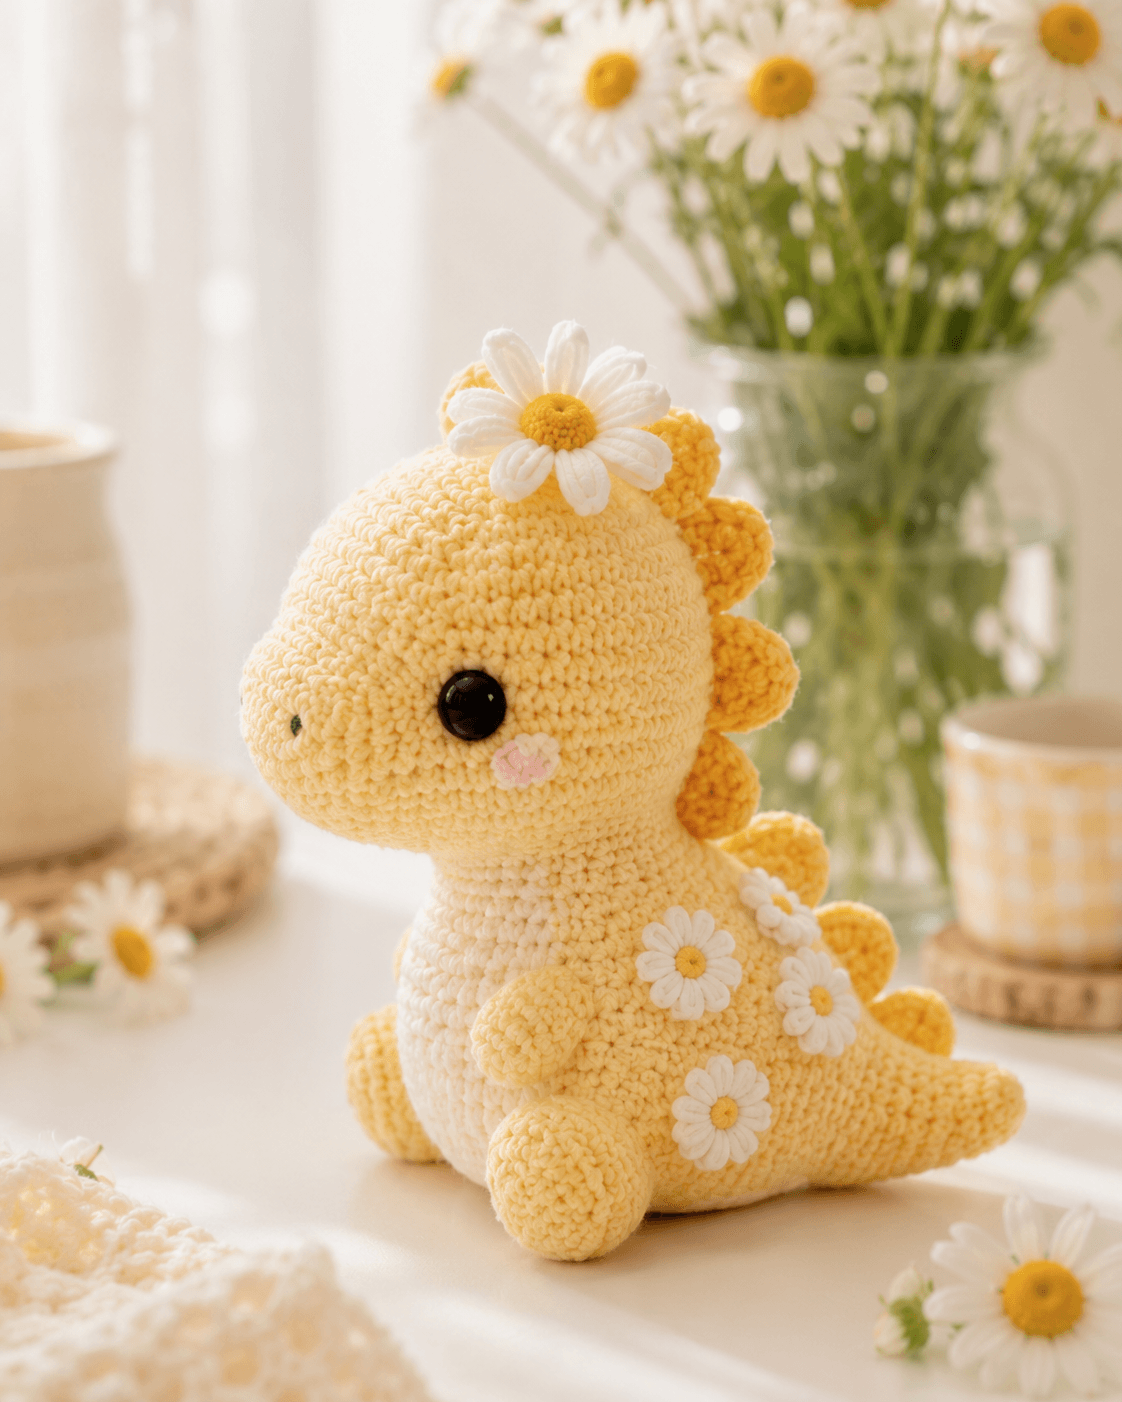
A daisy crown on a dinosaur shifts the visual weight upward, so the head shape has to do more work than the flowers. This dinosaur amigurumi crochet pattern builds a sitting pastel dino in worsted cotton with a 3.75 mm hook, about 20 cm tall, at an intermediate level. It suits shelf decor, nursery styling, or a spring market table where a standard spike-backed dinosaur would read too plain.
The Design: What Makes Daisy Dinosaur Different
This version depends on proportion, not novelty. The snout projects forward farther than a round teddy-style head, so the neck must stay narrow long enough to separate head mass from body bulk. The back spikes are rounded rather than pointed because the photo shows soft scalloped forms, and that change keeps the silhouette gentle instead of dragon-like. Daisy appliqués also matter structurally: flat flowers break up the long side panel of the body and visually shorten the torso.
One common mistake with a sitting dinosaur amigurumi is placing the forearms too high. That makes the chest look collapsed and throws the balance line backward. Another is using oversized spikes, which turns a pastel dinosaur crochet design into a stegosaurus shape by accident. Search results also show that many published dinosaur patterns default to generic spikes and plain backs instead of themed surface details.
Project Info at a Glance
| Skill Level | Time | Finished Size | Hook | Best For |
|---|---|---|---|---|
| Intermediate | 6–8 hours | 20 cm sitting | 3.75 mm | shelf decor, nursery display, gift plush |
Finished size and hook benchmarked against published sitting dinosaur patterns with similar proportions.
Materials and Tools
Yarn
- Butter yellow — worsted / 10 ply cotton — about 70 g — Bendigo-style cotton or any smooth cotton blend is suitable for this scale.
- Golden yellow — worsted / 10 ply cotton — about 10 g for spikes and flower centers.
- White — worsted cotton — small amount for belly and daisies
- Soft pink — small amount for cheek patch embroidery/appliqué
Tools
- Hook 3.75 mm
- Safety eyes 9 mm; the photo reads slightly larger, around 10–12 mm visually
- Polyfill stuffing
- Yarn needle
- Stitch markers
- Pins
Abbreviations
MR = magic ring, sc = single crochet, inc = increase, dec = invisible decrease, sl st = slip stitch, ch = chain, BLO = back loop only.
Invisible decrease keeps the front loop line flatter than a standard decrease, which matters on the snout and belly curve.
Pattern — Step by Step
Continuous spiral unless noted.
Head (Make 1)
Yarn: butter yellow — standard amigurumi math adapted to the photo; published dinosaur heads commonly expand to 42 sts at this size.
R1: 6 sc in MR (6)
R2: inc x6 (12)
R3: (sc, inc) x6 (18)
R4: (2 sc, inc) x6 (24)
R5: (3 sc, inc) x6 (30)
R6: (4 sc, inc) x6 (36)
R7: (5 sc, inc) x6 (42)
R8–R13: sc around (42)
R14: 12 sc, dec x6, 12 sc (36)
R15: 10 sc, dec x6, 8 sc (30)
R16: 9 sc, dec x6, 9 sc (24)
R17–R20: sc around (24)
Insert eyes between R11 and R12, about 8 stitches apart. Stuff the snout firmly, then the upper head slightly softer.
Fasten off only if sewing to a separate body. If you prefer a no-sew join, keep yarn attached.
Body (Make 1)
Yarn: white and butter yellow — standard amigurumi math with a medium 36-stitch plateau to match the photographed body depth.
R1: 6 sc in MR (6)
R2: inc x6 (12)
R3: (sc, inc) x6 (18)
R4: (2 sc, inc) x6 (24)
R5: (3 sc, inc) x6 (30)
R6: (4 sc, inc) x6 (36)
R7–R10: sc around (36)
R11: BLO sc around (36)
R12–R15: sc around (36)
R16: (4 sc, dec) x6 (30)
R17: sc around (30)
R18: (3 sc, dec) x6 (24)
R19: sc around (24)
R20: (2 sc, dec) x6 (18)
Start with white for the lower belly through R10, then blend to butter yellow at R11 or embroider a soft belly line after assembly. Stuff the lower body firmly for sitting stability.
Fasten off. Leave a 30 cm tail.
Tail (Make 1)
Yarn: butter yellow — standard tapered tail shaping; separate tails are common in published dinosaur patterns.
R1: 4 sc in MR (4)
R2: (sc, inc) x2 (6)
R3: sc around (6)
R4: (2 sc, inc) x2 (8)
R5: sc around (8)
R6: (3 sc, inc) x2 (10)
R7: sc around (10)
R8: (4 sc, inc) x2 (12)
R9–R12: sc around (12)
Stuff lightly at the base only. Keep the tip unstuffed for a cleaner taper.
Fasten off. Leave a 20 cm tail.
Arms / Front Legs (Make 2)
Yarn: butter yellow — standard amigurumi math adapted to the short forearm scale in the photo.
R1: 6 sc in MR (6)
R2: inc x6 (12)
R3–R4: sc around (12)
R5: (4 sc, dec) x2 (10)
R6–R7: sc around (10)
Stuff only the lower half. Flatten the top before sewing.
Fasten off. Leave a 20 cm tail.
Back Legs (Make 2)
Yarn: butter yellow — standard amigurumi math for a seated plush base.
R1: 6 sc in MR (6)
R2: inc x6 (12)
R3: (sc, inc) x6 (18)
R4–R5: sc around (18)
R6: (sc, dec) x6 (12)
R7: sc around (12)
Stuff firmly. Flatten the opening so the leg reads like a rounded foot from the front.
Fasten off. Leave a 24 cm tail.
Dorsal Spikes / Plates (Make 6)
Yarn: golden yellow — photo interpretation plus published dinosaur spike and back-feature practice.
R1: 6 sc in MR (6)
R2: (sc, inc) x3 (9)
R3: sc around (9)
R4: (2 sc, inc) x3 (12)
Do not stuff. Flatten lightly. Make six, with the last two worked only to R3 for smaller tail-end plates.
Fasten off. Leave a 15 cm tail on each.
Snout Bump (Make 1)
Yarn: butter yellow — standard shaping to push the muzzle forward without copying a published head.
R1: 6 sc in MR (6)
R2: inc x6 (12)
R3: sc around (12)
R4: (4 sc, dec) x2 (10)
Stuff lightly.
Fasten off. Leave a 20 cm tail.
Cheek Patches (Make 2)
Yarn: soft pink — photo detail.
R1: 6 sc in MR (6)
R2: inc x6 (12)
Fasten off. Leave a 12 cm tail.
Daisy Flower for Head (Make 1)
Yarn: white petals, golden yellow center — photo detail.
Center:
R1: 6 sc in MR (6)
R2: inc x6 (12)
Fasten off.
Petals: Join white to any stitch.
(ch 5, sl st in 2nd ch from hook, 1 sc, 1 hdc, 1 dc, sl st in next center stitch) x8
Fasten off. Leave a sewing tail.
Daisy Flowers for Body (Make 4)
Yarn: white petals, golden yellow center — photo detail.
Center:
R1: 6 sc in MR (6)
Petals:
(ch 4, sl st in 2nd ch from hook, 1 sc, 1 dc, sl st in next stitch) x6
Fasten off. Leave tails for sewing.
Assembly
- Sew the head to the top front of the body, slightly angled upward so the snout clears the belly.
- Sew the tail to the lower back centerline, pointing slightly outward to widen the sitting base.
- Attach the snout bump to the front half of the head and add light stuffing before closing the last stitches.
- Insert the safety eyes if not already installed, then sew or embroider the cheek patches just below and slightly behind the eyes.
- Sew the back legs to the lower front sides of the body, level with one another so the plush sits flat.
- Sew the arms one to two rounds below the neck join, not on the neck itself.
- Sew the six dorsal spikes from crown base to tail base, spacing the largest three across the back curve and the smallest two near the tail.
- Sew the head daisy slightly off center toward the crown rather than at the exact midpoint.
- Sew the four body daisies along the side panel and upper hip, staggering them instead of stacking them in a straight line.
- Weave in all tails, shape the stuffing by hand, and check that the toy sits on both legs and the tail base. The finished plush should hold a seated pose without rolling forward.
7 Technical Tips
- Mark round 1 on the head every time. The long snout makes count drift harder to spot, and one missed increase before round 7 will flatten the forehead.
- Pack the lower body firmer than the head. A body that compresses under thumb pressure by more than about 1 cm will slump once the head is attached.
- Use invisible decreases on the snout and belly. Standard decreases leave a ridge that shows on pale cotton and interrupts the side profile.
- Install eyes before the final neck stuffing. On this shape, eye washers become harder to press in once the cheek area is fully packed.
- Keep spike size graded. If all six spikes are the same diameter, the back reads stiff and the tail loses taper.
- Pin the arms before sewing. A difference of even one round in arm height makes the chest look twisted from the front.
- Weave tails through at least 5 cm of internal path. Short buried tails can work loose around the spikes and flower appliqués because those parts are handled during display.
Conclusion
This daisy-led version changes the usual dinosaur silhouette without changing the basic amigurumi logic. The dinosaur amigurumi crochet pattern works because the snout stays rounded, the body stays compact, and the spikes stay soft enough to support the floral theme. Next step: make one sample in plain yellow first, then place the daisies after the body is fully stuffed so the spacing stays clean. Share the finished piece on Pinterest and Instagram with #DaisyDinosaurPattern. One useful comparison remains: do you prefer the crown daisy centered, or offset toward the eye side like the photo?









