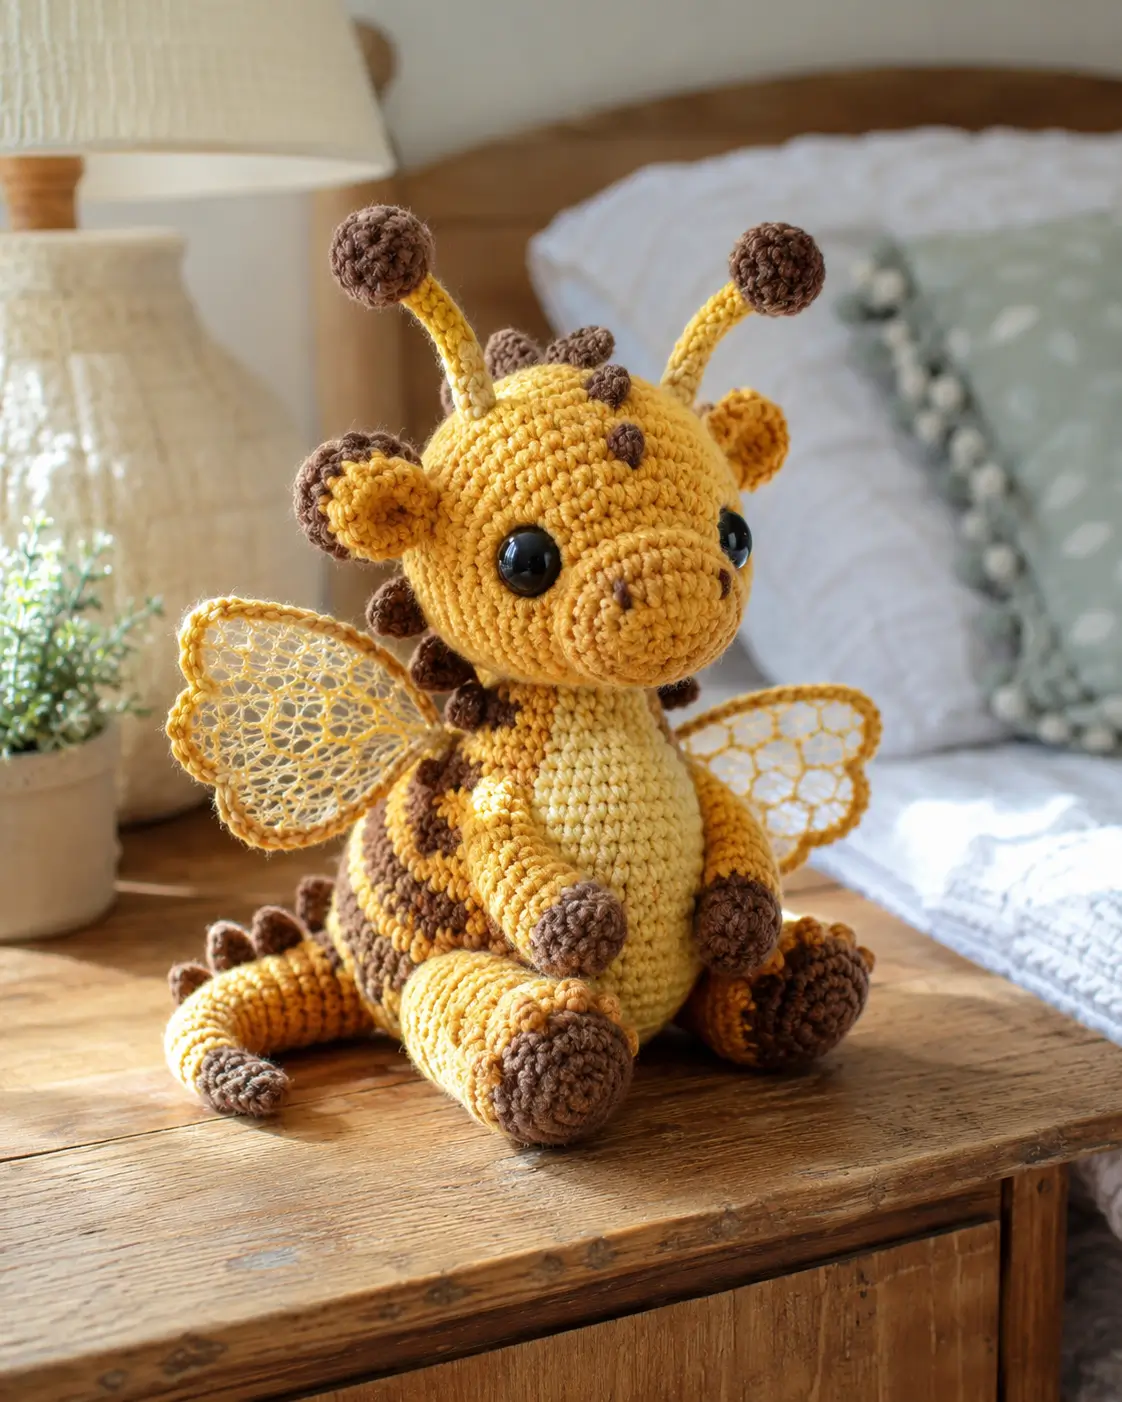
Giraffe antennae break the silhouette before the wings ever get a chance. This bee dragon amigurumi crochet pattern uses worsted yarn, a 3.5 mm hook, medium shaping, and separate wings to build a seated hybrid plush with bee stripes, a giraffe snout, and dragon spikes. It suits an intermediate maker who wants one fantasy piece that reads clearly from the front and the side.
The Design: What Makes Bee Giraffe Dragon Different
The first structural decision is the head. A giraffe-style snout sits farther forward than a typical baby dragon muzzle, so the face needs more front depth and less cheek width. The second is the stripe placement. A bee dragon amigurumi crochet pattern works best when the stripes wrap the lower body and tail rather than the face, because facial striping competes with the eyes and snout. The third is the wing scale. Small wings are the right call here. Larger wings would overpower the antennae and pull the design away from the bee-giraffe read.
Another key point is the top line. The ossicones and pom-pom antennae need space between them or the forehead gets crowded. Many makers would place the horns too close to the antenna bases and lose the giraffe influence. In stronger builds, the rounded snout, short wings, and striped torso divide the concept cleanly: giraffe in the face, bee in the color blocking, dragon in the wings and spikes.
Project Info at a Glance
| Skill Level | Time | Finished Size | Hook | Best For |
|---|---|---|---|---|
| Intermediate | 8–12 hours | Approx. 26–32 cm seated | 3.5 mm | Shelf display, nursery decor, fantasy gift |
Materials and Tools
Yarn
- Golden yellow — worsted — 110 g — main body color
- Cream — worsted — 45 g — belly panel and wing lace support
- Dark brown — worsted — 35 g — stripes, hooves, spikes, ear accents, nose dots
- Black embroidery thread — small amount — nostrils if needed
Tools
- Hook 3.5 mm
- Safety eyes 14–16 mm
- Polyester stuffing
- Tapestry needle
- Stitch markers
- Pins
- Thin wire or stiff thread for optional wing shaping
Abbreviations
MR / sc / inc / dec / sl st / ch / BLO / hdc / dc
Use invisible decrease on every visible shaping round. Standard decreases will notch the yellow body and make the cream belly seam look rough once the plush is stuffed.
Pattern — Step by Step
Continuous spiral unless noted.
Head (Make 1)
Yarn: golden yellow
R1: 6 sc in MR (6)
R2: inc ×6 (12)
R3: (sc, inc) ×6 (18)
R4: (2 sc, inc) ×6 (24)
R5: (3 sc, inc) ×6 (30)
R6: (4 sc, inc) ×6 (36)
R7–R12: sc around (36)
Place safety eyes between R8 and R9, 8 stitches apart.
R13: (4 sc, dec) ×6 (30)
R14: sc around (30)
R15: (3 sc, dec) ×6 (24)
R16: (2 sc, dec) ×6 (18)
Stuff firmly, especially across the forehead and cheeks.
R17: (sc, dec) ×6 (12)
R18: dec ×6 (6)
Fasten off. Leave a 25 cm tail.
Snout (Make 1)
Yarn: golden yellow
Ch 6.
Rnd 1: starting in 2nd ch from hook, 4 sc, 3 sc in last ch; rotate, 3 sc, inc in last st (12)
Rnd 2: inc, 3 sc, 3 inc, 3 sc, 2 inc (18)
Rnd 3: sc around (18)
Rnd 4: (2 sc, dec) ×4, 2 sc (14)
Lightly stuff. Fasten off. Leave a 20 cm tail.
Body (Make 1)
Yarn: golden yellow
R1: 6 sc in MR (6)
R2: inc ×6 (12)
R3: (sc, inc) ×6 (18)
R4: (2 sc, inc) ×6 (24)
R5: (3 sc, inc) ×6 (30)
R6: (4 sc, inc) ×6 (36)
R7–R11: sc around (36)
R12: (4 sc, dec) ×6 (30)
R13–R14: sc around (30)
R15: (3 sc, dec) ×6 (24)
R16–R17: sc around (24)
R18: (2 sc, dec) ×6 (18)
R19: sc around (18)
R20: (sc, dec) ×6 (12)
Stuff the lower body firmly so the plush sits upright. Fasten off. Leave a 30 cm tail.
Belly Panel (Make 1)
Yarn: cream
Ch 8.
Row 1: starting in 2nd ch from hook, 6 sc, 3 sc in last ch; rotate, 5 sc, inc in last st (16)
Row 2: inc, 5 sc, 3 inc, 5 sc, 2 inc (22)
Row 3: sc around (22)
Row 4: inc, 9 sc, 2 inc, 9 sc, inc (26)
Row 5–6: sc around (26)
Fasten off. Leave a 35 cm tail.
Front Legs (Make 2)
Yarn: yellow with brown hoof
With brown:
R1: 6 sc in MR (6)
R2: inc ×6 (12)
R3: BLO sc around, switch to yellow (12)
R4–R5: sc around (12)
R6: (4 sc, dec) ×2 (10)
R7–R10: sc around (10)
Stuff the hoof lightly. Fasten off. Leave a 20 cm tail.
Back Legs (Make 2)
Yarn: yellow with brown hoof
With brown:
R1: 6 sc in MR (6)
R2: inc ×6 (12)
R3: (sc, inc) ×6 (18)
R4: BLO sc around, switch to yellow (18)
R5: sc around (18)
R6: (sc, dec) ×6 (12)
R7–R8: sc around (12)
Stuff the foot and lower base firmly. Fasten off. Leave a 25 cm tail.
Ears (Make 2)
Yarn: yellow with brown inner accent
R1: 6 sc in MR (6)
R2: (sc, inc) ×3 (9)
R3: (2 sc, inc) ×3 (12)
R4: sc around (12)
Flatten slightly. Add a small brown semicircle inside each ear if desired. Fasten off. Leave a 15 cm tail.
Antennae Stems (Make 2)
Yarn: yellow
R1: 6 sc in MR (6)
R2–R9: sc around (6)
Do not overstuff. Fasten off. Leave a 20 cm tail.
Antennae Tips (Make 2)
Yarn: brown
R1: 6 sc in MR (6)
R2: inc ×6 (12)
R3: (sc, inc) ×6 (18)
R4–R5: sc around (18)
R6: (sc, dec) ×6 (12)
R7: dec ×6 (6)
Stuff lightly. Sew one tip to each stem.
Head Spikes (Make 7)
Yarn: brown
R1: 6 sc in MR (6)
R2: sc around (6)
R3: (sc, inc) ×3 (9)
R4: sc around (9)
Flatten lightly. Fasten off. Leave a 10 cm tail.
Wings (Make 2)
Yarn: yellow frame with cream lace center
With yellow, ch 7.
Row 1: starting in 2nd ch from hook, 6 sc (6)
Row 2: ch 1, turn, inc, 4 sc, inc (8)
Row 3: ch 1, turn, inc, 6 sc, inc (10)
Row 4: ch 1, turn, inc, 8 sc, inc (12)
Row 5: ch 1, turn, sc across (12)
Row 6: ch 1, turn, dec, 8 sc, dec (10)
Row 7: ch 1, turn, sc across (10)
Fasten off frame. With cream, sew or crochet an open mesh insert inside the wing outline using chains and anchored slip stitches to mimic the honeycomb-lace look in the photo. Leave a 20 cm tail for attachment.
Tail (Make 1)
Yarn: yellow with brown tail tip
With brown:
R1: 6 sc in MR (6)
R2: sc around (6)
Switch to yellow.
R3: inc ×6 (12)
R4–R5: sc around (12)
R6: (sc, inc) ×6 (18)
R7–R12: sc around (18)
R13: (2 sc, inc) ×6 (24)
R14–R18: sc around (24)
Stuff lightly so the tail can curve. Fasten off. Leave a 30 cm tail.
Tail Spikes (Make 5)
Yarn: brown
R1: 6 sc in MR (6)
R2: sc around (6)
Flatten. Fasten off. Leave a 10 cm tail.
Body Stripes (Make 4)
Yarn: brown
Ch lengths sized to wrap the body and tail:
Stripe 1: ch 24
Stripe 2: ch 22
Stripe 3: ch 18
Stripe 4: ch 16
Row 1: starting in 2nd ch from hook, sl st across.
Fasten off. Leave tails for sewing. These are appliqué stripes, not color-change rounds, which preserves the clean yellow shaping.
Nose Dots (Make 2)
Yarn: brown
R1: 4 sc in MR (4)
Fasten off. Leave a short tail.
Assembly
- Sew the snout to the lower front of the head, centered beneath the eyes.
- Attach the head to the body with the face angled slightly downward.
- Sew the cream belly panel from the underside of the snout down the body front.
- Attach the front legs one round below the neck join.
- Sew the back legs low and wide so the plush can sit without tipping.
- Attach the ears slightly behind the eye line.
- Sew the two antenna stems high on the forehead, then attach the brown antenna tips.
- Add the seven spikes from the crown down the neck and tail, spacing them evenly.
- Sew the wings to the upper back, keeping both top edges level from the front view.
- Attach the body stripes around the torso and tail, then add the small nose dots and final embroidery.
The finished plush should sit on the back legs and tail base without external support.
7 Technical Tips
- Pin the antennae before sewing. The failure mode is asymmetry at the top line; even a 5 mm difference makes one side read giraffe and the other side read insect.
- Keep the snout lightly stuffed. Too much filling pushes the nose outward and reduces the soft giraffe profile.
- Do not stripe the face. Facial color blocking near the eyes competes with the snout and makes the hybrid harder to read.
- Match wing height within 3 mm. Larger differences make one wing look decorative and the other structural, which breaks the balance.
- Stuff the lower body more firmly than the chest. A soft base will slump backward once the head and antennae are attached.
- Place the first neck spike after the antenna line, not between it. That exact spacing keeps the forehead clean and stops the top silhouette from looking crowded.
- Weave every appliqué stripe tail through at least 4 cm of interior stitches. Short anchors lift first at the stripe ends, especially near the tail curve.
Conclusion
This bee dragon amigurumi crochet pattern works when each feature stays in its lane. The snout handles the giraffe read, the stripes handle the bee read, and the wings plus spikes carry the dragon side without crowding the design. Follow the stitch counts exactly, keep the antennae high and evenly spaced, and attach the stripes only after the seated body shape is finished. Then photograph the plush from the front and three-quarter angle, since those views show silhouette balance fastest. Share the finished piece on Pinterest and Instagram with #BeeGiraffeDragonPattern. On your version, did the antennae sit closer to giraffe ossicones or farther out like insect feelers?









