Introduction
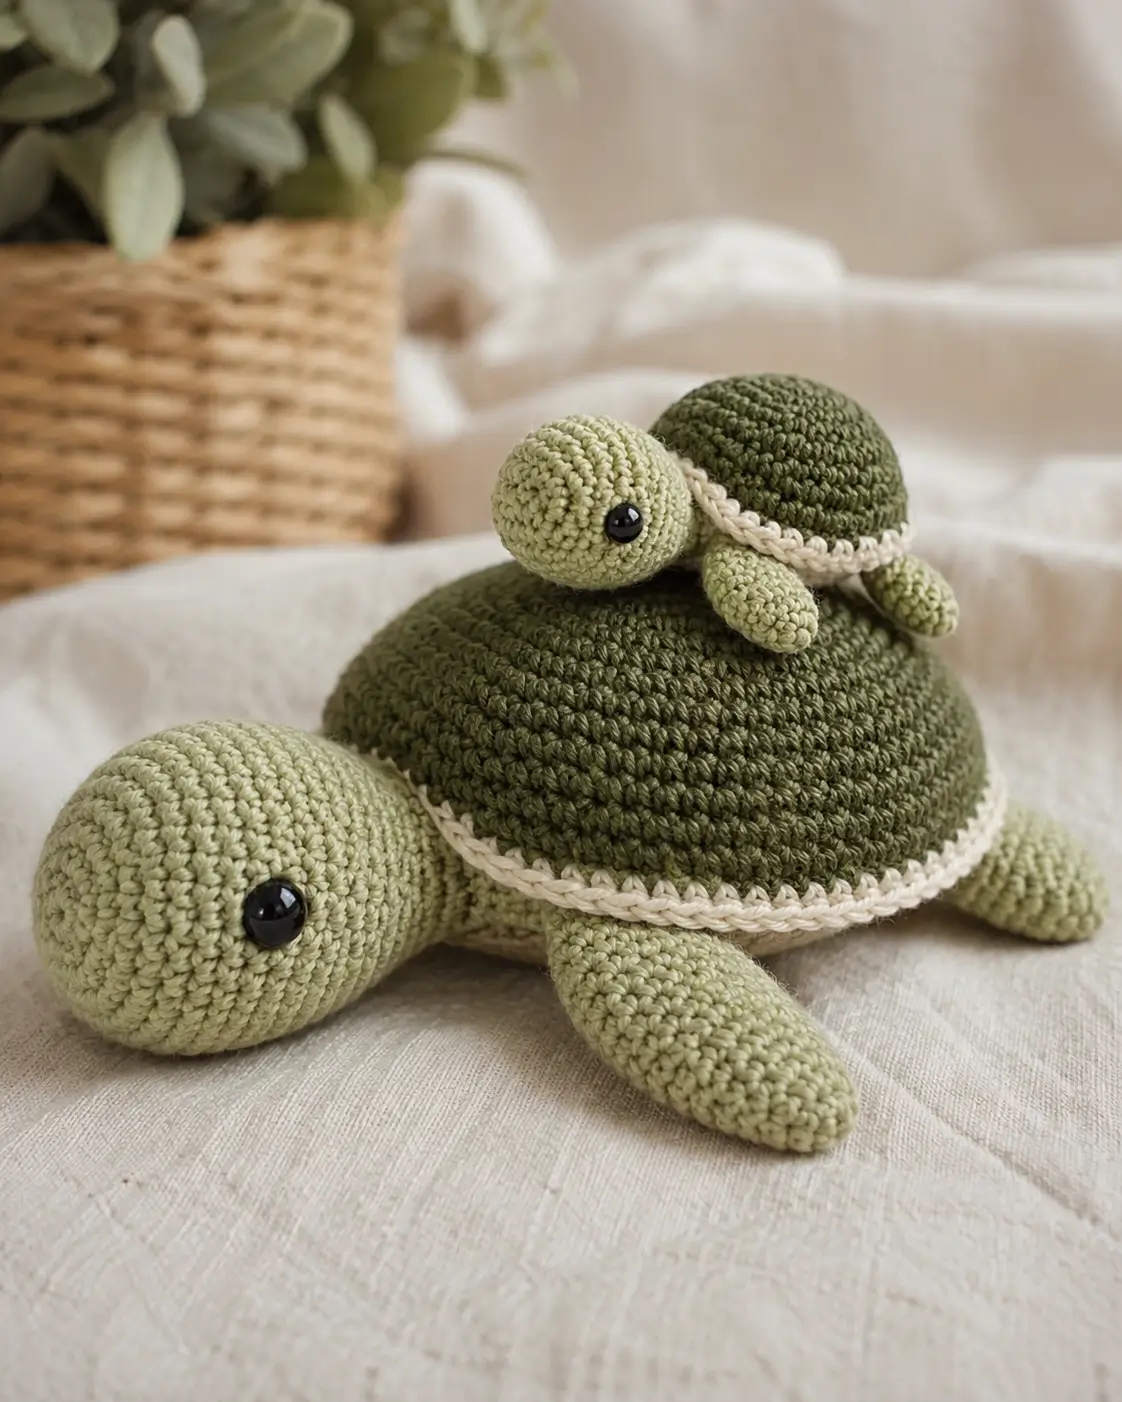
A turtle carries its roof on its back; this crochet turtle amigurumi pattern has to make that roof sit flat without burying the flippers. This version uses worsted yarn, a 3.5 mm hook, safety eyes, stuffing, and two greens to build a 16–20 cm mother turtle with a smaller shell rider. Skill level is advanced beginner. The stacked design works well for nursery shelving because the baby turtle is sewn in place.
The Design: What Makes This Turtle Different
Sea turtle shapes fail when the shell becomes a ball. The shell here uses a 42-stitch plateau and a short underside close, so the top stays domed while the base remains flatter. The head is an oval, not a sphere, because the eyes sit on the sides and the neck has to meet the shell rim without drooping. Front flippers are longer than back flippers; that difference gives the crochet sea turtle pattern its crawling profile and leaves space for the baby turtle crochet pattern on top. A cream cord frames the shell because the photo shows a raised border between moss and sage. The common mistake is placing all four flippers at equal angles. That makes an amigurumi turtle look like a flower instead of a reptile with forward sweep.
Project Info at a Glance
| Skill Level | Time | Finished Size | Hook | Best For |
|---|---|---|---|---|
| Advanced beginner | 3–4 hours for pair | Main 16–20 cm, baby 7–9 cm | 3.5 mm | Nursery shelf, market table display, turtle-themed gift |
Materials and Tools
Yarn
- Pale sage green — worsted/#4 — 70 g — WeCrochet Brava Worsted, Paintbox Cotton Aran, or Red Heart Super Saver.
- Dark moss green — worsted/#4 — 55 g — use the same fiber family as the body yarn.
- Cream — worsted/#4 — 20 g — for shell rim, underside edge, and cheek patches.
- Black embroidery floss — small amount — for optional mouth.
Tools
- Hook 3.5 mm
- 12 mm safety eyes for main turtle
- 8 mm safety eyes for baby turtle
- Polyester stuffing
- Yarn needle
- Locking stitch markers
- Pins
- Scissors
Use embroidered eyes instead of plastic safety eyes for toys intended for children under age three.
Abbreviations
MR = magic ring / sc = single crochet / inc = increase / dec = decrease / sl st = slip stitch / ch = chain / BLO = back loop only / FLO = front loop only
Invisible decrease uses the front loops of the next two stitches so the decrease line does not make a visible gap.
Pattern — Step by Step
Continuous spiral unless noted.
Main Turtle Head
Yarn: pale sage
R1: 6 sc in MR (6)
R2: inc ×6 (12)
R3: [1 sc, inc] ×6 (18)
R4: [2 sc, inc] ×6 (24)
R5: [3 sc, inc] ×6 (30)
R6: [4 sc, inc] ×6 (36)
R7: [5 sc, inc] ×6 (42)
R8–R13: sc around (42)
R14: [5 sc, dec] ×6 (36)
R15: [4 sc, dec] ×6 (30)
R16: [3 sc, dec] ×6 (24)
R17: [2 sc, dec] ×6 (18)
R18: [1 sc, dec] ×6 (12)
Insert 12 mm eyes between R10 and R11, about 16 stitches apart. Stuff firmly through the back opening.
R19: dec ×6 (6)
Fasten off. Leave 25 cm tail.
Main Domed Shell and Body
Yarn: dark moss, cream, pale sage
R1: 6 sc in MR (6)
R2: inc ×6 (12)
R3: [1 sc, inc] ×6 (18)
R4: [2 sc, inc] ×6 (24)
R5: [3 sc, inc] ×6 (30)
R6: [4 sc, inc] ×6 (36)
R7: [5 sc, inc] ×6 (42)
R8–R14: sc around (42)
R15: with cream, BLO sc around (42)
R16: with pale sage, [5 sc, dec] ×6 (36)
R17: [4 sc, dec] ×6 (30)
R18: [3 sc, dec] ×6 (24)
Stuff the shell. Keep the underside flatter than the dome by pressing stuffing toward the shell edge.
R19: [2 sc, dec] ×6 (18)
R20: [1 sc, dec] ×6 (12)
R21: dec ×6 (6)
Fasten off. Leave 30 cm tail.
Main Front Flippers
Make 2. Yarn: pale sage
R1: 6 sc in MR (6)
R2: inc ×6 (12)
R3: [1 sc, inc] ×6 (18)
R4–R8: sc around (18)
R9: [1 sc, dec] ×6 (12)
R10–R14: sc around (12)
Stuff lightly only in the first half. Flatten the opening so the flipper points forward.
R15: dec ×6 (6)
Fasten off. Leave 30 cm tail on each flipper.
Main Back Flippers
Make 2. Yarn: pale sage
R1: 6 sc in MR (6)
R2: inc ×6 (12)
R3: [1 sc, inc] ×6 (18)
R4–R5: sc around (18)
R6: [1 sc, dec] ×6 (12)
R7: dec ×6 (6)
Fasten off. Leave 25 cm tail on each flipper.
Main Tail
Yarn: pale sage
R1: 6 sc in MR (6)
R2–R4: sc around (6)
R5: [1 sc, inc] ×3 (9)
R6: sc around (9)
Fasten off. Leave 20 cm tail.
Cream Shell Rim
Yarn: cream
Ch 58.
R1: sl st in second ch from hook and across (57)
R2: ch 1, turn, sl st across (57)
Fasten off. Leave 40 cm tail. Pin around R15 of the shell. Stretch gently so the cord sits as a raised oval, not a tight belt.
Cheek Patches
Make 2. Yarn: cream or very pale sage
R1: 6 sc in MR (6)
R2: inc ×6 (12)
Sl st to first stitch (12)
Fasten off. Leave 18 cm tail on each patch.
Baby Turtle Head
Yarn: pale sage
R1: 6 sc in MR (6)
R2: inc ×6 (12)
R3: [1 sc, inc] ×6 (18)
R4: [2 sc, inc] ×6 (24)
R5: [3 sc, inc] ×6 (30)
R6–R8: sc around (30)
R9: [3 sc, dec] ×6 (24)
Insert 8 mm eyes between R6 and R7, about 10 stitches apart.
R10: [2 sc, dec] ×6 (18)
R11: [1 sc, dec] ×6 (12)
R12: dec ×6 (6)
Fasten off. Leave 20 cm tail.
Baby Turtle Shell and Body
Yarn: dark moss, cream, pale sage
R1: 6 sc in MR (6)
R2: inc ×6 (12)
R3: [1 sc, inc] ×6 (18)
R4: [2 sc, inc] ×6 (24)
R5: [3 sc, inc] ×6 (30)
R6–R9: sc around (30)
R10: with cream, BLO sc around (30)
R11: with pale sage, [3 sc, dec] ×6 (24)
R12: [2 sc, dec] ×6 (18)
Stuff lightly so the baby turtle can sit flat on the main shell.
R13: [1 sc, dec] ×6 (12)
R14: dec ×6 (6)
Fasten off. Leave 25 cm tail.
Baby Turtle Flippers
Make 4. Yarn: pale sage
R1: 6 sc in MR (6)
R2: inc ×6 (12)
R3: [1 sc, inc] ×6 (18)
R4: sc around (18)
Fold flat. Sc through both layers across the opening (9 edge sts).
Fasten off. Leave 18 cm tail on each flipper.
Baby Cream Shell Rim
Yarn: cream
Ch 36.
R1: sl st in second ch from hook and across (35)
Fasten off. Leave 25 cm tail. Sew around the baby shell at R10.
Assembly
- Pin the main head to the front-left side of the shell, with the lower edge touching the cream rim.
- Sew the head through R17–R19 of the head and R14–R16 of the shell, then pass through the neck twice for support.
- Sew the main body closing tail inside the underside so no knot sits on the table.
- Place the cheek patches one round below the safety eyes and slightly forward; sew with two passes around each patch.
- Pin the front flippers under the shell rim, angled 30 degrees forward from the head.
- Sew the back flippers under the rear shell edge, shorter and lower than the front flippers.
- Attach the tail at the back center between the two rear flippers.
- Sew the cream shell rim around R15 with small stitches every 4 shell stitches.
- Assemble the baby turtle, then sew its underside to the top right of the main shell with a 3 cm oval of stitches.
- Weave all yarn tails through at least 6 cm of nearby stitches, then trim.
The finished turtle pair has a stable domed shell, four visible main flippers, and one baby turtle fixed to the shell top.
7 Technical Tips
- Stitch marker drift: Spiral rounds can shift the shell seam by 2–3 stitches before R10. Move the marker after every round and recount the 42-stitch plateau at R7, R10, and R14.
- Stuffing firmness: A hollow shell center will cave in when the baby turtle is sewn on. Pack the dome to medium-firm density, then press the underside flat before closing R19–R21.
- Invisible decrease gaps: Loose decreases show as six small holes on the underside. Work each dec through front loops only and pull the working yarn tight after the second loop is drawn through.
- Eye placement timing: Safety-eye washers cannot be moved after the head closes. Set main eyes between R10 and R11 at 16 stitches apart, then set baby eyes between R6 and R7 at 10 stitches apart.
- Worsted tension: A 4 mm hook can leave 1–2 mm gaps in cotton worsted amigurumi. Use 3.5 mm unless the fabric becomes stiff enough to distort the oval head.
- Pinning failure: Unpinned flippers often point straight sideways and make the turtle look round rather than crawling. Pin front flipper tips 3 rows below the cream rim and place rear flippers about 5 cm behind them.
- Tail weaving: The cream rim can loosen if its tail is buried for only one stitch. Weave each rim tail under 8 stitches, reverse direction once, and trim only after pulling the cord flat.
Conclusion
Block the turtle pair by hand before photographing it: press the shell rim into an oval, angle the front flippers forward, and check that the baby turtle sits level. The next practical step is making a second baby turtle in a lighter shell color so the stacked shape reads clearly from above. Share the finished crochet turtle amigurumi pattern on Pinterest as a vertical process pin and on Instagram with one top-down photo plus one side-view photo. Use #MotherBabyTurtlePattern. For your version, should the baby turtle face the same direction as the mother, or look sideways from the shell?









