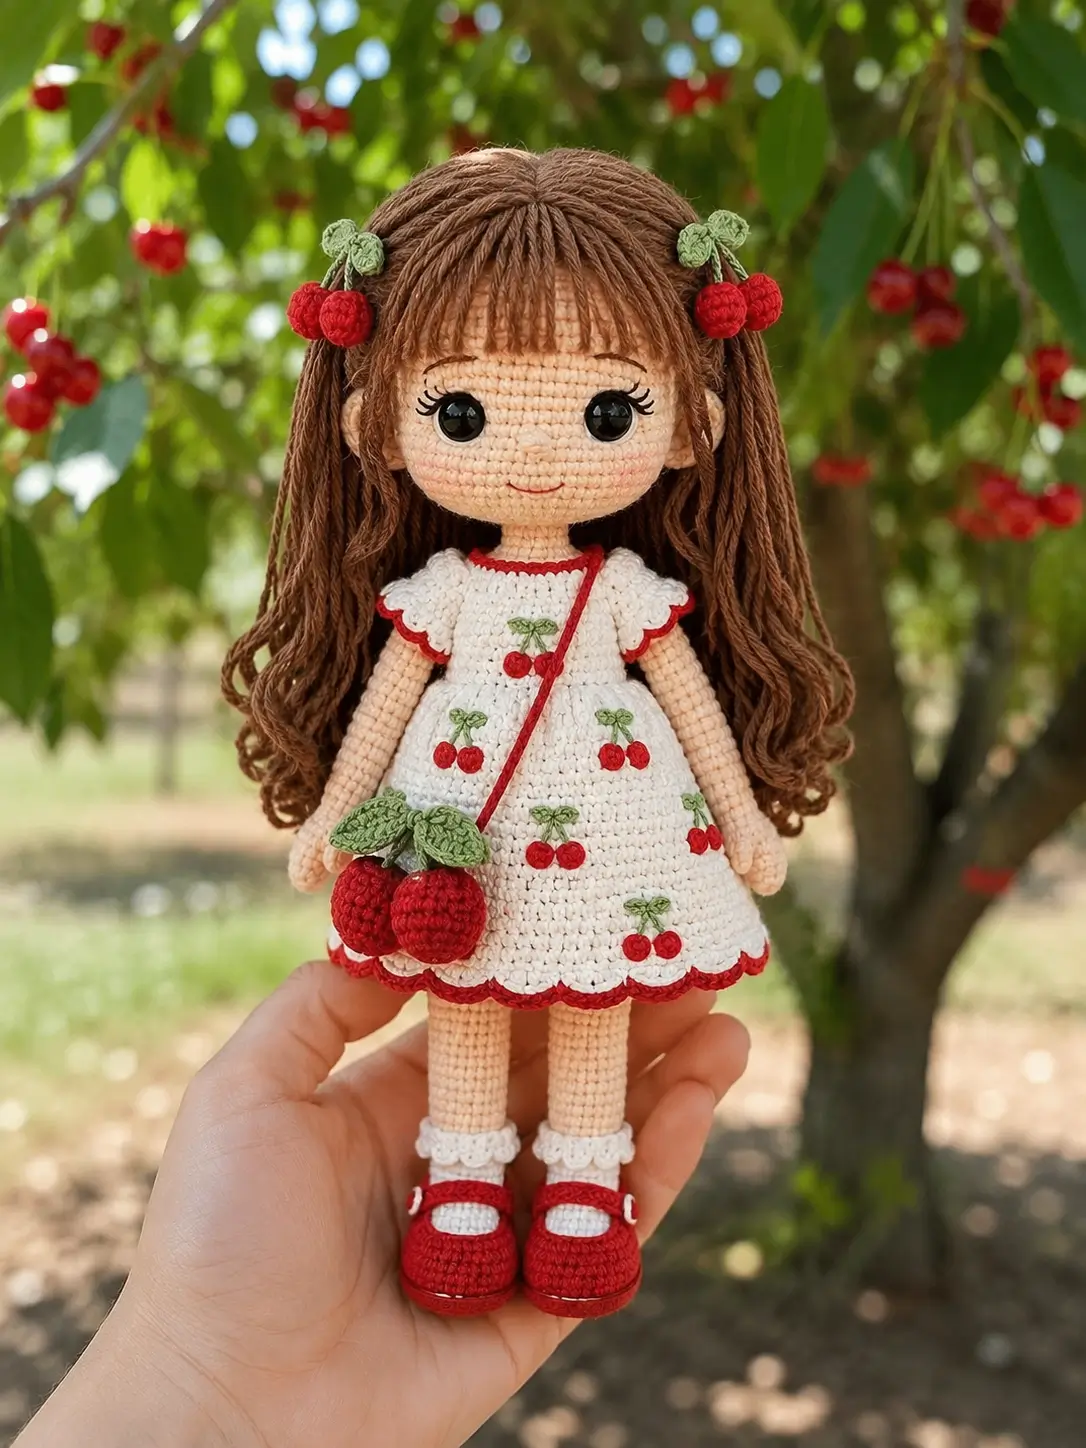
Cherry stems bend in pairs, so this cherry girl doll amigurumi pattern has to balance red fruit clusters against a human head before the first strand of hair goes on. Use sport cotton, a 1.75 mm hook, 10–12 mm safety eyes, and firm stuffing for a 26 cm intermediate doll. The finished piece works as a display sample for fruit-themed craft booths because the dress motifs read from a distance.
The Design: What Makes Cherry Girl Different
This design starts with the head, not the dress, because the hair mass controls the final balance. The cap stops at the ear line; loose strands are tied into side clusters so the cherry clips sit on crochet rather than glue. White dress construction stays separate from the body, because the skirt needs width without forcing the torso to carry extra stuffing. For the face, the eyes sit before the cheeks so the blush patches land under the lower lash line. A common mistake in a crochet cherry doll is making every cherry the same scale. Hair cherries, dress cherries, and purse cherries need three sizes. That scale change is what turns a basic amigurumi doll crochet pattern into a cherry amigurumi doll with readable details.
Project Info at a Glance
| Skill Level | Time | Finished Size | Hook | Best For |
|---|---|---|---|---|
| Intermediate | Two focused sessions | 26 cm | 1.75 mm | Display dolls, craft-market samples, fruit-theme sets |
The size follows the 26–27 cm range found in cherry doll pattern data, while the hook and yarn choices match published fine cotton cherry doll materials.
Materials and Tools
Yarn
- Peach skin-tone yarn — fine/sport cotton blend — 50 g — YarnArt Jeans 73, 07, or similar.
- Cream white yarn — fine/sport cotton blend — 35 g — YarnArt Jeans 03 or 01.
- Brown hair yarn — sport cotton/acrylic or soft acrylic — 45–50 g — YarnArt Jeans brown or Kartopu Anti-Pilling.
- Cherry red yarn — fine/sport cotton blend — 25 g — YarnArt Jeans 51, 90, or similar.
- Leaf green yarn — fine cotton or embroidery floss — 10 g — YarnArt Jeans green or cotton floss.
- Blush pink yarn — fine cotton or embroidery thread — scraps.
Tools
- Hook 1.75 mm
- Hook 1.5 mm for tiny cherries and dress appliqués
- 10–12 mm safety eyes
- Polyester stuffing
- Tapestry needle
- Long doll needle
- Stitch markers
- Pins
- Black embroidery thread
- White embroidery thread
- Small scissors
Abbreviations
MR = magic ring; sc = single crochet; inc = increase; dec = decrease; sl st = slip stitch; ch = chain; BLO = back loop only; FLO = front loop only; hdc = half double crochet; dc = double crochet.
For an invisible decrease, insert through the front loops of the next two stitches, yarn over, and finish one single crochet to hide the reduction line.
Pattern — Step by Step
Continuous spiral unless noted.
Head
Yarn: peach skin tone — Source: Standard amigurumi math, scaled to the verified 26 cm doll size.
R1: 6 sc in MR (6)
R2: inc ×6 (12)
R3: (1 sc, inc) ×6 (18)
R4: (2 sc, inc) ×6 (24)
R5: (3 sc, inc) ×6 (30)
R6: (4 sc, inc) ×6 (36)
R7: (5 sc, inc) ×6 (42)
R8–R17: sc around (42)
R18: (5 sc, dec) ×6 (36)
R19: (4 sc, dec) ×6 (30)
R20: (3 sc, dec) ×6 (24)
R21: (2 sc, dec) ×6 (18)
R22: (1 sc, dec) ×6 (12)
R23: dec ×6 (6)
Insert eyes between R12 and R13, 7 stitches apart, before closing R18. Stuff firmly from R18 onward.
Fasten off. Leave 35 cm tail.
Body
Yarn: peach skin tone — Source: Standard amigurumi math.
R1: 6 sc in MR (6)
R2: inc ×6 (12)
R3: (1 sc, inc) ×6 (18)
R4: (2 sc, inc) ×6 (24)
R5: (3 sc, inc) ×6 (30)
R6: (4 sc, inc) ×6 (36)
R7–R13: sc around (36)
R14: (4 sc, dec) ×6 (30)
R15–R16: sc around (30)
R17: (3 sc, dec) ×6 (24)
R18: sc around (24)
R19: (2 sc, dec) ×6 (18)
R20–R22: sc around (18)
R23: (1 sc, dec) ×6 (12)
Stuff the lower body firmly and the neck very firmly.
Fasten off. Leave 40 cm tail.
Arms
Yarn: peach skin tone — Source: Standard amigurumi math.
Make 2.
R1: 6 sc in MR (6)
R2: inc ×6 (12)
R3–R14: sc around (12)
R15: dec ×6 (6)
Stuff only the lower half of each arm. Flatten the top edge and sew through both layers.
Fasten off. Leave 25 cm tail.
Back Legs with Red Shoes
Yarn: red for shoes, peach for legs — Source: Standard amigurumi math.
Make 2.
R1: With red, 6 sc in MR (6)
R2: inc ×6 (12)
R3: (1 sc, inc) ×6 (18)
R4: (2 sc, inc) ×6 (24)
R5: BLO sc around (24)
R6–R7: sc around (24)
R8: (2 sc, dec) ×6 (18)
R9: (1 sc, dec) ×6 (12)
R10: Change to peach, BLO sc around (12)
R11–R23: sc around (12)
R24: dec ×6 (6)
Stuff shoe firmly; stuff leg lightly so it remains slim.
Fasten off. Leave 30 cm tail.
Shoe Straps and Sock Cuffs
Yarn: cream and red — Source: Standard garment edging.
Make 2 sock cuffs and 2 straps.
Sock cuff: Join cream yarn to the BLO ridge at R10 of each leg.
R1: sl st around the ridge (12)
R2: (ch 3, sl st in next st) ×12
Fasten off. Weave in the tail.
Shoe strap: With red, ch 11.
Row 1: Starting in second ch from hook, 10 sl st (10).
Sew one strap across each shoe front. Add one tiny white stitch at each outer side as a button mark.
Ears
Yarn: peach skin tone — Source: Standard amigurumi math; cherry doll sources include separate ear pieces.
Make 2.
R1: 6 sc in MR (6)
R2: inc ×6 (12)
R3: sc around (12)
Flatten into a half circle. Do not stuff.
Fasten off. Leave 20 cm tail.
Hair Cap and Long Hair
Yarn: brown — Source: Standard amigurumi math, adjusted for visible yarn-strand hair.
R1: 6 sc in MR (6)
R2: inc ×6 (12)
R3: (1 sc, inc) ×6 (18)
R4: (2 sc, inc) ×6 (24)
R5: (3 sc, inc) ×6 (30)
R6: (4 sc, inc) ×6 (36)
R7: (5 sc, inc) ×6 (42)
R8–R10: sc around (42)
Fasten off. Leave 40 cm tail for sewing the cap to the head.
For bangs, cut 18 strands at 14 cm. For side hair, cut 80 strands at 34 cm. Attach with a lark’s head knot along the cap edge, starting at the back and moving toward the forehead. Tie side sections at ear height before adding cherry clips.
Cream Dress with Red Scalloped Hem
Yarn: cream and red — Source: Standard garment math.
Work from neckline downward.
R1: With cream, ch 36, join with sl st, 36 sc (36)
R2: (5 sc, inc) ×6 (42)
R3: sc around (42)
R4: 7 sc, ch 6, skip 7, 14 sc, ch 6, skip 7, 7 sc (40)
R5: (4 sc, inc) ×8 (48)
R6: (5 sc, inc) ×8 (56)
R7–R12: sc around (56)
R13: Change to red, sc around (56)
R14: (skip 1 st, 5 dc in next st, skip 1 st, sl st in next st) ×14
For sleeves, join cream yarn at one armhole. Work 18 sc around, then add red edging with (ch 3, sl st in next st) around. Repeat for the second sleeve.
Cheek Patches
Yarn: blush pink — Source: Standard flat-circle math.
Make 2.
R1: 6 sc in MR (6)
R2: inc ×6, sl st to join (12)
Fasten off. Leave 18 cm tail. Sew under the outer lower edge of each eye.
Cherry Appliqués for Dress and Hair
Yarn: red and green — Source: Standard amigurumi berry math; published cherry doll sources use stuffed cherry rounds.
Make 10 tiny cherries.
R1: 6 sc in MR (6)
R2: inc ×6 (12)
R3: sc around (12)
R4: dec ×6 (6)
Stuff with a yarn scrap only.
Fasten off. Leave 15 cm tail.
Tiny stem: With green, ch 7, sl st back along chain.
Tiny leaf: ch 6, starting in second ch from hook: sl st, sc, hdc, sc, sl st.
Sew cherries in pairs. Place two pairs on the hair ties and three pairs on the dress front.
Crossbody Cherry Purse
Yarn: red, green, and red strap — Source: Standard amigurumi berry math.
Make 2 large cherries.
R1: 6 sc in MR (6)
R2: inc ×6 (12)
R3: (1 sc, inc) ×6 (18)
R4–R5: sc around (18)
R6: (1 sc, dec) ×6 (12)
R7: dec ×6 (6)
Stuff firmly.
Fasten off. Leave 25 cm tail.
Leaves, make 3: ch 8, starting in second ch from hook: sl st, sc, hdc, dc, hdc, sc, sl st. Work the same stitches along the other side of the chain and fasten off.
Strap: With red, ch 65.
Row 1: sl st in each ch (64).
Sew strap from right shoulder to left hip. Attach the two large cherries and three leaves at the lower hip.
Assembly
- Sew the head to the body using the 18-stitch neck as the center anchor.
- Place the hair cap on the head with the front edge one round above the eyes, then sew around R10 of the cap.
- Embroider lashes, eyebrows, nose, and mouth before adding cheek patches.
- Sew arms to the upper body, 2 rounds below the neck, with both thumbs facing forward.
- Sew legs to the lower body, spaced 10 stitches apart at the front.
- Sew ears at eye level, partly under the hair cap edge.
- Add the cream dress and tack it at the back neck with three small stitches.
- Sew tiny cherry pairs to the hair ties and dress front.
- Attach the crossbody strap, then sew the large cherry purse at the left hip.
- Weave in all tails, trim hair ends evenly, and check that both shoes touch the table.
The finished doll stands as a 26 cm cherry-themed amigurumi display piece.
7 Technical Tips
- Stitch marker drift: If the marker moves more than 2 stitches left by R10 of the head, the face will twist. Add one plain sc before the next round change to correct the column.
- Stuffing firmness: A 42-stitch head collapses at the eye sockets when the stuffing is too loose. Pack the cheeks first, then fill the crown until the surface springs back.
- Invisible decrease: Visible decrease bars on R18–R23 will show under the blush patches. Work every decrease through front loops only and pull the working yarn tight after each stitch.
- Eye placement timing: Eyes must go in before R18 closes the head opening. Place them between R12 and R13 with 7 stitches between posts.
- Velvet substitution: Velvet yarn with a 3 mm hook can add 4–6 cm to the finished doll. Reduce the head plateau to 36 stitches or the hair cap will become oversized.
- Pinning limbs: Feet rotate outward when the legs are sewn without a front reference. Pin both shoe centers 10 stitches apart, then view the doll from above before sewing.
- Tail weaving: Red tails can shadow through the cream dress fabric. Run red yarn ends inside red cherries or along the red hem, not through the white skirt.
Conclusion
Block the dress hem first, then check the cherry scale before sewing the purse strap in place. The pattern works because the doll has three repeated red elements: hair clips, dress appliqués, and the crossbody cherry bunch. Make one test cherry in each size and compare them against the head; a pair that covers more than four head stitches will read as fruit, not buttons. Save the finished project notes with hook size, eye spacing, and final height so the next cherry girl doll amigurumi pattern sample can match. Share the front view on Pinterest and the hair-tie detail on Instagram with #CherryGirlDollPattern. Which cherry pair should be largest on your version: hair clips, dress motifs, or purse fruit?









